
Metasys® System Direct Connection and Dial-Up Connection
Application Note
Code No. LIT-1201639
Software Release 5.1
Issued February 2016
Document Introduction.............................................................................................................2
Summary of Changes.........................................................................................................................2
Related Documentation......................................................................................................................2
Related Concepts.......................................................................................................................2
Communications Setup......................................................................................................................3
Detailed Procedures..................................................................................................................3
Microsoft Windows XP Operating Systems Direct Serial Connection...........................................3
Direct Serial Communications Checklist Windows XP Operating Systems..........................................3
Adding a Null Modem Serial Cable.......................................................................................................4
Making a New Direct Serial Connection Using Windows XP Operating Systems..............................10
Completing a New Direct Serial Connection Using Windows XP Operating Systems.......................18
Dial-Up Connection...........................................................................................................................21
Dial-Up (Modem) Communications Checklist.....................................................................................22
Adding a Modem.................................................................................................................................22
Downloading the USR 5637 Modem Driver........................................................................................22
Making a New Dial-Up Connection Using Windows XP Operating Systems......................................26
Completing a New Dial-Up Connection Using Windows XP Operating Systems...............................32
Enabling Communication with Multiple Internet Addresses................................................................35
Establishing the Connection...............................................................................................................40
Making a New Dial-Up Connection Using Windows 7 Operating Systems........................................43
Troubleshooting.......................................................................................................................46
Error 733............................................................................................................................................46
Error 777............................................................................................................................................47
User Name or Password Not Accepted..........................................................................................47
1Metasys® System Direct Connection and Dial-Up Connection Application Note

Document Introduction
This document provides the prerequisites, guidelines, and instructions for establishing direct serial connections and
dial-up modem connections between a service person’s laptop computer running the Windows® 7 or Windows XP®
operating system (OS) and one of the following devices:
• Network Automation Engine (NAE)
• Network Integration Engine (NIE)
• Application and Data Server (ADS)
• Extended Application and Data Server (ADX)
The computer with a web browser that you are connecting to an NAE or NIE can reside on an ADS or an ADX, but
we recommend that the computer with a web browser be a separate computer to achieve optimal performance from
the ADS/ADX.
The information in this document is also useful when troubleshooting direct serial connections and dial-up modem
connections in Metasys® system solutions.
Summary of Changes
The following information is new or revised:
•
Updated Dial-Up Connection section to include new modem and firmware version 1.1.0 language
•
Updated file names and screen captures in Downloading the USR 5637 Modem Driver section
•
Updated note in Completing a New Dial-Up Connection Using Windows XP Operating Systems section
•
Updated language in Establishing the Connection section
Related Documentation
See Table 1 for sources of further information on related topics.
Table 1: Related Documentation
LIT NumberSee DocumentFor Information On
LIT-1201527Metasys System Overview Technical Bulletin
Understanding the Metasys System
LIT-1201578Network and IT Professional Technical Bulletin
Understanding Network and Information
Technology Requirements for Metasys System
LIT-1201519NAE Commissioning Guide
Configuring and Troubleshooting an NAE45,
NAE55, or NIE
LIT-1201645ADS/ADX Commissioning Guide
Configuring and Troubleshooting an ADS
LIT-12011528Metasys System Extended Architecture
Remote Access Installation Instructions
Reducing the Download Time After Establishing
a Connection
Related Concepts
You must set the communications parameters before configuring for a connection. See the Communications Setup
section in this document.
Direct serial connection, also called direct connect, is a connection made from a computer to another computer or
some other device (such as an NAE or NIE) using a null modem cable connected from the serial port on the computer
to a serial port on the other computer or device. See the Microsoft Windows XP Operating Systems Direct Serial
Connection section in this document. Use a direct serial connection for troubleshooting, support, or to obtain
information in any of the following circumstances:
• There is no Local Area Network (LAN) or cable modem to use for a connection with the NAE/NIE or ADS/ADX.
• There is a firewall blocking the user from connecting to the NAE/NIE or ADS/ADX.
2Metasys® System Direct Connection and Dial-Up Connection Application Note

Note: This document describes direct connect using a serial port on a computer to the Serial A RS-232 port on the
NAE or NIE using a null modem cable. This procedure applies only to a computer running the Windows XP
OS. Direct serial connection using a null modem cable is not supported on a computer with the Windows 7
OS.
In a dial-up connection, a computer uses a modem to call and connect to another computer or some other device
(such as an NAE or NIE). You must connect the NAE or NIE to a phone line. An example application for a dial-up
connection is monitoring a remote site with a computer. See the Dial-Up Connection section in this document. Use
a dial-up connection for troubleshooting, support, or to obtain information in any of the following circumstances:
• There is no ADS/ADX.
• The ADS/ADX is located in another part of the building.
• You cannot connect from the web browser.
Communications Setup
This document only covers the setup for the computer. You must also set up the other devices to which the computer
connects. For performance reasons, the external modem Universal Serial Bus (USB) driver is not loaded as a default.
For security reasons, Dial In capability is not enabled by default. To successfully configure a direct serial or dial-up
connection, you must set up the communications for each device.
The following documents cover how to set up the NAE, NIE, or ADS:
•
Establishing the NAE Network Parameters and Establishing the NAE Direct-Connect and Modem Parameters
sections of the NAE Commissioning Guide (LIT-1201519)
•
Configuring an ADS/ADX to Accept Dial-Up Connections section of the ADS/ADX Commissioning Guide
(LIT-1201645)
For direct connect communications, you must use identical settings for each NAE or NIE.
For dial-up communications, you must also use identical settings for each NAE or NIE; however, you must either
set up a different phone number for each connection when configuring the computer, or you can change the phone
number each time you connect to a different NAE/NIE.
Detailed Procedures
Microsoft Windows XP Operating Systems Direct Serial Connection
You can connect a serial port on the computer to the Serial A RS-232 port on the NAE or NIE using a null modem
cable. Refer to Wiring section of the NAE55/NIE55 Installation Instructions (Part No. 24-10051-0) for information on
the physical connections.
Direct Serial Communications Checklist Windows XP Operating Systems
The setup of communications between a computer and an external device is a multi-step process. Table 2 is a guide
to verify that all steps required for successful communications using a direct serial connection are complete.
3Metasys® System Direct Connection and Dial-Up Connection Application Note

Table 2: Direct Serial Communications Checklist Windows XP Operating Systems
CompletedTaskStep
Verify that the null modem serial cable is installed. On the Windows Start menu,
select Settings > Control Panel. Double-click the Phone And Modem Options icon.
(Click the Printers and Other Hardware icon if you are using Category view.) If
Communications cable between two computers is not on the Modems tab of the
Phone And Modem Options screen, go to the Adding a Null Modem Serial Cable
section in this document.
1
Make a new direct serial connection. See the Making a New Direct Serial
Connection Using Windows XP Operating Systems section in this document.
2
To continue by generating databases for NAE/NIEs, refer to the NAE
Commissioning Guide (LIT-1201519).
3
Adding a Null Modem Serial Cable
To add a null modem serial cable:
1. On the Windows Start menu, click Settings > Control Panel. The Control Panel screen appears.
2. Double-click the Phone And Modem Options icon. The Phone And Modem Options screen appears.
3. Click the Modems tab (Figure 1). If a null modem serial connection already exists, it appears here, listed as
Communications cable between two computers. Click Cancel and continue to the Making a New Direct
Serial Connection Using Windows XP Operating Systems section. Otherwise, continue with Step 4.
4Metasys® System Direct Connection and Dial-Up Connection Application Note


Figure 3: Install New Modem Screen - Select Manufacturer/Model
6. In the Manufacturers list, check [Standard Modem Types]. In the Models list, check Communications cable
between two computers. Click Next. The next Install New Modem screen appears (Figure 4).
7Metasys® System Direct Connection and Dial-Up Connection Application Note
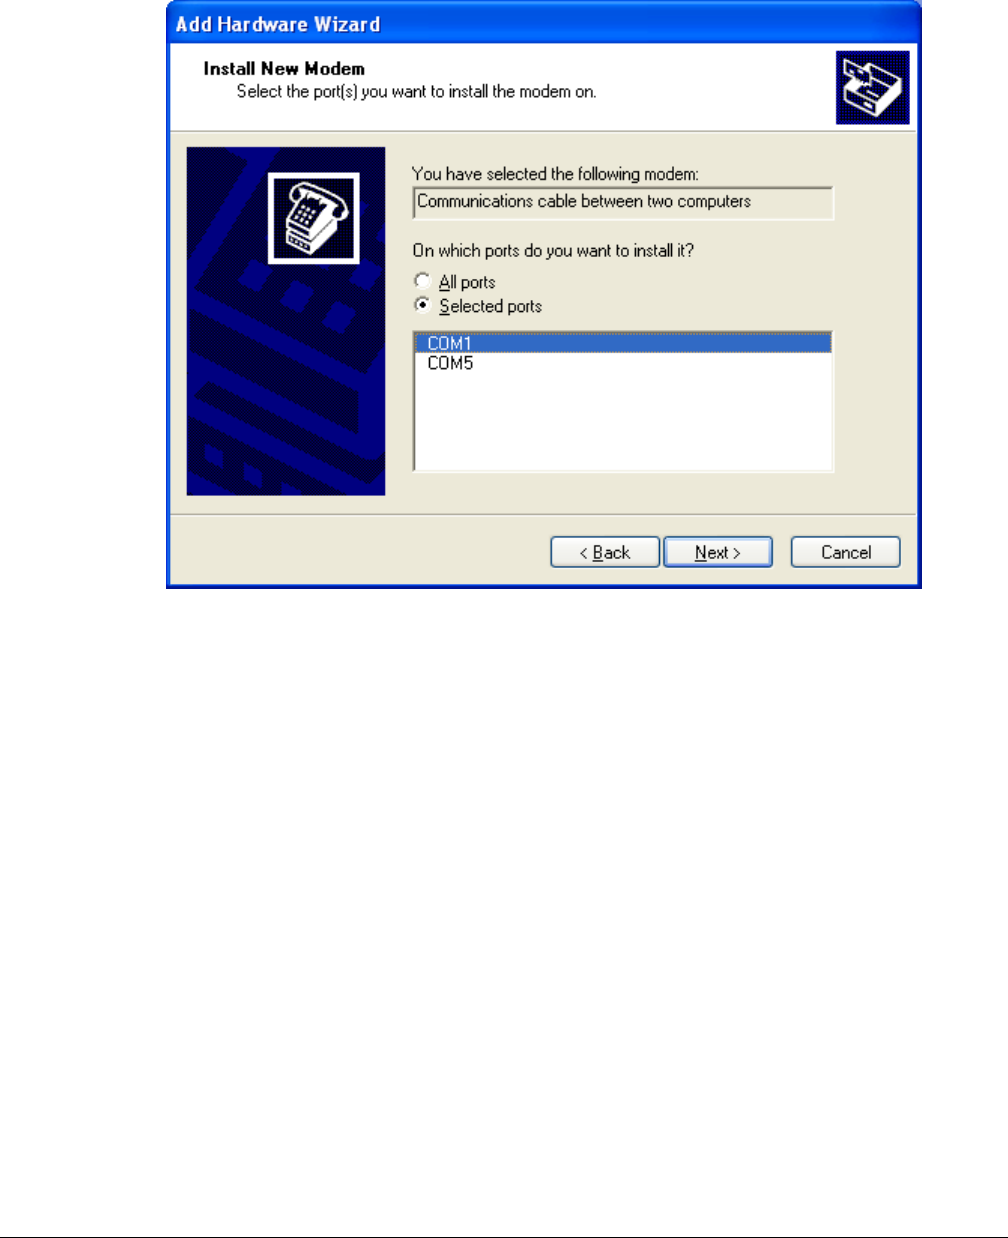

Figure 5: Install New Modem Screen - Installation Finished
8. Click Finish. The Phone And Modem Options screen reappears with the completed null modem serial cable
installation (Figure 6).
9. If the communications cable is not automatically selected, select it. Click OK.
9Metasys® System Direct Connection and Dial-Up Connection Application Note

Figure 6: Phone and Modem Options Screen - Installation Complete
10. Close the Control Panel screen.
Go to the Making a New Direct Serial Connection Using Windows XP Operating Systems section.
Making a New Direct Serial Connection Using Windows XP Operating Systems
Perform the tasks in this section for the Windows XP operating system. Then follow the instructions in the Completing
a New Direct Serial Connection Using Windows XP Operating Systems section.
To make a new direct serial connection using Windows XP:
1. On the Windows Start menu, click Settings > Control Panel. The Control Panel screen appears.
2. Double-click the Network Connections icon in Classic view or Network and Internet Connections icon in Category
view.
3. Select create a new connection. The Network Connection Wizard Welcome screen appears. Click Next. The
Network Connection Type screen appears (Figure 7).
10Metasys® System Direct Connection and Dial-Up Connection Application Note


Figure 13: Completing the New Connection Wizard Screen
12. Click Finish. For some network configurations, a warning screen appears (Figure 14) after completing the
Network Connection Wizard. Click OK.
Figure 14: Warning Screen
Continue with the Completing a New Direct Serial Connection Using Windows XP Operating Systems section.
17Metasys® System Direct Connection and Dial-Up Connection Application Note

Completing a New Direct Serial Connection Using Windows XP Operating Systems
Complete the Network Connection Wizard before proceeding. See the Making a New Direct Serial Connection Using
Windows XP Operating Systems section.
To complete a new direct serial connection using Windows XP:
1. When the Connect screen appears (Figure 15), click Properties.
Figure 15: Connect Screen
The Connection Properties screen appears (Figure 16), indicating Direct Connection in the title bar.
18Metasys® System Direct Connection and Dial-Up Connection Application Note


Figure 17: Modem Configuration Screen
3. In the Maximum speed (bps) drop-down list box, click the speed of the NAE/NIE port to which the computer is
connecting.
Note: Use Serial A port on the NAE/NIE for direct serial connections. The default port speed for Serial A port
is 115,200 bits per second (bps).
4. In the Hardware features section, verify that the Enable hardware flow control check box is the only check box
selected (Figure 17). Click OK. The Connection Properties screen returns (Figure 16).
5. Click the Networking tab (Figure 18).
20Metasys® System Direct Connection and Dial-Up Connection Application Note

Figure 18: Connection Properties Screen - Networking Tab
6. In the Components checked are used by this connection list, clear all check boxes except the Internet Protocol
(TCP/IP) check box. Click OK. The Connect screen returns (Figure 15).
Note: The check boxes for some components may appear shaded. These check boxes are unavailable and
cannot be cleared.
7. Click Cancel. The new direct serial connection is complete.
Go to the Establishing the Connection section.
Dial-Up Connection
For the Metasys system, you can use the following dial-up connections:
• External Modem - Connect a supported external Universal Serial Bus (USB) modem to the USB A port on the
NAE/NIE or connect an external USB modem to the USB port on the ADS/ADX. The USRobotics® USR5637
56K and Radicom Research V92HU-E2 modems are the supported modems.
Note: The USRobotics USR5637 modem requires firmware version 1.1.0. Dial-out problems occur if you update
the firmware to a newer version. To obtain firmware version 1.1.0 for this modem, search for Article 33356
on the Field Support Center Solutions Database website (http://support.controls.johnsoncontrols.com/kb),
or contact your local Johnson Controls field representative.
• Internal Modem - Connect a phone line to the Modem RJ-11 port on the NAE/NIE.
21Metasys® System Direct Connection and Dial-Up Connection Application Note

Refer to the Wiring section of the NAE55/NIE Installation Instructions (Part No. 24-10051-0) or NAE35/NAE45
Installation Instructions (Part No. 24-10050-6) for information on these connections.
Dial-Up (Modem) Communications Checklist
The setup of dial-up (modem) communications on a computer is a multi-step process. Table 3 is a guide to verify
that all steps required for successful communications using a dial-up connection are complete.
Table 3: Dial-Up (Modem) Communications Checklist
CompletedTaskStep
Verify that the modem you are using is installed. On the Windows Start menu, click
Settings > Control Panel. Double-click the Phone And Modem Options icon. (Click the
Printers and Other Hardware icon if you are using Category view.) If the modem you want
to use is not on the Modems tab of the Phone And Modem Options screen, go to Adding
a Modem in this document.
1
Make a new dial-up connection. Each site to which you want to establish a dial-up
connection must have its own connection. See the Making a New Dial-Up Connection
Using Windows XP Operating Systems section in this document.
2
To continue by generating databases for NAE/NIEs, refer to the Configuring the NAE55
Technical Bulletin (LIT-1201519).
3
Complete the connection. See the Making a New Direct Serial Connection Using Windows
XP Operating Systems section in this document.
4
Establish the connection. See the Establishing the Connection section in this document.
5
Adding a Modem
If available, follow the manufacturer’s instructions to add a modem. Otherwise, use the following instructions. First
you must download the appropriate modem driver.
Downloading the USR 5637 Modem Driver
To download the USR 5637 modem driver:
1. Navigate to the US Robotics 5637 USB modem web page at:
http://www.usr.com/support/product-template.asp?prod=5637
2. Select the appropriate modem driver. For Windows XP, Windows 7, and Windows Server 2008, the file is located
under the 32 Bit Driver for Windows XP, 2003, Vista, 2008, Win 7, Win 8, and Win 10 section.
3. Click USR5637Voice32bit.EXE. The File Download - Security Warning dialog box (Figure 19) appears.
22Metasys® System Direct Connection and Dial-Up Connection Application Note

Figure 19: File Download - Security Warning
Note: If you are using Internet Explorer® version 11, the dialog box appears at the bottom of your screen
(Figure 20).
Figure 20: File Download - Security Warning Internet Explorer 11
4. Click Save and select the location on your computer to save the file.
5. Browse to the location of the saved file.
6. Double-click USR5637Voice32bit.EXE. The Welcome to the Device Driver Installation Wizard dialog box
appears.
7. Click Next. The Software Installation dialog box (Figure 21) appears.
23Metasys® System Direct Connection and Dial-Up Connection Application Note

Figure 21: Software Installation Dialog Box
8. Click Continue Anyway. The software installation proceeds. When the installation completes, the Completing
the Device Driver installation screen (Figure 24) appears.
Figure 22: Completing the Device Driver Installation Wizard Dialog Box
9. Insert the USR 5637 modem.
24Metasys® System Direct Connection and Dial-Up Connection Application Note

10. Click Finish. The Welcome to the Found New Hardware Wizard dialog box (Figure 23) appears.
Figure 23: Welcome to the Found New Hardware Wizard Dialog Box
11. Click Next. The Completing the Found New Hardware Wizard dialog box appears
25Metasys® System Direct Connection and Dial-Up Connection Application Note

Figure 24: Completing the Found New Hardware Wizard
12. Click Finish.
Go to the Making a New Dial-Up Connection Using Windows XP Operating Systems section in this document.
Making a New Dial-Up Connection Using Windows XP Operating Systems
Perform the tasks in this section. Then follow the instructions in the Completing a New Dial-Up Connection Using
Windows XP Operating Systems section.
To make a new dial-up connection using Windows XP:
1. On the Windows Start menu, click Settings > Control Panel. The Control Panel screen appears.
2. Double-click the Network Connections icon in Classic view or Network and Internet Connections icon in Category
view, then click on the network Connections icon. The Network Connections screen appears.
3. Select create a new connection. The Network Connection Wizard Welcome screen appears.
4. Click Next. The Network Connection Type screen appears (Figure 25).
26Metasys® System Direct Connection and Dial-Up Connection Application Note


Figure 29: Completing the New Connection Wizard Screen
9. Click Finish. For some network configurations, a warning screen appears (Figure 30) after completing the Network
Connection Wizard. Click OK and continue to Completing a New Dial-Up Connection Using Windows XP Operating
Systems.
Figure 30: Warning Screen
Continue with the Completing a New Dial-Up Connection Using Windows XP Operating Systems section.
31Metasys® System Direct Connection and Dial-Up Connection Application Note

Completing a New Dial-Up Connection Using Windows XP Operating Systems
Complete the Network Connection Wizard before proceeding. See the Making a New Dial-Up Connection Using
Windows XP Operating Systems section.
To complete the new dial-up connection:
1. When the Connect screen appears indicating the name of the new connection in the title bar (Figure 31), click
Properties. The Connection Properties screen appears (Figure 32).
Note: The standard user name is MetasysSysAgent, and it is not case sensitive. For the MetasysSysAgent
default password, contact your local Johnson Controls® representative. The default password is case
sensitive.
Figure 31: Connect Screen
32Metasys® System Direct Connection and Dial-Up Connection Application Note


Figure 33: Modem Configuration Screen
3. In the Maximum speed (bps) list, select the speed of the NAE/NIE port to which the computer is connecting.
Note: The default port speed for the NAE/NIE is 115,200 bps. Use this port speed for communication via a USB
port. Use 57,600 bps as the maximum port speed if you are connecting to an NAE/NIE using a 56k
modem. (Remember to configure the NAE/NIE to communicate at 57,600 bps for use with a 56k modem.)
4. Clear the Enable modem compression check box (Figure 33). Click OK. The Connection Properties screen
returns (Figure 32).
5. Click the Networking tab (Figure 34).
34Metasys® System Direct Connection and Dial-Up Connection Application Note

Figure 34: Connection Properties Screen - Networking Tab
6. In the Components checked are used by this connection list, clear all check boxes except the Internet Protocol
(TCP/IP) check box. Click OK. The Connect screen returns (Figure 31).
Note: The check boxes for some components may appear shaded. These check boxes are unavailable and
cannot be cleared.
7. Click OK. The new dial-up connection is complete.
Go to the Enabling Communication with Multiple Internet Addresses section in this document.
Enabling Communication with Multiple Internet Addresses
To enable the computer to communicate with multiple Internet addresses (other than the Metasys device)
1. On the Windows Start menu, click Settings > Control Panel. The Control Panel screen appears.
2. Double-click the Network And Dial-Up Connections icon. The Network And Dial-Up Connections screen appears
(Figure 35).
35Metasys® System Direct Connection and Dial-Up Connection Application Note


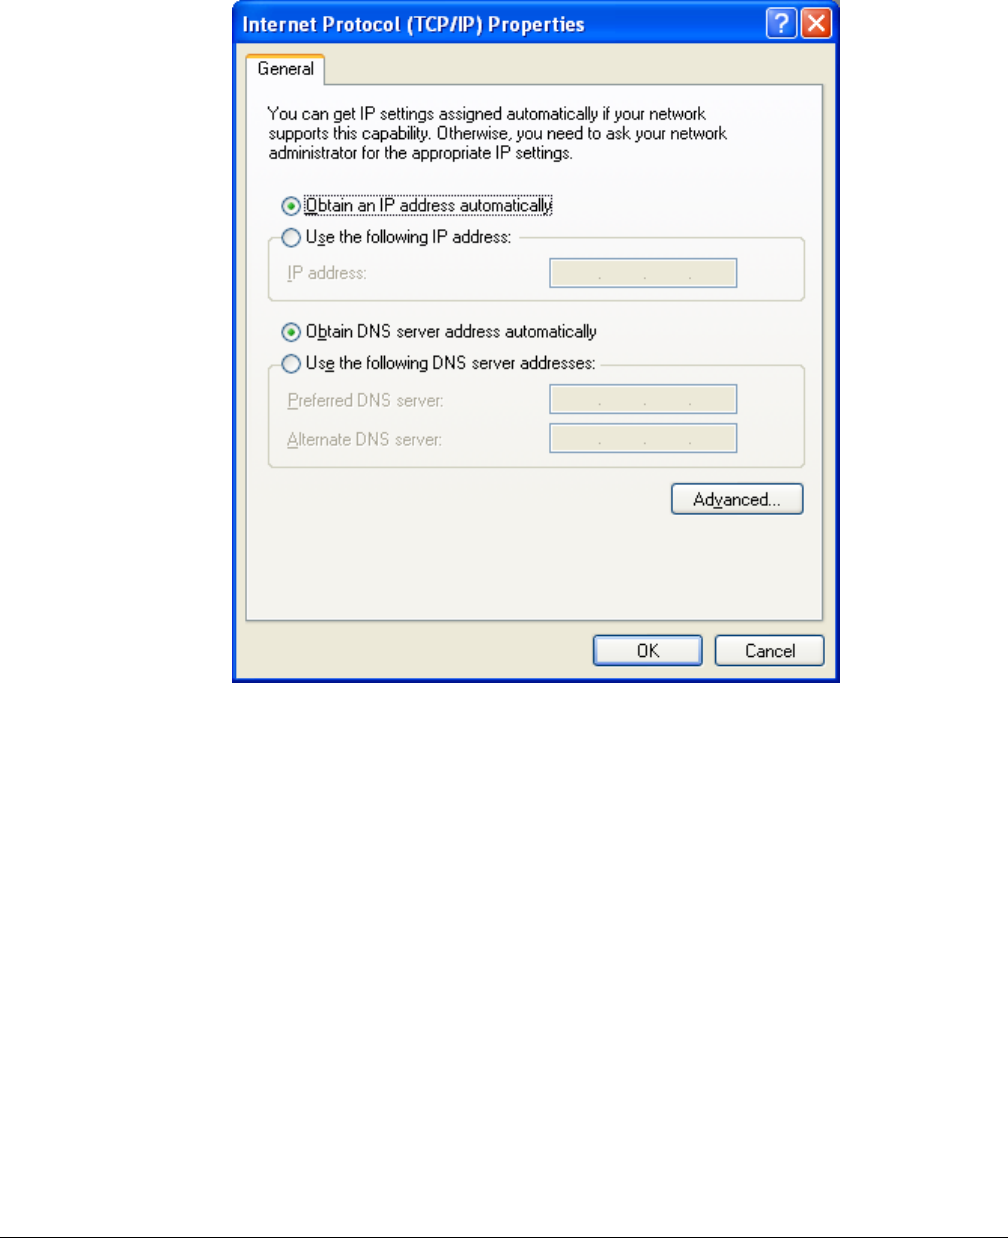

Figure 39: Advanced TCP/IP Settings Screen
8. Click OK.
Go to the Establishing the Connection section in this document.
Establishing the Connection
Important: The download process can take up to 1.5 hours. Use the Metasys Remote Access utility to reduce the
time required for downloading. Refer to the Metasys System Extended Architecture Remote Access
Installation Instructions (LIT-12011528) for more information.
If you are using a dial-up connection, check that the NAE/NIE is set for dial-up connections before you establish the
connection. Refer to the NAE Commissioning Guide (LIT-1201519) or the NAE85/NIE85 Commissioning Guide
(LIT-12011044) for details.
To establish the connection:
1. Change the NAE/NIE to enable and allow incoming connections on the modem used for the dial-up connection.
2. Reboot the NAE/NIE to load the USB drivers if the connection uses an external modem.
3. Double-click the icon on the desktop for the connection you created. If you did not create an icon on the desktop,
access the icon in the Network and Dial-Up Connections (Windows 7) folder or the Network Connections (Windows
XP) folder.
40Metasys® System Direct Connection and Dial-Up Connection Application Note

Use the following default user names and passwords to access the Metasys system:
Standard Access:
user name: MetasysSysAgent
Note: For the MetasysSysAgent default password, contact your local Johnson Controls representative.
Basic Access:
user name: BasicSysAgent
password: For the BasicSysAgent default password, contact your local Johnson Controls representative.
Note: The passwords are case sensitive.
Note: The Johnson Controls® disclaimer statement appears the first time you log in.
Note: The Basic Access password is disabled by default and must be enabled before you use it to access the
system.
4. Double-click the icon on the desktop for the connection you created and select Status (Figure 40). If you did not
create an icon on the desktop, browse to and double-click the icon in the Network and Dial-Up Connections
(Windows 2000) folder or the Network Connections (Windows XP) folder.
Figure 40: Desktop Connection Icon
5. The Dialup to NAE Status dialog box appears (Figure 41).
41Metasys® System Direct Connection and Dial-Up Connection Application Note


7. Click Close.
8. Log on to the user interface of the NAE/NIE from your Web browser using the following URL:
http://[insert IP address here]/Metasys/
Replace [insert IP address here] with the IP address found in Step 5.
Note: The dial-up connection does not automatically disconnect when you exit Metasys software. Close the
connection with the disconnect command. See Figure 40.
Making a New Dial-Up Connection Using Windows 7 Operating Systems
Perform the tasks in this section to create a new dial-up connection using Windows 7:
1. On the Windows Start menu, click Control Panel > Network Sharing Center. On the left, click Change Adapter
Settings.
2. Press the ALT key. The File menu appears on the top.
3. Select File > New Incoming Connection. The Allow connection to this computer screen appears (Figure 43).
Figure 43: Allow Connections to This Computer Screen
4. Select the users that you want to grant access to the ADX configuration. You must add the each user name
and password for the NAE to which you are connecting.
Note: The user name and password must be identical to the user name and password on the NAE to which
you are connecting.
5. Click Next. The How will people connect? screen appears (Figure 44).
43Metasys® System Direct Connection and Dial-Up Connection Application Note

Figure 44: How Will People Connect Screen
6. Select the modem. Click Next. The next Allow connections to this computer screen appears (Figure 45).
7. Select Internet Protocol Version 4 (TCP/IPv4).
8. Select Properties. The Incoming IP Properties window appears (Figure 46).
9. Select the Specify IP addresses button. Ensure the IP address range matches your network settings.
Figure 45: Allow Connections to This Computer Screen
44Metasys® System Direct Connection and Dial-Up Connection Application Note

Figure 46: Incoming Properties Window
Note: If your network utilizes Dynamic Host Configuration Protocol (DHCP), you can select the Assign IP
address automatically using DHCP button.
10. Click OK. The Incoming IP Properties window closes.
11. Select Allow Access.
12. The next Allow connections to this computer screen appears (Figure 47).
13. Write down the computer name for future use.
14. Close the window.
15. Verify that the connection appears in the Network Connections folder (Figure 48).
Figure 47: Allow Connections to This Computer Screen
45Metasys® System Direct Connection and Dial-Up Connection Application Note

Figure 48: Network Connections Folder
Troubleshooting
Use the information here to troubleshoot direct or dial-up connections. See Table 1 for documents that contain
troubleshooting information for the NAE/NIE and ADS/ADX.
Error 733
Figure 49: Error 733 - PPP Control Protocol Disagreement
46Metasys® System Direct Connection and Dial-Up Connection Application Note

See Table 4 for information on causes and resolution of this error.
Table 4: Error 733 - PPP Control Protocol Disagreement
To resolve this error...This error results occurs because...When using this hardware...
Select a different communications
protocol.
IPS/IPX protocol is selected.NAE/NIE
Error 777
Figure 50: Error 777 - Connection Device Out of Order
See Table 5 for information on causes and resolution of this error.
Table 5: Error 777
To resolve this error...This error results occurs because...When using this
hardware...
Change the communication speed to match the
correct setting for the modem used.
Maximum communication speed is set
incorrectly.
NAE/NIE
Select a different COM PORT.The COM PORT setting is incorrect.NAE/NIE
User Name or Password Not Accepted
Figure 51: User Name or Password Not Accepted
To correct this error, obtain a correct Metasys system user name or password and repeat the login procedure.
47Metasys® System Direct Connection and Dial-Up Connection Application Note

Building Efficiency
507 E. Michigan Street, Milwaukee, WI 53202
Metasys® and Johnson Controls® are registered trademarks of Johnson Controls, Inc.
All other marks herein are the marks of their respective owners.© 2016 Johnson Controls, Inc.
www.johnsoncontrols.comPublished in U.S.A.
48Metasys® System Direct Connection and Dial-Up Connection Application Note
