
Administration Guide | PUBLIC
Document Version: 7.70 PL0 – 2021-01-05
SAP Frontend Installation Guide
© 2020 SAP SE or an SAP aliate company. All rights reserved.
THE BEST RUN
Content
1 Introduction................................................................4
1.1 Important News..............................................................5
1.2 New or Changed Features in SAP GUI for Windows 7.70.................................. 5
1.3 Deleted Features............................................................. 6
1.4 SAP Notes for the Installation.................................................... 6
1.5 Information Available Online..................................................... 7
Naming Conventions........................................................7
2 Conguration Information.....................................................8
2.1 Conguration Files Overview .....................................................8
2.2 Conguration Scenarios ........................................................9
Migration of Conguration Files................................................10
2.3 Caching Remote Conguration Files...............................................15
2.4 Loading Conguration Files via Environment Variable or Command Line Parameter..............15
3 Planning..................................................................17
3.1 Installation Scenarios......................................................... 17
3.2 Hardware and Software Requirements............................................. 19
3.3 Installation and Maintenance Flow................................................20
4 Preparation............................................................... 22
4.1 Setting Up an Installation Server................................................. 23
4.2 Administering an Installation Server...............................................25
4.3 Adding New SAP Front-End Components to an Existing Installation Server....................27
4.4 Updating Products on the Installation Server with a Newer Version.........................28
4.5 Deleting Products from the Installation Server........................................29
4.6 Creating and Maintaining Installation Packages.......................................29
Creating a New Installation Package............................................ 29
Conguring Packages and Scripting Events.......................................30
Changing the Package Content................................................32
Deleting an Installation Package...............................................33
Creating a Package Denition File..............................................34
Creating and Deploying Single File Installers.......................................34
4.7 Patching the Installation Server..................................................36
4.8 Conguring Local Security Handling...............................................37
4.9 Conguring SAP Automatic Workstation Update......................................38
4.10 Controlling Remote Workstations.................................................41
2
PUBLIC
SAP Frontend Installation Guide
Content
5 Installation Process.........................................................43
5.1 Installation of the SAP Front End................................................. 43
Installing Components from an Installation Server.................................. 44
Installing Components Locally from a Distribution Medium............................ 47
5.2 Update of the SAP Frontend.................................................... 48
Updating the Front End from an Installation Server..................................49
Patching a Standalone Front End...............................................50
5.3 Upgrade of the SAP Front End...................................................50
Upgrading an Installation Server...............................................50
Upgrading a Standalone Front End..............................................51
6 Additional Information.......................................................52
6.1 Removing an Installation Server..................................................52
6.2 Uninstalling the SAP Front End...................................................52
6.3 FAQs.....................................................................53
6.4 Diagnosing Front-End Software Installations using NWCheckWorkstation.................... 54
6.5 Repairing Front-End Software Installations using NWSAPSetup............................54
6.6 Viewing Log and Error Files.....................................................55
6.7 Command-Line Parameters.....................................................55
6.8 Return Codes...............................................................59
6.9 Component List.............................................................60
7 Appendix................................................................. 67
7.1 Copyright Notices for Included 3rd Party Components..................................67
SAP Frontend Installation Guide
Content
PUBLIC 3

1 Introduction
Scope of this Documentation
The SAP GUI family consists of:
● SAP GUI for Windows
This GUI is described in detail in this documentation.
● SAP GUI for Java
SAP GUI for Java is a generic SAP GUI that runs on a variety of platforms including Windows, Mac OS X and
Linux platforms. It has the same look and feel as the Windows version with the exception of the platform-
specic window design.
This GUI is not described here. Instead, you can nd documentation describing the installation of SAP
GUI for Java in either of the following places:
○ In the folder PRES2/GUI/DOC on the Presentation DVD.
○ In the SAP GUI Community under:
https://wiki.scn.sap.com/wiki/display/ATopics/SAP+GUI+Family → Installation → SAP GUI for Java.
● SAP GUI for HTML
SAP GUI for HTML is based on the SAP Internet Transaction Server (ITS), which is fully integrated into the
kernel of the SAP Web Application Server. On the desktop, a suitable browser is fully sucient for running
SAP GUI for HTML.
This GUI is not described here since the SAP GUI for HTML does not need SAP software to be deployed
on the client.
SAP GUI for HTML and SAP GUI for Java do not have all the capabilities of SAP GUI for Windows. Some
applications such as SAP BI or SAP SCM require the SAP GUI for Windows. You nd more information in the
Master Guides for the relevant SAP products.
For more information about the SAP GUI family, see http://scn.sap.com/docs/DOC-25456
Platforms
You can nd information on SAP GUI for Windows platform support in the SAP Product Availability Matrix or
in SAP note
66971 .
Compatibility
SAP GUI for Windows 7.70 is compatible with all SAP products available when this document was created and
which are still supported by SAP.
Note
Only one version of SAP GUI for Windows is possible.
SAP GUI for Windows uses the Microsoft Controls technology, which means that all controls are registered
locally during the installation. As a result, the system database contains an entry indicating where each
control can be found. Since the system always registers the latest controls, only the most recently installed
version of a control is available at any time.
This means that on a single computer only one version of SAP GUI for Windows can be installed. During
installation of a new SAP GUI release, any older SAP GUI release present on the computer is uninstalled.
4
PUBLIC
SAP Frontend Installation Guide
Introduction

However, SAP GUI for Windows supports virtualization products which can be used to run multiple SAP GUI
versions on the same client in parallel if needed; for details see SAP note 66971 .
1.1 Important News
● De-support for saplogon.ini and related conguration les; therefore, SAP UI Landscape is now the
obligatory conguration format for SAP Logon entries
As of SAP GUI for Windows 7.60, the old conguration format for SAP Logon entries (saplogon.ini,
sapmsg.ini, saproute.ini) is no longer supported by SAP GUI for Windows. SAP GUI for Windows can still
handle this old format for compatibility reasons, because there may be external applications needing this
old format, but using SAP GUI for Windows as of version 7.60 with the old format is not supported. SAP will
neither test this format nor correct issues aecting it. Therefore, all installations of SAP GUI for Windows
7.60 and newer must use SAP UI Landscape (available since SAP GUI for Windows 7.40). Find more
information under Conguration Information [page 8].
1.2 New or Changed Features in SAP GUI for Windows 7.70
● SAP GUI for Windows “core” patches are now full installations
Up to release 7.50 of SAP GUI for Windows, SAP GUI patches were so-called “delta patches”. This means
that the patches only contain those les which have been changed since the initial delivery. The drawbacks
of this approach are that you always need an SAP GUI DVD (“Compilation”) to install SAP GUI and that the
process is more complex which can result in issues. The original idea of this approach was to keep the size
of the patches as small as possible to reduce network trac during patch update. However, due to
improved compression, the size of a SAP GUI patch containing all les is now almost the same as the size
of a patch containing only the changed les.
Therefore, as of release 7.60, the patches for component “SAP GUI FOR WINDOWS <RELEASE> CORE”
(with <RELEASE> replaced by the release of SAP GUI for Windows you are using) available on SAP Support
Portal are full installations of the following products:
○ SAP GUI for Windows 7.60/7.70
○ i.s.h.med Planning Grid
○ SAP Automatic Workstation Update
○ Calendar Synchronization for Microsoft Outlook
○ 64bit RFC Controls (as of release 7.70)
○ SAP PDFPRINT for SAP GUI 7.70
This means that you can install/update and upgrade SAP GUI for Windows and the above mentioned
products by just applying an SAP GUI patch. Like in prior releases, you can setup an NWSAPSetup
installation server and import additional components as required to create installation packages containing
all components that you would like to install. The usage of a compilation DVD is no longer required, but it is
still recommended, because the DVDs contain a consistent combination of all related components (Add-
Ons). See Update of the SAP Frontend [page 48] and Upgrade of the SAP Front End [page 50] for more
information.
SAP Frontend Installation Guide
Introduction
PUBLIC 5

● A new optional top level component 64Bit RFC Controls is available, which can only be installed on 64bit
operating systems.
The 64bit RFC Controls (both non-Unicode and Unicode) are used for external access to data within SAP
Systems without SAP GUI. They are accessible, for example, from Visual Basic for Applications via COM
Interface. In previous SAP GUI releases, these controls only existed in 32bit versions which causes trouble
when the controls are used from 64bit processes like Microsoft Oce. The new installation component
64Bit RFC Controls solves this issue. See SAP Note 2724656 for more information.”
● SAP GUI for Windows 7.70 introduces an alternative browser control which uses Microsoft Edge based on
Chromium (“WebView2 Control”)
The SAP components required to use this alternative to the Internet Explorer Control are installed together
with the SAP GUI Suite by default, but to be able to activate the new control, you need to make sure to have
the Microsoft WebView2 control installed on your clients. The installation and updates for WebView2
control can be downloaded from Microsoft (see https://developer.microsoft.com/en-us/microsoft-edge/
webview2/
) and be applied via the standard Microsoft deployment tools. They are not provided by SAP .
See also SAP Note 2913405 .
1.3 Deleted Features
The following components have been removed with SAP GUI 7.70:
● The SEM Add-On (Front-end add-on for SAP Strategic Enterprise Management (SEM)) was removed.
The package contained only few components. Among these components was the Assignment Control that
has been de-supported, because it is not required anymore (see SAP Note 2704440 ). The remaining
components have been added to the SAP GUI component.
1.4 SAP Notes for the Installation
You must read the following SAP notes before you start the installation. These SAP notes contain the most
recent information about the installation, as well as corrections to the installation documentation.
Make sure that you have the up-to-date version of each SAP note, which you can nd on SAP Service
Marketplace at https://support.sap.com/notes .
SAP Note Number Description
2796898
Latest information on new and changed features in SAP GUI
for Windows 7.70
26417
Latest information about hardware and software require
ments of SAP GUI for Windows
2928874
SAP Business Client 7.70: Prerequisites and restrictions
6 PUBLIC
SAP Frontend Installation Guide
Introduction

SAP Note Number Description
66971
Latest information about supported front-end platforms
147519
Latest information about release and maintenance strategy
of SAP GUI.
2302074
Maintenance strategy and deadlines for SAP Business Cli
ent / NWBC
166130
Latest information about delivery and compatibility of the
components delivered on the Presentation DVD.
1587566
Lists the known problems concerning SAPSetup and their
solutions.
1.5 Information Available Online
Installation of the SAP GUI for Windows
You nd the latest version of this document on the SAP GUI Product page or in the SAP NetWeaver Guide
Finder: https://help.sap.com/viewer/nwguidender
Installation of the SAP GUI for Java
You nd information about the installation of SAP GUI for Java on the SAP GUI Family page in the SAP
Community under Installation → SAP GUI for Java.
Installation of the SAP Online Documentation
You can access the SAP online documentation from the front end. The installation of the SAP online
documentation is described under https://help.sap.com/viewer/nwguidender.
SAP GUI Family
You nd information about the SAP GUI family in the SAP SAP Community under SAP GUI Family page in the
SAP Community .
Supported Platforms
You nd information about the platforms on which you can run SAP GUI in the SAP Product Availability Matrix
or SAP note 66971 .
1.5.1 Naming Conventions
“Upgrade” means the transition from one release to another, for example, from 7.60 to 7.70.
“Update” means a change within the same release. You use a “patch” to apply the update.
SAP Frontend Installation Guide
Introduction
PUBLIC 7

2 Conguration Information
Before SAP GUI for Windows 7.40 was released, you had to use the old conguration format for SAP Logon
entries (saplogon.ini, sapmsg.ini, saproute.ini). With SAP GUI for Windows 7.40, the new conguration format
SAP UI Landscape was introduced. This new format had been created to simplify the conguration by unifying
the persisted connection conguration data from SAP GUI for Windows, SAP GUI for Java and SAP Business
Client in a modern and easy way:
● There are less conguration les involved and they are stored in the same repository.
● Conguration les can either be stored locally or on a central server or share.
● Deployment options “pull” and “push” are available.
● The conguration les are the same for SAP GUI for Windows, SAP GUI for Java and SAP Business Client.
● If SAP GUI has been used already, the connection data will be migrated automatically into the SAP UI
Landscape format.
In the interim period (SAP GUI for Windows releases 7.40 and 7.50), you had the choice between the
conventional or classic installation procedure/conguration format and the new le format SAP UI Landscape.
Note
As of SAP GUI for Windows 7.60, the old conguration format is not supported anymore. SAP GUI for
Windows can still handle this old format for compatibility reasons, because there may be external
applications needing this old format, but using SAP GUI for Windows 7.60 and newer with the old format is
not supported. SAP will neither test this format nor correct issues aecting it. Therefore, all installations of
SAP GUI for Windows 7.60 and newer must use SAP UI Landscape.
In the following subchapters, you nd information on how to install and congure your SAP GUI for Windows
landcape with SAP UI landscape.
2.1 Conguration Files Overview
When installing SAP GUI with SAP UI Landscape, it is possible working only with the following two conguration
les that are stored in the same directory:
● Administrator conguration le SAPUILandscapeGlobal.xml in %APPDATA%\SAP\Common\
SAPUILandscapeGlobal.xml contains the les of a migration of the previous les.
● User conguration le SAPUILandscape.xml in %APPDATA%\SAP\Common\
Note
However, it is strongly recommended to use the central le, see Conguration File Provision [page 11].
A server conguration le can be supplied on a server in a similar way as in the conventional setup with SAP
UI Landscape. For information on the creation and distribution of conguration les in the SAP UI
Landscape format, see SAP note 2075073 .
8
PUBLIC
SAP Frontend Installation Guide
Conguration Information

In addition, in case of using a central le, you can provide an administrative core conguration le that can be
supplied and set only by an administrator and not by the users, see SAP note 2175351 .
For information on the conguration le storage, see SAP note 2075150 .
2.2 Conguration Scenarios
There are two scenarios when installing SAP GUI with SAP UI Landscape:
● Migration: If SAP GUI has been used already, the data will be migrated once into the new les (see section
Migration of Conguration Files [page 10] below).
Note
After le migration, you can only work on the les in the new format.
● Setup from scratch: If SAP GUI has not been used before, the conguration les have to be created from
scratch. For this, you have two possibilities:
○ Easiest way: You can create and edit SAP UI Landscape XML data with the SAP UI Landscape
Maintenance Tool which can be either accessed via transaction SLMT or by starting report RSLSMT.
With this tool, XML data can be persisted in the database. You nd more information on the
functionality in the system documentation of the corresponding transaction or report (i-button).
Note
○ You have to implement SAP note 2311166 to be able to use the report/transaction
○ You need the corresponding authorization:
○ role SAP_SLMT
○ authorization object S_LSMT with the following values:
○ 02 for change authorization
○ 03 for display authorization
○ You can create the UI landscape le by hand or on the basis of corresponding output data from an SAP
NetWeaver server.
Note
Be careful with the creation by hand, because this might cause problems when the SAP UI
Landscape le is not consistent. The GUIDS, for example, need to have a specic format and have
to be unique.
Note
For more information on the SAP UI Landscape, see the SAP UI Landscape Conguration Guide. You nd
this guide on Help Portal, the DVD and in the SAP GUI Community wiki .
SAP Frontend Installation Guide
Conguration Information
PUBLIC 9
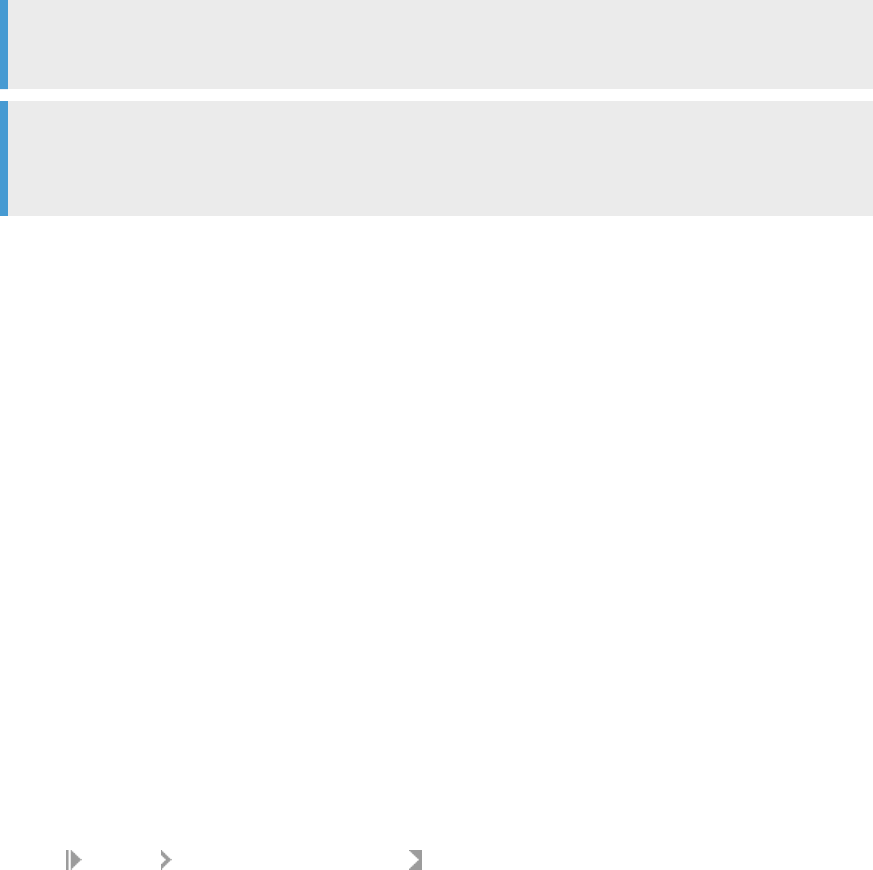
2.2.1 Migration of Conguration Files
The migrated data is imported into the following les:
● Administrator conguration le SAPUILandscapeGlobal.xml in %APPDATA%\SAP\Common\ contains
migrated data from:
○ NwbcOptions.xml
○ Saproute.ini
○ sapmsg.ini
○ services
● User conguration le SAPUILandscape.xml le in %APPDATA%\SAP\Common\ contains migrated data
from:
○ SAP Logon .ini and .xml les
○ %APPDATA%\SAP\NWBC\NwbcOptions.xml
10
PUBLIC
SAP Frontend Installation Guide
Conguration Information
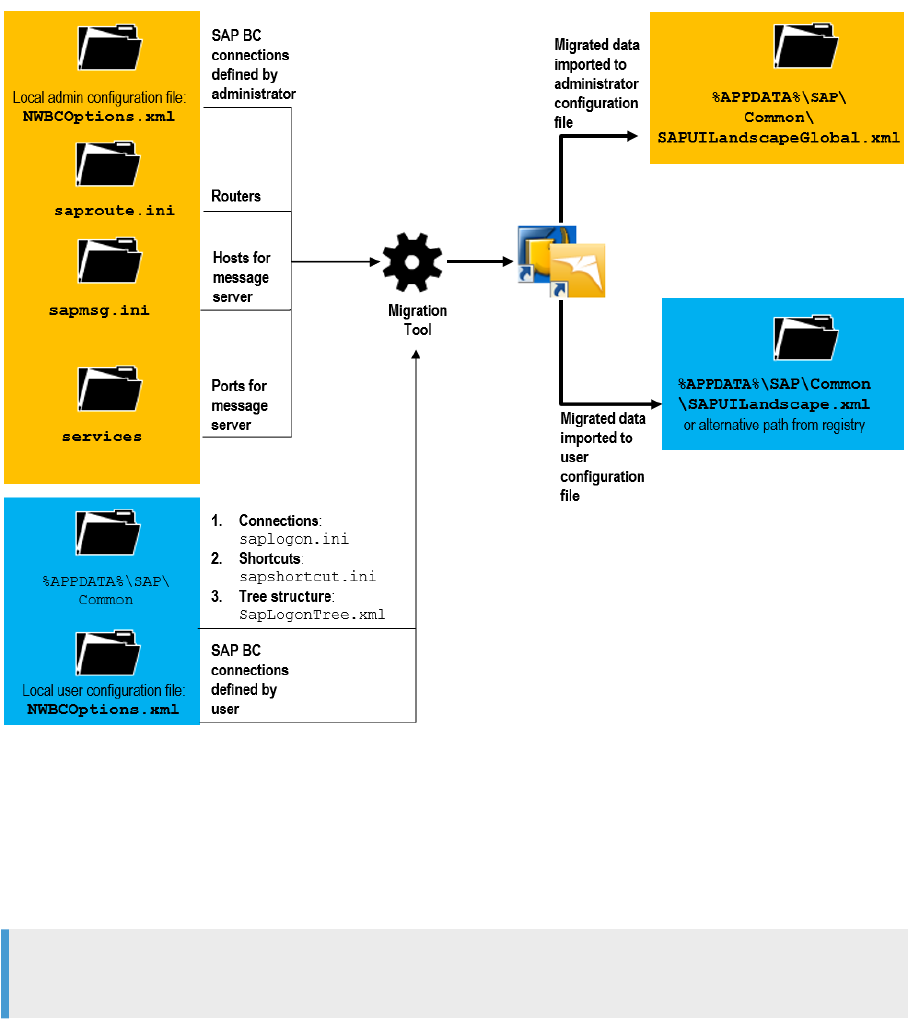
The concept described above is shown in the following gure that uses the installation with SAP BC (former
NWBC) as example:
2.2.1.1 Conguration File Provision
The administrator conguration le can be provided either by pull request or by push request.
Note
The pull request is recommended.
2.2.1.1.1 Provision by Pull Request
If the administrator conguration le is provided by pull request, it is located in a central, shared storage such
as a remote share or http server. The advantage of a cental storage is that the data does not have to be
deployed and that it can be updated centrally.
SAP Frontend Installation Guide
Conguration Information
PUBLIC 11
The administrator must specify the path to the administrator conguration le. Therefore, the administrator
denes the path via the registry value LandscapeFileOnServer in
HKEY_LOCAL_MACHINE\SOFTWARE\SAP\SAPLogon\Options (32 bits)
HKEY_LOCAL_MACHINE\SOFTWARE\Wow6432Node\SAP\SAPLogon\Options (64 bits)
(REG_EXPAND_SZ)
The local client can then retrieve the administrator conguration le from the central storage. If this le is not
readable for any reason, the last previously loaded version is read from the cache, if the cache is activated. In
addition, the user can create his or her own entries locally. However, this is only possible, if the SAP Logon is
used and the edit functions are not deactivated. These entries are merged with the central ones. The entries
from the administrator conguration le are displayed in another color / style to indicate they cannot be
changed by the user.
12 PUBLIC
SAP Frontend Installation Guide
Conguration Information
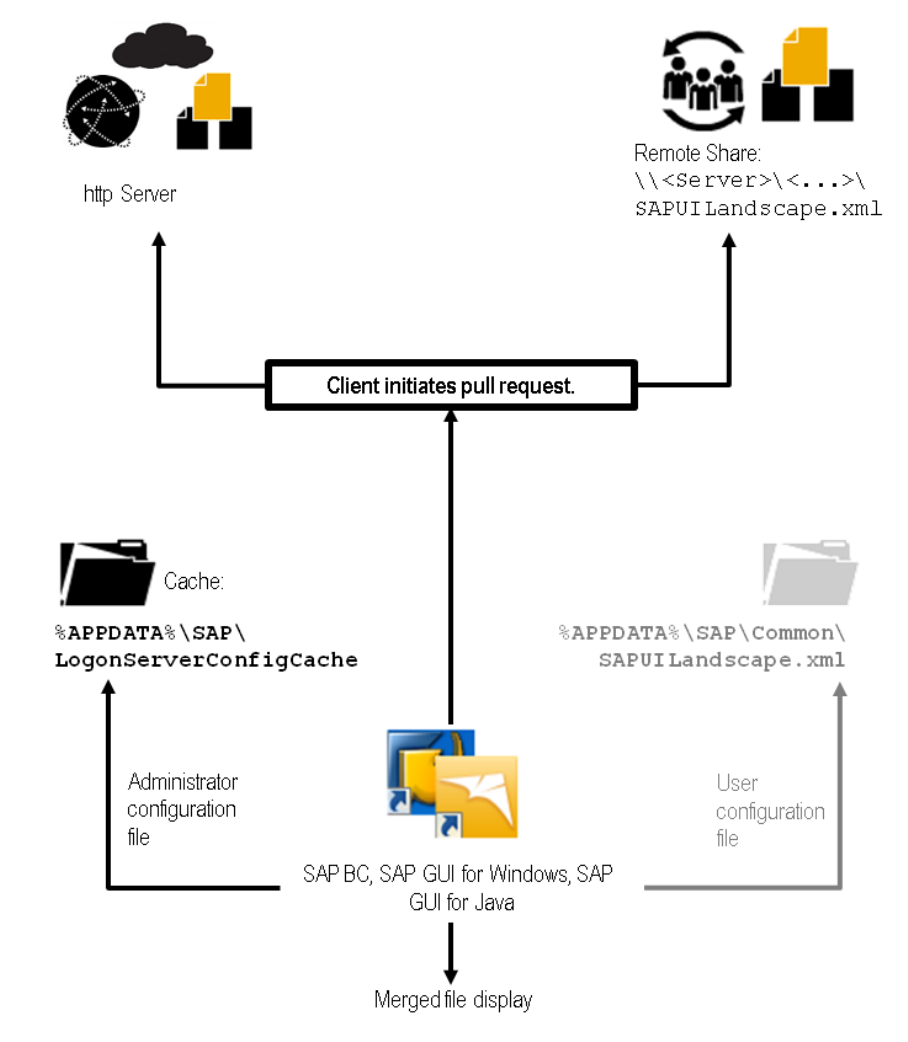
The concept described above is illustrated by the following gure:
2.2.1.1.2 Provision by Push Request
When using le provision by push request, the administrator distributes (pushes) the administrator
conguration le from his or her data storage repository to the local machines.
SAP Frontend Installation Guide
Conguration Information
PUBLIC 13

SAP GUI then retrieves the administrator connection conguration from the local client, according to the path
which is dened in the registry for the registry value LandscapeFileOnServer in
HKEY_LOCAL_MACHINE\SOFTWARE\SAP\SAPLogon\Options (32 bits)
HKEY_LOCAL_MACHINE\SOFTWARE\Wow6432Node\SAP\SAPLogon\Options (64 bits)
(REG_EXPAND_SZ)
The concept described above is illustrated by the following gure:
Thus, push distribution means that the le will not be held centrally on an http server or a central share, but will
be sent to the local machines. The recommended folder on the local machines is %ProgramData%/SAP/. The
administrator distributes the le with a software distribution tool, such as NetWeaver SAP Setup. This means
that during an update the le has to be exchanged on all clients.
Note
When changing system connection conguration data frequently, the push mechanism has severe
disadvantages compared to the pull mechanism, because only after an update triggered by the
14
PUBLIC
SAP Frontend Installation Guide
Conguration Information

administrator, the clients have up-to-date connection congurations. Therefore, the push mechanism is not
recommended.
2.3 Caching Remote Conguration Files
Conguration les (SAPUILandscape.xml les) loaded from a remote server will be cached by default. The
cache folder is %APPDATA%\SAP\LogonServerCongCache.
This feature can be switched on and o via the check box Allow caching of remote conguration les in the
SAP Logon Options Conguration Files dialog. By default, it is activated. In the same dialog, you nd
information on the the XML le and the caching path.
There are two options available to dene with which interval SAP Logon checks the server for new conguration
les:
● Update cache on every SAP Logon (Pad) start
● Update cache only in an interval of [hours]
When using the rst option, the cache is updated with every SAP Logon (Pad) start. With the second option the
server is only contacted, if the last enquiry or download took place more than x hours ago. This saves long
roundtrips in slow networks.
Note
Using the second option, the check also only takes place at SAP Logon start, not during a SAP Logon
session.
In case the corresponding server cannot be reached and the server conguration le is not available anymore,
the cached les will be used at SAP Logon restart and displayed in the SAP Logon Options Conguration
Files dialog under Loaded Conguration Files. In case that the given server conguration le and the cache
les are not available, only local conguration les will be used.
2.4 Loading Conguration Files via Environment Variable or
Command Line Parameter
You can use the Windows environment variable SAPLOGON_LSXML_FILE or the command line parameter /
LSXML_FILE to dene your own landscape les to be used by SAP GUI for Windows as in the former SAP GUI
for Windows releases (see the related SAP Note 38119 ).
Note
When using the command line parameter /LSXML_FILE, SAP GUI assumes the specied le to be a server
conguration le, if it is write-protected. Else, it assumes the le to be a local conguration le. This, for
example, has an impact on the caching of these les, as local les are not cached.
SAP Frontend Installation Guide
Conguration Information
PUBLIC 15

The value for the environment variable SAPLOGON_LSXML_FILE or the command line parameter /LSXML_FILE
can contain
● a full path including the name of the landscape le, or
● an http(s) address, fully specied, including the name of the landscape le
The landscape le to which the environment variable points, can reference to another landscape le. This
reference is always realized as an include:
Sample Code
<Includes>
<Include
url="http://myserver:myport/config/SAPUILandscapeGeneralExample.xml"/>
</Includes>
The internal handling of includes in the landscape le is the following:
1. No include is explicitly specied:
SAP GUI for Windows searches for a landscape le with standard lename SAPUILandscapeGlobal.xml
under the same path specied in the environment variable or command line parameter and - if it does exist
- includes it automatically.
2. Includes with index unequal to 0 are explicitly specied:
SAP GUI for Windows includes the le(s) from the explicitly specied include(s) (see example above). It
also searches for a landscape le with standard lename SAPUILandscapeGlobal.xml under the same
path specied in the environment variable or command line parameter and - if it does exist - includes it
automatically.
3. An include is specied with index equal to 0:
SAP GUI for Windows directly includes the le from the explicitly specied include. It will not search for a
landscape le with standard lename SAPUILandscapeGlobal.xml under the same path. Additional
includes with index equal to 0 will be ignored.
All connections which are dened in an http(s) referenced landscape le or in include les or in a read-only le
specied via command line parameter /LSXML_FILE are displayed as read-only in SAP Logon.
The searching order of the landscape le in SAP GUI for Windows is as follows:
1. File set in the command line parameter /LSXML_FILE.
2. File set in the directory path from the environment variable SAPLOGON_LSXML_FILE.
3. Files set in the SAP Logon Options dialogue on the Conguration Files Page.
4. Files set in the registry by the administrator.
If the les are not found using any of the searches outlined above, SAP GUI for Windows starts the data
migration automatically and tries to create the SAPUILandscape.xml and SAPUILandscapeGlobal.xml
les according to the old conguration le settings, provided that the les can be written under the specied
path.
For more information, see SAP Note 2075150 .
16
PUBLIC
SAP Frontend Installation Guide
Conguration Information

3 Planning
Purpose
This section tells you how to plan the front-end installation.
Process Flow
1. You plan an installation scenario, see Installation Scenarios [page 17].
2. You meet the Hardware and Software Requirements [page 19].
3. You review the Installation and Maintenance Flow [page 20].
3.1 Installation Scenarios
You can install SAP GUI for Windows in the following ways:
● Workstation installation from a server
The administrator sets up an installation server, from which the installation of the SAP front-end software
is run on many dierent clients.
All the necessary les are copied from the server to the client during installation.
● Workstation installation from a distribution medium such as a DVD
The administrator takes the distribution medium from PC to PC. This is mainly for testing or for standalone
computers and is not to be used for software distribution.
Tip
We recommend you to use workstation installation from a server because of its greater exibility,
especially if many workstations are involved.
These methods are described in more detail below.
Workstation Installation from a Server
The installation process from an installation server is exible, easy, and customizable. It makes maintenance
easier in any phase of the distribution process, for example, when patches are to be applied.
You have the following options when installing SAP GUI for Windows with server-based workstation installation:
● Without user interaction (unattended)
● With user interaction (attended), where the user can:
○ Select from installation packages that the administrator congured
○ Select from the complete component list of each product available on the installation server
SAP Frontend Installation Guide
Planning
PUBLIC 17

The following gure shows how server-based installation works:
The type of user determines which components to install and on which workstations. Dierent types of user
have dierent requirements. For example, an employee in the HR department requires dierent products and
components than a software developer.
Using an installation server, the administrator can group various components together as installation packages
relevant for certain types of employee. The administrator can also specify which package particular users
receive or oer a variety of packages and allow the user to choose the most appropriate one.
In addition, you can congure a distribution service to add local security handling (LSH) functions to the
installation server (see also Conguring Local Security Handling [page 37]). With local security handling, the
installation can be started even in the context of a user who is not a member of the local group of
administrators. The distribution service then installs a service process on the client and starts
NWSAPSetup.exe in the context of this service. The user rights and privileges are not altered. The installed
service does not start other processes except NWSAPSetup from congured installation servers.
The hard disk requirement on the installation server depends on the type and number of products that are
added to an installation server. SAP GUI for Windows requires approximately 800 MB with all components
installed.
As administrator, you can congure your own installation packages with NWSAPSetupAdmin.exe on the
installation server or use the precongured packages provided by SAP.
You apply patches on the installation server and call NWSAPSetup on your client again to apply the patch on
the client. You can control the installation using the command line. You can perform unattended installations
18
PUBLIC
SAP Frontend Installation Guide
Planning

with automatic patch installation on the client. To do this you place the appropriate command line in the logon
script of the client. The logon script is a program that is executed when you log on.
Alternatively, you can use the SAP Automatic Workstation Update. Whenever the installation server is patched,
or the packages installed are updated, this service will update the workstation(s) and reboot them if necessary.
The workstation updater works in two modes - one in the presence of a logged-on user and another in his or her
absence:
● When a user is logged on, the user is informed of update availability and the update happens on the user's
assent. The user is also informed if a reboot is necessary and the reboot is also only executed on the user's
assent.
● If no user is logged on, the update is done automatically and the reboot (if necessary) is done
automatically, too.
The SAP Automatic Workstation Update is not SAP GUI-specic, it works with all components available on the
installation server. For detailed information, see section Conguring SAP Automatic Workstation Update [page
38].
Workstation Installation from a Distribution Medium
Local installation on workstations with a distribution medium such as a DVD is useful for installing SAP GUI or
SAP Business Client on single machines (for example, laptops) that are not connected to a Local Area Network
(LAN). You can also use it for test purposes.
This installation type has the following disadvantages:
● No installation scenarios are available.
● When patches need to be applied, you need to patch each workstation separately.
3.2 Hardware and Software Requirements
You need to make sure in advance that your system meets the following requirements:
● Front-end workstations:
○ Read SAP note 26417 to check that all hardware and software requirements for the front-end
workstations have been met. For installations together with SAP Business Client 7.70, check the
requirements in SAP Note 2714160 .
○ Hard-disk clones only:
If the operating systems of your client computers were generated through hard-disk cloning, make
sure that the domain is set correctly. To do this, take the computers out of the domain and then put
them back in. This is especially important if you intend to use local security handling (LSH); see also
Conguring Local Security Handling [page 37].
● The host for server-based installations must:
○ Be accessible to all users at any time, even after the installation is complete
This is required for maintenance purposes such as the distribution of patches.
○ Have broadband network connection for high throughput
SAP Frontend Installation Guide
Planning
PUBLIC 19

○ Have 800 MB of free disk space
○ You nd an overview of the server versions in the Product Matrix of SAP GUI on the SAP GUI DVD or on
the SAP GUI Family Page .
3.3 Installation and Maintenance Flow
Purpose
This section describes a typical installation and maintenance ow for a server-based workstation installation.
Process Flow
1. You set up an installation server and, if necessary, local security handling (LSH).
The installation server contains:
○ Installation programs
○ Conguration information (for example, packages)
○ Service les (for local security handling)
○ Front-end components to be installed
2. You maintain installation packages for dierent user groups.
Users can install multiple packages and packages can share components. You can congure installation
parameters, such as installation directories for the components that a package contains.
3. We recommend that you congure local security handling and test it.
You can do this by logging on to a user PC with a user that does not have local administrator rights and
running NWSAPSetup.exe.
Note
Many Windows operating systems have local security mechanisms. In these systems, only users with
local administrator rights have write access to parts of the system database and the le system.
NWSAPSetup solves this problem with the Distribution Service (DS), which resides on the server, and
the Installation Service (IS) that has been installed on the workstation. The IS starts a new instance of
NWSAPSetup.exe that runs with sucient privileges.
4. You install packages using the logon script of your PC or using other software distribution technologies.
5. You patch the installation server.
6. You upgrade the front-end client computers when a new front-end release becomes available.
Related Information
Setting Up an Installation Server [page 23]
20
PUBLIC
SAP Frontend Installation Guide
Planning

4 Preparation
Purpose
This section tells you how to prepare an installation server for the front-end software installation.
Process Flow
1. You set up an installation server.
2. If required, you administer your installation server.
3. If required, you add new SAP front-end components to an existing installation.
4. If required, you update products on the installation server with a newer version using a patch.
5. If required, you create and maintain installation packages.
6. If required, you patch the installation server.
7. If required, you congure local security handling.
Note
After you have set up the installation server, it is ready for use during the deployment of SAP front-end
components on the workstations.
Creating packages for deployment is optional. Packages contain administrator-selected components,
which are helpful to regulate and customize installation parameters such as the installation directory.
Related Information
Setting Up an Installation Server [page 23]
Administering an Installation Server [page 25]
Adding New SAP Front-End Components to an Existing Installation Server [page 27]
Updating Products on the Installation Server with a Newer Version [page 28]
Creating and Maintaining Installation Packages [page 29]
Patching the Installation Server [page 36]
Conguring Local Security Handling [page 37]
22
PUBLIC
SAP Frontend Installation Guide
Preparation
4.1 Setting Up an Installation Server
Use
You use this procedure to help distribute SAP front-end software on multiple workstations on the network.
NWCreateInstServer is a wizard driven tool that helps the administrator create a new installation server.
After the server is set up, NWUpdateInstServer starts importing SAP products from the source into the
newly created server.
Prerequisites
You need local administrator rights under Windows operating systems with local security mechanisms.
Procedure
1. Execute the le NwCreateInstServer.exe from the SETUP folder of the DVD SAP Product Media.
2. Choose Next to continue.
Note
You can choose Cancel at any stage to abort the process.
NWCreateInstServer.exe prompts you to supply the path where you want to create the installation
server.
3. Enter the folder name manually or use Browse to navigate to the folder where you want to create the
installation server. Make sure the folder is empty.
4. Choose Verify to make sure that the chosen folder meets the prerequisites:
○ It must exist.
○ It must be accessible to the administrator with full access.
Note
The folder is automatically congured. It is made NULL-session accessible. Thus, it will be
automatically shared on the network for everyone to read. If you do not want this automatic
conguration, use the command line parameter DontConfigureServerPath.
5. If required, choose Share to maintain the le-sharing properties of the selected folder.
6. Choose Next to continue.
You see a screen indicating that the server is being created.
Note
Processing is recorded in the following le:
SAP Frontend Installation Guide
Preparation
PUBLIC 23

%ProgramFiles%\SAP\SAPSetup\Logs\NwCreateInstServer.log
If there are errors, you see a link to an Error Report. Any errors are recorded in the following le, which
you can view using your normal web browser:
%ProgramFiles%\SAP\SAPSetup\Errors\NwCreateInstServer_<CurrentDateTime>.xml
If you have a problem, create a problem message on component BC-FES-INS and attach these les to
the message.
When the installation is complete, you see a screen conrming that the server has been successfully
created.
You now have a valid but empty SAPSetup installation server.
7. Choose Next to continue.
NWCreateInstServer.exe automatically calls NWUpdateInstServer.exe to transfer SAP products to
your installation server.
8. Choose Next to continue.
You see the following screen:
Note
C:\MyNewInstServer is the path where NWCreateInstServer.exe initially created a new
installation server in this example.
24
PUBLIC
SAP Frontend Installation Guide
Preparation

9. Enter the folder name manually or use Browse to navigate to the folder of the installation server that you
want to update.
10. Choose Next to start the server update.
You see a screen indicating that the server is being updated.
Note
Processing is recorded in the following le:
%ProgramFiles%\SAP\SAPSetup\Logs\NWUpdateInstServer.log
If there are errors, you see a link to an Error Report. Errors are recorded in the following le, which you
can view using your normal web browser:
%ProgramFiles%\SAP\SAPSetup\Errors\NwUpdateInstServer_<CurrentDateTime>.xml
If you have a problem, create a problem message on component BC-FES-INS and attach these les to
the message.
NWServerUpdate.exe transfers all SAP products available on the DVD or source to the installation server.
When the update is complete, you see a screen conrming that you can use the installation server for SAP
product installation on end-user workstations.
11. If you have .NET Framework version 4 installed, choosing Finish automatically starts
NWSAPSetupAdmin.exe from the recently updated installation server.
The new NetWeaver SAPAdmin is a multi-product server administration tool.
For more information, see Administering an Installation Server [page 25].
Note
You can replicate an installation server to an existing network share by entering the following
command:
\\InstallationServerShare\Setup\NwCreateInstServer.exe /
Dest=<ReplicationPath> /NoDlg
After setting up your installation server, it is recommended to look for the latest patches. See also Patching the
Installation Server [page 36].
4.2 Administering an Installation Server
After you have successfully set up the installation server, you can nd NWSAPSetupAdmin.exe in the SETUP
directory of the installation server.
NWSAPSetupAdmin.exe is designed to help you administer the multi-product installation server. It supplies
the following features:
● Import Product
Use this feature to add new products (for example, SAP front-end components) to an existing installation
server for distribution over the network.
● Export Product
Use this feature to export front-end components available on one installation server to another.
SAP Frontend Installation Guide
Preparation
PUBLIC 25

● Delete Product
Use this feature to delete a product from an installation server.
● Create Package
Use this feature to create packages for deployment. Packages can contain many components and their
installation parameters can also be customized.
● Create Package Denition File (PDF)
You can create a package denition le (PDF) for an installation server package. PDF is a package
description format that simplies the interoperability and information exchange between the SAP Installer
and system management products like the System Management Server from Microsoft.
● Congure Package
Use this feature to change the attributes or the content of your packages.
● Patch
Use this feature to patch components that are available on the installation server.
● Local Security Handling
This feature allows workstation users to install SAP components from the installation server without
requiring administrative privileges.
Note
NWSAPSetupAdmin.exe requires the .NET Framework 4 to be installed as a prerequisite. You can
download the .NET Framework from:
http://www.microsoft.com/download/en/details.aspx?
displaylang=en&id=17718 .
● Conguring SAP Automatic Workstation Update
Whenever the installation server is patched, or the packages installed are updated, this service will update
the workstation(s) and reboot them if necessary. The workstation updater works in two modes - one in the
presence of a logged-on user and another in his or her absence:
○ When a user is logged on, the user is informed of update availability and the update happens on the
user's assent. The user is also informed if a reboot is necessary and the reboot is also only executed on
the user's assent.
○ If no user is logged on, the update is done automatically and the reboot (if necessary) is done
automatically, too.
● Control Remote Workstations
This functionality uses the Windows Management Instrumentation (WMI) to help you remotely access and
control workstations on which you have administration privileges. You access this feature via the Remote
menu, where you nd the options to:
○ collect remote log les
○ execute processes remotely
○ enumerate remote processes
You nd detailed information in section Controlling Remote Workstations [page 41].
26
PUBLIC
SAP Frontend Installation Guide
Preparation

4.3 Adding New SAP Front-End Components to an Existing
Installation Server
Use
This procedure tells you how to transfer new SAP front-end components on a distribution medium to your
installation server. Then you can deploy them to the workstations on the network.
You can add SAP products either using NWUpdateInstServer.exe or NWSAPSetupAdmin.exe (using the
import product wizard) that you can nd in the
SETUP directory of the source medium.
Prerequisites
● An existing installation server
● A medium that contains an SAP product to be added to the installation server
● Enough disk space
Note
You must not use the installation server during processing.
Procedure
To update the installation server with new SAP components, use one of the following two methods:
● Using NWUpdateInstServer.exe
1. Start NWUpdateInstServer.exe from the SETUP directory of the source that contains the
component to be added.
2. Supply the path of the installation server
3. Follow the wizard to update it with components that are available on the source.
● Using NWSAPSetupAdmin.exe
1. Start NWSAPSetupAdmin.exe from the SETUP directory of the installation server that needs to be
updated with the new component.
2. In the toolbar, choose Import Products.
3. Follow the wizard and supply the path to the source containing the product to be added to the
installation server.
Example
You can update the installation server with the Adobe LiveCycle Designer which is delivered on the same DVD
as the SAP GUI for Windows. You just have to start the program <Disc Drive of DVD>:
SAP Frontend Installation Guide
Preparation
PUBLIC 27

\ADOBE_LC_<release>\setup\NwUpdateInstServer.exe. After being shown a welcome page, you will be
asked for the path to the installation server that should be updated. Here, you must navigate to the path of the
installation server which has been set up in section 3.1 (C:\MyNewInstServer\).
You just have to choose Next and wait until the process ends. Afterwards, the SAPSetup Installation
Server Administration Tool (NwSAPSetupAdmin.exe) is displayed. On the Products tab, you will see
the added product Adobe LiveCycle Designer.
The user can now install the product by starting the program <Path of the installation server
share>\SetupAll.exe and selecting the product to be installed, in this case the Adobe LiveCycle Designer.
4.4 Updating Products on the Installation Server with a
Newer Version
Use
If newer releases of SAP products or components are required, you have to update your installation server to
be able to distribute these new products to the workstations using a network.
This wizard-driven process is handled by a tool called NWUpdateInstServer.exe that you can nd in the
SETUP directory of your source medium.
Prerequisites
● A medium with an SAP product in a release newer than that on the installation server
● Enough disk space
Note
You must not use the installation server during processing.
Procedure
1. Follow the steps as described in Adding New SAP Front-End Components to an Existing Installation Server
[page 27].
2. Start NWUpdateInstServer.exe from the source medium.
3. Follow the instructions in the wizard.
Note
You can also update products on the Installation Server by using the following command line:
28
PUBLIC
SAP Frontend Installation Guide
Preparation

\\UpdateSource\Setup\NwUpdateInstServer.exe /dest=<installation server setup
directory> /NoDlg or /silent
For a description of the command line parameters, see section Command-Line Parameters [page 55].
4.5 Deleting Products from the Installation Server
To delete products from the installation server, proceed as follows:
1. Start NWSAPSetupAdmin.exe from the SETUP directory of the installation server where you want to delete
a product.
2. On the Products tab, right-click the product to be deleted and choose Delete Product.
The product deletion wizard appears.
3. Follow the deletion wizard.
At the end of the deletion process, a message will inform you, if the deletion process completed
successfully.
Note
If you delete a product that is still a part of a preselection package, the indicator appears next to
name of the aected package on the Packages tab. This indicates that a product that is a part of the
package is not available on the installation server. Thus, either the package has to be deleted or the
product must be re-imported into the server from another source.
4.6 Creating and Maintaining Installation Packages
After setting up an installation server, you can create packages for an installation performed by users. The tool
that you use is NWSAPSetupAdmin.exe, which you can nd in the SETUP folder on the installation server.
The package creation and deployment in the new NetWeaver SAPSetup is enabled on multiple-product level, so
enabling the administrator of the installation server to create packages comprising more than one SAP front-
end component and parts.
4.6.1 Creating a New Installation Package
Procedure
1. Start NWSAPSetupAdmin.exe from the SETUP folder of your installation server.
2. In the toolbar, choose New Package.
The Package Creation Wizard appears.
3. To continue, choose Next.
SAP Frontend Installation Guide
Preparation
PUBLIC 29

The wizard displays components available on the installation server.
4. Select the products that you want to add to your package.
Yellow dots indicate changes in the selection list. The green plus signs next to the product names indicate
that these products will be installed when the user installs the package on his or her workstation.
5. Choose Next.
You are prompted for a package name.
6. Enter a name and choose Next.
NWSAPSetupAdmin.exe now creates a package and conrms the successful creation.
7. To return to NWSAPSetupAdmin.exe, choose Finish.
The newly created package is now visible in the Package View.
8. Right-click a package and choose Congure from the context menu to customize installation parameters,
such as the installation path for components contained in the package.
4.6.2 Conguring Packages and Scripting Events
Purpose
Package conguration lets the administrator change the attributes of a package (for example, the name), give
the package a description, set registry keys for the package and customize the installation of the package by
adding scripts that are to be executed during events in the package deployment cycle.
30
PUBLIC
SAP Frontend Installation Guide
Preparation

Prerequisites
● An installation server
● Packages created by the administrator and available for customization
Process Flow
1. Start NWSAPSetupAdmin.exe from the SETUP directory of the Installation Server.
2. Switch to the Congure Packages tab page. In the left window pane, you can see a tree listing the existing
packages.
Note
The indicator next to a package indicates that the package is incomplete. This typically occurs
when a product that the package contains has been deleted from the installation server. You can either
delete this package or re-import the missing product.
3. Select the package that you want to customize. You can for example change the name of the package, add
a description, set registry keys for the package or script events.
Note
The text supplied as description is eventually visible to the end-user wanting to install the package
using NWSAPSetup.exe.
4. Optional: You can set registry values on package level, for example, for the following registry keys:
○ Registry keys of the Accessibility page
○ Path to the SAP GUI branding image
○ Path to the Central Conguration File (new and old format)
○ Theme Key etc.
The default value for the used SAP GUI theme is SAP GUI Default. This means that NWSAPSetup will
remove any registry value presently setting the SAP GUI theme under HKEY_LOCAL_MACHINE so that
the default set by SAP GUI itself will be used. For SAP GUI for Windows 7.70, this is the Quartz theme or
the Quartz Dark theme (if Windows is running application in the dark mode). If you would like to set
another default theme, you need to change this value and supply the decimal value of the respective
theme. See section Themes Settings Page in the SAP GUI Administration Guide for more information
on the theme selection registry values.
You nd the whole list on the package conguration tab.
To change a registry key setting for the package, choose Modify Parameters. A window opens where you
can choose the variable name and enter the corresponding value below. You nd a description of the
registry key values in the SAP GUI Administration Guide
Note
Later, this setting cannot be changed with the same tool again. Changes have then to be done via
scripting.
SAP Frontend Installation Guide
Preparation
PUBLIC 31

5. Optional: Add event-scripting to perform custom actions on the user’s workstation during the installation
of the package (for example, copying additional les). You can insert scripting samples delivered by SAP via
Insert Script and adapt them to your requirements. The scripts are executed at the following events:
○ On Begin Install: executed before the installation of a selected package
○ On End Install: executed after the completion of package installation
○ On Begin Uninstall: executed before the uninstallation of a selected package
○ On End Uninstall: executed after the completion of package uninstallation
○ On Begin Update: Executed before the update of a selected Package.
○ On End Update: Executed after the completion of the Package update.
To learn more about the package update option see the next section Changing the Package Content
[page 32].
6. To save your changes, choose Save.
Sample Documentation
The documentation of the samples for package event scripting is contained in the NetWeaver SAP Setup
Guide.pdf le, which you can nd using the SAPSetup Installation Server Administration Tool
(NWSAPSetupAdmin.exe) by choosing the Help Menu SAP Installatin Server Help . In this
documentation, navigate through the tree structure as follows: Administering an Installation Server
Maintaining Installation Packages Conguring Packages and Scripting Events Package Event Scripting
Samples .
4.6.3 Changing the Package Content
Purpose
The package conguration lets the administrator also update the package content. This means, you can add or
remove components to be installed with the package. Also, you can add scripts that are to be executed before
or after the update.
Prerequisites
● An Installation Server
● Packages created by the administrator and available for customization.
32
PUBLIC
SAP Frontend Installation Guide
Preparation

Process Workow
1. Start NWSAPSetupAdmin.exe from the SETUP directory of the Installation Server.
2. Switch to the Congure Packages tab. In the left window pane, you can see a tree listing the existing
packages.
Note
The indicator next to a package indicates that the package is incomplete. This typically occurs
when a product that the package contains has been deleted from the installation server. You can either
delete this package or re-import the missing product.
3. Select the package for which you want to update the content, and choose Change Package Content.
You can now select or deselect components. Components added will be newly installed on the
workstations. Those removed will be uninstalled from the workstations, if they are not part of any other
package marked for installation. When updating a package, the package installation parameters are also
refreshed and include new variables or delete those that belong to components that are no longer part of
this package.
4. Optional: Add event-scripting to perform custom actions on the user’s workstation during the update of
the package. You can insert scripting samples delivered by SAP via Insert Script and adapt them to your
requirements. The scripts will be executed before and after the update:
1. On Begin Update: Executed before the update of a selected Package.
2. On End Update: Executed after the completion of the Package update.
5. Remember to click the Save button to persist changes made.
Saving the package increases the version number and the package is marked for update on the
workstation. When the package installation is updated on the workstation, the package components that
have been newly added or removed by the administrator are automatically installed or uninstalled
respectively.
Note
If you are using package event-scripting to transfer your les, the Mark for Update link as seen on the
Congure Packages tab can be used to inform the installer of the availability of an update after you have
modied this le. The installer will now recognize the package as updated and the modications will be
transferred to the workstations at update time via the OnBeginUpdate and /or OnEndUpdate scripts.
4.6.4 Deleting an Installation Package
Procedure
1. Switch to Package view.
2. Right-click the package you want to delete.
SAP Frontend Installation Guide
Preparation
PUBLIC 33
3. From the context menu, choose Delete Package.
The package is deleted. It is removed from the Package view.
4.6.5 Creating a Package Denition File
Use
You can create a package denition le (PDF) for an installation server package. PDF is a package description
format that simplies the interoperability and information exchange between the SAP Installer and system
management products like the System Management Server from Microsoft.
Procedure
Proceed as follows to create a package denition le:
1. If not already started, start NWSAPSetupAdmin.exe from the SETUP directory of the installation server.
2. On the Packages tab, right-click the package for which you want to create a PDF le and choose Create
Package Denition File.
3. Choose the directory where you want to save the le, enter a le name, and choose Save.
Result
NWSAPSetupAdmin.exe creates a PDF and an SMS le in the specied directory.
4.6.6 Creating and Deploying Single File Installers
Use
You can create single-le self-installing .exe-packages via NWSAPSetupAdmin.exe.
Such a package contains only those les that belong to the components that are a part of the package. Thus, it
reduces your network load in certain distribution scenarios where you previously had to make local copies of
your installation source before installing.
34
PUBLIC
SAP Frontend Installation Guide
Preparation

This single-le self-installer can also install silently without user interaction.
Note
The Single File Installer does not work together with SAP Automatic Workstation Update Service. It only
works together with an installation server.
Prerequisites
● You have created a SAP installation server using NWCreateInstServer.exe available with your SAP GUI
DVD, or inside the SETUP folder of any other SAP software installed using SAP Installer.
● You have created a package or packages that contain the desired components.
● Optional: If you want to distribute conguration les, e. g. the SAPUILandscape.xml, together with the
single-le self-installing package, create a folder on the installation server named CustomerFiles, and
copy your les in this folder. See also the scripting example Sample 1: Copying a file that you nd
by following the instructions given in section
Conguring Packages and Scripting Events [page 30].
Procedures
Proceed as follows to create or deploy a single-le self-installing package:
Creating a single-le self-installing package
1. Start NWSAPSetupAdmin.exe (you will need .NET 4 to use this version).
2. In the Packages tree, right-click the package you want to create a self-installing le from, and choose
Compress Package To Single-File Installer.
3. Following the wizard instructions, you will get a single exe-self-extractor at the end of the process.
4. Close NWSAPSetupAdmin.exe.
Deploying a single-le self-installing package
1. The self-installing le created above can be executed on any workstation to install your package.
2. Follow the installation wizard.
This self-installing package can be installed silently (i.e. without user-interaction) when invoked with the
command-line parameter /silent.
Result
You have created and deployed a self-installing package.
SAP Frontend Installation Guide
Preparation
PUBLIC 35

Troubleshooting
If you face problems with creating a self-installing package, check rst that your server has no missing les - via
the Check Server feature in the NWSAPSetup administration tool (NwSapSetupAdmin.exe).
If you encounter problems with installing the self-installing package, use the Check-Workstation tool
(NwCheckWorkstation.exe).
4.7 Patching the Installation Server
Use
Patching products on the installation server keeps them up-to-date with the most recent correction and
enhancements from SAP.
You can congure the SAP Automatic Workstation Update. This service will update the workstation(s) and
reboot them if necessary whenever the installation server is patched, or the packages installed are updated.
The workstation updater works in two modes - one in the presence of a logged-on user and another in his or her
absence. For detailed information, see section Conguring SAP Automatic Workstation Update [page 38].
Prerequisites
● An existing installation server
Note
To ensure a successful patch and to avoid having to reboot after the patch, you can unshare the
installation server during the patch and recreate it when the patch has nished.
● A patch supplied by SAP for products or components available on the installation server.
Procedure
1. Start NWSAPSetupAdmin.exe from the SETUP directory of the installation server.
2. Choose Patch Server.
This starts the patch wizard.
3. Choose Next to continue.
4. Browse to a valid SAP patch le and choose Next to continue.
NWSAPSetupAdmin.exe now validates the patch, which takes a few minutes.
36
PUBLIC
SAP Frontend Installation Guide
Preparation
If the patch is valid, you are prompted to proceed with it.
Note
To ensure that the installation server is not in use, the patch now closes NWSAPSetupAdmin.exe
before continuing. It restarts NWSAPSetupAdmin.exe after completing the patch.
5. Choose Next to continue.
NWUpdateInstServer.exe starts patching the installation server.
6. Follow the patch wizard, choosing Next as required.
Note
Processing is recorded in the following le:
%ProgramFiles%\SAP\SapSetup\Logs\NWUpdateInstServer.log
If there are errors, you see a link to an Error Report. Any errors are recorded in the following le, which
you can view using your normal web browser:
%ProgramFiles%\SAP\SapSetup\Errors\
NWUpdateInstServerErrors_<CurrentDateTime>.xml
If you have a problem, create a problem message on component BC-FES-INS and attach these les to
the message.
At the end of the process, you see a message indicating that the patch was successful.
7. Choose Finish.
NWSAPSetupAdmin.exe now restarts.
If you have patched a SAP front-end component (for example, SAP GUI for Windows 7.50), the version number
of this component in NWSAPSetupAdmin.exe increases after applying the patch.
4.8 Conguring Local Security Handling
Use
Local security handling (LSH) lets users on the network deploy SAP front-end components on their front ends
using NetWeaver SAPSetup without requiring administrative privileges on each front end.
Prerequisites
● You have set up an installation server [page 31].
● To enable front ends running Windows Vista or higher to use LSH, you need to change the default rewall
setting to enable remote service management as follows:
1. Open the control panel and choose Windows Firewall Change Settings .
SAP Frontend Installation Guide
Preparation
PUBLIC 37
2. On tab page Exceptions, select Remote Service Management and choose OK.
Procedure
1. Start NWSAPSetupAdmin.exe from the SETUP folder of the installation server.
2. Choose Services and select Congure local security handling.
The LSH conguration wizard starts.
3. Choose Next.
The wizard prompts you for the credentials of an account that has administrative privileges for all front
ends on the network.
4. Enter the account name with domain qualiers.
5. Choose Verify.
Verication only conrms that the password supplied matches its repetition. Verication does not validate
credentials.
6. Choose Next.
7. Enter details for the installation service (IS) account, verify, and choose Next to complete the process.
The wizard displays the success state in starting the distribution service and the status bar at the bottom
of NWSAPSetupAdmin.exe displays the service state as Active.
8. Test the functioning of the LSH feature by starting NWSAPSetup.exe from this installation server on a front
end where the logged-on user has ordinary user privileges (that is, the user does not have administrative
privileges).
Result
If the front-end installer starts successfully and is able to install components available on the installation server,
the conguration is successful.
If not, you need to recongure LSH.
4.9 Conguring SAP Automatic Workstation Update
Use
The SAP Automatic Workstation Update works only when installed on the workstation. Whenever the
installation server is patched, or the packages installed are updated, this service will update the workstation(s)
and reboot them if necessary. The workstation updater works in two modes - one in the presence of a logged-
on user and another in his or her absence:
● When a user is logged on, the user is informed of update availability and the update happens on the user's
assent. The user is also informed if a reboot is necessary and the reboot is also only executed on the user's
assent.
38
PUBLIC
SAP Frontend Installation Guide
Preparation
● If no user is logged on, the update is done automatically and the reboot (if necessary) is done
automatically, too.
Note
This service updates itself, when a patch of automatic workstation update is available.
Note
The SAP Automatic Workstation Update Service does not work together with the Single File Installer.
See also Creating and Deploying Single File Installers [page 34].
Prerequisites
The workstation side needs a network connection to the installation source for any update to be possible.
On the installation server side, the following prerequisites must be met:
1. The installation server should be hosted on a machine that can work as a le-server and serve numerous
network sessions.
2. Windows Server 2003 (or equivalent) is recommended as the installation server operating system with the
following ‘Local Security Policy’:
○ “Accounts: Guest account status” – Enabled.
○ “Network Access: Let Everyone permissions apply to anonymous users” - Enabled.
3. The installation server should be created (and hence congured) using NWCreateInstServer.exe.
Procedure
In order to congure automatic workstation update, proceed as follows:
1. Open the administration tool NWSapSetupAdmin.exe.
2. Choose Services Congure automatic update .
SAP Frontend Installation Guide
Preparation
PUBLIC 39

The screen Automatic Workstation Update Congurations appears.
You have now several options:
1. Update re-check frequency
The workstations that will have this feature installed, will poll the installation server at this interval to
check for update availability. The default is 24 hours.
2. Enforce reboot after every update
When this ag is not set, the user is asked to reboot only if it is required to complete the deployment
process. When the ag is set, a reboot is enforced, which means that the user is always asked to
reboot.
3. Additional Update Sources (optional)
You can index additional servers. The update service will then look up the indexed servers per line in
the given order for available updates.
3. Save your entries and close the program.
To make the automatic workstation update service available on workstations, you should create a package
using NWSapSetupAdmin.exe on the installation server. This package should consist of SAP GUI for
Windows and SAP Automatic Workstation Update. Once automatic workstation update is installed, then
the following programs will run on the workstation in the background:
NWSAPSetupUserNotificationTool.exe and NWSAPAutoWorkstationUpdateService.exe.
Note
The front-end side will query the last 10 installation sources that are network paths.
Result
You have congured the SAP Automatic Workstation Update and made it available on the workstations.
40
PUBLIC
SAP Frontend Installation Guide
Preparation

To disable the service, activate the option Disable Automatic Workstation Update in the conguration tool on
the installation server (see picture above). This conguration change is propagated as an update to the
workstations at the time of the next update check.
4.10 Controlling Remote Workstations
Use
The remote workstation control functionality helps you to remotely access and control workstations on which
you have administration privileges.
Prerequisites
● Since this functionality uses the Windows Management Instrumentation (WMI) service, WMI has to be
enabled.
● The rewall should be congured, so that WMI access is not blocked.
● You need to be an administrator on the workstation you want to access. This means, you should have either
domain administrator privileges or local administrator rights for the corresponding machine.
Procedure
In order to control workstations remotely, proceed as follows:
1. Open the administration tool NWSapSetupAdmin.exe.
2. Choose Remote.
You have now several options:
1. Collect remote log les
With this option, you can collect log les from remote workstations. For this, you just have to enter the
workstation name. In case you want to collect log les from several machines, you have to separate the
dierent names by a comma.
Note
Concerning the section Optional - Administrative Credentials: You need to supply administrative
credentials for the workstation only if you are not running this application using the same
credentials. For example, if you are domain administrator and the workstation is not part of your
domain; however, you have local administration rights for the machine. Then you would enter your
local administration credentials here. This data will not be saved.
Finally, you choose Collect to collect the log les from the remote workstations. If you want to stop the
collection process, just press Abort. When the le collection is nished, Windows Explorer opens
automatically the corresponding folder under %temp%\SAPRemoteWksta\.
SAP Frontend Installation Guide
Preparation
PUBLIC 41

2. Execute processes remotely
With this option, you execute processes on a remote workstation. You just have to enter the
workstation name as well as the application name in the appropriate eld. Also, you can supply the
application with the appropriate command line parameter, for example: c:\program files\sap
\sapsetup\setup\nwsapsetup.exe /uninstall /all /silent. Then choose Execute to run
the process on the remote machine.
Note
Start only non-interactive processes with this feature, because WMI will not allow the application
started remotely to interact with the user.
To get a list of running processes, use option Display Running Processes (for details see also paragraph
'Enumerate remote processes' below).
3. Enumerate remote processes
With this option, you get a list of processes running on a remote workstation. Just enter the
workstation name and choose Display. If you want to terminate a process, select the process and
choose Terminate.
Caution
Be careful with the Terminate option, because the user may lose unsaved date.
Troubleshooting
If you encounter problems with the WMI feature, diagnose WMI connectivity to a remote workstation using the
Microsoft tool wbemtest.exe. Note, that you have to supply the connection namespace as \
\WorkstationName\root\cimv2.
Delegation
In order to start an installation on a remote workstation that is located on an installation server, delegation is
required to be activated for the client machine(s) in question. Please, refer to the Microsoft TechNet article at
http://technet.microsoft.com/en-us/library/ee692772.aspx , question 10, for further details.
42
PUBLIC
SAP Frontend Installation Guide
Preparation

5 Installation Process
Purpose
This section provides information about the steps that you have to perform to install your SAP front end.
Prerequisites
You have completed planning Planning [page 17] and preparation Preparation [page 22] before you start the
installation.
Caution
In the event of errors, consult the log les before creating a problem message; see Viewing Log and Error
Files [page 55].
If required, create a problem message in BC-FES-INS and attach these les to the message.
Process Flow
1. You perform the Installation of the SAP Front End [page 43].
2. You perform the required Update of the SAP Frontend [page 48].
5.1 Installation of the SAP Front End
Purpose
This section describes how you install the SAP front-end software.
Process Flow
You have two possibilities to install components on your front end:
SAP Frontend Installation Guide
Installation Process
PUBLIC 43

● Installing Components from an Installation Server [page 44].
● Installing Components Locally from a Distribution Medium [page 47], such as DVD.
5.1.1 Installing Components from an Installation Server
Use
This procedure tells you how to install components from an installation server.
More information on how to install packages from an installation server:
● Installing Packages Congured by the Administrator [page 45]
● Installing Packages Using the Logon Script [page 46]
Prerequisites
● You have already set up an installation server, see Setting Up an Installation Server [page 23].
● The user logged on to the front end must have local administrative privileges.
● If the user does not have local administrative privileges, make sure that local security handling is correctly
congured on the installation server, see Conguring Local Security Handling [page 37].
Procedure
1. Start NWSAPSetup.exe from the SETUP folder on the installation server.
The SAPSetup installation wizard appears.
2. Choose Next.
The product list is displayed. Products that have already been installed are pre-selected.
3. Select the products or SAP front-end components that you want to install or deselect the ones you want to
remove.
Yellow dots indicate changes in the selection list. The green plus next to a product name indicates that this
product will be installed when the user installs the package on his or her workstation.
If you deselect a product in this list that has already been installed, a red minus appears to indicate that
this product is marked for uninstallation.
4. After (de)selection, choose Next.
The installation wizard might prompt you to enter or change information to customize the installation of
the selected products, such as the installation folder.
Note
The default path for installing SAP GUI for Windows is C:\%Program Files%\SAP\FrontEnd, but
you can change this if required.
44
PUBLIC
SAP Frontend Installation Guide
Installation Process
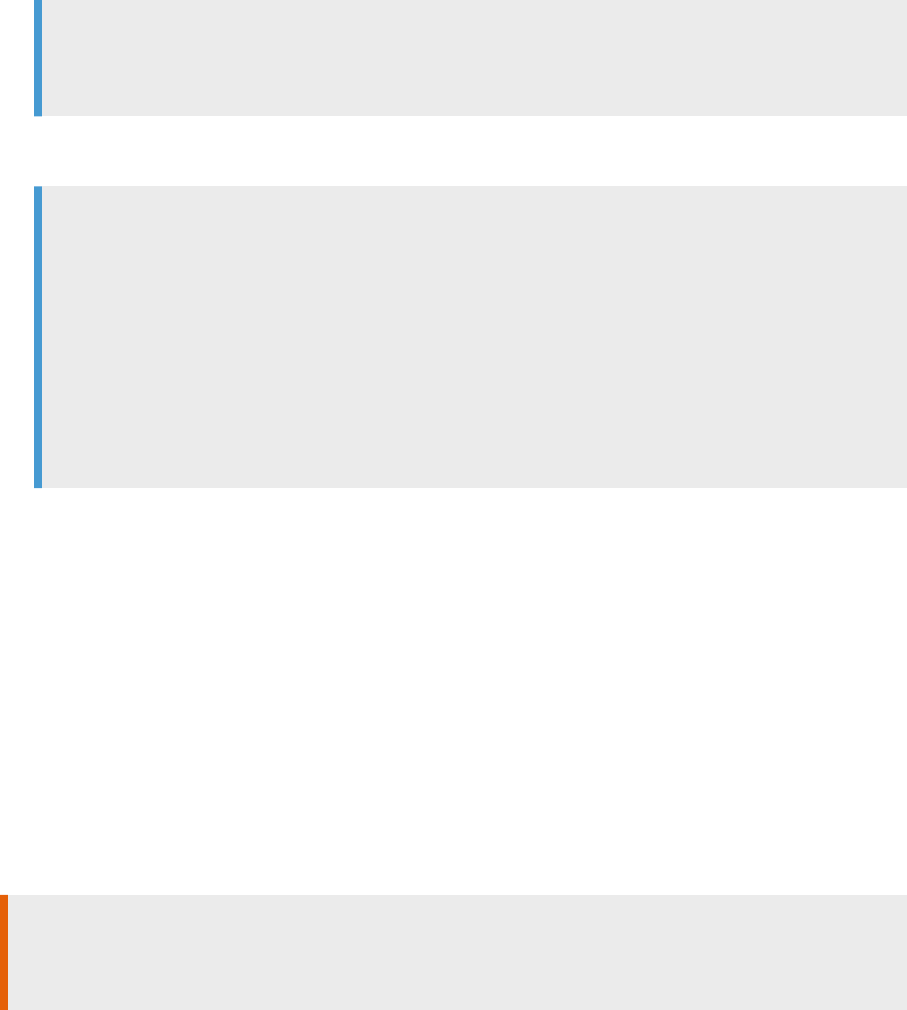
Note
The default path for installing SAP Business Client 7.70 is C:\%Program Files%\SAP\NWBC770, but
you can change this if required.
5. If necessary, change this information and choose Next to start the installation.
The installation starts and a progress screen appears.
Note
Processing is recorded in the following le:
%ProgramFiles%\SAP\SAPetup\Logs\NWSAPSetup.log
If there are errors, you see a link to an Error Report. Errors are recorded in the following le, which you
can view using your normal web browser:
%ProgramFiles%\SAP\SAPSetup\Errors\SAPSetupErrors_<DateTime>.xml
If you have a problem, create a problem message on component BC-FES-INS and attach these les to
the message.
When the update is complete, you see a conrmation screen. Your SAP front-end component is now
successfully congured and ready to use.
5.1.1.1 Installing Packages Congured by the
Administrator
Use
This procedure lets you install or remove packages on your front end that have been congured by the
administrator on the installation server.
Caution
Be careful when removing packages. Make sure you do not mistakenly remove shared components that are
used by other packages you want to keep.
Prerequisites
● You have already set up an installation server, see Setting Up an Installation Server [page 23].
● The user logged on to the front end must have local administrative privileges.
● If the user does not have local administrative privileges, make sure that local security handling is correctly
congured on the installation server, see also Conguring Local Security Handling [page 37].
● The administrator has created packages using NWSAPSetupAdmin for deployment on the front end.
SAP Frontend Installation Guide
Installation Process
PUBLIC 45

Procedure
1. Start NWSAPSetup.exe /package from the SETUP folder of the installation server or distribution
medium.
A list of the packages that the user is authorized to install or uninstall is displayed. Packages that have
already been installed are pre-selected. In the following case, the package Hospital Planning Package
is already installed on the workstation.
2. Select the components or packages that you want to install or deselect the ones you want to remove.
The yellow dot indicates a change in the selection list. The green plus next to the product name indicates
that this object will be installed when the user installs the package on his or her workstation. If you
deselected a package, you would see a red minus next to the object selected for de-installation.
3. After (de)selection, choose Next.
NWSAPSetup now processes the packages and displays the completion status when nished.
Note
If errors occur during the installation, SAPSetup displays a link to a document in which the errors have
been logged. Contact the administrator of the installation server or the network and pass on the
information given in this document.
5.1.1.2 Installing Packages Using the Logon Script
Use
Since the front-end software is normally installed on a large number of computers, NWSAPSetup lets you
automate this task.
By inserting a command line into the logon scripts of the computers on which the front-end software is to be
installed, you can start a package installation each time the user logs on.
Prerequisites
Make sure that the front-end software (especially SAP GUI) is not running when you perform the procedure
below because program les in use might cause a reboot.
Procedure
Enter the following command (both the path and either the package name or unique package identier must be
used):
\\<server>\<shared folder>\setup\NWSAPSetup.exe /package:“<package command-line
name>“ /silent
46
PUBLIC
SAP Frontend Installation Guide
Installation Process

Note
You can also call NWSAPSetupAdmin.exe in the same way to perform this task.
When you start this command for the rst time on a computer, NWSAPSetup installs the specied package.
For a list of options, see Command-Line Parameters [page 55].
5.1.2 Installing Components Locally from a Distribution
Medium
Use
This procedure installs SAP front-end software components on a single computer from a distribution medium
such as a DVD.
Prerequisites
The user logged on to the front end must have local administrative privileges.
Procedure
1. In folder Gui\Windows\Win32 on the Presentation DVD, start SAPGUISetup.exe to install SAP GUI for
Windows. To install SAP Business Client, start SapNwBcSetup.exe.
The SAPSetup installation wizard appears, showing you a list of components that are part of the product
SAP GUI for Windows.
Note
To view and optionally install all products – that is, SAP front-end components available on the
installation medium including SAP GUI and others (the Presentation DVD contains SAP GUI for
Windows and SAP BI front end as well as other components that can be integrated on an individual
basis) – use
SetUpAll.exe.
2. Choose Next.
A list with (de)selectable products is displayed.
Products that have already been installed are pre-selected.
3. Select the products or SAP front-end components that you want to install or deselect the ones you want to
remove.
Changes in the selection list are indicated by a yellow dot. If you select a product for installation, you will
see a green plus next to the product to install. If you select a product for de-installation, a red minus
appears.
SAP Frontend Installation Guide
Installation Process
PUBLIC 47

4. Choose Next.
The installation wizard might prompt you to enter or change information to customize the installation of
the selected products, such as the installation folder.
Note
The default path for installing SAP GUI for Windows is %ProgramFiles(x86)%\SAP\Frontend, but
you can change this if required.
Note
The default path for installing SAP Business Client 7.70 is C:\%Program Files%\SAP\NWBC770, but
you can change this if required.
5. If necessary, change this information and choose Next to start the installation.
The installation starts and you see a progress screen.
Note
Processing is recorded in the following le:
%ProgramFiles%\SAP\SAPetup\Logs\NWSAPSetup.log
If there are errors, you see a link to an Error Report. Errors are recorded in the following le, which you
can view using your normal web browser:
%ProgramFiles%\SAP\SAPSetup\Errors\SAPSetupErrors_<DateTime>.xml
If you have a problem, create a problem message on component BC-FES-INS and attach these les to
the message.
When the update is complete, you see a conrmation screen. Your SAP front-end component is now
successfully congured and ready to use.
5.2 Update of the SAP Frontend
Purpose
This section describes how you update the installed front ends when a newer version is available as a patch
either on the installation server or on a distribution medium (such as a DVD).
Note
As of release 7.60, patches for SAP GUI for Windows contain the complete set of les required for SAP GUI
for Windows. Therefore, you can upgrade to release 7.60 by just applying a patch to your existing
installation.
Prior to release 7.60 you rst had to start the installation of the new release using the SAP GUI version
delivered on the Presentation DVD and afterwards you could use patches to update SAP GUI for Windows.
48
PUBLIC
SAP Frontend Installation Guide
Installation Process

However, if you are not doing the upgrade via the Presentation DVD, you should upgrade all SAP Frontend
products you are using by applying the individual patches for these products. This ensures that you are
running a fully consistent setup in which all components t together.
Process Flow
You can update the SAP front end in one of the following ways:
Updating the Front End from an Installation Server [page 49]
Patching a Standalone Front End [page 50]
5.2.1 Updating the Front End from an Installation Server
Use
You can update the front end from an installation server.
Procedure
Updating the front end basically involves the same steps as an installation, see section Installing Components
from an Installation Server [page 44] [page 48].
You have the possibility to have the update run unattendedly or automatically:
● For unattended update, use the following command line:
\\<server_path>\setup\NWSAPSETUP.exe /UPDATE /silent
Note
To update a specic package or product, add:
/package="package command-line name"
Or
/product="product command-line name"
You will nd the command-line name of the package or product in the administrative console
NWSAPSetupAdmin.exe.
● For automatic update, you can use the SAP Automatic Workstation Update. Whenever the installation
server is patched, or the packages installed are updated, this service will update the workstation(s) and
reboot them if necessary. The workstation updater works in two modes - one in the presence of a logged-
on user and another in his or her absence
SAP Frontend Installation Guide
Installation Process
PUBLIC 49

○ When a user is logged on, the user is informed of update availability and the update happens on the
user's assent. The user is also informed if a reboot is necessary and the reboot is also only executed on
the user's assent.
○ If no user is logged on, the update is done automatically and the reboot (if necessary) is done
automatically, too.
The SAP Automatic Workstation Update is not SAP GUI-specic, it works with all components available on
the installation server. For details, see section Conguring SAP Automatic Workstation Update [page 38].
5.2.2 Patching a Standalone Front End
You can update a standalone front end by running a patch on it. Updating involves the same steps as an
installation.
More information: Installation of the SAP Front End [page 43]
Note
We recommend Updating the Front End from an Installation Server [page 49] instead of updating individual
front ends by running a patch.
5.3 Upgrade of the SAP Front End
This section describes how to upgrade SAP GUI for Windows to a new major version.
5.3.1 Upgrading an Installation Server
To migrate an existing Front-End Installation server that is based on release 7.20 or newer to a newer
compilation or release, proceed as follows:
1. Download the new compilation CD or DVD.
2. Create a copy of your existing installation server for fallback purposes.
3. Extract the downloaded CD or DVD to a folder of your choice.
4. In the extracted media, browse to the folder GUI\WINDOWS\WIN32\setup and start
NwUpdateInstServer.exe from that folder.
5. On the rst wizard page, choose Next on the rst wizard page.
6. On the next wizard page, choose Browse, navigate to the shared folder of the Front-End Installation Server
to be upgraded, select that folder and then conrm the browse dialog.
7. Choose Verify and then Next in case of a verication success.
The upgrade starts now and the progress bar of the wizard informs you about the progress of the upgrade.
8. Start NwSapSetupAdmin.exe of the upgraded installation server and nd your packages in the Packages
tab. Mark your package with the right mouse button and choose Congure Properties. In the Congure
Packages tab, click on the link Change Package Content. Some components of your old selection might be
50
PUBLIC
SAP Frontend Installation Guide
Installation Process

unselected because they were moved in the product hierarchy. Mark them as selected. Then save the
package.
9. Test whether the new package updates existing clients successfully.
5.3.2 Upgrading a Standalone Front End
To upgrade a standalone version of SAP GUI for Windows to a new major release, follow the steps described in
chapter Installing Components Locally from a Distribution Medium [page 47].
Note
As of release 7.60, patches for SAP GUI for Windows contain the complete set of les required for the
following products:
● SAP GUI for Windows <release>
● i.s.h.med Planning Grid
● SAP Automatic Workstation Update
● Calendar Synchronization for Microsoft Outlook
● 64Bit RFC Controls (as of SAP GUI for Windows 7.70)
● SAP PDFPRINT for SAP GUI 7.70
If you are updating a local installation with a patch and are using the parameter /silent (see also
Command-Line Parameters [page 55]), you should consider also using the parameter /update or /
product:<PRODUCTS YOU WOULD LIKE TO UPDATE>.
Without these parameters, the patch will install all the products mentioned above, even if some of them
have not been installed before.
Note
Separate patches are available for:
● BI 7.0 AddOn for SAP GUI 7.70
● KW AddOn for SAP GUI 7.70
● SAPSPrint 7.70
● SAP Interactive Excel 3.0
● Screen Reader Extension
● SAP Business Client 7.70
● SNC Client Encryption
SAP Frontend Installation Guide
Installation Process
PUBLIC 51
6 Additional Information
The following sections are optional and provide additional information:
● Removing an Installation Server [page 52]
● Uninstalling the SAP Front End [page 52]
● FAQs [page 53]
● Diagnosing Front-End Software Installations using NWCheckWorkstation [page 54]
● Repairing Front-End Software Installations using NWSAPSetup [page 54]
● Viewing Log and Error Files [page 55]
● Command-Line Parameters [page 55]
● Return Codes [page 59]
● Component List [page 60]
6.1 Removing an Installation Server
Use
You can remove an installation server if it is no longer needed.
Procedure
1. If local security handling is congured, (seeConguring Local Security Handling [page 37]), start
NWSAPSetupAdmin.exe and stop it using the Services menu.
2. First, unshare the folder so that the installation server is not available to front ends on the network.
3. Delete the folder from the le system using the Windows explorer.
6.2 Uninstalling the SAP Front End
Prerequisites
Make sure that SAP GUI for Windows and/or SAP Business Client are not running at uninstall time. If an
application is running during the uninstallation, the user is prompted to reboot afterwards.
52
PUBLIC
SAP Frontend Installation Guide
Additional Information

Procedure
1. Choose Start Settings Control Panel Add or Remove Programs .
A list of the installed applications appears.
2. Select the installed version of SAP GUI for Windows or SAP Business Client.
3. Choose Remove.
4. Choose Next.
Result
The component is uninstalled and a log le is generated.
Note
To ensure the upgrade possiblity, the product name of the SAP GUI for Windows is SAPGUI.
Note
To perform silent, unattended uninstallation, enter the following commands:
NWSAPSetup.exe /Product=”<product name>” /Silent /Uninstall for uninstalling a certain
product, for example SAPGUI.
NWSAPSetup.exe /all /Silent /Uninstall for uninstalling all SAP components installed by
SAPSetup without having to call specic command-lines for specic products.
You nd more information on this in section Command-Line Parameters [page 55].
6.3 FAQs
You can nd FAQs for the server and the client part of NetWeaver SAP Setup either from the DVD, from the
installation directory, or in the system documentation of the NetWeaver SAPSetup Server Installation
Administration Tool (NWSAPSetup.exe) choosing Help SAP Installation Server Help .
The FAQs for the server can be found under SAP Installation Server Help Troubleshooting and FAQs .
The FAQs for the client can be found under SAP Front-End Installer Help Troubleshooting and FAQs .
SAP Frontend Installation Guide
Additional Information
PUBLIC 53

6.4 Diagnosing Front-End Software Installations using
NWCheckWorkstation
To diagnose a workstation containing installed SAP components, start NWCheckWorkstation.exe from
either the SETUP directory of the Installation Server or from the SETUP directory of the workstation
(
%PROGRAMFILES%\SAP\SAPSetup\Setup), and follow the wizard. You will be presented with a report on
completion of the check process.
NWCheckWorkstation veries the installation of SAP front-end components by checking for discrepancies in
les, services, registry-keys, and other artifacts deployed using NWSAPSetup.
The workstation check tool will collect critical installation les and compress them into a cabinet archive. This
CAB-File will be presented to the user after the completion of the process, and can be supplied to SAP support
sta when reporting installation issues - for quicker diagnosis.
6.5 Repairing Front-End Software Installations using
NWSAPSetup
To repair a workstation containing installed SAP components, start NWSAPSetup.exe from the SETUP
directory of the Installation Server. NWSAPSetup.exe has to be called from the command line with /repair.
NWSAPSetup /repair checks for discrepancies in les, services, registry-keys, and other artifacts deployed
using NWSAPSetup and repairs the installation of SAP front-end components based on the outcome of these
checks.
Note
The repair process includes an update of all Front End components as described in chapter Updating the
Front End from an Installation Server [page 49]. If the version of a component on the installation server is
higher than of the component installed on the workstation, then this component will be udpated.
When the repair process starts, a progress screen appears. Processing is recorded in the following le:
%ProgramFiles%\SAP\SAPetup\Logs\NWSAPSetup.log
If there are errors, you see a link to an Error Report. Errors are recorded in the following le, which you can view
using your normal web browser:
%ProgramFiles%\SAP\SAPSetup\Errors\SAPSetupErrors_<DateTime>.xml
If you have a problem, create a problem message on component BC-FES-INS and attach these les to the
message.
When the repair process is complete, you see a conrmation screen. Your SAP front-end components are now
successfully repaired and ready to use.
54
PUBLIC
SAP Frontend Installation Guide
Additional Information

6.6 Viewing Log and Error Files
Log Files
All the installation tools described in this document maintain an activity record in log les that you can nd
here:
%ProgramFiles%\SAP\SAPSetup\Logs
Each tool stores the last twenty log les.
Error Files
Errors are stored in an XML format in les that you can view in any browser and you can nd in the following
folder:
%ProgramFiles%\SAP\SAPSetup\Errors
If you have a problem, create a problem message in BC-FES-INS and attach the relevant log les to the
message.
Log and Error Files for each Tool
Tool Log File Error File
NWCreateInstServer.exe NWCreateInstServer.log NwCreateInstServerErrors_<
DateTime>.xml
NWUpdateInstServer.exe NWUpdateInstServer.log NwUpdateInstServerErrors_<
DateTime>.xml
NWSAPSetupAdmin.exe NwSAPSetupAdmin.log NWSAPSetupAdminErrors_<Dat
eTime>.xml
NWSAPSetup.exe NWSAPSetup.log
SAPSetupErrors_<DateTime>.
xml
6.7 Command-Line Parameters
In this section, you nd two tables with command line parameters:
SAP Frontend Installation Guide
Additional Information
PUBLIC 55

● for installation server creation and update
● for frontend installation and update
Installation Server Creation and Update Command Line Parameters
NWCreateInstServer/ NWUpateInstServer Parameter Description
/Dest
Use this parameter to supply the destination folder where
you wish to create your installation server.
Sample: /Dest=”C:\MyInstServerPath”
/noDlg
Shows only the progress dialog
Displays no other user interface. You can use it instead
of
/silent, if you wish to see progress.
Caution
If using /noDlg, you need to supply the destination
server path via /Dest.
/silent
Displays no user interface – not even progress
Caution
If using /silent, you need to supply the destination
server path via /Dest.
/DontConfigureServerPath
Disables the automatic installation source folder congura-
tion (network share creation and null-session accessibility).
Tip
You can use command-line parameters to automatically replicate your (master) installation server across
multiple locations.
Front-End Installation and Update Command Line Parameters
You can call NWSAPSetup.exe with the command-line parameters listed below.
56
PUBLIC
SAP Frontend Installation Guide
Additional Information

NWSAPSetup Parameter Description
/package:["<package command-line name>"]
[/silent] [/uninstall] [/update]
Displays the wizard that lets you choose packages
Note
You cannot switch to Product View.
/Product:["<product command-line name>"]
[/uninstall] [/silent] [/update]
● If no product name is supplied, this command line pa
rameter enables a view of available products and prod
ucts that have already been installed.
● If a product name is supplied, the installer displays in
formation about the supplied product only.
Note
You cannot switch to Package View.
/ForceWindowsRestart
Restarts the workstation automatically when the installation
is done.
Use in combination with package and product af
ter
/silent or /nodlg.
Example:
<installation source>\setup
\nwsapsetup.exe /silent /product="SAPGUI
" /ForceWindowsRestart
/noDlg
Shows only the progress dialog
Displays no other user interface. You can use it instead
of
/silent.
Caution
If using /noDlg, you need to specify a product name or
package name.
/silent
Displays no user interface – not even progress
Caution
If using /silent, you need to specify a product name
or package name.
SAP Frontend Installation Guide
Additional Information
PUBLIC 57

NWSAPSetup Parameter Description
/SMS:["<package command-line name>"]
[/noDlg] [/silent] [/uninstall]
Creates a status le (Package Name.MIF) in the %TEMP
% folder that indicates the success or failure of the package
installation, or uninstallation.
Typically used by software distribution systems such as SMS
to determine the success or failure of a remote installation
(advertised package installation).
/uninstall
Uninstalls components that belong to a specied product or
a package
This command-line parameter is valid only together with one
of the following:
/Product=”Product Command-Line Name”
/Package=”Package Command-Line Name”
/all for uninstalling all SAP components installed by SAP
Setup; works only when supplied with /nodlg or /silent
/update
Updates components present in a newer version on the in
stallation server due to a patch.
To update a specic product or package, supply an addi
tional parameter:
/Product="Product Command-Line Name"
or
/Package="Package Command-Line Name"
You can install multiple products using a single command with the + operator, as shown in the following
example:
\\ServerName\ShareName\Setup\NwSAPSetup.exe /Product=”SAPGUI+SAPBI” /NoDlg
Product Command Line Names
The following table lists the command line names of the products delivered on Presentation CD 1. These
command line names can be used with NwSapSetup.exe in the command line when installing in product
mode.
Product Command Line Name
Business Explorer
SapBI
58 PUBLIC
SAP Frontend Installation Guide
Additional Information

Product Command Line Name
Calendar Synchronization for Microsoft Outlook
CALSYNC
i.s.h.med Planning Grid
GUIISHMED
KW-Add-On for SAP GUI 7.70
KW
SAP Automatic Workstation Update
SAPWUS
SAP Business Client 7.70
NWBC770
SAP GUI for Windows 7.70
SAPGUI
SAP GUI Screen Reader Extension for JAWS
SRX
SAP Interactive Excel
AXL
SAP PDFPRINT for SAP GUI 7.70
PdfPrintGui
SAP Secure Login Client
SLC
Caution
If you have both SAP Secure Login Client (SLC) and SAP
SNC Client Encryption (SCE) installed and want to unin
stall only one of the two products, read SAP note
2220853 before doing so.
SNC Client Encryption
SCE
Caution
If you have both SAP Secure Login Client (SLC) and SAP
SNC Client Encryption (SCE) installed and want to unin
stall only one of the two products, read SAP note
2220853 before doing so.
64Bit RFC Controls
RFC64
6.8 Return Codes
If you start NwSapSetup.exe from a batch le, the return code can be caught by the %ErrorLevel%
environment variable.
Example
<Path to your installation source>\setup\NwSAPsetup.exe /package="<Name of your
Installation package>" /silent echo %ErrorLevel%
SAP Frontend Installation Guide
Additional Information
PUBLIC 59

The following table gives an overview of the return codes for NwSapSetup.exe and their descriptions:
Return Code Description
0 Process ended without any errors detected.
48 General Failure
67 Installation is canceled by the user.
68 Invalid patch
69 Installation engine registration failed.
70 Invalid XML Files
129 Reboot is recommended.
130 Reboot was forced.
144 Error report has been created.
145 Error report has been created and reboot is recommended.
146 Error report has been created and reboot is forced.
Note
In case of return codes 144-146, have a look at the error and log le for NwSapSetup.exe as described in
section Viewing Log and Error Files [page 55].
6.9 Component List
The component list describes the features and functions of the selectable components, and the prerequisites
for using them. The components are grouped under component groups.
60
PUBLIC
SAP Frontend Installation Guide
Additional Information

List of Component Groups / Top Level Components
Group Description
SAP GUI for Windows 7.70 Installs SAP GUI for Windows 7.70 including related compo
nents. SAP GUI for Windows is SAP's universal client on Mi
crosoft Windows platforms for accessing SAP functionality.
SAP GUI functions like a browser. It gets information from
the SAP system like the following: Which contents to display
in its window as well as where, when, and how.
SAP Business Client 7.70 Installs the SAP Business Client 7.70
SAP GUI Suite SAP GUI for Windows along with all essential sub-compo
nents
R/3 Add-On Front-end add-on for SAP R/3 Enterprise
This package contains application extensions that are
needed for some R/3 transactions.
KW Add-On Front-end add-on for SAP Knowledge Workhouse. This pack
age contains components to create, edit, translate and dis
play content.
SCM Add-On Front-end add-on for of SAP Supply Chain Management
(SCM)
i.s.h.med Planning Grid The i.s.h.med Planning Grid is the graphics-based tool for
planning appointments in the clinical system i.s.h.med. This
component contains the current planning grid version as of
SAP ECC 6.0, Industry Extension Healthcare, Enhancement
Package 4. Its installation requires the Java Runtime Envi
ronment to be installed on the machine. For more informa
tion, see SAP note
1013957 .
SAP Screenreader Extensions (SRX) SAP GUI Screen Reader Extensions (SRX) enable the use of
SAP GUI together with the screen reader program Jaws for
Windows. The Extensions are Jaws-based scripts that make
the SAP GUI accessible via the SAP GUI object model.
The prerequisites for SRX are as follows:
● Freedom Scientic JAWS is installed in a supported ver
sion (see also SAP note
755545 )
● SAP GUI is installed or will be installed
SAP Frontend Installation Guide
Additional Information
PUBLIC 61

Group Description
SAP PDFPRINT for SAP GUI 7.70
To be able to print Interactive Forms (previously known as
PDF-based forms) on a printer with any device type, you can
additionally install the component SAP PDFPRINT.
SAP PDFPRINT allows you to address any printer when
printing Interactive Forms, in a similar way to using SAPWIN-
based device types. See SAP Note
2775797 for more in
formation.
SAP Automatic Workstation Update The Automatic Workstation Update works only when instal
led on the workstation. Whenever the installation server is
patched, or the packages installed are updated, this service
will update the workstation(s) and reboot them if necessary.
The workstation updater works in two modes - one in the
presence of a logged-on user and another in his absence:
● When a user is logged on, the user is informed of update
availability and the update happens on the user's as
sent. The user is also informed if a reboot is necessary
and the reboot is also only executed on the user's as
sent.
● If no user is logged on, the update is done automatically
and the reboot (if necessary) is done automatically, too.
SNC Client Encryption SNC Client Encryption is an optional feature of SAP GUI and
SAP NetWeaver technology platform. It enables users to pro
tect communication between SAP GUI for Windows and SAP
NetWeaver Application Server (AS) ABAP. The component
also enables encryption for RFC clients, such as BEx Query
Designer.
Calendar Synchronization for Microsoft Outlook Outlook client extension for the synchronization of SAPoce
calendar with the Outlook calendar .
The prerequisites for using the calendar synchronization are
as follows:
● Microsoft Outlook 2010 32bit, 2013 32bit or 2016 32bit
● Microsoft VSTO 2010 for .NET 4.0; see https://
www.microsoft.com/en-us/download/details.aspx?
id=48217
● Microsoft .NET 4.5.2 or later; see https://www.micro
soft.com/net/download/dotnet-framework-runtime/
net452
62 PUBLIC
SAP Frontend Installation Guide
Additional Information

Group Description
Business Explorer The Business Explorer is the SAP Business Information
Warehouse component that provides exible reporting and
analysis tools for strategic analyses and decision-making
support within a company. These tools include query, report
ing, and analysis functions.
You can perform a local installation of the Business Explorer
by running
SAPBISetup.exe from the PRES1\GUI
\WINDOWS\WIN32 subfolder of the Presentation DVD. You
can also import “Business Explorer” to an installation server
and dene your own packages to include this product.
The Business Explorer tree node also contains the OLE DB
for OLAP clients to connect to SAP NetWeaver Business In
telligence (BI).
SAP Interactive Excel Module FI or EC: Add-on to Microsoft Excel for creating re
ports in Microsoft Excel using data from FI-LC or EC-CS con
solidation
Excel sheets can be lled with data from the SAP system or
the Remote Data Entry tools for FI-LC and EC-CS. It can be
used for data entry into the FI-LC or EC-CS Remote Data En
try tool.
See also SAP note 1844598 .
64Bit RFC Controls
The 64bit RFC Controls (both non-Unicode and Unicode) are
used for external access to data within SAP Systems without
SAP GUI. They are accessible for example from Visual Basic
for Applications via COM Interface. In previous SAP GUI re
leases, these controls only existed in 32bit versions which
causes trouble when the controls are used from 64bit proc
esses like Microsoft Oce. The new installation component
64Bit RFC Controls solves this issue. See SAP Note 2724656
for more information.
The 64Bit RFC Controls can be installed in addition to the
32bit RFC Controls which are part of the SAP GUI Suite com
ponent group.
SAP Frontend Installation Guide
Additional Information
PUBLIC 63
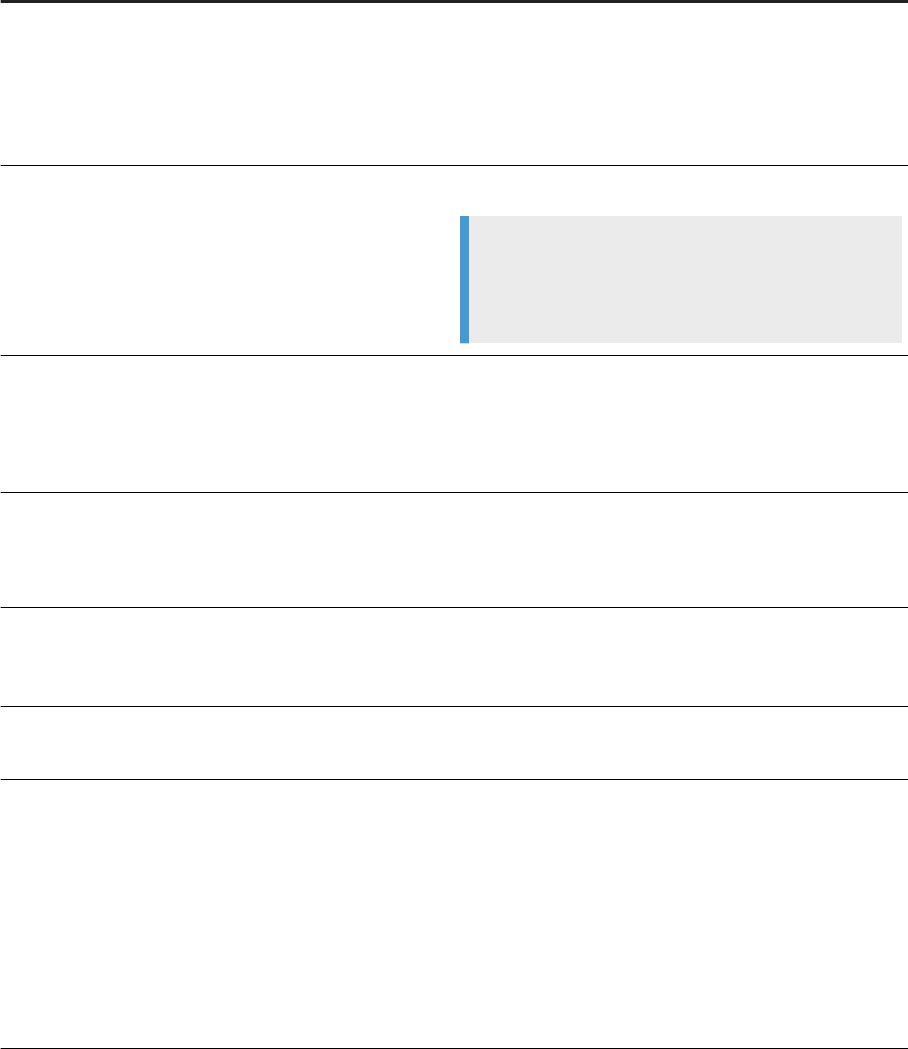
List of Available Components
SAP GUI Suite
Component Description
SAP GUI SAP graphical front end with starter application SAP Logon
Pad
The user can only display precongured connection informa
tion for SAP systems provided by the administrator (see
documentation for details).
SAP Logon Pad Desktop and Start menu shortcuts for SAP Logon Pad
Note
The functionality of SAP Logon Pad is fully contained in
SAP Logon. Therefore these shortcuts are only created
if SAP Logon is not selected.
SAP Logon Extended starter application SAP Logon with desktop and
Start menu shortcuts
The user can display and modify connection information for
SAP systems.
SAP GUI Scripting SAP GUI scripting interface
More information: SAP_GUI_Scripting_API.pdf
from the PRES1/DOCU folder on the Presentation DVD
SAP GUI Documentation
HTML-based SAP GUI documentation for end users and SAP
GUI Scripting API documentation. If this component is not
installed, the online help from help.sap.com is used instead.
GUI XT SAP GUI extensions for client side customizing of SAP Dyn
pro screens
32bit Unicode RFC Libraries Unicode RFC libraries for software developers
Supports Unicode and non-Unicode communication part
ners
Accessible from Visual Basic through COM Interface
These are the 32bit Unicode versions of the controls con
tained in component group 64bit RFC controls (see also sec
tion List of Component Groups / Top Level Components
above). The 32bit non-Unicode versions of the same con
trols are contained in the SAP GUI Suite component group.
64 PUBLIC
SAP Frontend Installation Guide
Additional Information

R/3 Add-On
Component Description
EH&S WWI Module EH&S: Windows Word Processor Integration
Report tool for SAP PLM Environment, Health and Safety to
generate reports such as material safety data sheets and la
bels
RTF Viewer required
Visual Conguration Tool
With the Visual Conguration Tool (VCT), it is possible to
carry out the conguration of screen sequences and screens
with drag and drop in BDT (transaction BUCO).
SCM Add-On
Component Description
SCM Front End Front-end add-on of SAP Supply Chain Management (SCM)
Business Explorer
Component
Description
Business Exlorer with OLE DB for OLAP Provider The Business Explorer is the SAP Business Information
Warehouse component that provides exible reporting and
analysis tools for strategic analyses and decision-making
support within a company. These tools include query, report
ing, and analysis functions.
The Business Explorer tree node also contains the OLE DB
for OLAP clients to connect to SAP NetWeaver Business In
telligence (BI).
KW Add-On for SAP GUI
Component Description
KW Online Editing Knowledge Warehouse Editing within SAP GUI
Requires Microsoft Internet Explorer 5 or higher
KW Translator Knowledge Warehouse Translator:
Translation tool to process translation packages oine
Requires Microsoft Internet Explorer 5 or higher
KW HTML Editor
Allows creating and editing HTML documents in SAP GUI for
area HTML-Based Documents. This is an alternative to the
old component Html Pad which allows creating and editing
HTML documents within Knowledge Workbench (KWB)
SAP Frontend Installation Guide
Additional Information
PUBLIC 65

SAP Business Client 7.70
Component Description
SAP BC (former NWBC) User interface (UI) that presents a single entry point to dif
ferent SAP business applications and technologies. It is a
high-delity shell that integrates various UI technologies and
design generations aimed at a more ecient, intuitive, and
complete user experience over dierent UI technologies.You
nd more information on the
SAP BC Community page .
Chromium for SAP Business Client 7.70
With this component it is possible to use the open source
framework Chromium instead of Microsoft Internet Explorer
within SAP Business Client 7.70 for rendering HTML content.
SCN Client Encryption
Component Description
SNC Client Encryption Is an optional feature of SAP GUI and SAP NetWeaver tech
nology plattform. It enables users to protect communication
between SAP GUI for Windows and SAP NetWeaver Applica
tion Server (AS) ABAP. The component also enables encryp
tion for RFC clients, such as BEx Query Designer.
SAP GUI Screen Reader Extensions for JAWS
Component
Description
Accessibility settings for SAP GUI This component applies typical settings required for using
SAP GUI for Windows together with a screenreader. One of
these settings is to activate the SAP GUI Accessibility mode
by default.
66 PUBLIC
SAP Frontend Installation Guide
Additional Information
7 Appendix
7.1 Copyright Notices for Included 3rd Party Components
Copyright Notices for the WebView2Loader.dll
Copyright (C) Microsoft Corporation. All rights reserved.
Redistribution and use in source and binary forms, with or without modication, are permitted provided that
the following conditions are met:
* Redistributions of source code must retain the above copyright notice, this list of conditions and the following
disclaimer.
* Redistributions in binary form must reproduce the above copyright notice, this list of conditions and the
following disclaimer in the documentation and/or other materials provided with the distribution.
* The name of Microsoft Corporation, or the names of its contributors may not be used to endorse or promote
products derived from this software without specic prior written permission.
THIS SOFTWARE IS PROVIDED BY THE COPYRIGHT HOLDERS AND CONTRIBUTORS "AS IS" AND ANY
EXPRESS OR IMPLIED WARRANTIES, INCLUDING, BUT NOT LIMITED TO, THE IMPLIED WARRANTIES OF
MERCHANTABILITY AND FITNESS FOR A PARTICULAR PURPOSE ARE DISCLAIMED. IN NO EVENT SHALL
THE COPYRIGHT OWNER OR CONTRIBUTORS BE LIABLE FOR ANY DIRECT, INDIRECT, INCIDENTAL,
SPECIAL, EXEMPLARY, OR CONSEQUENTIAL DAMAGES (INCLUDING, BUT NOT LIMITED TO, PROCUREMENT
OF SUBSTITUTE GOODS OR SERVICES; LOSS OF USE, DATA, OR PROFITS; OR BUSINESS INTERRUPTION)
HOWEVER CAUSED AND ON ANY THEORY OF LIABILITY, WHETHER IN CONTRACT, STRICT LIABILITY, OR
TORT (INCLUDING NEGLIGENCE OR OTHERWISE) ARISING IN ANY WAY OUT OF THE USE OF THIS
SOFTWARE, EVEN IF ADVISED OF THE POSSIBILITY OF SUCH DAMAGE.
SAP Frontend Installation Guide
Appendix
PUBLIC 67

Important Disclaimers and Legal Information
Hyperlinks
Some links are classied by an icon and/or a mouseover text. These links provide additional information.
About the icons:
● Links with the icon : You are entering a Web site that is not hosted by SAP. By using such links, you agree (unless expressly stated otherwise in your
agreements with SAP) to this:
● The content of the linked-to site is not SAP documentation. You may not infer any product claims against SAP based on this information.
● SAP does not agree or disagree with the content on the linked-to site, nor does SAP warrant the availability and correctness. SAP shall not be liable for any
damages caused by the use of such content unless damages have been caused by SAP's gross negligence or willful misconduct.
● Links with the icon : You are leaving the documentation for that particular SAP product or service and are entering a SAP-hosted Web site. By using such
links, you agree that (unless expressly stated otherwise in your agreements with SAP) you may not infer any product claims against SAP based on this
information.
Videos Hosted on External Platforms
Some videos may point to third-party video hosting platforms. SAP cannot guarantee the future availability of videos stored on these platforms. Furthermore, any
advertisements or other content hosted on these platforms (for example, suggested videos or by navigating to other videos hosted on the same site), are not within
the control or responsibility of SAP.
Beta and Other Experimental Features
Experimental features are not part of the ocially delivered scope that SAP guarantees for future releases. This means that experimental features may be changed by
SAP at any time for any reason without notice. Experimental features are not for productive use. You may not demonstrate, test, examine, evaluate or otherwise use
the experimental features in a live operating environment or with data that has not been suciently backed up.
The purpose of experimental features is to get feedback early on, allowing customers and partners to inuence the future product accordingly. By providing your
feedback (e.g. in the SAP Community), you accept that intellectual property rights of the contributions or derivative works shall remain the exclusive property of SAP.
Example Code
Any software coding and/or code snippets are examples. They are not for productive use. The example code is only intended to better explain and visualize the syntax
and phrasing rules. SAP does not warrant the correctness and completeness of the example code. SAP shall not be liable for errors or damages caused by the use of
example code unless damages have been caused by SAP's gross negligence or willful misconduct.
Gender-Related Language
We try not to use gender-specic word forms and formulations. As appropriate for context and readability, SAP may use masculine word forms to refer to all genders.
68
PUBLIC
SAP Frontend Installation Guide
Important Disclaimers and Legal Information
SAP Frontend Installation Guide
Important Disclaimers and Legal Information
PUBLIC 69

www.sap.com/contactsap
© 2020 SAP SE or an SAP aliate company. All rights reserved.
No part of this publication may be reproduced or transmitted in any form
or for any purpose without the express permission of SAP SE or an SAP
aliate company. The information contained herein may be changed
without prior notice.
Some software products marketed by SAP SE and its distributors
contain proprietary software components of other software vendors.
National product specications may vary.
These materials are provided by SAP SE or an SAP aliate company for
informational purposes only, without representation or warranty of any
kind, and SAP or its aliated companies shall not be liable for errors or
omissions with respect to the materials. The only warranties for SAP or
SAP aliate company products and services are those that are set forth
in the express warranty statements accompanying such products and
services, if any. Nothing herein should be construed as constituting an
additional warranty.
SAP and other SAP products and services mentioned herein as well as
their respective logos are trademarks or registered trademarks of SAP
SE (or an SAP aliate company) in Germany and other countries. All
other product and service names mentioned are the trademarks of their
respective companies.
Please see https://www.sap.com/about/legal/trademark.html for
additional trademark information and notices.
THE BEST RUN
