
Oracle® Database
Database Net Services Administrator's Guide
21c
F31801-06
February 2024
Oracle Database Database Net Services Administrator's Guide, 21c
F31801-06
Copyright © 2002, 2024, Oracle and/or its affiliates.
Primary Author: Binika Kumar
Contributing Authors: Doug Williams, Prakash Jashnani
Contributors: Abhishek Dadhich, Alan Williams, Anita Patel, Bhaskar Mathur, David Lin, Feroz Khan, Kant
Patel, Kevin Neel, Krishna Itikarlapalli, Misaki Miyashita, Murali Purayathu, Norman Woo, Robert Achacoso,
Santanu Datta, Saravanakumar Ramasubramanian, Sarma Namuduri, Scot McKinley, Sharad Chandran R,
Srinivas Pamu, Steve Ding, Sudeep Reguna, Thanigai Nallathambi, Yi Ouyang
This software and related documentation are provided under a license agreement containing restrictions on
use and disclosure and are protected by intellectual property laws. Except as expressly permitted in your
license agreement or allowed by law, you may not use, copy, reproduce, translate, broadcast, modify, license,
transmit, distribute, exhibit, perform, publish, or display any part, in any form, or by any means. Reverse
engineering, disassembly, or decompilation of this software, unless required by law for interoperability, is
prohibited.
The information contained herein is subject to change without notice and is not warranted to be error-free. If
you find any errors, please report them to us in writing.
If this is software, software documentation, data (as defined in the Federal Acquisition Regulation), or related
documentation that is delivered to the U.S. Government or anyone licensing it on behalf of the U.S.
Government, then the following notice is applicable:
U.S. GOVERNMENT END USERS: Oracle programs (including any operating system, integrated software,
any programs embedded, installed, or activated on delivered hardware, and modifications of such programs)
and Oracle computer documentation or other Oracle data delivered to or accessed by U.S. Government end
users are "commercial computer software," "commercial computer software documentation," or "limited rights
data" pursuant to the applicable Federal Acquisition Regulation and agency-specific supplemental
regulations. As such, the use, reproduction, duplication, release, display, disclosure, modification, preparation
of derivative works, and/or adaptation of i) Oracle programs (including any operating system, integrated
software, any programs embedded, installed, or activated on delivered hardware, and modifications of such
programs), ii) Oracle computer documentation and/or iii) other Oracle data, is subject to the rights and
limitations specified in the license contained in the applicable contract. The terms governing the U.S.
Government's use of Oracle cloud services are defined by the applicable contract for such services. No other
rights are granted to the U.S. Government.
This software or hardware is developed for general use in a variety of information management applications.
It is not developed or intended for use in any inherently dangerous applications, including applications that
may create a risk of personal injury. If you use this software or hardware in dangerous applications, then you
shall be responsible to take all appropriate fail-safe, backup, redundancy, and other measures to ensure its
safe use. Oracle Corporation and its affiliates disclaim any liability for any damages caused by use of this
software or hardware in dangerous applications.
Oracle®, Java, MySQL and NetSuite are registered trademarks of Oracle and/or its affiliates. Other names
may be trademarks of their respective owners.
Intel and Intel Inside are trademarks or registered trademarks of Intel Corporation. All SPARC trademarks are
used under license and are trademarks or registered trademarks of SPARC International, Inc. AMD, Epyc,
and the AMD logo are trademarks or registered trademarks of Advanced Micro Devices. UNIX is a registered
trademark of The Open Group.
This software or hardware and documentation may provide access to or information about content, products,
and services from third parties. Oracle Corporation and its affiliates are not responsible for and expressly
disclaim all warranties of any kind with respect to third-party content, products, and services unless otherwise
set forth in an applicable agreement between you and Oracle. Oracle Corporation and its affiliates will not be
responsible for any loss, costs, or damages incurred due to your access to or use of third-party content,
products, or services, except as set forth in an applicable agreement between you and Oracle.

Contents
Preface
Audience xiv
Documentation Accessibility xv
Diversity and Inclusion xv
Conventions xv
Part I Understanding Oracle Net Services
1
Introducing Oracle Net Services
1.1 About Oracle Net Services 1-1
1.1.1 Understanding Connectivity 1-1
1.1.1.1 About Client/Server Application Connections 1-2
1.1.1.2 About Web Client Application Connections 1-3
1.1.2 Understanding Manageability 1-5
1.1.2.1 About Location Transparency 1-5
1.1.2.2 About Centralized Configuration and Management 1-6
1.1.2.3 About Quick Installation and Configuration 1-7
1.1.3 Understanding Shared Server Architecture 1-7
1.1.4 Understanding Performance 1-10
1.1.4.1 Listener Queue Size 1-10
1.1.4.2 Session Data Unit Size for Data Transfer Optimization 1-10
1.1.4.3 Persistent Buffer Flushing for TCP/IP 1-11
1.1.4.4 Sockets Direct Protocol 1-11
1.1.4.5 Database Availability 1-12
1.1.5 Understanding Network Security 1-12
1.1.5.1 Firewall Access Control 1-12
1.2 Understanding Database Instances 1-14
1.3 Components of Oracle Net Services 1-16
1.3.1 About Oracle Net 1-16
1.3.1.1 Oracle Net Foundation Layer 1-16
1.3.1.2 Oracle Protocol Support 1-17
iii

1.3.2 About Oracle Net Listener 1-18
1.3.3 About Oracle Connection Manager 1-19
1.3.4 About Networking Tools 1-19
1.3.5 About Oracle Advanced Security 1-20
2
Identifying and Accessing the Database
2.1 Understanding Database Instances 2-1
2.2 Understanding Database Services 2-3
2.3 Connecting to a Database Service 2-5
2.3.1 About Connect Descriptors 2-5
2.3.1.1 About IPv6 Addresses in Connect Descriptors 2-7
2.3.2 About the Protocol Address 2-7
2.3.3 About Service Registration 2-8
2.3.3.1 Specifying an Instance Name 2-8
2.3.3.2 Specifying a Service Handler 2-8
2.4 Understanding Service Handlers 2-9
2.4.1 About Dispatchers 2-9
2.4.2 About Dedicated Server Processes 2-11
2.4.3 About Database Resident Connection Pooling 2-12
2.5 Understanding Naming Methods 2-14
2.5.1 About Naming Methods 2-15
2.5.2 Choosing a Naming Method 2-16
2.5.3 Establishing a Client Session Using a Naming Method 2-17
2.5.4 Entering a Connect String 2-17
2.6 Enhancing Service Accessibility Using Multiple Listeners 2-18
2.6.1 About Connect-Time Failover 2-19
2.6.2 About Transparent Application Failover 2-19
2.6.3 About Client Load Balancing 2-19
2.6.4 About Connection Load Balancing 2-19
3
Managing Network Address Information
3.1 Using Localized Management 3-1
3.2 Using a Directory Server for Centralized Management 3-2
3.2.1 Understanding the Directory Information Tree 3-4
3.2.1.1 Fully-Qualified Names for Domain Component Namespaces 3-5
3.2.1.2 Fully-Qualified Names for X.500 Namespaces 3-6
3.2.1.3 Using the Relative Name of an Entry 3-7
3.2.1.4 Using the Fully-Qualified Name of an Entry 3-8
3.2.2 Understanding Oracle Context 3-8
iv

3.2.3 Understanding Net Service Alias Entries 3-9
3.2.4 Who Can Add or Modify Entries in the Directory Server 3-10
3.2.5 Client Connections Using Directory Naming 3-11
3.2.6 Considerations When Using Directory Servers 3-12
3.2.6.1 Performance Considerations 3-12
3.2.6.2 Security Considerations 3-13
3.2.6.3 Object Classes 3-16
3.2.7 Limitations of Directory Naming Support with Microsoft Active Directory 3-16
4
Understanding the Communication Layers
4.1 Understanding Oracle Net Stack Communication for Client/Server Applications 4-1
4.1.1 About the Client Communication Stack 4-4
4.1.1.1 Client Application Layer 4-4
4.1.1.2 Presentation Layer 4-4
4.1.1.3 Oracle Net Foundation Layer 4-4
4.1.1.4 Oracle Protocol Support Layer 4-5
4.1.2 About the Server Communication Stack 4-5
4.2 Using Oracle Net Stack Communication for Java Applications 4-5
4.3 Using Oracle Net Stack Communication for Web Clients 4-6
4.4 Understanding Oracle Protocol Support Layer 4-7
4.4.1 About TCP/IP Protocol 4-8
4.4.1.1 IPv6 Address Notation 4-8
4.4.1.2 IPv6 Interface and Address Configurations 4-10
4.4.1.3 IPv6 Network Connectivity 4-11
4.4.1.4 IPv6 Support in Oracle Database 4-13
4.4.2 About TCP/IP with TLS Protocol 4-13
4.4.3 About Named Pipes Protocol 4-14
4.4.4 About Sockets Direct Protocol (SDP) 4-14
4.4.5 About Exadirect Protocol 4-14
4.4.6 About Websocket Protocol 4-15
5
Understanding Oracle Net Architecture
5.1 About Service Registration 5-1
5.2 About the Listener and Connection Requests 5-2
5.3 About Oracle Restart 5-3
5.4 About Blocked Connection Requests 5-4
5.5 Understanding Database Server Process Architecture 5-4
5.5.1 About Shared Server Processes 5-4
5.5.2 About Dedicated Server Processes 5-5
v

5.6 Understanding Oracle Connection Manager Architecture 5-6
5.7 Complete Architecture 5-7
5.8 Reverse Connection Using CMAN Tunnels 5-8
Part II Configuration and Administration of Oracle Net Services
6
Quick Start to Oracle Net Services
6.1 Prerequisites for Establishing Connectivity 6-1
6.2 Confirming Network Availability 6-1
6.3 Starting Oracle Net Listener and the Oracle Database Server 6-2
6.4 Starting Oracle Connection Manager 6-3
6.5 Connecting to the Database 6-4
6.6 Using Easy Connect to Connect to a Database 6-7
7
Managing Oracle Net Services
7.1 Using the User Interface Tools 7-1
7.1.1 Using Oracle Enterprise Manager Cloud Control to Configure Oracle Net
Services 7-1
7.1.1.1 Accessing the Net Services Administration Page 7-2
7.1.2 Using Oracle Net Manager to Configure Oracle Net Services 7-2
7.1.2.1 Starting Oracle Net Manager 7-3
7.1.2.2 Navigating Oracle Net Manager 7-3
7.1.2.3 Using Oracle Net Manager Wizards 7-3
7.1.3 Deciding When to Use Oracle Enterprise Manager Cloud Control and Oracle
Net Manager 7-4
7.1.4 Using Oracle Net Configuration Assistant to Configure Network Components 7-5
7.2 About the OracleNetAdmins Group 7-6
7.2.1 Adding Users To the OracleNetAdmins Group 7-6
7.2.2 Removing Users From the OracleNetAdmins Group 7-7
7.2.3 Changing Ownership of the OracleNetAdmins Group 7-7
7.3 Using Listener Control Utility to Administer the Listener 7-8
7.4 Performing Common Network Tasks 7-9
8
Configuring Naming Methods
8.1 Configuring the Easy Connect Naming Method 8-1
8.1.1 Understanding the Easy Connect Naming Method 8-2
8.1.2 About Easy Connect Plus 8-4
8.1.3 Examples of Easy Connect Naming Method 8-5
vi

8.1.4 Configuring Easy Connect Naming on the Client 8-8
8.1.5 Configuring Easy Connect Naming to Use a DNS Alias 8-9
8.2 Configuring the Local Naming Method 8-10
8.2.1 Configuring the tnsnames.ora File During Installation 8-11
8.2.2 Configuring the tnsnames.ora File After Installation 8-11
8.3 Configuring the Directory Naming Method 8-18
8.3.1 Creating Multiple Default Contexts in a Directory Naming Server 8-23
8.3.2 Exporting Local Naming Entries to a Directory Naming Server 8-24
8.3.3 Exporting Directory Naming Entries to a tnsnames.ora File 8-26
8.3.4 Configuring the LDAP Naming Adapter to Use Wallets 8-27
8.4 Configuring External Naming Methods 8-29
9
Configuring and Administering Oracle Net Listener
9.1 Overview of Oracle Net Listener 9-1
9.2 Configuring Dynamic Service Registration 9-2
9.2.1 Setting Initialization Parameters for Service Registration 9-2
9.2.2 Registering Information with a Local Listener 9-3
9.2.3 Registering Information with a Remote Listener 9-5
9.2.4 Registering Information with All Listeners in a Network 9-7
9.2.5 Configuring a Naming Method 9-9
9.3 Configuring Oracle Net Listener During Installation 9-10
9.4 Customizing Oracle Net Listener Configuration 9-10
9.4.1 Configuring Listening Protocol Addresses 9-11
9.4.1.1 Configuring Listening Protocol Addresses Using Oracle Enterprise
Manager Cloud Control 9-11
9.4.1.2 Configuring Listening Protocol Addresses Using Oracle Net Manager 9-12
9.4.2 Handling Large Volumes of Concurrent Connection Requests 9-12
9.4.3 Managing Oracle Net Listener Security 9-13
9.4.3.1 Specifying Valid Nodes and Subnets 9-14
9.5 Administering the Listener 9-15
9.5.1 Starting and Stopping a Listener 9-15
9.5.1.1 Starting or Stopping a Listener Using the Listener Control Utility 9-16
9.5.1.2 Starting or Stopping a Listener Using Oracle Enterprise Manager Cloud
Control 9-16
9.5.2 Managing a Listener in an Oracle Restart Configuration 9-17
9.5.2.1 Viewing Configured Listeners Using the SRVCTL Utility 9-17
9.5.2.2 Adding or Removing a Listener Using the SRVCTL Utility 9-18
9.5.2.3 Starting or Stopping a Listener Using the SRVCTL Utility 9-18
9.5.3 Determining the Current Status of a Listener 9-18
9.5.3.1 Showing Status Using Listener Control 9-18
9.5.3.2 Showing Status Using Oracle Enterprise Manager Cloud Control 9-20
vii

9.5.4 Monitoring Services of a Listener 9-20
9.5.5 Monitoring Listener Log Files 9-22
9.6 Understanding Listener Redirects 9-22
10
Configuring and Administering Oracle Connection Manager
10.1 About the cman.ora File 10-2
10.2 Setting Up Oracle Connection Manager 10-4
10.2.1 Configuring the cman.ora file for the Oracle Connection Manager Host 10-5
10.2.1.1 Configuring Transport Layer Security on Oracle Connection Manager 10-6
10.2.1.2 Enabling Access Control 10-7
10.2.2 Configuring Clients for Oracle Connection Manager 10-7
10.2.3 Configuring the Oracle Database Server for Oracle Connection Manager 10-9
10.2.3.1 Configuring Service Registration for Use with Oracle Connection
Manager 10-9
10.2.3.2 Enabling Session Multiplexing for Oracle Connection Manager 10-10
10.3 Configuring Oracle Connection Manager in Traffic Director Mode 10-11
10.3.1 About Using Oracle Connection Manager in Traffic Director Mode 10-12
10.3.2 Configuring cman.ora File for Oracle Connection Manager in Traffic Director
Mode 10-14
10.3.3 Configuring a Wallet for Oracle Connection Manager in Traffic Director Mode
Proxy Authentication 10-15
10.3.3.1 Enabling Oracle Connection Manager in Traffic Director Mode to Use
External Password Store 10-16
10.3.4 Configuring Databases for Oracle Connection Manager in Traffic Director
Mode Proxy Authentication 10-17
10.3.5 Configuring Service Registration with Oracle Connection Manager in Traffic
Director Mode 10-17
10.3.6 Configuring Proxy Resident Connection Pool in Oracle Connection Manager
in Traffic Director Mode 10-17
10.3.7 Configuring Oracle Connection Manager in Traffic Director Mode for
Unplanned Events 10-19
10.3.8 Configuring Oracle Connection Manager in Traffic Director Mode for Planned
Down Events 10-19
10.3.9 Configuring Oracle Connection Manager in Traffic Director Mode for Service
Affinity 10-20
10.3.10 Configuring Transport Layer Security on Oracle Connection Manager in
Traffic Director Mode 10-20
10.3.11 Enhancements to Oracle Connection Manager in Traffic Director Mode 10-21
10.3.12 Oracle Connection Manager in Traffic Director Mode Restrictions 10-22
10.4 Configuring Oracle Connection Manager in Tunneling Mode for Reverse Connection 10-23
10.4.1 Configure cman.ora for Oracle Connection Manager in Server Tunneling
Mode 10-23
10.4.2 Configure cman.ora for Oracle Connection Manager in Client Tunnelling Mode 10-24
viii

10.4.3 Configure Clients to Make Reverse Connection 10-24
10.4.4 Configure Rules in Server CMAN for Tunnel Registration and Client Access 10-25
10.4.4.1 Configure Rules in Server CMAN using rule_list Syntax 10-25
10.4.4.2 Configure Rules in Server CMAN Using rule_group Syntax 10-26
10.4.5 Configure Oracle Database Server for Client Oracle Connection Manager 10-26
10.5 Using Oracle Connection Manager as a Bridge for IPv4 and IPv6 10-27
10.6 Starting and Stopping Oracle Connection Manager 10-29
10.7 About CMCTL REST Interface 10-30
10.7.1 Configuring CMCTL REST Interface 10-30
10.7.2 REST APIs for CMCTL Commands 10-32
10.8 Migrating CMAN Sessions During Patching 10-32
10.9 Oracle Connection Manager Enhancements 10-33
11
Configuring a Shared Server Architecture
11.1 How Oracle Net Manages Client Loads 11-1
11.2 About Dispatchers 11-1
11.2.1 Grouping Services by Dispatcher 11-2
11.2.2 Monitoring Dispatchers 11-2
11.3 Enabling Session Multiplexing 11-3
11.4 Configuring Clients for Environments with Both Shared and Dedicated Servers 11-4
12
Configuring Profiles
12.1 Overview of Profile Configuration 12-1
12.2 Configuring the Profile During Installation 12-1
12.3 Understanding Client Attributes for Names Resolution 12-2
12.3.1 About the Default Domain for Clients 12-2
12.3.1.1 Specifying a Default Domain 12-2
12.3.2 Prioritizing Naming Methods 12-3
12.3.3 Routing Connection Requests to a Process 12-4
12.4 Settings for Database Access Control 12-5
12.4.1 Configuring Database Access Control 12-5
12.5 About Advanced Profile Information 12-6
12.5.1 Setting the Advanced Features in the sqlnet.ora File Using Oracle Net
Services 12-9
12.6 Configuring External Naming Methods 12-10
12.7 Configuring Oracle Network Security 12-10
ix

13
Enabling Advanced Features of Oracle Net Services
13.1 Configuring Advanced Network Address and Connect Data Information 13-1
13.1.1 Creating a List of Listener Protocol Addresses 13-2
13.1.2 About the Address List Parameters 13-4
13.1.2.1 Configuring Address List Parameters 13-6
13.1.3 About the Advanced Connect Data Parameters 13-6
13.2 Understanding Connection Load Balancing 13-8
13.2.1 Example of Connection Load Balancing for Shared Server Configuration 13-9
13.2.2 Example of Connection Load Balancing for Dedicated Server Configuration 13-12
13.2.3 COLOCATION_TAG of Client Connections 13-14
13.3 Configuring Transparent Application Failover 13-15
13.3.1 About Transparent Application Failover 13-15
13.3.2 What Transparent Application Failover Restores 13-16
13.3.3 About the FAILOVER_MODE Parameters 13-17
13.3.4 Implementing Transparent Application Failover 13-18
13.3.4.1 TAF with Connect-Time Failover and Client Load Balancing 13-18
13.3.4.2 TAF Retrying a Connection 13-19
13.3.4.3 TAF Pre-establishing a Connection 13-19
13.3.5 Verifying Transparent Application Failover 13-20
13.4 Specifying the Instance Role for Primary and Secondary Instance Configurations 13-20
13.5 Configuring Static Service Registration 13-23
13.5.1 Parameters for Static Service Registration 13-23
13.5.2 Configuring Static Service Information for the Listener 13-25
13.6 Configuring Connections to Third-Party Database Services 13-25
13.6.1 Default Configuration for External Procedures 13-26
13.6.1.1 Configuring Oracle Net Services for External Procedures 13-29
13.6.2 About Oracle Net Services for Oracle Heterogeneous Services 13-33
13.6.2.1 Configuring Oracle Database to Connect to Agents 13-33
13.6.3 Configuring Oracle Net Services for an Oracle Rdb Database 13-35
14
Optimizing Performance
14.1 Understanding the Benefits of Network Data Compression 14-1
14.2 Configuring Session Data Unit 14-1
14.2.1 Setting the SDU Size for the Database 14-3
14.2.2 Setting the SDU Size for the Client 14-3
14.3 Determining the Bandwidth-Delay Product 14-3
14.4 Configuring I/O Buffer Space 14-4
14.4.1 Configuring I/O Buffer Size on the Server 14-5
14.4.1.1 Setting the Buffer Size Parameter for Shared Server Processes 14-6
14.4.2 Configuring I/O Buffer Space on the Client 14-6
x

14.5 Configuring SDP Support for InfiniBand Connections 14-6
14.5.1 Prerequisites for Using SDP 14-7
14.5.2 Configuring SDP on the Server 14-7
14.5.3 Configuring SDP on the Client 14-8
14.6 Configuring Exadirect Support for InfiniBand Connections 14-9
14.6.1 Prerequisites for Using Exadirect 14-9
14.6.2 Configuring Exadirect on the Server 14-10
14.6.3 Configuring Exadirect on the Client 14-10
14.7 Limiting Resource Consumption by Unauthorized Users 14-10
14.8 Configuring Key-Based Routing for Client-Server Connections 14-12
14.8.1 About Key-Based Routing 14-12
14.8.2 Specifying a Sharding Key in the Connect String 14-13
Part III Testing and Troubleshooting Oracle Net Services
15
Testing Connections
15.1 Testing the Network 15-1
15.2 Using the TNSPING Utility to Test Connectivity from the Client 15-2
15.3 Using the TRCROUTE Utility to Test Connectivity from the Client 15-4
16
Troubleshooting Oracle Net Services
16.1 Understanding Automatic Diagnostic Repository 16-1
16.1.1 ADRCI: ADR Command Interpreter 16-5
16.2 Diagnosing Oracle Net Services 16-6
16.2.1 Diagnosing Server Problems 16-7
16.2.2 Diagnosing Client Problems 16-8
16.3 Resolving the Most Common Error Messages for Oracle Net Services 16-11
16.3.1 ORA-03113: End-of-file on Communication Channel 16-12
16.3.2 ORA-12154: Could Not Resolve the Connect Identifier Specified 16-12
16.3.2.1 ORA-12154 Error When Using the Local Naming Method 16-13
16.3.2.2 ORA-12154 Error When Using the Directory Naming Method 16-13
16.3.2.3 ORA-12154 Error When Using the Easy Connect Naming Method 16-14
16.3.2.4 ORA-12154 Error When Using the External Naming Method 16-14
16.3.3 ORA-12170: Connect Timeout Occurred 16-14
16.3.4 TNS-12500 or ORA-12500: Listener Failed to Start a Dedicated Server
Process 16-16
16.3.5 ORA-12514: Listener Does Not Currently Know of Service Requested in
Connect Descriptor 16-16
xi

16.3.6 ORA-12520: Listener Could Not Find Available Handler for Requested Type
of Server 16-17
16.3.7 ORA-12521: Listener Does Not Currently Know of Instance Requested in
Connect Descriptor 16-17
16.3.8 ORA-12525: Listener Has Not Received Client's Request in Time Allowed 16-18
16.3.9 ORA-12533: Illegal Address Parameters 16-19
16.3.10 TNS-12540 or ORA-12540: TNS:Internal Limit Restriction Exceeded and
TNS-00510: Internal Limit Restriction Exceeded 16-19
16.3.11 TNS-12541 or ORA-12541: TNS:No Listener 16-19
16.3.12 TNS-12549 or ORA-12549: TNS:Operating System Resource Quota
Exceeded and TNS-00519: Operating System Resource Quota Exceeded 16-20
16.3.13 TNS-12560 or ORA-12560: TNS:Protocol Adapter Error Occurred 16-20
16.3.14 Directory Naming Errors 16-20
16.4 Troubleshooting Suggestions for Oracle Net Services 16-21
16.4.1 Suggestions for Diagnosing Network Problems 16-21
16.4.2 Troubleshooting Oracle Connection Manager in Traffic Director Mode 16-22
16.4.3 Questions to Consider When Troubleshooting Oracle Net Services 16-22
16.5 Example of Troubleshooting a TNS-12154 Error 16-23
16.6 Logging Error Information for Oracle Net Services 16-24
16.6.1 Oracle Net Error Stacks 16-24
16.6.1.1 Understanding Error Stack Messages 16-25
16.6.2 Oracle Net Services Log File Names 16-26
16.6.3 Oracle Network Log File Segmentation 16-26
16.6.4 About the Logging Parameters 16-26
16.6.4.1 sqlnet.ora Log Parameters 16-27
16.6.4.2 listener.ora Log Parameters 16-28
16.6.4.3 cman.ora Log Parameters 16-28
16.6.5 Setting Logging Parameters in Configuration Files 16-29
16.6.5.1 Setting Parameters for the sqlnet.ora File Using Oracle Net Manager 16-29
16.6.5.2 Setting Parameters for the listener.ora File Using Oracle Enterprise
Manager Cloud Control 16-30
16.6.5.3 Setting Parameters for the listener.ora File Using Oracle Net Manager 16-30
16.6.6 Setting Logging During Control Utilities Runtime 16-31
16.6.7 Using Log Files 16-31
16.6.8 Analyzing Listener Logs 16-32
16.6.8.1 Listener Log Audit Trails 16-32
16.6.8.2 Listener Service Registration Events 16-34
16.6.8.3 Listener Direct Hand-Off Information 16-35
16.6.8.4 Listener Subscription for ONS Node-Down Event Information 16-36
16.6.8.5 Listener Oracle Clusterware Notification Information 16-36
16.6.9 Analyzing Oracle Connection Manager Logs 16-36
16.7 Tracing Error Information for Oracle Net Services 16-39
xii

16.7.1 Understanding Oracle Net Services Trace File Names 16-39
16.7.2 Setting Tracing Parameters 16-40
16.7.2.1 cman.ora Trace Parameters 16-40
16.7.2.2 listener.ora Trace Parameters 16-41
16.7.2.3 sqlnet.ora Trace Parameters 16-43
16.7.2.4 Setting Tracing Parameters in Configuration Files 16-46
16.7.3 Setting Tracing During Control Utilities Runtime 16-48
16.7.4 Evaluating Oracle Net Services Trace Files 16-48
16.7.4.1 Flow of Data Packets Between Network Nodes 16-48
16.7.4.2 Oracle Net Data Packet Formats 16-49
16.7.4.3 Pertinent Oracle Net Trace Error Output 16-50
16.7.5 Using the Trace Assistant to Examine Trace Files 16-53
16.7.5.1 Trace Assistant Syntax 16-53
16.7.5.2 Packet Examples 16-55
16.7.5.3 Two-Task Common (TTC) Packet Examples 16-59
16.7.5.4 Connection Example 16-64
16.7.5.5 Statistics Example 16-67
16.8 Contacting Oracle Support Services 16-67
xiii

Preface
Oracle Database Net Services Administrator's Guide describes how to use Oracle Net
Services. This guide describes the Oracle Net Services product and its components,
as well as Oracle Net Services administrative and deployment topics.
• Audience
• Documentation Accessibility
• Diversity and Inclusion
• Conventions
Audience
Oracle Database Net Services Administrator's Guide is intended for the following
readers:
• Network administrators
• Directory server administrators
• Database administrators
• Decision makers
This guide is especially targeted for network administrators who are responsible for
ensuring connectivity. For network administrators, Oracle recommends:
• For a conceptual understanding of Oracle Net Services, read all of Understanding
Oracle Net Services
• For essential configuration instructions, read all of Configuration and
Administration of Oracle Net Services
• For troubleshooting, read Testing and Troubleshooting Oracle Net Services
For directory administrators, Oracle recommends:
• For understanding how Oracle Net Services uses a directory server, read
Managing Network Address Information in Understanding Oracle Net Services
• For instructions about configuring naming information in a directory server, and
exporting existing naming data to a directory server, read Configuring Naming
Methods in Configuration and Administration of Oracle Net Services
For database administrators, Oracle recommends:
• For a general understanding of networking, read Introducing Oracle Net Services
and Quick Start to Oracle Net Services
• For an overview of communication layers, read Understanding the Communication
Layers
Preface
xiv

• For understanding how to configure Oracle database server features that require listener
and shared server configuration, read Configuring and Administering Oracle Net Listener,
Configuring a Shared Server Architecture , and Optimizing Performance
For decision makers, Oracle recommends
• For an understanding of how Oracle Net Services fits into the overall network architecture
and for explaining the basics of Oracle Net Services, read Introducing Oracle Net
Services, Managing Network Address Information , and Quick Start to Oracle Net
Services
Oracle recommends that all readers look over Understanding Oracle Net Services, to ensure
that they have the background required to benefit from the rest of the guide.
Documentation Accessibility
For information about Oracle's commitment to accessibility, visit the Oracle Accessibility
Program website at http://www.oracle.com/pls/topic/lookup?ctx=acc&id=docacc.
Access to Oracle Support
Oracle customers that have purchased support have access to electronic support through My
Oracle Support. For information, visit http://www.oracle.com/pls/topic/lookup?ctx=acc&id=info
or visit http://www.oracle.com/pls/topic/lookup?ctx=acc&id=trs if you are hearing impaired.
Diversity and Inclusion
Oracle is fully committed to diversity and inclusion. Oracle respects and values having a
diverse workforce that increases thought leadership and innovation. As part of our initiative to
build a more inclusive culture that positively impacts our employees, customers, and
partners, we are working to remove insensitive terms from our products and documentation.
We are also mindful of the necessity to maintain compatibility with our customers' existing
technologies and the need to ensure continuity of service as Oracle's offerings and industry
standards evolve. Because of these technical constraints, our effort to remove insensitive
terms is ongoing and will take time and external cooperation.
Conventions
The following text conventions are used in this document:
Convention Meaning
boldface
Boldface type indicates graphical user interface elements associated with an
action, or terms defined in text or the glossary.
italic Italic type indicates book titles, emphasis, or placeholder variables for which
you supply particular values.
monospace
Monospace type indicates commands within a paragraph, URLs, code in
examples, text that appears on the screen, or text that you enter.
Preface
xv

Part I
Understanding Oracle Net Services
Part I provides an overview of Oracle Net Services concepts, products, and tools.
This part contains the following chapters:
• Introducing Oracle Net Services
Understand the basic elements of Oracle Net Services architecture and the Oracle Net
foundation layer.
• Identifying and Accessing the Database
• Managing Network Address Information
• Understanding the Communication Layers
• Understanding Oracle Net Architecture

1
Introducing Oracle Net Services
Understand the basic elements of Oracle Net Services architecture and the Oracle Net
foundation layer.
• About Oracle Net Services
Oracle Net Services provides enterprise-wide connectivity solutions in distributed,
heterogeneous computing environments. It eases the complexities of network
configuration and management, maximizes performance, and improves network
diagnostic capabilities.
• Understanding Database Instances
• Components of Oracle Net Services
1.1 About Oracle Net Services
Oracle Net Services provides enterprise-wide connectivity solutions in distributed,
heterogeneous computing environments. It eases the complexities of network configuration
and management, maximizes performance, and improves network diagnostic capabilities.
Note:
The terms "SQL*Net" and "Net Services" are used interchangeably throughout
Oracle documentation and both these terms refer to the same functionality.
This section introduces the basic networking concepts involved in a typical network
configuration.
• Understanding Connectivity
• Understanding Manageability
• Understanding Shared Server Architecture
• Understanding Performance
• Understanding Network Security
1.1.1 Understanding Connectivity
Oracle Net, a component of Oracle Net Services, enables a network session from a client
application to an Oracle Database server. When a network session is established, Oracle Net
acts as the data courier for both the client application and the database. It is responsible for
establishing and maintaining the connection between the client application and database, as
well as exchanging messages between them. Oracle Net is able to perform these jobs
because it is located on each computer in the network.
• About Client/Server Application Connections
• About Web Client Application Connections
1-1

1.1.1.1 About Client/Server Application Connections
Oracle Net enables connections from traditional client/server applications to Oracle
Database servers. Figure 1-1 shows how Oracle Net enables a network connection
between a client and a database server. Oracle Net is a software component that
resides on both the client and the database server. Oracle Net is layered on top of
network Oracle protocol support, rules that determine how applications access the
network and how data is subdivided into packets for transmission across the network.
In the following figure, Oracle Net communicates with TCP/IP to enable computer-level
connectivity and data transfer between the client and the database.
Figure 1-1 Client/Server Application Connection
TCP/IP
Network
Database
Server
Application
Oracle
Net
RDBMS
Oracle
Net
Client
Specifically, Oracle Net is comprised of the Oracle Net foundation layer, which
establishes and maintains connections, and Oracle protocol support, which maps the
foundation layer technology to industry-standard protocols.
• Java Client Application Connections
1.1.1.1.1 Java Client Application Connections
Java client applications access an Oracle database through a Java Database
Connectivity (JDBC) Driver, a standard Java interface for connecting from Java to a
relational database. Oracle offers the following drivers:
• JDBC OCI Driver for client-side use with an Oracle client installation.
• JDBC Thin Driver, a pure Java driver for client-side use without an Oracle
installation, particularly with applets.
These drivers use Oracle Net to enable connectivity between a client application and
an Oracle database.
The following figure shows a Java client application using a JDBC OCI driver and an
Oracle Database server. The Java client application makes calls to the JDBC OCI
driver, which translates the JDBC calls directly into the Oracle Net layer. The client
then uses Oracle Net to communicate with Oracle Database that is also configured
with Oracle Net.
Chapter 1
About Oracle Net Services
1-2

Figure 1-2 Java Application Connection
TCP/IP
Network
Database
Server
JDBC OCI
Driver
Application
Oracle
Net
RDBMS
Oracle
Net
Client
See Also:
• Oracle Database JDBC Developer's Guide
• Oracle Database JDBC Java API Reference
1.1.1.2 About Web Client Application Connections
Internet connections from client web browsers to an Oracle Database server are similar to
client/server applications, except that the connection request goes to an application web
server.
Figure 1-3 shows the basic architecture for web client connections, including a client web
browser, an application web server, and an Oracle Database server. The browser on the
client communicates with HTTP to the web server to make a connection request. The web
server sends the request to an application where it is processed. The application then uses
Oracle Net to communicate with the Oracle Database server that also is configured with
Oracle Net.
Figure 1-3 Web Client Connections through Application Web Server
TCP/IP
Network
TCP/IP
Network
HTTP
Protocol
Database
Server
Net8
RDBMS
Oracle
Net
Client
Web
Browser
Application
Web Server
Oracle
Net
Application
The basic components have the following characteristics:
• HyperText Transport Protocol (HTTP)
HTTP provides the language that enables web browsers and application web servers to
communicate.
Chapter 1
About Oracle Net Services
1-3

• Application Web Server
An application web server manages data for a website, controls access to that
data, and responds to requests from web browsers. The application on the web
server communicates with the database and performs the job requested by the
web server.
• Web Client Connections Through Java Application Web Server
• Web Client Connections Without an Application Web Server
1.1.1.2.1 Web Client Connections Through Java Application Web Server
An application web server can host Java applications and servlets, as shown in
Figure 1-4. Web browsers make a connection request by communicating through
HTTP to an application web server. The application web server sends the request to
an application or a servlet, which uses a JDBC OCI or a JDBC Thin driver to process
the request. The driver then uses Oracle Net to communicate with the Oracle
Database server that also is configured with Oracle Net.
Figure 1-4 Web Client Connections Through Java Application Web Server
TCP/IP
Network
TCP/IP
Network
HTTP
Protocol
Database
Server
Net8
Oracle Net
RDBMS
Client
Web
Browser
Application
Web Server
JDBC OCI
Driver
Oracle Net
Java Servlet
HTTP
Protocol
Net8
Client
Web
Browser
JavaNet
JDBC Thin
Driver
Java Servlet
1.1.1.2.2 Web Client Connections Without an Application Web Server
Web clients that do not require an application web server to access applications can
access Oracle Database directly, for example, by using a Java applet. In addition to
regular connections, the database can be configured to accept HTTP protocol, FTP, or
WebDAV protocol connections. These protocols are used for connections to Oracle
XML DB in the Oracle Database instance.
The following figure shows two different web clients. The first web client makes an
HTTP connection to the database. The second web client uses a web browser with a
JDBC Thin driver, which in turn uses a Java version of Oracle Net called JavaNet to
communicate with the Oracle Database server that is configured with Oracle Net.
Chapter 1
About Oracle Net Services
1-4

See Also:
Oracle XML DB Developer's Guide
Figure 1-5 Web Client Connection Scenarios
HTTP
Protocol
Database
Server
RDBMS
Oracle
Net
Client
TCP/IP
Network
Client
Configured
to support
HTTP
Web
Browser
Web
Browser
JDBC Thin
Driver
Java Applet
JavaNet
1.1.2 Understanding Manageability
Oracle Net Services offers several manageability features to configure and manage
networking components.
• About Location Transparency
• About Centralized Configuration and Management
To manage large networking environments, administrators can access a centralized
repository to specify and modify the network configuration. For this reason, you can store
the Oracle Net Services configuration in an LDAP-compliant directory server.
• About Quick Installation and Configuration
1.1.2.1 About Location Transparency
Each database is represented by one or more services. A service is identified by a service
name, for example,
sales.us.example.com
. A client uses a service name to identify the
database it must access. The information about the database service and its location in the
network is transparent to the client because the information needed for a connection is stored
in a repository.
The repository is represented by one or more naming methods. A naming method is a
resolution method used by a client application to resolve a connect identifier to a connect
descriptor when attempting to connect to a database service. Oracle Net Services offers
several naming methods that support localized configuration on each client, or centralized
configuration that can be accessed by all clients in the network.
Chapter 1
About Oracle Net Services
1-5

For example, in the following figure, a company has three databases that clients can
access. Each database has a distinct service name, such as
sales.us.example.com
,
hr.us.example.com
, and
mktg.us.example.com
.
1. The client uses the repository to find the information it needs for
sales.us.example.com
.
2. After the client has the information it needs, it connects to the database.
Figure 1-6 Service Information Repository
Client
sales =
hr =
mktg =
Repository of service
information
1
2
sales.us.example.com
hr.us.example.com
mktg.us.example.com
1.1.2.2 About Centralized Configuration and Management
To manage large networking environments, administrators can access a centralized
repository to specify and modify the network configuration. For this reason, you can
store the Oracle Net Services configuration in an LDAP-compliant directory server.
Support of LDAP-compliant directory servers provides a centralized vehicle for
managing and configuring a distributed Oracle network. The directory can act as a
central repository for all information about database network components, user and
corporate policies, and user authentication and security, thus replacing client-side and
server-side localized configuration files.
All computers on the network can refer to the directory for information. Figure 1-7
shows clients, Oracle Database servers, and other servers (such as application web
servers) connecting to a centralized directory server.
Chapter 1
About Oracle Net Services
1-6

Figure 1-7 Centralized Storage of Network Configuration with a Directory Server
Intranet
Client
Database
Client
Directory
Server
Database
Application
Web Server
Related Topics
• Using a Directory Server for Centralized Management
1.1.2.3 About Quick Installation and Configuration
Networking elements for the Oracle Database server and clients are preconfigured for most
environments. The Easy Connect naming method is enabled by default, and does not require
a repository. Clients connect using the hostname of the database. As a result, clients and
servers are ready to connect out-of-the-box using Easy Connect, giving users the benefits of
distributed computing.
1.1.3 Understanding Shared Server Architecture
The Oracle Database shared server architecture increases the scalability of applications and
the number of clients that can simultaneously be connected to the database. The shared
server architecture also enables existing applications to scale up without making any
changes to the application itself.
When using a shared server, clients do not communicate directly with a database server
process, a database process that handles a client's requests on behalf of a database.
Instead, client requests are routed to one or more dispatchers. The dispatchers place the
client requests in a common queue. An idle shared server from the shared pool of server
processes picks up and processes a request from the queue. This means a small pool of
server processes can serve a large number of clients.
The Shared Server Architecture and Dedicated Server Architecture figures show the basic
difference between the shared server connection model and the traditional dedicated server
connection model. In the shared server model, a dispatcher can support multiple client
connections concurrently. In the dedicated server model, there is one server process for each
client. Each time a connection request is received, a server process is started and dedicated
to that connection until completed. This causes a processing delay.
Chapter 1
About Oracle Net Services
1-7

Figure 1-8 Shared Server Architecture
Client
Client
Client
Database
Shared
Server
Process
Shared
Server
Process
Dispatcher
Web
Browser
Web
Browser
Web
Browser
Figure 1-9 Dedicated Server Architecture
Client
Client
Client
Database
Dedicated
Server
Process
Dedicated
Server
Process
Dedicated
Server
Process
A shared server is ideal for configurations with a large number of connections because
it reduces the server memory requirements. A shared server is well suited for both
Internet and intranet environments.
Utilization of server resources can be further enhanced with Oracle Connection
Manager. Oracle Connection Manager, an Oracle Net Services component, enables
multiple client network sessions to be multiplexed, or funneled, through a single
network connection to a database.
Chapter 1
About Oracle Net Services
1-8

The session multiplexing feature reduces the demand on resources needed to maintain
multiple network sessions between two processes by enabling the server to use fewer
network connection endpoints for incoming requests. In this way, the total number of network
sessions that a server can handle is increased. One Oracle Connection Manager with
multiple gateways enables thousands of concurrent users to connect to a server.
The following figure shows how session multiplexing can be used in a web architecture.
When Oracle Connection Manager is run on the same computer as an application web
server, the application web server can route multiple client sessions through Oracle
Connection Manager to ensure that those sessions have continuous access to an Oracle
Database server. This functionality is especially useful for web applications where session
availability and response time are major concerns.
Figure 1-10 Session Multiplexing
Database
Server
RDBMS
Oracle
Net
Oracle
Connection
Manager
Application
Web Server
Client
Web
Browser
Client
Web
Browser
Client
Web
Browser
The following are the advantages and disadvantages of session multiplexing. Session
multiplexing is recommended for networks where continuous connectivity is required.
Advantages of Session Multiplexing
• Limits the number of network resources used for each process
• Supports large client populations
• Maximizes the number of client/server sessions over a limited number of process
connections
• Optimizes resource utilization
• Enables identification and monitoring of real users
• Enables mid-tier applications to support additional services
• Requires only a single transport for clients with multiple applications
• Requires only a single network connection for database links
Disadvantage of Session Multiplexing
Chapter 1
About Oracle Net Services
1-9

Clients must connect to Oracle Connection Manager.
1.1.4 Understanding Performance
System performance is important to users. Users usually start to notice performance
when a system takes longer than one second to respond. Oracle Net configuration can
be modified to enhance system performance.
This section discusses performance considerations.
• Listener Queue Size
• Session Data Unit Size for Data Transfer Optimization
• Persistent Buffer Flushing for TCP/IP
• Sockets Direct Protocol
• Database Availability
1.1.4.1 Listener Queue Size
If you anticipate receiving a large number of connection requests for a listening
process (such as a listener or Oracle Connection Manager) over TCP/IP, then Oracle
Net enables you to configure the listening queue to be higher than the system default.
1.1.4.2 Session Data Unit Size for Data Transfer Optimization
Before sending data across the network, Oracle Net buffers and encapsulates data
into the session data unit (SDU). Oracle Net sends the data stored in this buffer when
the buffer is full, flushed, or when database server tries to read data. When large
amounts of data are being transmitted or when the message size is consistent,
adjusting the size of the SDU buffers can improve performance, network utilization, or
memory consumption. You can deploy SDU at the client, application web server, and
database.
Tuning your application to reduce the number of round trips across the network is the
best way to improve your network performance. If this is done, then it is also possible
to optimize data transfer by adjusting the size of the SDU.
Considerations for Modifying the Size of the SDU
Modify the SDU size under the following situations:
• The data coming back from the server is fragmented into separate packets.
• You are on a wide area network (WAN) that has long delays.
• The packet size is consistently the same.
• Large amounts of data are returned.
Do not modify the SDU size under the following situations:
• The application can be tuned to avoid the delays listed in the adjacent column.
• You have a high speed network where the effect of the data transmission is
negligible.
• Your requests return small amounts of data from the server.
Chapter 1
About Oracle Net Services
1-10

Note:
Starting with Oracle Database 11g, Oracle Net Services optimizes bulk data transfer
for certain components, such as Oracle SecureFiles LOBs and Oracle Data Guard
redo transport services. The SDU size limit, as specified in the network parameter
files, does not apply to these bulk data transfers. Bulk data transfer optimization
does not apply when ASO options are enabled or TLS transport is used.
See Also:
"Configuring Session Data Unit "
1.1.4.3 Persistent Buffer Flushing for TCP/IP
Under certain conditions for some applications using TCP/IP, Oracle Net packets may not get
flushed immediately to the network. Most often, this behavior occurs when large amounts of
data are streamed. The implementation of TCP/IP itself is the reason for the lack of flushing,
causing unacceptable delays. To remedy this problem, specify no delays in the buffer flushing
process.
See Also:
Oracle Database Net Services Reference for additional information about the
TCP.NODELAY parameter
1.1.4.4 Sockets Direct Protocol
Oracle Net Services provides support for InfiniBand high-speed networks. InfiniBand is a
high-bandwidth I/O architecture designed to increase communication speed between CPUs,
server-side devices, and network subsystems. Oracle Net Services provides support for
Sockets Direct Protocol (SDP). SDP is an industry-standard wire protocol intended for use
between InfiniBand network peers.
SDP reduces the overhead of TCP/IP by eliminating intermediate replication of data and
transferring most of the messaging burden away from the CPU and onto the network
hardware. The result is a low-latency, increased bandwidth, high-throughput connection that
reduces the amount of CPU cycles dedicated to network processing.
The communication between clients, including Oracle WebLogic Server or any other third-
party middle-tier client, and Oracle Database 12c release onwards can take advantage of
high-speed interconnect benefits. Oracle WebLogic Server includes Oracle TCP/IP support
as part of its installation.
A driver installed on the Oracle WebLogic Server servers transparently converts TCP/IP
support to SDP support. The SDP requests are then sent to an InfiniBand switch that
Chapter 1
About Oracle Net Services
1-11

processes and forwards the requests from the Oracle WebLogic Server servers to the
database server.
See Also:
"Configuring SDP Support for InfiniBand Connections"
1.1.4.5 Database Availability
Availability to the database is crucial for any network. You can configure multiple
listeners to handle client connection requests for the same database service. This is
beneficial in Oracle Real Application Clusters configurations, where each instance has
a listener associated with it. Multiple listener configurations enable you to use the
following features.
• Connect-time failover enables clients to request a different listener, usually on a
different node, if the first listener fails.
• Client load balancing enables clients to randomize requests to the multiple
listeners, usually on different nodes. These features can be used together or
separately. Together, they ensure access to the database and distribute the load to
not overburden a single listener.
1.1.5 Understanding Network Security
Data access and the secure transfer of data are important considerations when
deploying Oracle Database. Granting and denying access to a database is crucial for a
secure network environment. Oracle Net Services enables database access control
using firewall access control and valid node registration.
• Firewall Access Control
See Also:
"Managing Oracle Net Listener Security" for information about valid node
registration
1.1.5.1 Firewall Access Control
Oracle Connection Manager can be configured to grant or deny client access to a
particular database service or a computer. By specifying filtering rules, you can allow
or restrict specific client access to a server, based on the following criteria:
• Source host names or IP addresses for clients
• Destination host names or IP addresses for servers
• Destination database service names
Chapter 1
About Oracle Net Services
1-12

• Client use of Oracle Net Services security features
Figure 1-11 shows an Oracle Connection Manager positioned between three clients and an
Oracle Database server. Oracle Connection Manager is configured to allow access to the first
two clients and to deny access to the third.
Figure 1-11 Intranet Network Access Control with Oracle Connection Manager
Oracle Connection
Manager
Departmental
Firewall
Client
Access is denied
to this Client
Client
Database
Server
Although Oracle Connection Manager cannot be integrated with third-party firewall products,
vendors can package it with their own products in a way that enables this product to serve as
an application gateway.
In general, firewalls should be set to receive incoming requests, and allow outbound calls
from Oracle Database. By defining filtering rules, you can limit access to the network.
Caution:
Incorrectly setting your firewall options can cause security problems. Before
changing your firewall settings, discuss the options and your network site policies
with your system administrator.
Figure 1-12 shows an application gateway controlling traffic between internal and external
networks and providing a single checkpoint for access control and auditing. As a result,
unauthorized Internet hosts cannot directly access the database inside a corporation, but
authorized users can still use Internet services outside the corporate network. This capability
is critical in Internet environments to restrict remote access to sensitive data.
Chapter 1
About Oracle Net Services
1-13

Figure 1-12 Internet Network Access Control with an Application Gateway
Clients
Application
Gateway
Demilitarized
Zone (DMZ)
Corporate
Network
Application
Web Server
Intranet
Databases
Internet
It is important to deploy at least two Oracle Connection Manager firewalls or Oracle
Net Firewall proxies in an Internet network environment in the event that one firewall
goes down.
1.2 Understanding Database Instances
A database has at least one instance. An instance is comprised of a memory area
called the System Global Area (SGA) and Oracle background processes. The memory
and processes of an instance efficiently manage the associated database's data and
serve the database users.
Note:
An instance also manages other services, such as Oracle XML DB.
The following figure shows two database instances,
sales
and
finance
, associated
with their respective databases and service names.
Chapter 1
Understanding Database Instances
1-14

Figure 1-13 One Instance for Each Database
Salesperson
Financial Analyst
sales.us.example.com
finance.us.example.com
Database
Server
sales
Database
Server
finance
Instances are identified by an instance name, such as
sales
and
finance
in this example.
The instance name is specified by the INSTANCE_NAME initialization parameter. The
instance name defaults to the Oracle system identifier (SID) of the database instance.
Some hardware architectures allow multiple computers to share access to data, software, or
peripheral devices. Oracle Real Application Clusters (Oracle RAC) can take advantage of
such architecture by running multiple instances on different computers that share a single
physical database.
The following figure shows an Oracle RAC configuration. In this example, two instances,
sales1
and
sales2
, are associated with one database service,
sales.us.example.com
.
Chapter 1
Understanding Database Instances
1-15

Figure 1-14 Multiple Instances Associated with an Oracle RAC Database
sales.us.example.com
sales.us.example.com
Cluster
Node
Cluster
Node
sales1
sales2
Oracle RAC
Database
1.3 Components of Oracle Net Services
This section describes the connectivity, manageability, scalability, and security
features.
• About Oracle Net
• About Oracle Net Listener
• About Oracle Connection Manager
• About Networking Tools
• About Oracle Advanced Security
1.3.1 About Oracle Net
Oracle Net is a software layer that resides on the client and on the Oracle Database
server. It is responsible for establishing and maintaining the connection between the
client application and server, as well as exchanging messages between them, using
industry-standard protocols. Oracle Net has two software components:
• Oracle Net Foundation Layer
• Oracle Protocol Support
The Oracle Net foundation layer uses Oracle protocol support to communicate
with these industry-standard network protocols.
1.3.1.1 Oracle Net Foundation Layer
On the client side, applications communicate with Oracle Net foundation layer to
establish and maintain connections. The Oracle Net foundation layer uses Oracle
Chapter 1
Components of Oracle Net Services
1-16

protocol support that communicates with an industry-standard network protocol, such as
TCP/IP, to communicate with the Oracle Database server.
Figure 1-15 illustrates the communication stack on the client.
Figure 1-15 Oracle Net on the Client
Oracle Net
Foundation
Layer
Application
Oracle
Protocol
Support
Network
Protocol
The Oracle Database server side is similar to the client side as illustrated in Figure 1-16. A
network protocol sends client request information to an Oracle protocol support layer, which
then sends information to the Oracle Net foundation layer. The Oracle Net foundation layer
then communicates with the Oracle Database server to process the client request.
Figure 1-16 Oracle Net on the Server
Oracle Net
Foundation
Layer
RDBMS
Oracle
Protocol
Support
Network
Protocol
1.3.1.2 Oracle Protocol Support
The Oracle Net foundation layer uses Oracle protocol support to communicate with these
industry-standard network protocols.
• TCP/IP (version 4 and version 6)
• TCP/IP with Transport Layer Security (TLS)
• Named Pipes
• SDP
Oracle protocol support maps Oracle Net foundation layer functionality to industry-standard
protocols used in client/server connections.
Chapter 1
Components of Oracle Net Services
1-17

Related Topics
• Understanding Oracle Protocol Support Layer
A network protocol is responsible for transporting data from the client computer to
the database server computer. This section describes the protocols used by the
Oracle Protocol Support layer of the Oracle Net communication stack.
1.3.2 About Oracle Net Listener
Oracle Database server receives the initial connection through Oracle Net Listener.
Oracle Net Listener, referred to in this document as the listener, brokers a client
request, handing off the request to the server. The listener is configured with a protocol
address, and clients configured with the same protocol address can send connection
requests to the listener. When a connection is established, the client and Oracle server
communicate directly with one another.
Oracle Net listener supports ACLs (Access Control Lists) for service and this is
supported for all IP protocols.
See Also:
DBSFWUSER.DBMS_SFW_ACL_ADMIN in Oracle Database PL/SQL
Packages and Types Reference for more information about listener ACLs
The following figure shows the listener accepting a connection request from a client
and forwarding that request to an Oracle server.
Figure 1-17 Listener in a Connection Request
Network
Protocol
Database Server Computer
Application
Oracle Protocol
Support
RDBMS
Oracle Protocol
Support
Client
Oracle Net
Foundation
Layer
Oracle Net
Foundation
Layer
Listener
See Also:
Configuring and Administering Oracle Net Listener for additional information
about the listener
Chapter 1
Components of Oracle Net Services
1-18

1.3.3 About Oracle Connection Manager
Oracle Connection Manager is the software component that resides on its own computer,
separate from a client or an Oracle Database server. It proxies and screens requests for the
database server. In addition, it multiplexes database sessions.
In its session multiplexing role, Oracle Connection Manager funnels multiple sessions
through a single transport protocol connection to a particular destination. In this way, Oracle
Connection Manager reduces the demand on resources needed to maintain multiple
sessions between two processes by enabling the Oracle Database server to use fewer
connection endpoints for incoming requests.
As an access control filter, Oracle Connection Manager controls access to Oracle databases.
Note:
Oracle Connection Manager can act as a Connection Manager in Traffic Director
Mode by setting
tdm=yes
in
cman.ora
.
Oracle Connection Manager in Traffic Director mode provides improved high
availability (HA) (planned and unplanned), connection multiplexing support, and
load balancing. This feature also provides an inband client notification mechanism
to deliver planned shutdown for Oracle Connection Manager down and service
down events to the OCI client.
See Also:
• "Understanding Shared Server Architecture"
• "Firewall Access Control" for a description of filtering
1.3.4 About Networking Tools
Oracle Net Services provides user interface tools and command-line utilities to configure,
manage, and monitor the network.
• Oracle Net Configuration Assistant is a standalone tool that enables you to configure
listeners and naming methods.
• Oracle Enterprise Manager Cloud Control combines configuration functionality across
multiple file systems, along with listener administrative control to provide an integrated
environment for configuring and managing Oracle Net Services.
• Oracle Net Manager provides configuration functionality for an Oracle home on a local
client or server host.
• Command-line control utilities to configure, administer, and monitor network components,
including listeners and Oracle Connection Managers.
With Oracle Enterprise Manager Cloud Control or Oracle Net Manager, you can fine-tune the
listener and naming method configuration created with Oracle Net Configuration Assistant. In
Chapter 1
Components of Oracle Net Services
1-19

addition, Oracle Enterprise Manager Cloud Control and Oracle Net Manager offer built-
in wizards and utilities to test connectivity, migrate data from one naming method to
another, and create additional network components.
See Also:
Managing Oracle Net Services
1.3.5 About Oracle Advanced Security
Oracle Advanced Security is a separately licensable product that provides Oracle
Database Transparent Data Encryption (TDE) and Oracle Data Redaction. TDE
encrypts data so that only an authorized recipient can read it. Oracle Data Redaction
enables an administrator to redact (mask) column data, using the following types of
redaction:
• Full redaction redacts all the contents of the column data. The redacted value
returned to the querying user depends on the data type of the column. For
example, columns of the NUMBER data type are redacted with a zero (0) and
character data types are redacted with a blank space.
• Partial redaction redacts a portion of the column data. For example, masking most
of a credit card number with asterisks (*), except for the last four digits.
• Regular expressions enable using patterns of data to redact. For example, use
regular expressions to redact email addresses, which can have varying character
lengths. It is designed for use with character data only.
• Random redaction present the redacted data to the querying user as randomly-
generated values each time it is displayed.
• No redaction enables an administrator to test the internal operation of the
redaction policies, with no effect on the results of queries against tables with
policies defined on them.
See Also:
Oracle Database Advanced Security Guide
Chapter 1
Components of Oracle Net Services
1-20

2
Identifying and Accessing the Database
Understand how databases are identified, and how clients access them.
• Understanding Database Instances
• Understanding Database Services
• Connecting to a Database Service
• Understanding Service Handlers
• Understanding Naming Methods
Oracle Net Services offers several types of naming methods that support localized
configuration on each client, or centralized configuration that can be accessed by all
clients in the network.
• Enhancing Service Accessibility Using Multiple Listeners
2.1 Understanding Database Instances
A database has at least one instance. An instance is comprised of a memory area called the
System Global Area (SGA) and Oracle background processes. The memory and processes
of an instance efficiently manage the associated database's data and serve the database
users.
Note:
An instance also manages other services, such as Oracle XML DB.
The following figure shows two database instances,
sales
and
finance
, associated with their
respective databases and service names.
2-1

Figure 2-1 One Instance for Each Database
Salesperson
Financial Analyst
sales.us.example.com
finance.us.example.com
Database
Server
sales
Database
Server
finance
Instances are identified by an instance name, such as
sales
and
finance
in this
example. The instance name is specified by the INSTANCE_NAME initialization
parameter. The instance name defaults to the Oracle system identifier (SID) of the
database instance.
Some hardware architectures allow multiple computers to share access to data,
software, or peripheral devices. Oracle Real Application Clusters (Oracle RAC) can
take advantage of such architecture by running multiple instances on different
computers that share a single physical database.
The following figure shows an Oracle RAC configuration. In this example, two
instances,
sales1
and
sales2
, are associated with one database service,
sales.us.example.com
.
Chapter 2
Understanding Database Instances
2-2

Figure 2-2 Multiple Instances Associated with an Oracle RAC Database
sales.us.example.com
sales.us.example.com
Cluster
Node
Cluster
Node
sales1
sales2
Oracle RAC
Database
2.2 Understanding Database Services
An Oracle database is represented to clients as a service. A database can have one or more
services associated with it.
The following figure shows two databases, each with its own database service for clients.
One service,
sales.us.example.com
, enables salespersons to access the sales database.
Another service,
finance.us.example.com
, enables financial analysts to access the finance
database.
Figure 2-3 One Service for Each Database
Salesperson
Financial Analyst
sales.us.example.com
finance.us.example.com
Database
Server
Database
Server
Chapter 2
Understanding Database Services
2-3

The sales and finance databases are each identified by a service name,
sales.us.example.com
and
finance.us.example.com
, respectively. A service name is
a logical representation of a database. When an instance starts, it registers itself with a
listener using one or more service names. When a client program or database
connects to a listener, it requests a connection to a service.
A service name can identify multiple database instances, and an instance can belong
to multiple services. For this reason, the listener acts as a mediator between the client
and instances and routes the connection request to the appropriate instance. Clients
connecting to a service need not specify which instance they require.
The service name is specified by the SERVICE_NAMES initialization parameter in the
server parameter file. The server parameter file enables you to change initialization
parameters with
ALTER SYSTEM
commands, and to carry the changes across a
shutdown and startup. The DBMS_SERVICE package can also be used to create
services. The service name defaults to the global database name, a name comprising
the database name (DB_NAME initialization parameter) and domain name
(DB_DOMAIN initialization parameter). In the case of
sales.us.example.com
, the
database name is
sales
and the domain name is
us.example.com
.
Note:
Starting with Oracle Database 19c, customer use of the
SERVICE_NAMES
parameter is deprecated. To manage your services, Oracle recommends that
you use the
SRVCTL
or
GDSCTL
command line utilities, or the
DBMS_SERVICE
package.
The following figure shows clients connecting to multiple services associated with one
database.
Figure 2-4 Multiple Services Associated with One Database
book.us.example.com
soft.us.example.com
Database Server
Associating multiple services with one database enables the following functionality:
Chapter 2
Understanding Database Services
2-4

• A single database can be identified different ways by different clients.
• A database administrator can limit or reserve system resources. This level of control
enables better allocation of resources to clients requesting one of the services.
See Also:
• Oracle Database Administrator's Guide for additional information about
initialization parameters
• Oracle Database SQL Reference for additional information about the
ALTER
SYSTEM
statement
• Oracle Database Reference for additional information about the
SERVICE_NAMES parameter
• Oracle Database PL/SQL Packages and Types Reference for additional
information about the DBMS_SERVICE package.
2.3 Connecting to a Database Service
To connect to a database service, clients use a connect descriptor that provides the location
of the database and the name of the database service. The following example is an Easy
Connect descriptor that connects to a database service named
sales.us.example.com
, and
the host
sales-server
(the port is 1521 by default):
sales-server/sales.us.example.com
The following example shows the entry in the
tnsnames.ora
file for the preceding Easy
Connect connect descriptor and database service:
(DESCRIPTION=
(ADDRESS=(PROTOCOL=tcp)(
HOST=sales-server
)(PORT=1521))
(CONNECT_DATA=
(
SERVICE_NAME=sales.us.example.com
)))
• About Connect Descriptors
• About the Protocol Address
• About Service Registration
See Also:
"Understanding Naming Methods"
2.3.1 About Connect Descriptors
A connect descriptor is comprised of one or more protocol addresses of the listener and the
connect information for the destination service in the
tnsnames.ora
file. Example 2-1 shows a
connect descriptor mapped to the
sales
database.
Chapter 2
Connecting to a Database Service
2-5

Example 2-1 Connect Descriptor
sales=
(DESCRIPTION=
(ADDRESS=(PROTOCOL=tcp)(HOST=sales-server)(PORT=1521))
(CONNECT_DATA=
(SID=sales)
(SERVICE_NAME=sales.us.example.com)
(INSTANCE_NAME=sales)))
As shown in Example 2-1, the connect descriptor contains the following parameters:
• The ADDRESS section contains the following:
– PROTOCOL parameter, which identifies the listener protocol address. The
protocol is
tcp
for TCP/IP.
– HOST parameter, which identifies the host name. The host is
sales-server
.
– PORT parameter, which identifies the port. The port is
1521
, the default port
number.
– Optional HTTPS_PROXY and HTTPS_PROXY_PORT parameters, that allow
the database client connection to traverse through the organization’s forward
web proxy. These parameters are applicable only to the connect descriptors
where PROTOCOL=TCPS.
• The CONNECT_DATA section contains the following:
– SID parameter, which identifies the system identifier (SID) of the Oracle
database. The SID is
sales
.
– SERVICE_NAME parameter, which identifies the service. The destination
service name is a database service named
sales.us.example.com
.
The value for this connect descriptor parameter comes from the
SERVICE_NAMES initialization parameter (SERVICE_NAMES uses a final S)
in the initialization parameter file. The SERVICE_NAMES initialization
parameter is typically the global database name, which includes the database
name and domain name. In the example,
sales.us.example.com
has a
database name of
sales
and a domain of
us.example.com
.
Note:
Starting with Oracle Database 19c, customer use of the
SERVICE_NAMES
parameter is deprecated. To manage your services,
Oracle recommends that you use the
SRVCTL
or
GDSCTL
command
line utilities, or the
DBMS_SERVICE
package.
– INSTANCE_NAME parameter, which identifies the database instance. The
instance name is optional.
The INSTANCE_NAME parameter in the initialization parameter file defaults to
the SID entered during installation or database creation.
• About IPv6 Addresses in Connect Descriptors
Chapter 2
Connecting to a Database Service
2-6

See Also:
"Understanding Database Instances", and "Understanding Database Services"
2.3.1.1 About IPv6 Addresses in Connect Descriptors
A host can use IP version 4 (IPv4) and IP version 6 (IPv6) interfaces. IPv6 addresses and
host names that resolve to IPv6 addresses are usable in the HOST parameter of a TNS
connect address, which can be obtained through any of the supported net naming methods
listed in #unique_74/unique_74_Connect_42_G456831 .
End-to-end connectivity using IPv6 requires the following configuration:
• The client TNS connect address must connect to the Oracle Net Listener on the IPv6
endpoint.
• The database instance configured for Oracle Net Listener must listen for connection
requests on IPv6 endpoints.
For a given host name, Oracle Net attempts to connect to all IP addresses returned by
Domain Name System (DNS) name resolution until a successful connection is established or
all addresses have been attempted. Suppose that in Example 2-1 the
sales-server
host is
an IPv4-only host that is accepting client connections. DNS maps
sales-server
to the
following IP addresses:
1. IPv6 address
2001:0db8:0:0::200C:417A
2. IPv4 address
192.0.2.213
In this case, Oracle Net first tries to connect on the IPv6 address because it is first in the DNS
list. In this example,
sales-server
does not support IPv6 connectivity, so this attempt fails.
Oracle Net proceeds to connect to the IPv4 address, which succeeds.
See Also:
• "About TCP/IP Protocol"
• "Configuring Listening Protocol Addresses"
• "Using Oracle Connection Manager as a Bridge for IPv4 and IPv6"
• "IPv6 Network Connectivity"
2.3.2 About the Protocol Address
The address portion of the connect descriptor is the protocol address of the listener. To
connect to a database service, clients first contact a listener process that typically resides on
the database server. The listener receives incoming client connection requests and sends
these requests to the database server. After the connection is established, the client and
database server communicate directly.
Chapter 2
Connecting to a Database Service
2-7

The listener is configured to accept requests from clients at a protocol address. This
address defines the protocol the listener is listening on and any other protocol-specific
information. For example, the listener could be configured to listen at the following
protocol address:
(DESCRIPTION=
(ADDRESS=(PROTOCOL=tcp)(HOST=sales-server)(PORT=1521)))
The preceding example shows a TCP/IP protocol address that specifies the host of the
listener and a port number. Client connect descriptors configured with this same
protocol address can send connection requests to this listener.
2.3.3 About Service Registration
The connect descriptor specifies the database service name with which clients seek to
establish a connection. The listener knows which services can handle connection
requests because Oracle Database dynamically registers this information with the
listener. This process of registration is called service registration. Registration also
provides the listener with information about the database instances and the service
handlers available for each instance. A service handler can be a dispatcher or
dedicated server.
• Specifying an Instance Name
• Specifying a Service Handler
2.3.3.1 Specifying an Instance Name
If connecting to a specific instance of the database is required, then clients can specify
the INSTANCE_NAME of a particular instance in the connect descriptor. This feature
can be useful for an Oracle RAC configuration. For example, the following connect
descriptor specifies the instance name
sales1
that is associated with
sales.us.example.com
.
(DESCRIPTION=
(ADDRESS=(PROTOCOL=tcp)(HOST=sales-server)(PORT=1521))
(CONNECT_DATA=
(SERVICE_NAME=sales.us.example.com)
(INSTANCE_NAME=sales1)))
2.3.3.2 Specifying a Service Handler
Clients that always want to use a particular service handler type can use a connect
descriptor to specify the service handler type. In the following example, the connect
descriptor uses
(SERVER=shared)
to request a dispatcher when connecting to a
database. The database may be configured to use dedicated servers by default.
(DESCRIPTION=
(ADDRESS=(PROTOCOL=tcp)(HOST=sales-server)(PORT=1521))
(CONNECT_DATA=
(SERVICE_NAME=sales.us.example.com)
(SERVER=shared)))
When the listener receives the client request, it selects one of the registered service
handlers. Depending on the type of handler selected, the communication protocol
used, and the operating system of the database server, the listener performs one of
the following actions:
Chapter 2
Connecting to a Database Service
2-8

• Hands the connect request directly off to a dispatcher.
• Sends a redirect message back to the client with the location of the dispatcher or
dedicated server process. The client then connects directly to the dispatcher or dedicated
server process.
• Spawns a dedicated server process and passes the client connection to the dedicated
server process.
After the listener has completed the connection operation for the client, the client
communicates directly with the Oracle database without the listener's involvement. The
listener resumes listening for incoming network sessions.
The following should be considered when specifying service handlers:
• If you want the client to use a dedicated server, then specify
(SERVER=dedicated)
. If the
SERVER parameter is not set, then a shared server configuration is assumed. However,
the client will use a dedicated server if no dispatchers are available.
• If database resident connection pooling is enabled on the server, then specify
(SERVER=pooled)
to get a connection from the pool. If database resident connection
pooling is not enabled on the server, then the client request is rejected, and the user
receives an error message.
See Also:
• "About the Listener and Connection Requests" for a discussion about how the
listener works with service handlers
• Oracle Call Interface Programmer's Guide and Oracle Database Administrator's
Guide
• Oracle Database Global Data Services Concepts and Administration Guide for
additional information about management of global services
2.4 Understanding Service Handlers
Service handlers act as connection points to an Oracle database. A service handler can be a
dispatcher or a dedicated server process, or pooled.
• About Dispatchers
• About Dedicated Server Processes
• About Database Resident Connection Pooling
2.4.1 About Dispatchers
The shared server architecture uses a dispatcher process to direct client connections to a
common request queue. An idle shared server process from a shared pool of server
processes picks up a request from the common queue. This approach enables a small pool
of server processes to serve a large number of clients. A significant advantage of the shared
server model over the dedicated server model is reduced system resources, enabling support
of an increased number of users.
Chapter 2
Understanding Service Handlers
2-9

The listener uses the dispatcher as a type of service handler to which it can direct
client requests. When a client request arrives, the listener performs one of the
following actions:
• Hands the connection request directly to a dispatcher.
• Issues a redirect message to the client, containing the protocol address of a
dispatcher. The client then terminates the network session to the listener and
establishes a network session to the dispatcher, using the network address
provided in the redirect message.
The listener uses direct hand off whenever possible. Redirect messages are used, for
example, when dispatchers are remote to the listener.
The following figure shows the listener handing a connection request directly to a
dispatcher.
1. The listener receives a client connection request.
2. The listener hands the connect request directly to the dispatcher.
3. The client is now connected to the dispatcher.
Figure 2-5 Direct Hand Off to a Dispatcher
Client
Database
Shared
Server
Process
Shared
Server
Process
Dispatcher
1
3
Pool of shared
server processes
2
Listener
The following figure shows the role of a dispatcher in a redirected connection.
1. The listener receives a client connection request.
2. The listener provides the location of the dispatcher to the client in a redirect
message.
3. The client connects directly to the dispatcher.
Chapter 2
Understanding Service Handlers
2-10

Figure 2-6 Redirected Connection to a Dispatcher
Client
Database
Shared
Server
Process
Shared
Server
Process
Dispatcher
1
2
3
Database Instance
Pool of shared
server processes
Listener
2.4.2 About Dedicated Server Processes
In a dedicated server configuration, the listener starts a separate dedicated server process
for each incoming client connection request dedicated to servicing the client. After the
session is complete, the dedicated server process terminates. Because a dedicated server
process has to be started for each connection, this configuration may require more system
resources than shared server configurations.
A dedicated server process is a type of service handler that the listener starts when it
receives a client request. To complete a client/server connection, one of the following actions
occurs:
• The dedicated server inherits the connection request from the listener.
• The dedicated server informs the listener of its listening protocol address. The listener
passes the protocol address to the client in a redirect message and terminates the
connection. The client connects to the dedicated server directly using the protocol
address.
One of the preceding actions is selected based on the operating system and the transport
protocol.
If the client and database exist on the same computer, then a client connection can be
passed directly to a dedicated server process without going through the listener. This is
known as a bequeath protocol. The application initiating the session spawns a dedicated
server process for the connection request. This happens automatically if the application used
to start the database is on the same computer as the database.
Note:
In order for remote clients to connect to dedicated servers, the listener and the
database instance must be running on the same computer.
Chapter 2
Understanding Service Handlers
2-11

Figure 2-7 shows the listener passing a client connection request to a dedicated server
process.
1. The listener receives a client connection request.
2. The listener starts a dedicated server process, and the dedicated server inherits
the connection request from the listener.
3. The client is now connected directly to the dedicated server.
Figure 2-7 Connection to a Dedicated Server Process
Client
Database
Dedicated
Server
Process
1
2
3
Database Instance
Listener
Figure 2-8 shows the role of a dedicated server in a redirected connection.
1. The listener receives a client connection request.
2. The listener starts a dedicated server process.
3. The listener provides the location of the dedicated server process to the client in a
redirect message.
4. The client connects directly to the dedicated server.
Figure 2-8 Redirected Connection to a Dedicated Server Process
Client
Database
Dedicated
Server
Process
1
3
2
4
Database Instance
Listener
2.4.3 About Database Resident Connection Pooling
Database resident connection pooling provides a connection pool in the database
server for typical web application usage scenarios in which an application acquires a
database connection, works on it for a relatively short duration, and then releases it.
Database resident connection pooling pools "dedicated" servers. A pooled server is
the equivalent of a server foreground process and a database session combined.
Chapter 2
Understanding Service Handlers
2-12

Database resident connection pooling uses dynamic registration between the server and the
listener. It cannot use static registration.
Database resident connection pooling complements middle-tier connection pools that share
connections between threads in a middle-tier process. In addition, it enables sharing of
database connections across middle-tier processes on the same middle-tier host and even
across middle-tier hosts. This results in significant reduction in key database resources
needed to support a large number of client connections, thereby reducing the database tier
memory footprint and boosting the scalability of both middle-tier and database tiers. Having a
pool of readily available servers has the additional benefit of reducing the cost of creating and
closing client connections.
Database resident connection pooling provides pooling for dedicated connections across
client applications and processes. This feature is useful for applications that must maintain
persistent connections to the database and optimize server resources, such as memory.
Clients obtaining connections out of the database resident connection pool are persistently
connected to a background process, the connection broker, instead of the dedicated servers.
The connection broker implements the pool functionality and performs the multiplexing of
inbound connections from the clients to a pool of dedicated servers with sessions.
When a client must perform database work, the connection broker picks up a dedicated
server from the pool and assigns it to the client. Subsequently, the client is directly connected
to the dedicated server until the request is served. After the server finishes processing the
client request, the server goes back into the pool and the connection from the client is
restored to the connection broker.
The following figure shows the process.
Chapter 2
Understanding Service Handlers
2-13

Figure 2-9 Dedicated Server Processes Handling Connections Through the Connection Broker
Process
Client
process
n
Client
process
3
Client
process
2
Client
process
1
...
Client
process
n
Client
process
3
Client
process
2
Client
process
1
...
Pool of dedicated server processes
Direct
connection
after handoff
Connection
Broker
Hand back
Hand off
Persistent
connections
System Global Area
Host 1 Host 2
2.5 Understanding Naming Methods
Oracle Net Services offers several types of naming methods that support localized
configuration on each client, or centralized configuration that can be accessed by all
clients in the network.
• About Naming Methods
A naming method is a resolution method used by a client application to resolve a
connect identifier to a connect descriptor when attempting to connect to a
database service.
• Choosing a Naming Method
Selecting the appropriate naming method for mapping names to connect
descriptors depends upon the size of the organization.
• Establishing a Client Session Using a Naming Method
• Entering a Connect String
You can make a connection across the network after the network components are
started. How you make a connection depends upon the naming method and the
tool used for the connection.
Chapter 2
Understanding Naming Methods
2-14

2.5.1 About Naming Methods
A naming method is a resolution method used by a client application to resolve a connect
identifier to a connect descriptor when attempting to connect to a database service.
Overview
The information needed to use a service name to create a database connection can be
stored in a repository, which is represented by one or more naming methods. Users initiate a
connection request by providing a connect string.
A connect string includes a user name and password, along with a connect identifier. A
connect identifier can be the connect descriptor or a name that resolves to a connect
descriptor. The connect descriptor contains:
• Network route to the service, including the location of the listener through a protocol
address
• A database service name or Oracle system identifier (SID)
The following
CONNECT
command uses a connect string that has a complete connect
descriptor as the connect identifier instead of a network service name. The string should be
entered on a single line. It is shown on two lines because of page width.
SQL> CONNECT hr@(DESCRIPTION=(ADDRESS=(PROTOCOL=tcp)(HOST=sales-server1)
(PORT=1521))(CONNECT_DATA=(SERVICE_NAME=sales.us.example.com)))
One of the most common connect identifiers is a network service name, a simple name for a
service. The following
CONNECT
command uses a connect string that uses network service
name
sales
as the connect identifier:
SQL> CONNECT hr@sales
When network service name
sales
is used, connection processing takes place by first
mapping
sales
to the connect descriptor.
Types of Naming Methods
The mapped information is accessed by naming methods. The following naming methods are
available:
• Local naming
• Directory naming
• Easy Connect naming
• External naming
How to Configure Naming Methods
A naming method configuration consists of the following steps:
1. Select a naming method.
2. Map connect descriptors to the names or to a connect identifier.
3. Configure clients to use the naming method.
Chapter 2
Understanding Naming Methods
2-15

2.5.2 Choosing a Naming Method
Selecting the appropriate naming method for mapping names to connect descriptors
depends upon the size of the organization.
• For a small organization with only a few databases, use Easy Connect naming to
make TCP/IP connections with the host name of the database server or local
naming to store names in
tnsnames.ora
file on the clients.
• For large organizations with several databases, use directory naming to store
names in a centralized directory server.
• For an Internet network, configure the application web servers needed to connect
to the databases with the local naming method.
This is a summary of the advantages and disadvantages of each naming method, and
some recommendations for using them in the network:
Naming Method Description Advantages/Disadvantages Recommended for:
Local Naming Stores network service
names and their connect
descriptors in a localized
configuration file named
tnsnames.ora
, which by
default is located in the
ORACLE_BASE_HOME/
network/admin
directory.
Advantages:
• Provides a straightforward method
for resolving network service name
addresses.
• Resolves network service names
across networks running different
protocols.
Disadvantage: Requires local
configuration of all network service name
and address changes.
Simple distributed
networks with a small
number of services that
change infrequently.
Directory Naming Stores connect identifiers
in a centralized LDAP-
compliant directory server
to access a database
service.
Advantages:
• Centralizes network names and
addresses in a single place,
facilitating administration of name
changes and updates. This
eliminates the need for an
administrator to make changes to
what potentially could be hundreds
or even thousands of clients.
• Directory stores names for other
services.
• Tools provide simple configuration.
Disadvantage: Requires access to a
directory server.
Large, complex
networks (over 20
databases) that change
on a frequent basis.
Chapter 2
Understanding Naming Methods
2-16

Naming Method Description Advantages/Disadvantages Recommended for:
Easy Connect
Naming
Enables clients to connect
to an Oracle database
server by using a TCP/IP
connect string consisting
of a host name and
optional port and service
name.
Advantages:
• Requires minimal user configuration.
The user can provide only the name
of the database host to establish a
connection.
• The easy naming method requires
no client-side configuration.
• Eliminates the need to create and
maintain a local names configuration
file (
tnsnames.ora
).
Disadvantage: Available only in a limited
environment, as indicated in the
Recommended for column.
Simple TCP/IP networks
that meet the following
criteria:
• The client and
server are
connecting using
TCP/IP.
• No features
requiring a more
advanced connect
descriptor are
required.
External Naming Stores network service
names in a supported
third-party naming
service, such as Network
Information Service (NIS)
External Naming.
Advantage: Enables administrators to
load Oracle network service name into
their native name service using tools and
utilities with which they are already
familiar.
Disadvantage: Requires third-party
naming services that cannot be
administered using Oracle Net products.
Networks with existing
name services.
2.5.3 Establishing a Client Session Using a Naming Method
A typical process for establishing a client session using a naming method is as follows:
1. The client initiates a connect request by providing a connect identifier.
2. The connect identifier is resolved to a connect descriptor by a naming method.
3. The client makes the connection request to the address provided in the connect
descriptor.
4. A listener receives the request and directs it to the appropriate database server.
5. The connection is accepted by the database server.
Note:
Besides connect descriptors, you can use naming methods to map a connect name
to a protocol address or protocol address list.
2.5.4 Entering a Connect String
You can make a connection across the network after the network components are started.
How you make a connection depends upon the naming method and the tool used for the
connection.
The connect string takes the following format:
CONNECT username@connect_identifier
Chapter 2
Understanding Naming Methods
2-17

Default Connect Identifier
On most operating systems, you can define a default connect identifier. When using
the default, a connect identifier does not need to be specified in the connect string. To
define a default connect identifier, use the TWO_TASK environment variable on Linux
and UNIX platforms or the LOCAL environment variable or registry entry on Microsoft
Windows.
For example, if the TWO_TASK environment variable is set to
sales
, then you can
connect to a database from SQL*Plus with
CONNECT username
rather than
CONNECT
username@sales
. Oracle Net checks the TWO_TASK variable, and uses the value
sales
as the connect identifier.
For instructions on setting the TWO_TASK and LOCAL environment variables, see the
Oracle operating system-specific documentation.
Connect Identifier and Connect Descriptor Syntax Characteristics
Connect identifiers used in a connect string cannot contain spaces, unless enclosed
within single quotation marks (') or double quotation marks ("). In the following
examples, a connect identifier and a connect descriptor that contain spaces are
enclosed within single quotation marks:
CONNECT scott@'(DESCRIPTION=(ADDRESS=(PROTOCOL=tcp)(HOST=sales-server)
(PORT=1521))(CONNECT_DATA=(SERVICE_NAME=sales.us.example.com)))'
Enter password:
password
CONNECT scott@'cn=sales, cn=OracleContext, dc=us, dc=example, dc=com'
Enter password:
password
Single quotation marks are required if double quotation marks are used in a connect
identifier. For example:
CONNECT scott@'sales@"good"example.com'
Enter password:
password
Similarly, double quotation marks are required if single quotation marks are used in a
connect identifier. For example:
CONNECT scott@"cn=sales, cn=OracleContext, ou=Mary's Dept, o=example"
Enter password:
password
2.6 Enhancing Service Accessibility Using Multiple Listeners
For some configurations, such as Oracle RAC, multiple listeners on multiple nodes can
be configured to handle client connection requests for the same database service. In
the following example,
sales.us.example.com
can connect using listeners on either
sales1-server
or
sales2-server
.
(DESCRIPTION=
(ADDRESS_LIST=
(ADDRESS=(PROTOCOL=tcp)(HOST=sales1-server)(PORT=1521))
(ADDRESS=(PROTOCOL=tcp)(HOST=sales2-server)(PORT=1521)))
(CONNECT_DATA=
(SERVICE_NAME=sales.us.example.com)))
Chapter 2
Enhancing Service Accessibility Using Multiple Listeners
2-18

A multiple-listener configuration also enables you to leverage the failover and load balancing
features, either individually or in combination with each other.
• About Connect-Time Failover
• About Transparent Application Failover
• About Client Load Balancing
• About Connection Load Balancing
2.6.1 About Connect-Time Failover
The connect-time failover feature enables clients to connect to another listener if the initial
connection to the first listener fails. The number of listener protocol addresses determines
how many listeners are tried. Without connect-time failover, Oracle Net attempts a connection
with only one listener.
2.6.2 About Transparent Application Failover
The Transparent Application Failover (TAF) feature is a runtime failover for high availability
environments, such as Oracle Real Application Clusters. TAF fails over and reestablishes
application-to-service connections. It enables client applications to automatically reconnect to
the database if the connection fails and, optionally, resume a
SELECT
statement that was in
progress. The reconnection happens automatically from within the Oracle Call Interface (OCI)
library.
2.6.3 About Client Load Balancing
The client load balancing feature enables clients to randomize connection requests among
the listeners. Oracle Net progresses through the list of protocol addresses in a random
sequence, balancing the load on the various listeners. Without client load balancing, Oracle
Net progresses through the list of protocol addresses sequentially until one succeeds.
2.6.4 About Connection Load Balancing
The connection load balancing feature improves connection performance by balancing the
number of active connections among multiple dispatchers. In a single-instance environment,
the listener selects the least-loaded dispatcher to handle the incoming client requests. In an
Oracle Real Application Clusters environment, connection load balancing can balance the
number of active connections among multiple instances.
Due to dynamic service registration, a listener is always aware of all instances and
dispatchers regardless of their location. Depending on the load information, a listener decides
which instance and, if shared server is configured, to which dispatcher to send the incoming
client request.
In a shared server configuration, a listener selects a dispatcher in the following order:
1. Least-loaded node
2. Least-loaded instance
3. Least-loaded dispatcher for that instance
In a dedicated server configuration, a listener selects an instance in the following order:
1. Least-loaded node
Chapter 2
Enhancing Service Accessibility Using Multiple Listeners
2-19

2. Least-loaded instance
If a database service has multiple instances on multiple nodes, then the listener
chooses the least-loaded instance on the least-loaded node.
Chapter 2
Enhancing Service Accessibility Using Multiple Listeners
2-20

3
Managing Network Address Information
Identify how the network address information for Oracle Net Services can be stored in local
files or in a centralized directory server. Using localized management, network address
information is stored in
tnsnames.ora
files on each computer in the network. Using
centralized management, network address information is stored in centralized directory
server.
• Using Localized Management
• Using a Directory Server for Centralized Management
3.1 Using Localized Management
When localized management is used, network computers are configured with the files
described in Table 3-1. The files are stored locally on the computers.
Table 3-1 Oracle Net Configuration Files Used with Localized Management
Configuration File Description
tnsnames.ora
Located primarily on the clients, this file contains network service
names mapped to connect descriptors. This file is used for the local
naming method.
sqlnet.ora
Located on client and database server computers, this file may include
the following:
• Client domain to append to unqualified service names or network
service names
• Order of naming methods the client should use when resolving a
name
• Logging and tracing features to use
• Route of connections
• External naming parameters
• Oracle security parameters
• Database access control parameters
listener.ora
Located on the database server, this configuration file for the listener
may include the following:
• Protocol addresses it is accepting connection requests on
• Database and nondatabase services it is listening for
• Control parameters used by the listener
cman.ora
Located on the computer where Oracle Connection Manager runs, this
configuration file includes the following components:
• A listening endpoint
• Access control rule list
• Parameter list
Each Oracle Connection Manager configuration is encapsulated within
a single name-value (NV) string, which consists of the preceding
components.
3-1

Configuration files are typically created in the
ORACLE_HOME/network/admin
directory
and in the
ORACLE_BASE_HOME/network/admin
directory for a read-only Oracle home.
However, configuration files can be created in other directories. Oracle Net checks the
other directories for the configuration files. For example, the order for checking the
tnsnames.ora
file is:
1. The directory specified by the
TNS_ADMIN
environment variable.
2. If the
TNS_ADMIN
environment variable is not set or the file is not found in the
TNS_ADMIN
directory, then Oracle Net checks for the file in the
ORACLE_HOME/
network/admin
directory. For a read-only Oracle home, Oracle Net checks the
ORACLE_BASE_HOME/network/admin
directory.
3. For a read-only Oracle home, if the file is not found in the
ORACLE_BASE_HOME/
network/admin
directory, Oracle Net checks the
ORACLE_HOME/network/admin
directory.
Note:
On Microsoft Windows, the
TNS_ADMIN
environment variable is used if it is set
in the environment of the process. If the
TNS_ADMIN
environment variable is
not defined in the environment, or the process is a service which does not
have an environment, then Microsoft Windows scans the registry for a
TNS_ADMIN
parameter.
See Also:
• Oracle Database Global Data Services Concepts and Administration
Guide for information about the
gsm.ora
file
• Operating system-specific documentation
3.2 Using a Directory Server for Centralized Management
When an Oracle network uses a directory server, the directory server manages global
database links as network service names for the Oracle databases in the network.
Users and programs can use a global link to access objects in the corresponding
database.
Oracle Net Services uses a centralized directory server as one of the primary methods
for storing connect identifiers. Clients use the connect identifiers in their connect string,
and the directory server resolves the connect identifier to a connect descriptor that is
passed back to the client. This feature is called directory naming. This type of
infrastructure reduces the cost of managing and configuring resources in a network.
Oracle Internet Directory provides a centralized mechanism for managing and
configuring a distributed Oracle network. The directory server can replace client-side
and server-side localized
tnsnames.ora
files.
Chapter 3
Using a Directory Server for Centralized Management
3-2

The following figure shows a client resolving a connect identifier through a directory server.
1. The client contacts the directory server to resolve a connect identifier to a connect
descriptor.
2. The directory server resolves the connect identifier and retrieves the connect descriptor
for the client.
3. The client sends the connection request to the listener, using the connect descriptor.
Figure 3-1 Client Using a Directory Server to Resolve a Connect Identifier
Database
Server
Client
3
1
2
Directory
Server
Listener
Note:
Java Database Connectivity (JDBC) Drivers support directory naming. See Oracle
Database JDBC Developer's Guide for additional information.
This section contains the following topics:
• Understanding the Directory Information Tree
• Understanding Oracle Context
The entries under Oracle Context support various directory-enabled features, including
directory naming.
• Understanding Net Service Alias Entries
• Who Can Add or Modify Entries in the Directory Server
• Client Connections Using Directory Naming
Most clients needing to perform name lookups in the directory server access the directory
server using anonymous authentication.
Chapter 3
Using a Directory Server for Centralized Management
3-3

• Considerations When Using Directory Servers
• Limitations of Directory Naming Support with Microsoft Active Directory
3.2.1 Understanding the Directory Information Tree
Directory servers store information in a hierarchical namespace structure called a
directory information tree (DIT). Each node in the tree is called an entry. Oracle Net
Services uses both the tree structure and specific entries in the tree. DITs are
commonly aligned with an existing domain structure such as a Domain Name System
(DNS) structure or a geographic and organization structure.
The following figure shows a DIT structured according to DNS domain components.
Figure 3-2 DNS Domain Component DIT
dc=us
cn=OracleContext
cn=myproddb
dc=jp
dc=com
dc=example
The following figure shows a DIT structured according to country, organization, and
organizational units. This structure is commonly referred to as an X.500 DIT.
Figure 3-3 X.500 DIT
ou=sales
cn=OracleContext
cn=myproddb
ou=mtkg
c=us
o=example
For example, consider Figure 3-4. The
cn=sales
and
cn=db1
entries represent a
network service name and a database service, respectively. Additional entries under
cn=sales
and
cn=db1
contain the connect descriptor information. These entries are not
represented in the graphic. The
cn=sales
and
cn=db1
entries enable clients to connect
to the database using connect strings
CONNECT username@sales
and
CONNECT
username@db1
.
Chapter 3
Using a Directory Server for Centralized Management
3-4

Figure 3-4 Database Service and Net Service Entries in a DIT
dc=us
cn=OracleContext
cn=db1
dc=jp
dc=com
dc=example
(DESCRIPTION=
(ADDRESS=(PROTOCOL=tcp)(HOST=db1-server)
(PORT=1521))(CONNECT_DATA=
(SERVICE_NAME=db1.jp.example.com)))
cn=db1
cn=sales
.
.
.
.
.
.
Each entry is uniquely identified by a distinguished name (DN). The DN indicates exactly
where the entry resides in the directory server hierarchy. The DN for db1 is
dn:cn=db1,cn=OracleContext,dc=jp,dc=example,dc=com
. The DN for sales is
dn:cn=sales,cn=OracleContext,dc=jp,dc=example,dc=com
. The format of a DN places the
lowest component of the DIT to the left, then moves progressively up the DIT.
Each DN is made up of a sequence of relative distinguished names (RDNs). The RDN
consists of an attribute, such as
cn
, and a value, such as
db1
or
sales
. The RDN for db1 is
cn=db1
, and the RDN for sales is
cn=sales
. The attribute and its value uniquely identify the
entry.
• Fully-Qualified Names for Domain Component Namespaces
• Fully-Qualified Names for X.500 Namespaces
• Using the Relative Name of an Entry
If a client is configured with a default realm Oracle Context, then an entry can be
identified by its relative name, and the service can be referred to by its common name. A
relative name can be used if the entry is in the same Oracle Context that is configured to
be the default Oracle Context for the client's Oracle home.
• Using the Fully-Qualified Name of an Entry
3.2.1.1 Fully-Qualified Names for Domain Component Namespaces
For domain component namespaces, the default directory entry defined for the client must be
in one of the following formats:
dc[,dc][...]
ou,dc[,dc][...]
In the preceding syntax, [dc] represents an optional domain component, [...] represents
additional domain component entries and ou represents the organizational unit entry.
The fully-qualified name used in the connect identifier by the client must be in one of the
following formats:
cn.dc[.dc][...]
cn[.ou]@dc[.dc][...]
Chapter 3
Using a Directory Server for Centralized Management
3-5

In the preceding syntax, [cn] represents the Oracle Net entry.
Example 3-1 Using a Fully-Qualified Name with an Organizational Unit
Consider a directory server that contains an entry for database object sales with a DN
of
cn=sales,cn=OracleContext,dc=jp,dc=example,dc=com
. In this example, the client
requires a connect identifier of
sales.jp.example.com
.
Consider a similar entry that contains database object sales with a DN of
cn=sales,cn=OracleContext,ou=mktg,dc=jp,dc=example,dc=com
.
Because domain components must be separated from organization units, the client
must use the format
. The client requires the connect identifier to be
.
Figure 3-5 illustrates the preceding example.
Figure 3-5 Fully-Qualified Name for Domain Component Namespaces
cn=OracleContext
cn=sales
CONNECT scott@sales.jp.example.com
Connect String=
dc=jp, dc=example, dc=com
ou=mktg
cn=OracleContext
cn=sales
CONNECT scott@[email protected]
Connect String=
dc=jp, dc=example, dc=com
3.2.1.2 Fully-Qualified Names for X.500 Namespaces
For X.500 namespaces, the default directory entry defined for the client must be in one
of the following formats:
[ou],o
[ou],o,c
In the preceding formats, [ou] represents an optional organizational unit name, o
represents the organization, and c represents the country.
The fully-qualified name the client uses as the connect identifier must be in one of the
following formats:
cn[.ou].o
cn[.ou].o.c
In the preceding formats, cn represents the Oracle Net entry.
Chapter 3
Using a Directory Server for Centralized Management
3-6

For example, if the directory contains database object
sales
with a DN of
cn=sales,cn=OracleContext,ou=mktg,o=example,c=jp
, then the client requires a connect
identifier of
sales.mktg.example.jp
. Figure 3-6 illustrates this example.
Figure 3-6 Fully-Qualified Name for X.500 Namespaces
o=example
ou=mktg
cn=OracleContext
CONNECT scott@sales.mktg.example.jp
Connect String=
c=jp
cn=sales
3.2.1.3 Using the Relative Name of an Entry
If a client is configured with a default realm Oracle Context, then an entry can be identified by
its relative name, and the service can be referred to by its common name. A relative name
can be used if the entry is in the same Oracle Context that is configured to be the default
Oracle Context for the client's Oracle home.
Consider a directory server that contains an entry for a database called sales with a DN of
dn:cn=sales,cn=OracleContext,o=example,c=us
, as shown in Figure 3-7. If the client is
configured with a default realm Oracle Context of
cn=OracleContext,o=example,c=us
, then
the connect identifier can be
sales
.
Figure 3-7 Relative Naming
o=example
cn=OracleContext
cn=sales
CONNECT scott@sales
Connect String=
c=us
Note:
The JDBC OCI Driver supports both full-qualified and relative naming. The JDBC
Thin Driver supports fully-qualified naming only when the complete DN is used.
Chapter 3
Using a Directory Server for Centralized Management
3-7

Related Topics
• Oracle Database JDBC Developer’s Guide
3.2.1.4 Using the Fully-Qualified Name of an Entry
Consider the same directory structure as shown in Figure 3-7, but with the client's
Oracle home configured with a default realm Oracle Context of
cn=OracleContext,o=example,c=jp
.
Because the client is configured with a default Oracle Context that does not match the
location of sales in the directory server, a connect string that uses sales does not work.
Instead, the client must specifically identify the location of sales, which can be done
using one of the following ways:
• The entry's complete DN can be used in the connect string, for example:
CONNECT
username
@"cn=sales,cn=OracleContext,o=example,c=us"
Enter password:
password
JDBC Thin drivers support fully-qualified naming only when the complete DN is
used. However, many applications do not support the use of a DN.
• The entry can be referred to by a fully-qualified DNS-style name which is mapped
by the Directory Naming adapter to the full x.500 DN of the database object in the
LDAP directory, for example:
CONNECT
username
@sales.example.us
Enter password:
password
Note:
JDBC OCI Drivers support fully-qualified naming. JDBC Thin Drivers support
fully-qualified naming only when the complete DN is used. See the Oracle
Database JDBC Developer's Guide for additional information.
3.2.2 Understanding Oracle Context
The entries under Oracle Context support various directory-enabled features, including
directory naming.
In Figure 3-8, the entries
db1
and
sales
reside under
cn=OracleContext
. This entry is
a special RDN called an Oracle Context.
Chapter 3
Using a Directory Server for Centralized Management
3-8

Figure 3-8 Oracle Context in the DIT
dc=us
cn=OracleContext
cn=db1
dc=jp
dc=com
dc=example
(DESCRIPTION=
(ADDRESS=(PROTOCOL=tcp)(HOST=db1-server)
(PORT=1521))(CONNECT_DATA=
(SERVICE_NAME=db1.jp.example.com)))
cn=db1
cn=sales
.
.
.
.
.
.
During directory configuration, you set the default Oracle Context. Clients use this Oracle
Context as the default location to look up connect identifiers in the directory server. With
Oracle Internet Directory, an Oracle Context located at the root of the DIT, with DN of
dn:cn=OracleContext
, points to a default Oracle Context in an identity management realm.
An identity management realm is a collection of identities governed by the same
administrative policies. This Oracle Context is referred to as a realm Oracle Context. Unless
configured to use another Oracle Context, clients use this realm-specific Oracle Context.
The default Oracle Context affects the connect string. For example, if a client must access
the
db1
and
sales
entry frequently, then a reasonable default Oracle Context would be
dc=jp,dc=example,dc=com
. If a client directory entry does not match the directory entry
where a service is located, then the client must specify the fully-qualified name of an entry in
the connect string, as described in "Client Connections Using Directory Naming".
Note:
The RDN
cn=OracleContext
does not have to be explicitly specified in the connect
string.
Related Topics
• Oracle Fusion Middleware Administering Oracle Internet Directory
3.2.3 Understanding Net Service Alias Entries
Directory naming enables you to create network service alias entries in addition to database
service and network service name entries. A network service alias is an alternative name for
a network service name or database service. A network service alias entry does not have
connect descriptor information. Instead, it references the location of the entry for which it is
an alias. When a client requests a directory lookup of a network service alias, the directory
determines that the entry is a network service alias and completes the lookup as if it is the
referenced entry. For example, in the following figure, a network service alias of db1alias is
created for a database service of db1. When db1alias is used to connect to a database
Chapter 3
Using a Directory Server for Centralized Management
3-9

service, as in
CONNECT username@db1alias
, it will actually resolve to and use the
connect descriptor information for db1.
Figure 3-9 Net Service Alias db1alias in a Directory Server
cn=OracleContext
cn=db1
dc=jp
dc=com
dc=example
cn=db1alias
(Net Service Alias Entry)
There are several uses for network service aliases. As shown in Figure 3-9, a network
service alias can be useful as a way for clients to refer to a network service name by
another name. Another use is to have a network service alias in one Oracle Context
for a database service or network service name in a different Oracle Context. This
enables a database service or network service name to be defined once in the
directory server, but referred to by clients that use other Oracle Contexts.
In Figure 3-10, database service db1 resides in
dc=jp,dc=example,dc=com
. A network
service alias named db1 is created in
dc=us,dc=example,dc=com
. This enables clients
in both Japan and the United States to use the connect string
CONNECT username@db1
as opposed to clients in the Unites States needing to specify
CONNECT
username@db1.jp.example.com
.
Figure 3-10 Net Service Alias db1 in a Directory Server
cn=OracleContext
dc=jpdc=us
dc=com
dc=example
cn=db1
cn=OracleContext
cn=db1
(Net Service Alias Entry)
3.2.4 Who Can Add or Modify Entries in the Directory Server
The database service entries are configured during or after installation. You can then
use Oracle Enterprise Manager Cloud Control or Oracle Net Manager to modify the
Oracle Net attributes of the database service entries. You can also use these tools to
create network service name and network service alias entries.
Chapter 3
Using a Directory Server for Centralized Management
3-10

To use these configuration tools, a DIT structure containing a root Oracle Context, and
identity management realm must exist. The directory administrator creates this structure with
Oracle Internet Directory Configuration Assistant. For some deployments, the directory
administrator may need to create additional Oracle Contexts. Additional Oracle Contexts are
usually used to subdivide large sites, or separate a production environment from a test
environment.
Certain tools are used by certain groups, and you must be a member of the group to use the
tools, as described in the following:
• To create a database service entry with Database Configuration Assistant:
–
OracleDBCreators
group (
cn=OracleDBCreators,cn=OracleContext...
)
–
OracleContextAdmins
group
(
cn=OracleContextAdmins,cn=Groups,cn=OracleContext...
)
• To create network service names or network service aliases with Oracle Net Manager:
–
OracleNetAdmins
group (
cn=OracleNetAdmins,cn=OracleContext...
)
–
OracleContextAdmins
group
The
OracleNetAdmins
group is owned by itself. Members of the
OracleNetAdmins
group have
create, modify, and read access to Oracle Net objects and attributes. They can also add or
delete members in the group, and add or delete groups to be owners of the
OracleNetAdmins
group.
Any member of the
OracleNetAdmins
group can add or delete other members from the
OracleNetAdmins
group. If you prefer another group to add or delete
OracleNetAdmins
members, then you can change the owner attribute of the
OracleNetAdmins
group to another
group. The owner cannot be an individual user entry but must be a group entry, and the group
entry is one comprised of the LDAP schema object classes
GroupOfUniqueNames
and
orclPriviledgeGroup
.
The
OracleContextAdmins
group is a super-user group for Oracle Context. Members of the
OracleContextAdmins
group can add all supported types of entries to Oracle Context.
The directory user that created Oracle Context is automatically added to these groups. Other
users can be added to these groups by the directory administrator.
See Also:
• "Configuring the Directory Naming Method" for additional information about
using Oracle Net Manager
• Oracle Database Administrator's Guide for additional information about
registering a database service with Database Configuration Assistant
3.2.5 Client Connections Using Directory Naming
Most clients needing to perform name lookups in the directory server access the directory
server using anonymous authentication.
Chapter 3
Using a Directory Server for Centralized Management
3-11

To perform a lookup, the directory server must allow anonymous authentication.
Directory servers usually allow anonymous authentication by default, however, some
directory servers, such as earlier releases of Oracle Internet Directory, require
directory configuration to allow anonymous access.
To look up entries, a client must be able to find the directory server in which that entry
resides. Clients locate a directory server in one of two ways:
• Dynamically using DNS. In this case, the directory server location information is
stored and managed in a central domain name server. The client, at request
processing time, retrieves this information from DNS.
• Statically in the directory server usage file,
ldap.ora
, created by Oracle Internet
Directory Configuration Assistant and stored on the client host.
After a directory is found, clients are directed to the realm Oracle Context from the root
Oracle Context.
Clients make connections to a database using connect identifiers in the same way
they might use other naming methods. A connect identifier can be a database service,
network service name, or network service alias. These can be referred to by their
common names (relative name) if the default Oracle Context is where the entity
resides. If not, then the connect identifier needs a fully-qualified name or distinguished
name.
3.2.6 Considerations When Using Directory Servers
The following considerations should be reviewed when using directory servers:
• Performance Considerations
• Security Considerations
• Object Classes
3.2.6.1 Performance Considerations
Connect identifiers are stored in a directory server for all clients to access. Depending
on the number of clients, there can be a significant load on a directory server.
During a connect identifier lookup, a name is searched under a specific Oracle
Context. Users expect relatively quick performance so the database connect time is
not affected. Because of the scope of the lookup, users may begin to notice slow
connect times if lookups take more than one second.
You can resolve performance problems by changing the network topology or
implementing replication.
See Also:
Directory server vendor documentation for details on resolving performance
issues
Chapter 3
Using a Directory Server for Centralized Management
3-12

3.2.6.2 Security Considerations
Administrative clients can create and modify entries in the directory server, so security is
essential. This section contains the following security-related topics:
• Authentication Methods
Clients use different methods of authentication depending upon the task to be performed,
such as resolving connect string names and managing directory entries.
• Access Control Lists
3.2.6.2.1 Authentication Methods
Clients use different methods of authentication depending upon the task to be performed,
such as resolving connect string names and managing directory entries.
• Clients that perform lookups for information in the directory server typically use
anonymous authentication.
You can configure the client LDAP naming adapter to authenticate the LDAP bind during
name lookup. Sites that need to protect their network service data or disable anonymous
binds to the directory must configure their clients to use wallets for authentication during
name lookup.
This configuration involves mapping the DN in the client certificate to the user's DN in the
directory server. You must set the following parameters in the
sqlnet.ora
file for these
clients:
–
NAMES.LDAP_AUTHENTICATE_BIND=TRUE
–
WALLET_LOCATION=location_value
The Oracle wallet trust store must contain root certificates issued by the certificate
authority of the LDAP server.
Starting with Oracle Database 21c, you can configure the client LDAP naming adapter to
authenticate the LDAPS bind using simple authentication. This method uses LDAP over
TLS connection (LDAPS) by accessing the user name and password stored in the wallet.
• Clients that administer the directory server entries authenticate with the directory server.
Database Configuration Assistant or Oracle Net Manager can be used to add or modify
the entries. Only authenticated users with proper privileges can modify entries. Use one
of the following authentication methods:
– Simple Authentication
The client identifies itself to the directory server using a DN and password. The
server verifies that the DN and password sent by the client matches the DN and
password stored in the directory server.
– Strong Authentication
The client identifies itself to the directory server using a public-key encryption
available with Transport Layer Security (TLS). In public-key encryption, the sender of
a message encrypts the message with the public key of the recipient. Upon delivery,
the recipient decrypts the message using the recipient's private key.
If you have configured the directory server with mutual TLS authentication and have
mapped the DN in the client certificate to the directory user entry, then the directory
server uses the client certificate for authentication.
Chapter 3
Using a Directory Server for Centralized Management
3-13

Related Topics
• About TCP/IP with TLS Protocol
The TCP/IP with Transport Layer Security (TLS) protocol enables an Oracle
application on a client to communicate with remote databases through TCP/IP and
TLS.
• Configuring the LDAP Naming Adapter to Use Wallets
The client LDAP naming adapter authenticates the LDAP bind while connecting to
the LDAP directory to resolve connect string names. You can configure the
adapter to use an Oracle wallet during the authentication.
• Oracle Database Security Guide
3.2.6.2.2 Access Control Lists
Authentication is used with access control lists (ACLs) to determine whether clients
can read, modify, or add information in the directory server. ACLs specify the following:
• The entries that the user can access.
• The authentication method used to access the entry.
• The access rights, or what the user can do with the object, such as read or write.
ACLs are established for a group of users. During Oracle Context creation, the
OracleDBCreators
,
OracleNetAdmins
, and
OracleContextAdmins
groups are created.
The user who creates Oracle Context using Oracle Net Configuration Assistant is
automatically added as the first member of these groups.
Table 3-2 describes ACL requirements for these groups, anonymous users, and their
relation to Oracle Net entries in the directory server.
Table 3-2 ACL Requirements for User Groups
Group ACL Requirements
Anonymous users All Oracle Net attributes and objects in the directory server have
read access for the anonymous user. Read access of these
objects for anonymous is also applied to Oracle Context. This
enables anonymous users to browse directory naming entries
contained within the
cn=OracleContext
RDN. This does not
include objects used for enterprise user security.
Oracle Net Configuration Assistant sets up this access during
client installation.
OracleContextAdmins
group users
Members of
OracleContextAdmins
(
cn=OracleContextAdmins,cn=Groups,cn=OracleContext,
...
) have create, modify, and read access to all directory naming
objects. Oracle Net Configuration Assistant establishes these
access rights for this group during Oracle Context creation.
In addition to the Oracle Context creator, other users can be
added to this group by the directory administrator using Oracle
Enterprise Manager Cloud Control.
Chapter 3
Using a Directory Server for Centralized Management
3-14

Table 3-2 (Cont.) ACL Requirements for User Groups
Group ACL Requirements
OracleDBCreators
group
users
Members of
OracleDBCreators
(
cn=OracleDBCreators,cn=OracleContext,...
) have create
and read access to database service objects and attributes.
Oracle Net Configuration Assistant establishes the access rights
for this group during Oracle Context creation.
In addition to the Oracle Context creator, other users can be
added to this group by the directory administrator with Oracle
Enterprise Manager Cloud Control.
OracleNetAdmins
group
users
Members of
OracleNetAdmins
(
cn=OracleNetAdmins,cn=OracleContext,...
) have create,
modify, and read access to directory naming objects and
attributes. Oracle Net Configuration Assistant establishes these
access rights for this group during Oracle Context creation.
In addition to the Oracle Context creator, other users can be
added to this group by the directory administrator.
Situations in which a high degree of security is desired for lookup or read-access to Oracle
Net Services name and related data, administrators can define additional read-access control
for some or all of the data. Such ACL definitions can prevent anonymous users from reading
the Oracle Net Services data. If read-access to Oracle Net Services data is restricted, then
clients must use authenticated binds to do name lookups.
There are no predefined groups or procedures for the Oracle configuration tools for defining
read-access restrictions on this data, so administrators must use standard object
management tools from their directory system to manually create any necessary groups and
ACLs.
ACLs can be added to Oracle Net Services objects using
ldapmodify
and an LDIF-format
file. Example 3-2 shows how to restrict all access for user,
cn=user1
:
Example 3-2 Restricting User Access with an Access Control List
dn: cn=sales,cn=oraclecontext,dc=example,dc=com
replace: orclentrylevelaci
orclentrylevelaci: access to attr=(*)
by dn="cn=user1" (noread,nosearch,nowrite,nocompare)
The preceding example illustrates the basic form of an ACL for a single object. This approach
is not necessarily the best way to define access because access definitions for objects are
complex and may involve security properties which are inherited from parent nodes in the
DIT. Oracle recommends that administrators refer to the documentation for their directory
systems, and integrate access management for Oracle Net Services objects into a directory-
wide policy and security implementation.
For Oracle Internet Directory directories,
oidadmin
has functionality to create users, groups,
and also define ACLs for objects and general directory security.
Related Topics
• Authentication Methods
Clients use different methods of authentication depending upon the task to be performed,
such as resolving connect string names and managing directory entries.
Chapter 3
Using a Directory Server for Centralized Management
3-15

• About the OracleNetAdmins Group
3.2.6.3 Object Classes
Directories must be populated with the correct version of the Oracle schema before
Oracle Context, a database service or network service name entry can be created.
The Oracle schema defines the type of objects, called object classes, that can be
stored in the directory server and their attributes. The following table lists the object
classes for database service, network service name, and network service alias entries.
Table 3-3 Oracle Net Services LDAP Main Object Classes
Object Class Description
orclDbServer
Defines the attributes for database service entries.
orclNetService
Defines the attributes for network service name entries.
orclNetServiceAlias
Defines the attributes for network service alias entries.
The following table lists the object classes used by
orclDbServer
,
orclNetService
,
and
orclNetServiceAlias
.
Table 3-4 Oracle Net Services LDAP Derived Object Classes
Object Class Description
orclNetAddress
Defines a listener protocol address.
orclNetAddressList
Defines a list of addresses.
orclNetDescription
Specifies a connect descriptor containing the protocol
address of the database and the connect information to the
service.
orclNetDescriptionList
Defines a list of connect descriptors.
These object classes use attributes that specify the contents of connect descriptors.
See Also:
Oracle Database Net Services Reference for additional information about
these object classes and their attributes
3.2.7 Limitations of Directory Naming Support with Microsoft Active
Directory
In addition to Oracle Internet Directory, directory naming support is also provided with
Microsoft Active Directory with the following limitations:
• Oracle provides support for Microsoft Active Directory only on Microsoft Windows
operating systems. Therefore, client computers and the database server must run
Chapter 3
Using a Directory Server for Centralized Management
3-16

on Microsoft Windows operating systems to access or create entries in Microsoft Active
Directory.
• The following features are not supported by Microsoft Active Directory:
– Multiple Oracle Contexts
Microsoft Active Directory can support only one Oracle Context.
– Net service aliases
You cannot create network service aliases in Microsoft Active Directory. However,
you can create network service names.
See Also:
Microsoft Active Directory documentation for Microsoft-specific information
Chapter 3
Using a Directory Server for Centralized Management
3-17

4
Understanding the Communication Layers
The primary function of Oracle Net is to establish and maintain connections between a client
application and an Oracle database server. Oracle Net is comprised of several
communication layers that enable clients and database servers to share, modify, and
manipulate data.
• Understanding Oracle Net Stack Communication for Client/Server Applications
• Using Oracle Net Stack Communication for Java Applications
• Using Oracle Net Stack Communication for Web Clients
• Understanding Oracle Protocol Support Layer
A network protocol is responsible for transporting data from the client computer to the
database server computer. This section describes the protocols used by the Oracle
Protocol Support layer of the Oracle Net communication stack.
See Also:
Introducing Oracle Net Services for an introductory overview of Oracle Net
architecture
4.1 Understanding Oracle Net Stack Communication for Client/
Server Applications
A database server is the Oracle software managing a database, and a client is an application
that requests information from the server. The way the client and server communicate is
known as the client/server stack.
Information passed from a client application sent by the client communication stack across a
network protocol is received by a similar communication stack on the database server side.
The process flow on the database server side is the reverse of the process flow on the client
side, with information ascending through the communication layers.
Figure 4-1 illustrates the various layers on the client and on the database server after a
connection has been established.
4-1

Figure 4-1 Layers Used in a Client/Server Application Connection
This communication architecture is based on the Open Systems Interconnection (OSI)
model. In the OSI model, communication between separate computers occurs in a
stack-like fashion with information passing from one node to the other through several
layers of code, including:
1. Physical layer
2. Data link layer
3. Network layer
4. Transport layer
5. Session layer
6. Presentation layer
7. Application layer
The following figure shows how Oracle Net software consisting of the Oracle Net
foundation layer and Oracle Protocol Support fits into the session layer of the OSI
model.
Chapter 4
Understanding Oracle Net Stack Communication for Client/Server Applications
4-2

Figure 4-2 OSI Communication Layers
illustration:
release:
caption:
date:
platform:
net81100
9
OSI Communication Layers
12/18/00
pc
Application
Layer
Presentation
Layer (TTC)
Session Layer
(Oracle Net)
Transport Layer
Network Layer
Data Link Layer
Physical Layer
Network Connection
RDBMS
Client
Database Server
Presentation
Layer (TTC)
Session Layer
(Oracle Net)
Transport Layer
Network Layer
Data Link Layer
Physical Layer
See Also:
For additional information about the OSI stack, go to
http://www.ietf.org
Chapter 4
Understanding Oracle Net Stack Communication for Client/Server Applications
4-3

This section contains the following topics:
• About the Client Communication Stack
• About the Server Communication Stack
4.1.1 About the Client Communication Stack
The client communication stack includes the following:
• Client Application Layer
• Presentation Layer
• Oracle Net Foundation Layer
• Oracle Protocol Support Layer
4.1.1.1 Client Application Layer
During a session with the database, the client uses Oracle Call Interface (OCI) to
interact with the database server. OCI is a software component that provides an
interface between the application and SQL.
See Also:
Oracle Call Interface Programmer's Guide
4.1.1.2 Presentation Layer
Character set differences can occur if the client and database server run on different
operating systems. The presentation layer resolves any differences. It is optimized for
each connection to perform conversion when required.
The presentation layer used by client/server applications is Two-Task Common (TTC).
TTC provides character set and data type conversion between different character sets
or formats on the client and database server. At the time of initial connection, TTC is
responsible for evaluating differences in internal data and character set
representations and determining whether conversions are required for the two
computers to communicate.
4.1.1.3 Oracle Net Foundation Layer
The Oracle Net foundation layer is responsible for establishing and maintaining the
connection between the client application and database server, as well as exchanging
messages between them. The Oracle Net foundation layer can perform these tasks
because of Transparent Network Substrate (TNS) technology. TNS provides a single,
common interface for all industry-standard OSI transport and network layer protocols.
TNS enables peer-to-peer application connectivity, where two or more computers can
communicate with each other directly, without the need for any intermediary devices.
On the client side, the Oracle Net foundation layer receives client application requests
and resolves all generic computer-level connectivity issues, such as:
Chapter 4
Understanding Oracle Net Stack Communication for Client/Server Applications
4-4

• The location of the database server or destination
• How many protocols are involved in the connection
• How to handle interrupts between client and database server based on the capabilities of
each
On the server side, the Oracle Net foundation layer performs the same tasks as it does on
the client side. It also works with the listener to receive incoming connection requests.
In addition to establishing and maintaining connections, the Oracle Net foundation layer
communicates with naming methods to resolve names and uses security services to ensure
secure connections.
4.1.1.4 Oracle Protocol Support Layer
Oracle protocol support layer is positioned at the lowest layer of the Oracle Net foundation
layer. It is responsible for mapping TNS functionality to industry-standard protocols used in
the client/server connection. This layer supports the following network protocols:
• TCP/IP (IPv4 and IPv6)
• TCP/IP with Transport Layer Security (TLS)
• Named Pipes
• Sockets Direct Protocol (SDP)
• Exadirect
All Oracle software in the client/server connection process requires an existing network
protocol stack to establish the computer-level connection between the two computers for the
transport layer. The network protocol is responsible for transporting data from the client
computer to the database server computer, at which point the data is passed to the server-
side Oracle protocol support layer.
Related Topics
• Understanding Oracle Protocol Support Layer
A network protocol is responsible for transporting data from the client computer to the
database server computer. This section describes the protocols used by the Oracle
Protocol Support layer of the Oracle Net communication stack.
4.1.2 About the Server Communication Stack
The server communication stack uses the same layers as the client stack with the exception
that the database uses Oracle Program Interface (OPI). For each statement sent from OCI,
OPI provides a response. For example, an OCI request to fetch 25 rows would elicit an OPI
response to return the 25 rows after they have been fetched.
4.2 Using Oracle Net Stack Communication for Java
Applications
The Oracle Java Database Connectivity (JDBC) Drivers provide Java applications access to
an Oracle database. Oracle offers two JDBC drivers.
• JDBC OCI Driver is a type 2 JDBC driver which is used by client/server Java
applications. The JDBC OCI driver uses a communication stack similar to a standard
Chapter 4
Using Oracle Net Stack Communication for Java Applications
4-5

client/server communication stack. The JDBC OCI driver converts JDBC
invocations to calls to OCI which are then sent over Oracle Net to the Oracle
database server.
• JDBC Thin Driver is a type 4 driver which is used by Java applets. The JDBC Thin
Driver establishes a direct connection to the Oracle database server over Java
sockets. The JDBC Thin driver uses a Java implementation of the Oracle Net
foundation layer called JavaNet and a Java implementation of TTC called
JavaTTC to access the database.
The following figure shows the stack communication layers used by JDBC drivers.
Figure 4-3 Layers Used for Java-Client Applications
See Also:
Oracle Database JDBC Developer's Guide
4.3 Using Oracle Net Stack Communication for Web Clients
The Oracle database server supports many other implementations for the presentation
layer that can be used for web clients accessing features inside the database in
addition to TTC. The listener facilitates this by supporting any presentation
implementation requested by the database.
Chapter 4
Using Oracle Net Stack Communication for Web Clients
4-6

Figure 4-4 shows the stack communication layers used in an HTTP or FTP connection to
Oracle XML DB in the Oracle database instance. WebDAV connections use the same stack
communication layers as HTTP and FTP.
Figure 4-4 Layers Used in Web Client Connections
Presentation -
HTTP or FTP
Web Browser
Transport Protocol -
TCP/IP
Client
Database Server
RDBMS and
Oracle XML DB
Presentation -
HTTP or FTP
TCP/IP Oracle
Protocol Support
Transport Protocol -
TCP/IP
See Also:
Oracle XML DB Developer's Guide
4.4 Understanding Oracle Protocol Support Layer
A network protocol is responsible for transporting data from the client computer to the
database server computer. This section describes the protocols used by the Oracle Protocol
Support layer of the Oracle Net communication stack.
• About TCP/IP Protocol
TCP/IP (Transmission Control Protocol/Internet Protocol) is the standard communication
protocol suite used for client/server communication over a network.
• About TCP/IP with TLS Protocol
The TCP/IP with Transport Layer Security (TLS) protocol enables an Oracle application
on a client to communicate with remote databases through TCP/IP and TLS.
• About Named Pipes Protocol
The Named Pipes protocol is a high-level interface providing interprocess
communications between clients and database servers using distributed applications.
• About Sockets Direct Protocol (SDP)
The Sockets Direct Protocol (SDP) is an industry-standard wire protocol between
InfiniBand network peers. When used over an InfiniBand network, SDP reduces TCP/IP
overhead by eliminating intermediate replication of data and transferring most of the
messaging burden away from the CPU and onto the network hardware.
• About Exadirect Protocol
The Exadirect protocol is an innovative protocol for low overhead database access. Use
the new transport to improve latency and throughput by leveraging Remote Direct
Memory Access (RDMA) in an InfiniBand environment.
Chapter 4
Understanding Oracle Protocol Support Layer
4-7

• About Websocket Protocol
The Database client connection supports secure websocket protocol. The secure
web socket connection establishment is designed to work over
HTTPS
, to support
HTTPS
proxies and intermediary proxies.
4.4.1 About TCP/IP Protocol
TCP/IP (Transmission Control Protocol/Internet Protocol) is the standard
communication protocol suite used for client/server communication over a network.
TCP is the transport protocol that manages the exchange of data between hosts. IP is
a network layer protocol for packet-switched networks.
Oracle Net supports IP in two versions: IP version 4 (IPv4) and IP version 6 (IPv6).
IPv6 addresses the shortcomings of the currently used IPv4. The primary benefit of
IPv6 is a large address space derived from the use of 128-bit addresses.
• IPv6 Address Notation
• IPv6 Interface and Address Configurations
• IPv6 Network Connectivity
• IPv6 Support in Oracle Database
See Also:
http://tools.ietf.org/html/rfc2460
for the IPv6 specification
4.4.1.1 IPv6 Address Notation
Oracle Database supports the standard IPv6 address notations specified by RFC
2732. A 128-bit IP address is generally represented as 8 groups of 4 hexadecimal
digits, with the colon (
:
) symbol as the group separator. For example, the following
address is in a valid IPv6 format:
2001:0db8:0000:0000:0000:0000:200C:417A
Each hexadecimal digit in the address represents 4 bits, so each group in the address
represents 16 bits. The following addresses represent the first and last hosts in the
2001:0db8:0000:0000
subnet:
2001:0db8:0000:0000
:0000:0000:0000:0000
2001:0db8:0000:0000
:FFFF:FFFF:FFFF:FFFF
In shorthand notation, consecutive zero fields can be compressed with a double colon
(
::
) separator, as shown in the following equivalent notations:
2001:0db8:0:0::200C:417A
2001:0db8::200C:417A
2001:DB8::200C:417A
• CIDR Notation
• IPv6 Addresses in URLs
Chapter 4
Understanding Oracle Protocol Support Layer
4-8

• IPv4-Mapped Addresses
See Also:
•
http://www.ietf.org/rfc/rfc2732.txt
for RFC 2732, and information about
notational representation
•
http://www.ietf.org/rfc/rfc3513.txt
for RFC 3513, and information about
proper IPv6 addressing
4.4.1.1.1 CIDR Notation
Classless Inter-Domain Routing (CIDR) is a method of grouping IP addresses into subnets
that are independent of the value of the addresses. Classless routing was designed to
overcome the exhaustion of address space in the IP class system and the unmanageable
growth in the size of routing tables.
CIDR denotes a network by the first address in the network and the size in bits of the network
prefix in decimal, separated with a slash (
/
). For example,
2001:0db8::/32
indicates that the
first 32 bits of the address identify the network, whereas the remaining bits identify the hosts
in the network.
CIDR uses an analogous notation for IPv4 address. For example, in the notation
192.0.2.0/24
the first 24 bits of the address represent the network prefix. The
DBMS_NETWORK_ACL_ADMIN
package, which provides an API to manage access control lists,
supports CIDR notation for both IPv6 and IPv4 addresses and subnets.
See Also:
• Oracle Database PL/SQL Packages and Types Reference to learn about
DBMS_NETWORK_ACL_ADMIN
•
http://tools.ietf.org/html/rfc4632
for RFC 4632
4.4.1.1.2 IPv6 Addresses in URLs
In URLs, IPv6 addresses are enclosed by the left bracket (
[
) and right bracket (
]
) characters.
For example, the IPv6 address
[2001:0db8:0:0:8:800:200C:417A]
forms part of the
following URLs:
http://[2001:0db8:0:0:8:800:200C:417A]
http://[2001:0db8:0:0:8:800:200C:417A]:80/index.html
4.4.1.1.3 IPv4-Mapped Addresses
IPv4-mapped addresses are a subclass of IPv6 addresses in which the following conditions
are true:
• The first 80 bits are set to 0 in the standard IPv6 notation
Chapter 4
Understanding Oracle Protocol Support Layer
4-9

• The second 16 bits are set to 1 in the standard IPv6 notation
• The last 32 bits are in IPv4 notation
An IPv4-mapped address can represent the addresses of IPv4-only nodes as IPv6
addresses.
Example 4-1 shows the same IP address in different notations. The first address uses
standard IPv6 notation. The second address is an IPv4-mapped address in which the
last 32 bits use dotted-decimal IPv4 notation. The last address uses a shorthand
notation to compress the consecutive zero fields.
Example 4-1 IPv4-Mapped Address
0000:0000:0000:0000:0000:FFFF:C0A8:0226
0000:0000:0000:0000:0000:FFFF:192.0.2.38
::FFFF:192.0.2.38
See Also:
http://tools.ietf.org/html/rfc4942
for security consideration relating to
the use of IPv4-mapped addresses
4.4.1.2 IPv6 Interface and Address Configurations
A host may have different IPv4 and IPv6 interface configurations. The following
configurations are possible for a host:
• Only an IPv4 interface, in which case the host is an IPv4-only host.
• Only an IPv6 interface, in which case the host is an IPv6-only host.
• Both an IPv4 and IPv6 interface, in which case the host is a dual-stack host.
A single host may also use different types of IP address. For example, a domain name
server may associate a dual-stack host both by an IPv4 and an IPv6 address or only
an IPv6 address. The IP address configurations that are not supported are the
following:
• An IPv4-only host cannot use an IPv6 address.
• An IPv6-only host cannot use an IPv4 address.
Figure 4-5 shows possible host and interface configurations. The dual-stack host in the
center of the diagram can communicate with IPv4 hosts over IPv4 and with IPv6 hosts
over IPv6.
Chapter 4
Understanding Oracle Protocol Support Layer
4-10

Figure 4-5 Supported Host and Interface Configurations
IPv4
192.0.2.5
IPv4 IPv6
192.0.2.4
2001:DB8::417B
IPv6 Address
IPv4 Address
Interface
Host
IPv6
2001:DB8::417A
4.4.1.3 IPv6 Network Connectivity
The network connectivity of a host refers to its ability to communicate with another host over
a network. For example, if a dual-stack client must communicate with an IPv6-only server,
then the network and router must make end-to-end communication between these hosts
possible.
A client or server host is IPv6-capable if it meets the following criteria:
• It has a configured IPv6 interface.
• It can connect to other hosts using the IPv6 protocol.
The IPv6 capability of a host is partially dependent on the network and partially dependent on
its interface and address configuration. Figure 4-6 shows the possibilities for connectivity in a
client/server network. For example, an IPv4-only host can connect to either an IPv4-only or
dual-stack server, but not an IPv6-only server. Both dedicated and shared server modes are
supported.
Chapter 4
Understanding Oracle Protocol Support Layer
4-11

Figure 4-6 Client/Server Connectivity
IPv4 / IPv6
IPv6 Only
IPv4 Only
Clients
IPv4 / IPv6
IPv6 Only
IPv4 Only
Servers
Table 4-1 summarizes the IP protocols used for client/server connectivity with different
host and network configurations.
Table 4-1 Supported Host and Network Configurations
Client IPv4-Only Server Dual-Stack Server IPv6-Only Server
IPv4-Only Client Supported (v4) Supported (v4) Not Supported
Dual-Stack Client Supported (v4) Supported (v4, v6) Supported (v6)
IPv6-Only Client Not Supported Supported (v6) Supported
See Also:
• "About IPv6 Addresses in Connect Descriptors"
• "Configuring Listening Protocol Addresses"
• "Using Oracle Connection Manager as a Bridge for IPv4 and IPv6"
Chapter 4
Understanding Oracle Protocol Support Layer
4-12

4.4.1.4 IPv6 Support in Oracle Database
Components in this release of Oracle Database support IPv6 in the configurations described
in "IPv6 Network Connectivity", with the following exception:
• Oracle Clusterware for private and ASM networks
See Also:
Oracle Clusterware Administration and Deployment Guide
4.4.2 About TCP/IP with TLS Protocol
The TCP/IP with Transport Layer Security (TLS) protocol enables an Oracle application on a
client to communicate with remote databases through TCP/IP and TLS.
Oracle Database supports mutual TLS (mTLS) and TLS authentication.
Mutual TLS or Two-Way Authentication
Mutual TLS (mTLS) authentication uses encryption data, such as certificates and private keys
in Oracle wallets on both nodes to configure an encrypted secure link between the database
server and database client. When the database client initiates a connection to the database
server, mTLS performs a handshake between both the server and client using certificates
stored in the wallet.
During the handshake, the following processes occur:
• The client and server negotiate a cipher suite (made up of a set of authentication,
encryption, and data integrity types) to apply to the messages they exchange.
• With mTLS, the client and server exchange certificates to authenticate both the parties to
each other. The certificate authenticity is checked against a root of trust by both the
parties.
• The client and server agree upon a symmetric encryption key used to encrypt the
communication channel.
The database checks the user certificate to verify that it bears the certificate authority's (CA)
signature.
TLS or One-Way Authentication
If you do not require client authentication, similar to
HTTPS
connections that require only the
web server to have a certificate, then you can configure TLS authentication. In this case, only
the server authenticates to the client by presenting its server certificate and the client verifies
whether the database server certificate is valid. This allows the client and server to establish
the encrypted connection before exchanging any messages.
The database client recognizes and authenticates the identity of the database server in one
of the following ways:
• TLS Authentication with a Client Wallet:
Chapter 4
Understanding Oracle Protocol Support Layer
4-13

TLS stores authentication data, such as trusted CA certificates and private keys, in
an Oracle wallet. When the database server sends its certificate to the client, the
database client verifies it using the trusted root certificate stored in the wallet.
• TLS Authentication without a Client Wallet:
An Oracle client wallet with the server certificate is not required if the database
server certificate is signed by a trusted root certificate that is already installed in
the client system's default certificate store. The default certificate store is located
in
/etc/pki/tls/cert.pem
on Linux or in the Microsoft Certificate Store on
Windows. When the server sends its certificate to the client, the database client
verifies the server certificate using common root certificates from the default
certificate store.
Walletless TLS authentication simplifies the client configuration and database
client-server communication process because clients can use the system default
certificate store to validate the server certificates, instead of configuring their own
local wallets with trusted root certificates.
Related Topics
• Oracle Database Security Guide
4.4.3 About Named Pipes Protocol
The Named Pipes protocol is a high-level interface providing interprocess
communications between clients and database servers using distributed applications.
Named Pipes is specifically designed for Microsoft Windows LAN environments. One
server-side process creates a named pipe, and the client-side process opens it by
name. What one side writes, the other can read.
If a remote Oracle database is running on a host system that supports network
communication using Named Pipes, then Oracle Net enables applications on a client
to communicate with the Oracle database using Named Pipes.
4.4.4 About Sockets Direct Protocol (SDP)
The Sockets Direct Protocol (SDP) is an industry-standard wire protocol between
InfiniBand network peers. When used over an InfiniBand network, SDP reduces
TCP/IP overhead by eliminating intermediate replication of data and transferring most
of the messaging burden away from the CPU and onto the network hardware.
4.4.5 About Exadirect Protocol
The Exadirect protocol is an innovative protocol for low overhead database access.
Use the new transport to improve latency and throughput by leveraging Remote Direct
Memory Access (RDMA) in an InfiniBand environment.
Exadirect protocol uses TCP for control communication and IB RC transport for data.
The Exadirect protocol adapter is supported only on Oracle Linux in this release.
Chapter 4
Understanding Oracle Protocol Support Layer
4-14

4.4.6 About Websocket Protocol
The Database client connection supports secure websocket protocol. The secure web socket
connection establishment is designed to work over
HTTPS
, to support
HTTPS
proxies and
intermediary proxies.
This protocol offers a native connection to the database with minimum protocol overhead.
Secure websocket protocol is used to negotiate
SQL*Net
protocol during connection
establishment between the database server and the client. The secure websocket protocol
uses
TLS
and requires wallet for operation.
The Web server should support web socket tunneling. Web server proxy module (in case of
Apache or Oracle HTTP Server (OHS),
mod_proxy_wstunnel
)) proxies the secure web socket
database connection data between the client and the backend database server. The
Database client connects using secure websocket protocol to Web server and the Web
server connects to the database using websocket protocol.
Chapter 4
Understanding Oracle Protocol Support Layer
4-15

5
Understanding Oracle Net Architecture
The Oracle Net listener is an application positioned on top of the Oracle Net foundation layer.
The database receives an initial connection from a client application through the listener.
The listener brokers client requests, handing off the requests to the Oracle database server.
Every time a client requests a network session with a database, the listener receives the
initial request.
Figure 5-1 illustrates the various layers on the client and database during an initial
connection. As shown in the diagram, the listener is at the top layer of the server-side
network stack.
Figure 5-1 Layers Used in an Initial Connection
• About Service Registration
• About the Listener and Connection Requests
• About Oracle Restart
• About Blocked Connection Requests
• Understanding Database Server Process Architecture
• Understanding Oracle Connection Manager Architecture
• Complete Architecture
• Reverse Connection Using CMAN Tunnels
Starting with Oracle Database 21c, you can use secure tunnels to connect to an Oracle
Database instance, which is inside a network that supports only outbound connections.
5.1 About Service Registration
The listener determines whether a database service and its service handlers are available
through service registration. During registration, the Listener Registration (LREG) process
provides the listener with information about the following:
5-1

• Names of the database services provided by the database
• Name of the database instance associated with the services and its current and
maximum load
• Service handlers (dispatchers and dedicated servers) available for the instance,
including their type, protocol addresses, and current and maximum load
The preceding information enables the listener to direct a client request appropriately.
The following figure shows two database instances registering information with two
listeners. The figure does not represent all the information that can be registered. For
example, listening endpoints, such as the port numbers, can be dynamically registered
with the listener.
Figure 5-2 Service Registration
Instance
Instance
Service names,
instance names,
network addresses
Listener
Listener
If the listener is not running when an instance starts, then the LREG process cannot
register the service information. LREG attempts to connect to the listener periodically,
but it may take up to 60 seconds before LREG registers with the listener after it has
been started. To initiate service registration immediately after the listener is started,
use the SQL statement
ALTER SYSTEM REGISTER
. This statement is especially useful in
high availability configurations.
5.2 About the Listener and Connection Requests
Each listener is configured with one or more protocol addresses that specify its
listening endpoints. The protocol address defines the protocol the listener listens on
and any other protocol-specific information. For example, the listener could be
configured to listen at the following protocol address:
(DESCRIPTION=
(ADDRESS=(PROTOCOL=tcp)(HOST=sales-server)(PORT=1521)))
The preceding example shows a TCP/IP address that specifies the host of the listener
(
sales-server
) and a port number (1521).
Clients configured with a protocol address can send connection requests to the
listener. When a client request reaches the listener, it selects an appropriate service
handler to service the request and forwards the request to the handler. A service
handler is a dispatcher or a dedicated server process that acts as a connection point
to a database.
Chapter 5
About the Listener and Connection Requests
5-2

The following figure illustrates the role of the listener during the establishment of a
connection. The figure shows a browser making an HTTP connection and a client making a
database connection.
1. The browser or client send a connection request to the listener.
2. The listener parses the request and forwards it to the service handler for the database
service requested.
3. The browser or client connect to the database.
Figure 5-3 Listener Architecture
Client
2
1
3
3
Database
Client
Web
Browser
HTTP
Presentation
over TCP/IP
Database
Connection
over TCP/IP
Listener
5.3 About Oracle Restart
Oracle Restart enhances the availability of Oracle databases in a single-instance
environment. Using the Server Control (SRVCTL) utility, you can add components such as
the listener to an Oracle Restart configuration. The configuration enables the listener to start
automatically when the listener fails or is not running.
When using Oracle Restart, note the following:
• Use the SRVCTL utility to start and stop the listener. Do not use the listener control utility
LSNRCTL.
• Each listener must have a unique name.
See Also:
• "Managing a Listener in an Oracle Restart Configuration"
• Oracle Database Administrator's Guide to learn how to configure Oracle Restart
Chapter 5
About Oracle Restart
5-3

5.4 About Blocked Connection Requests
Blocked connection requests can occur when an incoming request occurs before the
respective instance has been registered, or when a database is in restricted mode,
such as when a shutdown of the database is in progress. If a database instance is in
restricted mode, then LREG instructs the listener to block all connections to the
instance. Clients attempting to connect receive one of the following errors:
• ORA-12526: TNS:listener: all appropriate instances are in restricted mode
• ORA-12527: TNS:listener: all appropriate instances are in restricted mode or
blocking new connections
• ORA-12528: TNS:listener: all appropriate instances are blocking new connections
The ORA-12528 error occurs when a database instance is not yet registered with the
listener.
See Also:
• Oracle Database Error Messages for information about these error
messages
• Oracle Database SQL Reference for information about the
ALTER SYSTEM
REGISTER
statement
• Oracle XML DB Developer's Guide for information about dynamically
registering HTTP, FTP, and WebDAV listening endpoints
5.5 Understanding Database Server Process Architecture
Based on the service handler type registered with the listener, the listener forwards
requests to either a shared server or dedicated server process. The shared server
architecture enables a database server to allow many client processes to share server
processes. In a dedicated server configuration, the listener starts a separate dedicated
server process for each incoming client connection request dedicated to servicing the
client.
• About Shared Server Processes
• About Dedicated Server Processes
5.5.1 About Shared Server Processes
Shared server processes are used in the shared server architecture, as shown in
Figure 5-4. With shared server architectures, client processes ultimately connect to a
dispatcher. The LREG process registers the location and load of the dispatchers with
the listener, enabling the listener to forward requests to the least loaded dispatcher.
This registration process is not shown in the figure.
A dispatcher can support multiple client connections concurrently. Each client
connection is bound to a virtual circuit. A virtual circuit is a piece of shared memory
Chapter 5
About Blocked Connection Requests
5-4

used by the dispatcher for client database connection requests and replies. The dispatcher
places a virtual circuit on a common request queue when a request arrives. An idle shared
server picks up the virtual circuit from the request queue, services the request, and
relinquishes the virtual circuit before attempting to retrieve another virtual circuit from the
request queue. Shared servers place all completed requests into a dispatcher's response
queue. Each dispatcher has its own response queue in the SGA (System Global Area). This
approach enables a small pool of server processes to serve a large number of clients.
Figure 5-4 Shared Server Architecture
Client
Client
Web
Browser
Client
Web
Browser
Shared
Server
Process
Shared
Server
Process
Shared
Server
Process
Database
Database Server
Dispatcher
Dispatcher
Virtual
Circuits
Database Connection
over TCP/IP
FTP Connection
over TCP/IP
HTTP Connection
over TCP/IP
Client
Database Connection
over TCP/IP
5.5.2 About Dedicated Server Processes
In a dedicated server architecture, each client process connects to a dedicated server
process. The server process is not shared by any other client. Figure 5-5 illustrates a
dedicated server architecture.
LREG registers information about dedicated server processes with the listener. This enables
the listener to start a dedicated server process when a client request arrives and forward the
request to it.
Note:
Dedicated server architectures do not support HTTP, FTP, or WebDAV clients. Only
database clients are supported.
Chapter 5
Understanding Database Server Process Architecture
5-5
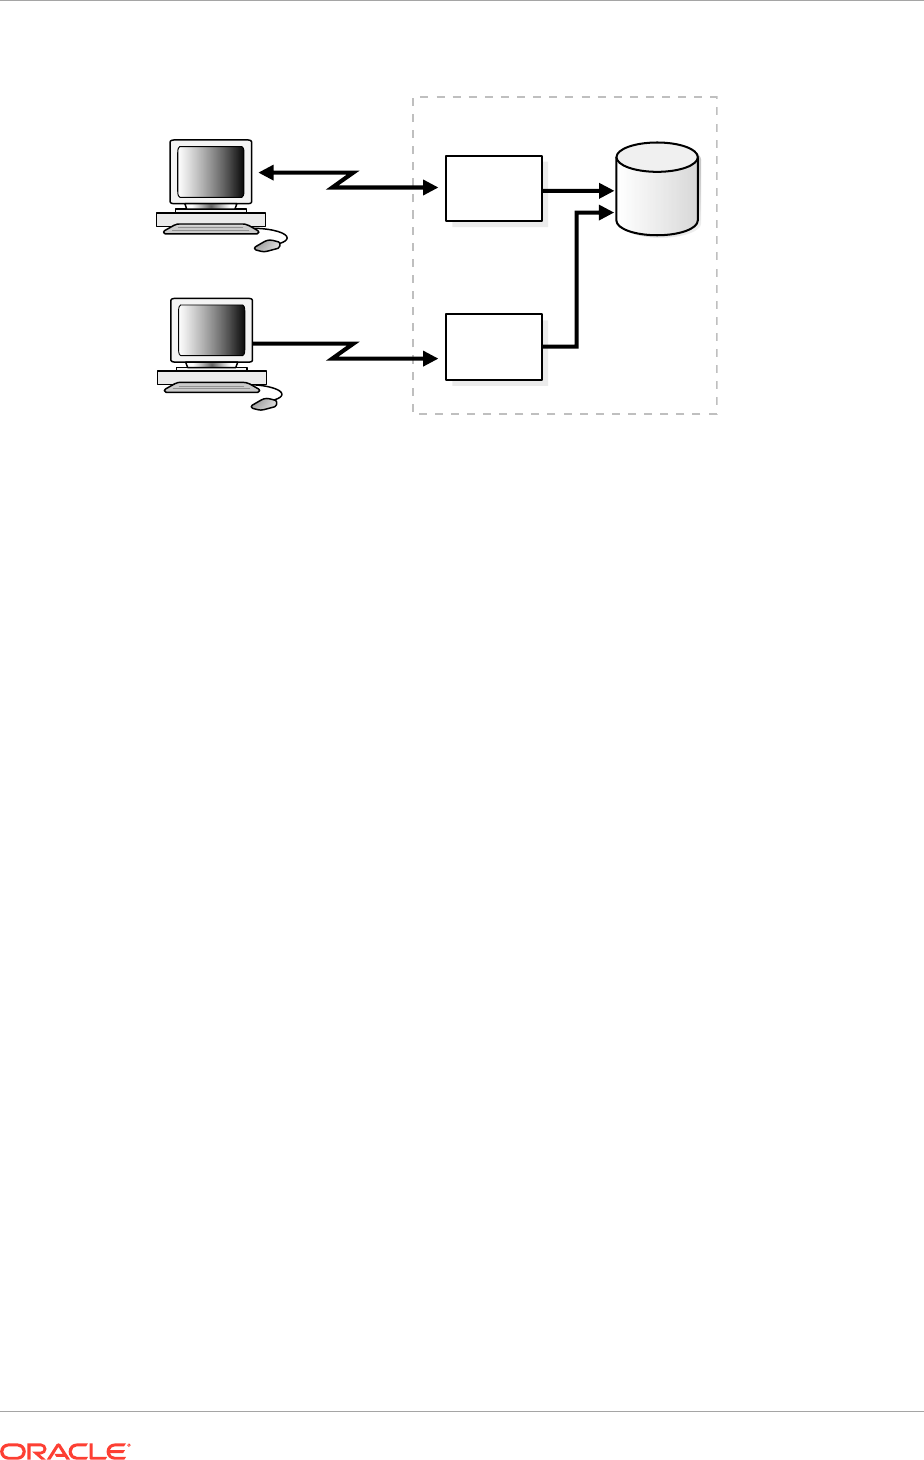
Figure 5-5 Dedicated Server Architecture
Client
Dedicated
Server
Process
Dedicated
Server
Process
Database
Database Server
Database
Connection
over TCP/IP
Client
Database
Connection
over TCP/IP
5.6 Understanding Oracle Connection Manager Architecture
Oracle Connection Manager is a gateway through which client connection requests
are sent either to the next hop or directly to the database server. Clients who relay
connection requests through an Oracle Connection Manager can take advantage of
the session multiplexing and access control features configured on Oracle Connection
Manager. It carries no service information until a LREG process registers its services.
Oracle Connection Manager consists of three components:
• listener
• CMGW (Oracle Connection Manager Gateway)
• CMADMIN (Oracle Connection Manager Administration)
The listener receives client connections and evaluates against a set of rules whether
to deny or allow access. If it allows access, then the listener forwards a request to a
gateway process, selecting the one with the fewest connections. The CMGW process,
in turn, forwards the request to another Oracle Connection Manager or directly to the
database server, relaying data until the connection terminates. If a connection to the
server already exists, then the gateway multiplexes, or funnels, its connections
through the existing connection. CMADMIN monitors the state of the gateway
processes and the listener, shutting down or starting up processes as needed. In
addition, it registers the location and load of the gateway processes with the listener,
and it answers requests from the Oracle Connection Manager Control utility.
In the following figure, the listener screens connection requests. A gateway process
registers with the CMADMIN process., and the CMADMIN process registers with the
listener. Finally, the listener forwards the connection requests to the gateway process.
After receiving the three valid client connections, the gateway process multiplexes
them through a single network protocol connection to the database. The fourth
connection is denied when it is evaluated against the set of rules.
Chapter 5
Understanding Oracle Connection Manager Architecture
5-6

Figure 5-6 Oracle Connection Manager Architecture
Oracle Connection
Manager Computer
Client
Client
Listener
Web
Browser
Web
Browser
CMADMIN
Process
Database
Server
Gateway
Process
Multiple
Connections
Funneled
Listener
5.7 Complete Architecture
Oracle Net provides an architectural solution that allows for greater scalability in Internet and
intranet environments.
Figure 5-7 shows how multiple connections to an Oracle database server are made more
scalable with Oracle Connection Manager and a shared server architecture. Oracle
Connection Manager is used to offload some of the network I/O of the application web
servers, and a shared server is used to serve more concurrent users.
Chapter 5
Complete Architecture
5-7

Figure 5-7 Scalable Architectural Solutions
Application
Web Servers
Oracle
Connection
Manager
Web
Browser
Web
Browser
Web
Browser
Application
Web Servers
Oracle
Connection
Manager
Web
Browser
Web
Browser
Web
Browser
Shared
Server
Process
Shared
Server
Process
Shared
Server
Process
Database
Database Server
Dispatcher
Dispatcher
Virtual
Circuits
5.8 Reverse Connection Using CMAN Tunnels
Starting with Oracle Database 21c, you can use secure tunnels to connect to an
Oracle Database instance, which is inside a network that supports only outbound
connections.
A network may allow only outbound connections and restrict inbound connections for
security reasons. However, using the Oracle Connection Manager tunnel feature, you
can connect to a database inside a network that allows only outbound connections.
Oracle Connection Manager creates a pool of connections, known as tunnels, that can
be used to connect to a database inside the network.
To access a database inside a network that allows only egress connections, you must
deploy CMAN at both the client site that is hosting the database and the server site
Chapter 5
Reverse Connection Using CMAN Tunnels
5-8

that wants to access the database. The data transfer happens over an encrypted channel on
public internet using TLS, if TLS is configured between the two CMANs.
When client CMAN is started, the gateways connects to the server CMAN and creates a pool
of connections, known as tunnels. Reverse connections from the server to the client are
routed through these tunnels. You can also configure the pool size.
In Figure 5-8, the client CMAN uses tunnel service of the server CMAN to establish a tunnel
connection. Once a client CMAN establishes a tunnel, the server CMAN offers client CMAN
identifier as a service for clients in site A.
Figure 5-8 Reverse Conncection Using CMAN Tunnels
Site A
Allows ingress connections
Site B
Allows egress connections
Server
CMAN
Client
CMAN
Basic Key
Reverse connections from site A to site B and site C
using the tunnel T1 created from site B to site A
and tunnel T2 created from site C to site A
A tunnel T1 is
created by the
Client CMAN in
Site B.
Client 1 Database
Site C
Allows egress connections
Client
CMAN
DatabaseClient 2
A tunnel T2 is
created by the
Client CMAN in
Site C.
T1
T2
Chapter 5
Reverse Connection Using CMAN Tunnels
5-9

Part II
Configuration and Administration of Oracle
Net Services
Part II describes how to set up and configure Oracle Net Services.
This part contains the following chapters:
• Quick Start to Oracle Net Services
• Managing Oracle Net Services
• Configuring Naming Methods
Find out how to configure connectivity information for client connections to the database
server.
• Configuring and Administering Oracle Net Listener
• Configuring and Administering Oracle Connection Manager
• Configuring a Shared Server Architecture
You can manage server loads on Oracle Database by managing dispatchers, and
configuring your clients to take advantages of Oracle Net Services features.
• Configuring Profiles
• Enabling Advanced Features of Oracle Net Services
Understand how to configure the advanced features of Oracle Net Services, including
advanced connect data parameters, load balancing, failover, and connections to non-
database services.
• Optimizing Performance

6
Quick Start to Oracle Net Services
Help novice users set up and test a simple but common network configuration, such as one
between a client application and a database over a TCP/IP network.
• Prerequisites for Establishing Connectivity
• Confirming Network Availability
• Starting Oracle Net Listener and the Oracle Database Server
• Starting Oracle Connection Manager
• Connecting to the Database
• Using Easy Connect to Connect to a Database
6.1 Prerequisites for Establishing Connectivity
The tasks in this chapter show a TCP/IP connection between a database server and a client
computer. The following conditions are assumed about the database server and client
computer:
• Database server
– The server is running on a network that can access the client
– An Oracle database is installed
– A listener is configured
– TCP/IP protocol support is installed
• Client computer
– The client computer is running on a network that can access the database server
– Oracle Client is installed
– TCP/IP protocol support is installed
In a TCP/IP network, each computer has a unique IP address. A name resolution service,
such as Domain Name System (DNS), can be used to map the IP address of a computer with
its host name. If a name resolution service is not used, then the mapping is typically stored in
a centrally maintained file called
hosts
. This file is located in the
/etc
directory on Linux and
the
\windows\system32\drivers\etc
directory on Microsoft Windows. For example, an entry
for a database server computer named
sales-server
may look like the following:
#IP address of server host name alias
192.0.2.203 sales-server sales.us.example.com
6.2 Confirming Network Availability
Before using Oracle Net to connect a client computer to a database server, confirm that the
client computer can successfully communicate with the database server computer. Evaluating
network connectivity can eliminate network-based errors.
6-1

The following procedure describes how to confirm network connectivity:
1. Confirm that the database server computer can communicate with itself with a
loopback test as follows:
a. To confirm hardware connectivity, enter the following command at the
command line:
ping
ip_address
In the preceding command,
ip_address
is the IP address of the database
server computer, such as the following:
ping 192.0.2.203
b. To confirm the DNS or host name is configured properly, enter the following
command at the command line:
ping
host_name
In the preceding command,
host_name
is the host name of the server.
c. To test the TCP/IP setup for the server, enter the following command:
ping 127.0.0.1
ping6 ::1
The IP address 127.0.0.1 is the standard IPv4 address for a loopback test.
The IP address ::1 (0: 0: 0: 0: 0: 0: 0: 1) is the standard IPv6 address for a
loopback test.
2. Verify the client computer can successfully communicate with the database server
computer.
The method for verification varies according to the network protocol. For TCP/IP,
you can use PING, FTP or TELNET utilities.
If the client computer cannot reach the server, then verify that the network cabling
and network interface cards are correctly connected. Contact your network
administrator to correct these problems.
6.3 Starting Oracle Net Listener and the Oracle Database
Server
Oracle Net Listener and the Oracle Database server must be running in order for the
database server to receive connections. The following procedure describes how to
start Oracle Net Listener:
1. Start the listener with the Listener Control utility. From the command line, enter the
following:
lsnrctl
LSNRCTL> START [
listener_name
]
In the preceding command, listener_name is the name of the listener defined in
the
listener.ora
file. It is not necessary to identify the listener if you are using the
default name
LISTENER
.
A status message indicating that the listener has successfully started displays.
Chapter 6
Starting Oracle Net Listener and the Oracle Database Server
6-2

2. Start the database as follows:
a. Start SQL*Plus without connecting to the database using the following command:
SQLPLUS /nolog
b. Connect to the database as SYSDBA using the following command:
SQL> CONNECT
username
as sysdba
You will be prompted to enter a password.
Note:
For simplicity, this example does not perform the password management
techniques that a deployed system normally uses. In a production
environment, follow the Oracle Database password management
guidelines, and disable any sample accounts. See Oracle Database
Security Guide for password management guidelines and other security
recommendations.
c. Start the database using the following command:
SQL> STARTUP
database_name
In the preceding command, database_name is the name of the database.
See Also:
Oracle Database Administrator's Guide for additional information about
starting the database
3. Confirm that database service registration with the listener has completed using the
Listener Control utility and the following command:
LSNRCTL> SERVICES [
listener_name
]
The
SERVICES
command lists the services supported by the database, along with at least
one available service handler. If the database service registration is not listed, then enter
the following SQL command:
SQL> ALTER SYSTEM REGISTER;
See Also:
"Monitoring Services of a Listener" for additional information about the
SERVICES
command
6.4 Starting Oracle Connection Manager
If Oracle Connection Manager is installed, then start Oracle Connection Manager as follows:
Chapter 6
Starting Oracle Connection Manager
6-3

1. Start the Oracle Connection Manager Control utility (CMCTL) using the following
commands:
cmctl
CMCTL> ADMINISTER [instance_name]
In the preceding command, instance_name is the name of Oracle Connection
Manager to administer. You can determine the name by viewing the
cman.ora
file.
The file is located on the Oracle Connection Manager computer in the
ORACLE_BASE_HOME/network/admin
directory by default.
Oracle Connection Manager displays a status message indicating the name of the
instance, and informs you that the instance has not yet been started.
Note:
If you do not provide an instance name as an argument, then provide
Oracle Connection Manager with a fully qualified host name. This is the
default. After you issue the
ADMINISTER
command, CMCTL displays the
instance name as follows:
CMAN_fully_qualified_host_name
2. Start Oracle Connection Manager that you have chosen to administer using the
following command:
cmctl> STARTUP
Oracle Connection Manager confirms that the instance has been started, and
provides status for the instance.
3. Exit from the Oracle Connection Manager Control utility using the following
command:
cmctl> EXIT
On Microsoft Windows, you can start Oracle Connection Manager through the Control
Panel, as follows:
1. Select Services in the Control Panel.
2. Select the
OracleHOME_NAMECMan
service, and then click Start.
3. In the Services window, click Close.
6.5 Connecting to the Database
There are several methods to connect to an Oracle database. Table 6-1 lists syntax to
connect to a database.
Chapter 6
Connecting to the Database
6-4

Table 6-1 Connecting to a Database
Type of Connection Connection Syntax Description
From the command
line
The general form of connecting
an application to a database
server from the command line is:
tool
username@connect_identifier
You will be prompted to enter
your password which will be
encrypted.
For example:
SQLPLUS system@sales
Enter password:
password
Most Oracle tools can use the operating system
command line to connect, and some provide
alternatives.
From a login screen
username
@
connect_identifi
er
Some tools provide a login screen as an alternative form
to log in. A user can log in to a database server by
identifying both the user name and connect identifier in
the user name field of the tool login screen, and entering
the password in the password field.
From a 3GL
application
exec sql connect :
username
identified by :
password
In the preceding connection
request, :username
and :password are 3GL variables
that can be set within the
program either statically or by
prompting the user. When
connecting to a database server,
the value of the :username
variable is in the form:
username@net_service_name
The :password variable contains
the password for the database
account to which you are
connecting.
Applications written in 3GL, such as OCI and pre-
compilers, are used by middle-tier and database
application developers for direct database access from a
client program.
Chapter 6
Connecting to the Database
6-5

Table 6-1 (Cont.) Connecting to a Database
Type of Connection Connection Syntax Description
From within
SQL*Plus
SQLPLUS /nolog
SQL> CONNECT
username@net_service_name
For example:
SQLPLUS /nolog
SQL> CONNECT scott@serverx
Enter password:
password
In the preceding commands,
username and password are the
database user and password,
and net_service_name is the
network service name.
Some Oracle tools have commands for database
connections to allow an alternative user name to be
specified without leaving the tool.
Other Oracle tools use slightly different methods specific
to their function or interface. For example, Oracle CDE
tools use login buttons with fields for the user name,
password, and remote database ID.
Using
KERBEROS5_CC_NAM
E
parameter
(DESCRIPTION=
(ADDRESS=(PROTOCOL=tcp)
(HOST=sales-svr)
(PORT=1521))
(CONNECT_DATA=(SERVICE_N
AME=sales.example.com))
(SECURITY=(SQLNET.KERBER
OS5_CC_NAME=/usr/tmp/
krbcache))
)
Use this parameter to specify the complete path to the
Kerberos credentials cache file for the Kerberos
Principal (
user
), when more than one Kerberos
Principal needs to log in through the Database Client.
If you are using Kerberos authentication to connect to a
database, then specifying the complete path to the
credential cache using the
KERBEROS5_CC_NAME
parameter is mandatory. For a single Kerberos Principal,
you can specify the credential cache path in the
sqlnet.ora
file using the
SQLNET.KERBEROS5_CC_NAME
parameter. When a
client needs to use more than one Kerberos Principal for
making multiple database connections, specify
KERBEROS5_CC_NAME
parameter in either the
CONNECT
string for individual connections or in the
tnsnames.ora
file.
Note:
The parameter value
specified in the
CONNECT
string takes precedence
over the value specified in
the
sqlnet.ora
file. You
can also specify this
parameter in the aliases
defined in the
tnsnames.ora
file.
Chapter 6
Connecting to the Database
6-6

Table 6-1 (Cont.) Connecting to a Database
Type of Connection Connection Syntax Description
Using
KERBEROS5_PRINCI
PAL
parameter
(DESCRIPTION=
(ADDRESS=(PROTOCOL=tcp)
(HOST=sales-svr)
(PORT=1521))
(CONNECT_DATA=(SERVICE_N
AME=sales.example.com))
(SECURITY=
(KERBEROS5_CC_NAME=/tmp/
krbuser1/krb.cc)
(KERBEROS5_PRINCIPAL=krb
This parameter is used to specify Kerberos Principals for
a database client.
This is an optional parameter. However, if you use this
parameter, then ensure that the
KERBEROS5_PRINCIPAL
matches the Principal retrieved
from the Kerberos credential cache, which is specified in
the
KERBEROS5_CC_NAME
parameter. The authentication
fails if the Principal name does not match.
Related Topics
• Oracle Database Security Guide
6.6 Using Easy Connect to Connect to a Database
After network connectivity has been verified as described in "Confirming Network Availability",
you can use the Easy Connect naming method to connect to the database. This naming
method provides out-of-the-box TCP/IP connectivity to databases. It extends the functionality
of the host naming method by enabling clients to connect to a database server with an
optional port and service name in addition to the host name of the database. The following is
the syntax to connect using Easy Connect:
CONNECT
username
/
password
@
host
[:
port
][/
service_name
][:
server_type
][/
instance_name
]
Note:
In Oracle Call Interface documentation, server is referred to as
connect_type
.
If Oracle Database server installation was performed in Typical mode, then the default
service name used by the Oracle instance is the database name, and the following Easy
Connect syntax can be used to connect to that instance:
SQLPLUS /nolog
SQL> CONNECT
username
@"
host
/
db_name"
SQL> Enter password:
password
Chapter 6
Using Easy Connect to Connect to a Database
6-7


7
Managing Oracle Net Services
Know about the various administration tools of Oracle Net Services. This involves the main
administration applications, Oracle Enterprise Manager Cloud Control and Oracle Net
Manager. Also, know about the command-line control utilities.
• Using the User Interface Tools
• About the OracleNetAdmins Group
• Using Listener Control Utility to Administer the Listener
• Performing Common Network Tasks
Learn how to perform network configuration and administration tasks, such as configuring
directory server, naming methods, profiles, listener, and Oracle Connection Manager.
7.1 Using the User Interface Tools
Oracle Net Services provides tools to help you perform configuration and administrative
tasks.
• Using Oracle Enterprise Manager Cloud Control to Configure Oracle Net Services
• Using Oracle Net Manager to Configure Oracle Net Services
• Deciding When to Use Oracle Enterprise Manager Cloud Control and Oracle Net
Manager
• Using Oracle Net Configuration Assistant to Configure Network Components
7.1.1 Using Oracle Enterprise Manager Cloud Control to Configure Oracle
Net Services
Oracle Enterprise Manager Cloud Control enables you to configure Oracle Net Services for
any Oracle home across multiple file systems. It also provides common administration
functions for listeners. Oracle Enterprise Manager Cloud Control provides an integrated
environment for configuring and managing Oracle Net Services.
You can use Oracle Enterprise Manager Cloud Control to configure and administer the
following from multiple Oracle homes:
• Listeners: Configure listeners to receive client connections.
• Naming: Define connect identifiers and map them to connect descriptors to identify the
network location of a service. Oracle Net Manager supports configuration of connect
descriptors in local
tnsnames.ora
files or a centralized directory service.
• File location: Specify the file location of the Oracle Net configuration files.
• Accessing the Net Services Administration Page
7-1

See Also:
Oracle Enterprise Manager Cloud Control documentation set and online help
for information about using Oracle Enterprise Manager Cloud Control
7.1.1.1 Accessing the Net Services Administration Page
The following procedure describes how to access the Net Services Administration
page using Oracle Enterprise Manager Cloud Control:
1. From the Login to Database page, enter the database credentials, and then click
Login.
The Select Enterprise Manager Home page appears.
2. Select All Targets from the Targets menu.
3. Select Listener from the Refine Search list.
4. Select the listener by double-clicking on the listener name.
5. Select Net Services Administration from the Oracle Listener menu.
The Net Services Administration page appears.
From the Net Services Administration page, you can administer the listeners, naming
methods, preferences, and so on. The administration procedures are described in
other chapters of this book.
7.1.2 Using Oracle Net Manager to Configure Oracle Net Services
Oracle Net Manager enables you to configure Oracle Net Services for an Oracle home
on a local client or server host.
You can use Oracle Net Manager to configure the following network components:
• Listeners: Create and configure listeners to receive client connections.
• Naming: Define connect identifiers and map them to connect descriptors to identify
the network location and identification of a service. Oracle Net Manager supports
configuration of connect descriptors in local
tnsnames.ora
files or a centralized
directory service.
• Naming methods: Configure the ways connect identifiers are resolved to connect
descriptors.
• Profiles: Configure preferences for enabling and configuring Oracle Net features
on the client or server.
This section introduces the features of Oracle Net Manager. However, the primary
documentation for using Oracle Net Manager is online help.
• Starting Oracle Net Manager
• Navigating Oracle Net Manager
• Using Oracle Net Manager Wizards
Chapter 7
Using the User Interface Tools
7-2

7.1.2.1 Starting Oracle Net Manager
To start Oracle Net Manager, do the following
• On Linux, run
netmgr
from the
ORACLE_HOME/bin
directory.
• On Microsoft Windows, select Programs from the Start menu, and then select Oracle -
HOME_NAME. Next, select Configuration and Migration Tools, and then Net
Manager.
7.1.2.2 Navigating Oracle Net Manager
The Oracle Net Manager interface includes a toolbar and menu options, as well as property
sheets for configuring network components.
The navigator pane provides a tree view of network objects and the objects they contain,
organized in a folder hierarchy. You can expand and collapse the folders to monitor or
manage objects such as connect identifiers, listeners, and profiles. Click an object to make
changes to it.
The following are the main folders in the navigator pane:
• Local
Displays networking elements configured in local configuration files:
– Net service names in the
tnsnames.ora
file
– Listeners in the
listener.ora
file
– Profile in the
sqlnet.ora
file
•
Directory
Displays connect identifiers configured in a directory server
7.1.2.3 Using Oracle Net Manager Wizards
The Oracle Net Manager wizards provide step-by-step guidance for tasks. The wizards
simplify complex tasks by guiding you through the tasks in manageable steps. The wizards
are not intended to provide all configuration options. After you have completed a task with a
wizard, use the other components of Oracle Net Manager to modify the configuration.
• Using the Net Service Name Wizard
• Using the Directory Server Migration Wizard
7.1.2.3.1 Using the Net Service Name Wizard
The Net Service Name wizard guides you through creating a basic network service name in a
directory server or a
tnsnames.ora
file.
The following procedure describes how to start the Net Service Name wizard to create
network service names:
1. In the navigator pane, select Directory or Local, and then select Service Naming.
2. Click the plus sign (+) on the toolbar, or select Create from the Edit menu.
Chapter 7
Using the User Interface Tools
7-3

See Also:
Oracle Net Manager online help for detailed information about using the Net
Service Name wizard to create a network service name
7.1.2.3.2 Using the Directory Server Migration Wizard
If a
tnsnames.ora
file already exists, then its network service names can be exported
to a directory server with the Directory Server Migration wizard.
The following procedure describes how to use the Directory Server Migration wizard:
1. Select Directory from the Command menu.
2. Select Export Net Service Names from the Oracle Net Manager menu.
See Also:
"Exporting Local Naming Entries to a Directory Naming Server"
7.1.3 Deciding When to Use Oracle Enterprise Manager Cloud Control
and Oracle Net Manager
Much of the functionality previously available only in Oracle Net Manager has been
integrated with Oracle Enterprise Manager Cloud Control. Oracle Enterprise Manager
Cloud Control provides the ability to manage configuration for multiple Oracle homes
across multiple file systems. Oracle Net Manager only enables you to manage
configuration for one Oracle home on a local host computer. The following are the key
differences between the tools.
Oracle Enterprise Manager Cloud Control
• Configure the following features:
- Local naming (
tnsnames.ora
files)
- Directory naming
- Listeners
• Provide Oracle home support across multiple file system
• Provide the ability to search and sort local and directory naming entries
• Export directory naming entries to a
tnsnames.ora
file
• Perform the following administrative tasks for a selected listener:
- Show current status
- Change status
- Change tracing level settings
- Change logging settings
Chapter 7
Using the User Interface Tools
7-4

- Set connect-time failover and load balancing methods when there is more than one
listener
Oracle Net Manager
• Configure the following features:
- Local naming (
tnsnames.ora
files)
- Directory naming
- Listeners
- Profiles
• Provide Oracle home support for single host
• Set connect-time failover and load balancing methods when there is more than one
listener
• Set the following options for clients and servers:
- Tracing settings
- Logging settings
- Security, authentication and access rights
- Routing
Note:
When Automatic Diagnostic Repository (ADR) is enabled, any changes to the
tracing and logging settings using Oracle Enterprise Manager Cloud Control are
ignored by the system.
7.1.4 Using Oracle Net Configuration Assistant to Configure Network
Components
Oracle Net Configuration Assistant configures basic network components during installation,
including:
• Listener names and protocol addresses
• Naming methods the client uses to resolve connect identifiers to connect descriptors
• Net service names in a
tnsnames.ora
file
• Directory server usage
Oracle Net Configuration Assistant runs automatically during software installation, as
described in the Oracle Database installation guide. It can also be run after installation in
standalone mode to configure naming methods, the listener, network service names in the
tnsnames.ora
file, and directory server usage.
To start Oracle Net Configuration Assistant do the following:
• On Linux and UNIX, run
netca
from the
ORACLE_HOME/bin
directory.
Chapter 7
Using the User Interface Tools
7-5

• On Microsoft Windows, select Programs from the Start menu, and then select
Oracle - HOME_NAME. Next, select Configuration and Migration Tools, and
then Oracle Net Configuration Assistant.
See Also:
• Oracle Net Configuration Assistant online help
• Oracle Grid Infrastructure Installation Guide for information on running
Oracle Net Configuration Assistant in silent mode
The following are the configuration options on the Oracle Net Configuration Assistant
Welcome page:
• Listener configuration – Create, modify, delete, or rename a listener.
• Naming Methods configuration – Configure the computer to resolve connect
identifiers to connect descriptor with one or more of following naming methods:
– Local naming
– Directory naming
– Easy Connect naming
– External naming
• Local Net Service Name configuration
– Create, modify, delete, rename, or test connectivity of a connect descriptor
stored in a local
tnsnames.ora
file
• Directory Usage Configuration – Configure a directory server for directory-enabled
features.
7.2 About the OracleNetAdmins Group
To use Oracle Net Manager, you must be a member of the
OracleNetAdmins
group or
the
OracleContextAdmins
group. Oracle Net Configuration Assistant establishes these
access rights for these groups during Oracle Context creation.
• Adding Users To the OracleNetAdmins Group
• Removing Users From the OracleNetAdmins Group
• Changing Ownership of the OracleNetAdmins Group
7.2.1 Adding Users To the OracleNetAdmins Group
The following procedure describes how to add a user to the
OracleNetAdmins
group
using the
ldapmodify
command:
1. Create an Lightweight Directory Interchange Format (LDIF) file that specifies that
you want to add a user to the
OracleNetAdmins
group.
You can use the following sample LDIF file. Use the appropriate DN for
cn=OracleNetAdmins
and the user that you want to add.
Chapter 7
About the OracleNetAdmins Group
7-6

dn: cn=OracleNetAdmins,cn=OracleContext,...
changetype: modify
add: uniquemember
uniquemember:
DN of user being added to group
2. Enter the following command at the command line to refresh the file:
$ ldapmodify -h
directory_host
-p
port
-D
binddn
-q -f
ldif_file
In the preceding command, directory_host is the directory server host, port is the listening
TCP/IP port for the directory server, binddn is the directory administrator or user DN, and
ldif_file is the input file name. If the port is not specified, then the default port of 389 is
used. The
-q
option prompts for a single bind password.
7.2.2 Removing Users From the OracleNetAdmins Group
The following procedure describes how to remove a user from the
OracleNetAdmins
group
with the
ldapmodify
command:
1. Create an LDIF file that specifies that you want to delete a user to the
OracleNetAdmins
group.
You can use the following sample LDIF file. Enter the appropriate DN for
cn=OracleNetAdmins
and the user that you want to delete.
dn: cn=OracleNetAdmins,cn=OracleContext,...
changetype: modify
delete: uniquemember
uniquemember:
DN of user being deleted from group
2. Enter the following command to delete the user:
$ ldapmodify -h
directory_host
-p
port
-D
binddn
-q -f
ldif_file
In the preceding command, directory_host is the directory server host, port is the listening
TCP/IP port for the directory server, binddn is the directory administrator or user DN, and
ldif_file is the input file name. If the port is not specified, then the default port of 389 is
used. The
-q
option prompts for a single bind password.
7.2.3 Changing Ownership of the OracleNetAdmins Group
The following procedure describes how to add a group as an owner of an
OracleNetAdmins
group:
1. Create an LDIF file, as follows:
a. Specify the group you want to add as an owner.
You can use the following sample LDIF file. Enter the appropriate DN for
cn=OracleNetAdmins
and the DN of the group that you want to add.
dn: cn=OracleNetAdmins,cn=OracleContext,...
changetype: modify
add: owner
owner:
DN of group to add
For example, the following LDIF syntax changes the ownership from the
OracleNetAdmins
group to another group named
ExampleSecurityAdmins
. The group
can be either inside or outside Oracle Context.
Chapter 7
About the OracleNetAdmins Group
7-7

dn: cn=OracleNetAdmins,cn=OracleContext,...
changetype: modify
add: owner
owner: cn=ExampleSecurityAdmins
b. (Optional) Specify the group to delete as an owner.
dn: cn=OracleNetAdmins,cn=OracleContext,...
changetype: modify
delete: owner
owner:
DN of group to delete
2. Enter the following command at the command line to refresh the file:
$ ldapmodify -h
directory_host
-p
port
-D
binddn
-q -f
ldif_file
In the preceding command, directory_host is the directory server host, port is the
listening TCP/IP port for the directory server, binddn is the directory administrator
or user DN, and ldif_file is the input file name. If the port is not specified, then the
default port of 389 is used. The
-q
option prompts for a single bind password to be
entered.
7.3 Using Listener Control Utility to Administer the Listener
Oracle Net Services provides tools to help you start, stop, configure, and control each
network component. The Listener Control utility enables you to administer the listener.
The utility is started by the user that owns the Oracle installation, or a member of the
designated group, on the same machine where the listener is running. The basic
syntax for this utility is as follows:
lsnrctl
command
[
listener_name
]
For example, the following command starts a listener named
lsnr
:
lsnrctl START lsnr
You can also issue Listener Control utility commands at the
LSNRCTL>
program prompt.
To obtain the prompt, enter
lsnrctl
with no arguments at the operating system
command line. When you run
lsnrctl
, the utility is started, and you can enter the
necessary commands from the program prompt.
For example:
lsnrctl
LSNRCTL> START lsnr
See Also:
• "Customizing Oracle Net Listener Configuration" for additional
information about the listener
• Oracle Database Net Services Reference for additional information
about the Listener Control utility
Chapter 7
Using Listener Control Utility to Administer the Listener
7-8

7.4 Performing Common Network Tasks
Learn how to perform network configuration and administration tasks, such as configuring
directory server, naming methods, profiles, listener, and Oracle Connection Manager.
Configuring Directory Server for Oracle Net Usage
• Configure directory server usage.
Tool used to perform the task: Oracle Internet Directory Configuration Assistant. See
Oracle Fusion Middleware Administering Oracle Internet Directory.
• Add users to the
OracleNetAdmins
group.
Tool used to perform the task:
ldapmodify
. See Who Can Add or Modify Entries in the
Directory Server.
• Authenticate with the directory.
Tools used to perform the task: Oracle Enterprise Manager Cloud Control, Oracle Net
Manager. See Online help in Oracle Enterprise Manager Cloud Control and Oracle
Database Enterprise User Security Administrator's Guide.
• Change Oracle Context.
Tool used to perform the task: Oracle Net Manager. See Online help in Oracle Net
Manager.
Configuring Naming Methods
• Configure the local naming method.
Tool used to perform the task: Oracle Enterprise Manager Cloud Control, Oracle Net
Manager, Oracle Net Configuration Assistant. See Configuring the Local Naming Method.
• Configure the directory naming method.
Tool used to perform the task: Oracle Enterprise Manager Cloud Control, Oracle Net
Manager. See Configuring the Directory Naming Method.
• Configure the Easy Connect naming method.
Tool used to perform the task: Oracle Net Manager. See Understanding the Easy
Connect Naming Method.
• Configure external naming methods.
Tool used to perform the task: Oracle Net Manager. See Configuring External Naming
Methods.
Migrating to Directory Naming
Export from
tnsnames.ora
files.
Tools used to perform the task: Oracle Enterprise Manager Cloud Control, Oracle Net
Manager. See Exporting Directory Naming Entries to a tnsnames.ora File.
Configuring Profiles
• Prioritize naming methods.
Tool used to perform the task: Oracle Net Manager, Oracle Net Configuration Assistant.
See Prioritizing Naming Methods.
Chapter 7
Performing Common Network Tasks
7-9

• Configure a default domain that is automatically appended to any unqualified
network service name.
Tool used to perform the task: Oracle Net Manager, Oracle Net Configuration
Assistant. See About the Default Domain for Clients.
• Route connection requests.
Tool used to perform the task: Oracle Net Manager, Oracle Net Configuration
Assistant. See Routing Connection Requests to a Process.
• Configure access control.
Tool used to perform the task: Oracle Net Manager. See Settings for Database
Access Control.
• Configure an authentication method.
Tool used to perform the task: Oracle Net Manager. See Configuring Oracle
Network Security.
• Configure connect request timeouts.
Tool used to perform the task: Manual configuration. See Limiting Resource
Consumption by Unauthorized Users.
Configuring Listeners
• Configure listening protocol addresses.
Tool used to perform the task: Oracle Enterprise Manager Cloud Control, Oracle
Net Manager, Oracle Net Configuration Assistant. See Configuring Listening
Protocol Addresses.
• Configure dynamic service registration.
Tool used to perform the task: Automatic configuration. See Configuring Dynamic
Service Registration.
• Configure static service registration.
Tool used to perform the task: Oracle Enterprise Manager Cloud Control, Oracle
Net Manager. See Configuring Static Service Registration.
• Configure connect request timeouts.
Tool used to perform the task: Manual configuration. See Limiting Resource
Consumption by Unauthorized Users.
Administering Listeners
• Start and stop listeners.
Tool used to perform the task: Listener Control Utility. See Starting and Stopping a
Listener.
• View registered information.
Tool used to perform the task: Listener Control Utility. See Monitoring Services of a
Listener.
Configuring Oracle Connection Manager
• Configure session multiplexing.
Tool used to perform the task: Manual configuration. See Enabling Session
Multiplexing for Oracle Connection Manager.
Chapter 7
Performing Common Network Tasks
7-10


8
Configuring Naming Methods
Find out how to configure connectivity information for client connections to the database
server.
• Configuring the Easy Connect Naming Method
The Easy Connect naming method eliminates the need for service name lookup in
tnsnames.ora
files for TCP/IP environments. In fact, no naming or directory system is
required when using this method.
• Configuring the Local Naming Method
The local naming method adds network service names to the
tnsnames.ora
file. Each
network service name maps to a connect descriptor.
• Configuring the Directory Naming Method
With the directory naming method, connect identifiers are mapped to connect descriptors
contained in an LDAP-compliant directory server, such as Oracle Internet Directory and
Microsoft Active Directory.
• Configuring External Naming Methods
Related Topics
• Understanding Naming Methods
Oracle Net Services offers several types of naming methods that support localized
configuration on each client, or centralized configuration that can be accessed by all
clients in the network.
8.1 Configuring the Easy Connect Naming Method
The Easy Connect naming method eliminates the need for service name lookup in
tnsnames.ora
files for TCP/IP environments. In fact, no naming or directory system is
required when using this method.
• Understanding the Easy Connect Naming Method
The Easy Connect naming method provides out-of-the-box TCP/IP connectivity to
databases.
• About Easy Connect Plus
Starting with Oracle Database 19c release, the Easy Connect syntax that applications
use to connect to Oracle Database has improved functionality. The new version is called
Easy Connect Plus.
• Examples of Easy Connect Naming Method
Examples show Easy Connect Naming syntax and how each string converts into a
connect descriptor.
• Configuring Easy Connect Naming on the Client
Learn about the required conditions and configuration tasks that clients need to ensure
before using the Easy Connect naming method.
• Configuring Easy Connect Naming to Use a DNS Alias
You can optionally configure a DNS alias for the host name, as provided with the host
naming method.
8-1

8.1.1 Understanding the Easy Connect Naming Method
The Easy Connect naming method provides out-of-the-box TCP/IP connectivity to
databases.
Overview
This naming method extends the functionality of the host naming method by enabling
clients to connect to a database server with an optional port and service name in
addition to the host name of the database:
CONNECT username@[//]host[:port][/[service_name][:server_type][/
instance_name]]
Enter password: password
The connect identifier converts to the following connect descriptor:
(DESCRIPTION=
(ADDRESS=(PROTOCOL=tcp)(HOST=
host
)(PORT=
port
))
(CONNECT_DATA=
(SERVICE_NAME=
service_name
)
(SERVER=
server_type
)
(INSTANCE_NAME=
instance_name
))
)
If the Oracle Database server installation was performed in Typical mode, then the
default service name used by the Oracle instance is the database name, and the
following Easy Connect syntax can be used to connect to that instance:
SQLPLUS /nolog
SQL> CONNECT
username
@
host
/
db_name
SQL> Enter password:
password
Easy Connect Syntax Examples
The connect strings in the following example connect the client to database service
sales.us.example.com
with a listening endpoint of 1521 on database server
sales-
server
:
CONNECT scott@sales-server:1521/sales.us.example.com
CONNECT scott@//sales-server/sales.us.example.com
CONNECT scott@//sales-server.us.example.com/sales.us.example.com
After each of the connect strings, you must enter a password to connect to the
database service.
These connect strings convert into the following connect descriptor:
(DESCRIPTION=
(ADDRESS=(PROTOCOL=tcp)(HOST=sales-server)(PORT=1521))
(CONNECT_DATA=
(SERVICE_NAME=sales.us.example.com)))
Chapter 8
Configuring the Easy Connect Naming Method
8-2

Connect Identifier for Easy Connect Naming
This is a list of the Easy Connect syntax elements and descriptions for each:
Syntax Element Description
//
Use
//
to specify a URL or JDBC connection.
Required for URL or JDBC connections. The connect identifier must
be preceded by a double-slash (
//
). For example:
scott@//sales-server
Enter password:
password
Optional for SQL connections. The connect identifier can preceded by
a double-slash (
//
). For example, the following connect strings are
semantically equivalent:
SQL> CONNECT scott@sales-server
SQL> CONNECT scott@//sales-server
host
Required. Specify the host name or IP address of the database host
computer.
The host name is domain-qualified if the local operating system
configuration specifies a domain.
You may use an IPv4 or IPv6 address as a value. IPv6 addresses or
host names that resolve to IPv6 addresses must be enclosed in
square brackets, as in
[2001:0db8:0:0::200C:417A]
and
[salesdb]
.
port
Optional. Specify the listening port.
The default is 1521.
service_name
Optional. Specify the service name of the database.
If a user specifies a service name, then the listener connects the user
to that specific database. Otherwise, the listener connects to the
database specified by the
DEFAULT_SERVICE_listener_name
parameter in the
listener.ora
file. If
DEFAULT_SERVICE_listener_name
is not configured for the listener
and a service name is not explicitly specified by the user as part of
the Easy Connect syntax, then the listener returns an error.
server_type
Optional. Specify the database server type to use.
This parameter instructs the listener to connect the client to a specific
type of service handler.
The values for the
server_type
parameter are
dedicated
,
shared
,
and
pooled
. If server is not specified in the Easy Connect syntax,
then the type of server is chosen by the listener (shared server if
configured, otherwise a dedicated server is used).
Note: In Oracle Call Interface documentation, server is referred to as
connect_type
.
instance_name
Optional. Identify the database instance to access.
The instance name can be obtained from the
INSTANCE_NAME
parameter in the initialization parameter file.
Related Topics
• DEFAULT_SERVICE_listener_name
Chapter 8
Configuring the Easy Connect Naming Method
8-3

• INSTANCE_NAME
8.1.2 About Easy Connect Plus
Starting with Oracle Database 19c release, the Easy Connect syntax that applications
use to connect to Oracle Database has improved functionality. The new version is
called Easy Connect Plus.
Easy Connect Plus simplifies Oracle Database application configuration and
deployment for common use cases. With Easy Connect Plus, you no longer need to
configure Oracle Net parameter files such as
tnsnames.ora
and
sqlnet.ora
. Easy
Connect Plus also no longer requires you to set the
TNS_ADMIN
environment variable.
The new functionality simplifies client configuration, as the client connections to Oracle
Database Cloud Services use TLS for network security. The new syntax is as follows:
[[protocol:]//]host1{,host12}[:port1]{,host2:port2}[/[service_name]
[:server][/instance_name]][?
parameter_name=value{¶meter_name=value}]
The question mark (?) indicates the start of name-value pairs and the ampersand (&)
is the delimiter between the name-value pairs.
Support for specifying protocol: Easy Connect adaptor supports specification of
protocol as part of the connect string. This protocol is applicable to each host in the
connect string.
Multihost or port support: Easy Connect adaptor can now accept multiple hosts or
ports in the connect string. This helps in load-balancing the client connections.
Name-Value pairs: Easy Connect adaptor can now accept a list of name value pairs.
Each name-value pair will be added as a
DESCRIPTION
level parameter. The following
names are supported:.
•
ENABLE
•
FAILOVER
•
LOAD_BALANCE
•
RECV_BUF_SIZE
•
SEND_BUF_SIZE
•
SDU
•
SOURCE_ROUTE
•
RETRY_COUNT
•
RETRY_DELAY
•
CONNECT_TIMEOUT
•
TRANSPORT_CONNECT_TIMEOUT
For example, the following syntax to specify the Session Data Unit (SDU)
salesserver1:1521/sales.us.example.com?sdu=16384
Chapter 8
Configuring the Easy Connect Naming Method
8-4

translates to the following connect descriptor:
(DESCRIPTION=
(SDU=16384)
(ADDRESS=(PROTOCOL=tcp)(HOST=saleserver1)(PORT=1521))
(CONNECT_DATA=(SERVICE_NAME=sales.us.example.com)))
Similarly, the following syntax to specify connect timeout, transport connect timeout, and retry
count values
salesserver1:1521/sales.us.example.com?
connect_timeout=60&transport_connect_timeout=30&retry_count=3&retry_delay=2
translates to the following connect descriptor:
(DESCRIPTION=
(retry_count=3)(retry_delay=2)
(connect_timeout=60)(transport_connect_timeout=30)
(ADDRESS=(PROTOCOL=tcp)(HOST=salesserver1)(PORT=1521))
(CONNECT_DATA=(SERVICE_NAME=sales.us.example.com)))
Security Attributes: The following SECURITY attributes are supported for TLS:
•
SSL_SERVER_DN_MATCH=on/off
•
SSL_SERVER_CERT_DN=longDN
•
WALLET_LOCATION=Wallet location
8.1.3 Examples of Easy Connect Naming Method
Examples show Easy Connect Naming syntax and how each string converts into a connect
descriptor.
Table 8-1 Examples of Easy Connect Naming
Naming Option Connect String Connect Descriptor
Easy Connect string with
host.
The host name is
sales-
server
.
sales-server (DESCRIPTION=
(CONNECT_DATA=
(SERVICE_NAME=))
(ADDRESS=
(PROTOCOL=TCP)
(HOST=sales-server)
(PORT=1521)))
Easy Connect string with
host and port.
The host name is
sales-
server
, and the port is
3456
.
sales-server:3456 (DESCRIPTION=
(CONNECT_DATA=
(SERVICE_NAME=))
(ADDRESS=
(PROTOCOL=TCP)
(HOST=sales-server)
(PORT=3456)))
Chapter 8
Configuring the Easy Connect Naming Method
8-5

Table 8-1 (Cont.) Examples of Easy Connect Naming
Naming Option Connect String Connect Descriptor
Easy Connect string with
host and service name.
The host name is
sales-
server
and the service
name is
sales
.
sales-server/sales (DESCRIPTION=
(CONNECT_DATA=
(SERVICE_NAME=sales))
(ADDRESS=
(PROTOCOL=TCP)
(HOST=sales-server)
(PORT=1521)))
Easy Connect string with
IPv6 address.
The IPv6 address of the
host is
2001:0db8:0:0::200C:41
7A
, the port is
80
, and the
service name is
sales
.
[2001:0db8:0:0::200C:417A]:80/sales
Square brackets are required around
IPv6 host names.
(DESCRIPTION=
(CONNECT_DATA=
(SERVICE_NAME=sales)
(ADDRESS=
(PROTOCOL=TCP)
(HOST=2001:0db8:0:0::200C:417A)
(PORT=80)))
Easy Connect string with
IPv6 host address.
The host is
sales-server
,
the port is
80
, and the
service name is
sales
.
sales-server:80/sales (DESCRIPTION=
(CONNECT_DATA=
(SERVICE_NAME=sales)
(ADDRESS=
(PROTOCOL=TCP)
(HOST=sales-server)
(PORT=80)))
Easy Connect string with
host, service name, and
server.
The host name is
sales-
server
, the service name is
sales
, the server is
dedicated
, and the
instance name is
inst1
sales-server/sales:dedicated/inst1 (DESCRIPTION=
(CONNECT_DATA=
(SERVICE_NAME=sales)
(INSTANCE_NAME=inst1)
(SERVER=dedicated))
(ADDRESS=
(PROTOCOL=TCP)
(HOST=sales-server)
(PORT=1521)))
Easy Connect with host and
instance name.
The host name is
sales-
server
and the instance
name is
inst1
.
sales-server//inst1 (DESCRIPTION=
(CONNECT_DATA=
(SERVICE_NAME=)
(INSTANCE_NAME=inst1))
(ADDRESS=
(PROTOCOL=TCP)
(HOST=sales-server)
(PORT=1521)))
Chapter 8
Configuring the Easy Connect Naming Method
8-6

Table 8-1 (Cont.) Examples of Easy Connect Naming
Naming Option Connect String Connect Descriptor
Note: The Easy Connect
Plus feature supports this
naming option.
Easy Connect adaptor with
a list of name value pairs.
SDU
,
RETRY_COUNT
,
CONNECT_TIMEOUT
The host is
salesserver
,
the port is
1521
, and the
service name is
sales
.
salesserver1:1521/sales?
SDU=8128&retry_count=3&connect_t
imeout=10
(DESCRIPTION=
(SDU=8128)(retry_count=3)
(connect_timeout=10)
(ADDRESS=(PROTOCOL=tcp)
(HOST=saleserver1)
(PORT=1521))
(CONNECT_DATA=(SERVICE_NAME=sa
les)))
Note: The Easy Connect
Plus feature supports this
naming option.
Easy Connect adapter with
multiple hosts or ports in the
connect string
The host is
salesserver
,
the port is
1521
, and the
service name is
sales
.
salesserver1:1521,salesserver2,s
alesserver3:1522/sales
((DESCRIPTION=(LOAD_BALANCE=ON
)
(ADDRESS=(PROTOCOL=tcp)
(HOST=sales-server1)
(PORT=1521))
(ADDRESS=(PROTOCOL=tcp)
(HOST=sales-server2)
(PORT=1522))
(ADDRESS=(PROTOCOL=tcp)
(HOST=sales-server3)
(PORT=1522)))
(CONNECT_DATA=(SERVICE_NAME=sa
les)))
Note: The Easy Connect
Plus feature supports this
naming option.
Easy Connect adapter with
specification of protocol as
part of the connect string.
The host is
salesserver
,
the port is
1521
, and the
service name is
sales
.
tcps://salesserver1:1521/sales
(DESCRIPTION=
(ADDRESS=(PROTOCOL=tcps)
(HOST=salesserver1)
(PORT=1521))
(SECURITY=(SSL_SERVER_DN_MATCH
=TRUE))
(CONNECT_DATA=(SERVICE_NAME=sa
les)))
Note: The Easy Connect
Plus feature supports this
naming option.
The following SECURITY
attributes are supported for
TLS
The host is
sales-server
,
the port is
1521
, and the
service name is
sales
.
tcps://sales-server:1521/sales?
ssl_server_cert_dn="cn=sales,cn=
OracleContext,dc=us,dc=example,d
c=com"&wallet_location="/tmp/
oracle"
(DESCRIPTION=
(ADDRESS=(PROTOCOL=tcps)
(HOST=salesserver)(PORT=1521))
(CONNECT_DATA=(SERVICE_NAME=sale
s))
(SECURITY=(SSL_SERVER_DN_MATCH=T
RUE)
(SSL_SERVER_CERT_DN=cn=sales,cn=
OracleContext,dc=us,dc=example,d
c=com)(WALLET_LOCATION=/tmp/
oracle)))
Chapter 8
Configuring the Easy Connect Naming Method
8-7

Related Topics
• About TCP/IP Protocol
TCP/IP (Transmission Control Protocol/Internet Protocol) is the standard
communication protocol suite used for client/server communication over a
network.
• Configuring Listening Protocol Addresses
• Using Oracle Connection Manager as a Bridge for IPv4 and IPv6
In some database connection environments, a client and database may use
different versions of the IP protocol so that complete connectivity does not exist. In
this case, at least two hops in the connection use different versions of the IP
protocol.
8.1.4 Configuring Easy Connect Naming on the Client
Learn about the required conditions and configuration tasks that clients need to ensure
before using the Easy Connect naming method.
Clients can connect to Oracle Database using Easy Connect naming if the following
conditions are met:
• Oracle Net Services software is installed on the client.
• Oracle TCP/IP protocol is supported on both the client and database server.
• No features require a more advanced connect descriptor.
Easy Connect naming is not suitable for large or complex environments with advanced
features, such as external procedure calls, or Heterogeneous Services, that require
additional connect information. In these cases, another naming method is
recommended.
Easy Connect naming is automatically configured at installation. Before using it, you
must ensure that
EZCONNECT
is specified by the
NAMES.DIRECTORY_PATH
parameter in
the
sqlnet.ora
file. This parameter specifies the order of naming methods Oracle Net
can use to resolve connect identifiers to connect descriptors.
Note:
Starting with Oracle Database 19c Release 2 (19.2), for connections with
protocol set to TCPS,
SSL_SERVER_DN_MATCH
is set to
ON
by default when
using easy connect. If
SSL_SERVER_CERT_DN
is not set, then a partial DN
match done in the following order, should succeed for the client to establish a
connection to the server.
1. The host name in the connect string is matched with the host name in
the server certificate.
2. The service name in the connect string is matched with the service name
in the server certificate.
If
SSL_SERVER_CERT_DN
is set, then a full DN match should succeed for the
client to establish a connection to the server.
Chapter 8
Configuring the Easy Connect Naming Method
8-8

The following procedure describes how to verify that the Easy Connect naming method is
configured:
1. Start Oracle Net Manager.
2. In the navigator pane, expand Local, and then select Profile.
3. From the list in the right pane, select Naming.
4. Click the Methods tab.
Verify that
EZCONNECT
is listed in the Selected Methods list. If it is not, then proceed to
Step 5. If it is listed, then proceed to Step 7.
5. From the Available Methods list, select EZCONNECT, and then click the right-arrow
button.
6. In the Selected Methods list, select EZCONNECT, and then use the Promote button to
move the selection to the top of the list.
7. Select Save Network Configuration from the File menu.
The
sqlnet.ora
file updates the NAMES.DIRECTORY_PATH parameter, listing
hostname
first:
NAMES.DIRECTORY_PATH=(ezconnect, tnsnames)
Related Topics
• Using Oracle Net Manager to Configure Oracle Net Services
8.1.5 Configuring Easy Connect Naming to Use a DNS Alias
You can optionally configure a DNS alias for the host name, as provided with the host naming
method.
With host naming, clients use a connect string that uses the following pattern:
CONNECT
username@DNS_alias
Enter password:
password
The following procedure describes how to configure a DNS alias:
1. Ensure the database service is registered with the listener.
If the database can find the listener, then information about the database service is
dynamically registered with the listener during service registration, including the service
name. The listener is found if the following conditions are met:
• The default listener named
LISTENER
on TCP/IP, port 1521 is running.
• The LOCAL_LISTENER parameter is set in the initialization file.
If the database cannot find the listener, then you can configure static registration for the
listener.
2. Establish a host name resolution environment.
You can configure a mechanism such as DNS, NIS, or a centrally-maintained TCP/IP
host file,
/etc/hosts
. For example, if a service name of
sales.us.example.com
for a
database exists on a computer named
sales-server
, then the entry in the
/etc/hosts
file would look like the following:
#IP address of server host name alias
192.0.2.35 sales-server sales.us.example.com
Chapter 8
Configuring the Easy Connect Naming Method
8-9

The domain section of the service name must match the network domain.
3. Connect to the database using the DNS alias.
Using the example in the previous step, the client can use
sales.example.com
in
the connect string:
CONNECT
username
@sales.us.example.com
Enter password:
password
If the client and server are in the same domain such as
us.example.com
, then the
client must enter only
sales
in the connect string.
Related Topics
• Configuring Static Service Information for the Listener
Learn how to statically configure database service information for the listener
using Oracle Enterprise Manager Cloud Control.
8.2 Configuring the Local Naming Method
The local naming method adds network service names to the
tnsnames.ora
file. Each
network service name maps to a connect descriptor.
The following example shows the network service name
sales
mapped to the connect
descriptor contained in
DESCRIPTION
. The
DESCRIPTION
section contains the protocol
address and identifies the destination database service. In this example, the protocol
is TCP/IP and the port is 1521.
Example 8-1 Connector Descriptor with Host Name
sales=
(DESCRIPTION=
(ADDRESS=(PROTOCOL=tcp)(HOST=sales-server)(PORT=1521))
(CONNECT_DATA=
(SERVICE_NAME=sales.us.example.com)))
The following example shows a valid
tnsnames.ora
entry to connect to a host
identified with an IPv6 address and a port number of 1522.
Example 8-2 Connect Descriptor with IPv6 Address
salesdb =
( DESCRIPTION =
( ADDRESS=(PROTOCOL=tcp)(HOST=2001:0db8:1:1::200C:417A)(PORT=1522) )
( CONNECT_DATA =
(SERVICES_NAME=sales.example.com) )
)
You can configure local naming during or after installation, as described in the
following sections:
• Configuring the tnsnames.ora File During Installation
• Configuring the tnsnames.ora File After Installation
You can add network service names to the
tnsnames.ora
file at any time after
installation.
Related Topics
• IPv6 Network Connectivity
Chapter 8
Configuring the Local Naming Method
8-10

8.2.1 Configuring the tnsnames.ora File During Installation
Oracle Net Configuration Assistant enables you to configure network service names for
clients. Oracle Universal Installer launches Oracle Net Configuration Assistant after software
installation. The configuration varies depending on the installation mode.
• Administrator or runtime installation: Oracle Net Configuration Assistant prompts you to
configure network service names in the
tnsnames.ora
file to connect to an Oracle
Database service.
• Custom installation: Oracle Net Configuration Assistant prompts you to select naming
methods to use. If local is selected, then Oracle Net Configuration Assistant prompts you
to configure network service names in the
tnsnames.ora
file to connect to an Oracle
Database service.
8.2.2 Configuring the tnsnames.ora File After Installation
You can add network service names to the
tnsnames.ora
file at any time after installation.
To configure the local naming method, perform the following tasks:
• Task 1, Configure Net Services Names
• Task 2, Configure Local Naming as the First Naming Method
• Task 3, Copy the Configuration to the Other Clients
• Task 4, Configure the Listener
• Task 5, Connect to the Database
Note:
The underlying network connection must be operational before attempting to
configure connectivity with Oracle Net.
Task 1 Configure Net Services Names
To configure the network services names, use one of the following methods:
• Net Services Names Configuration using Oracle Enterprise Manager Cloud Control
• Net Services Names Configuration using Oracle Net Manager
• Net Services Names Configuration using Oracle Net Configuration Assistant
Each method provides similar functionality. However, Oracle Net Manager has more
configuration options for the
sqlnet.ora
file.
• Net Services Names Configuration using Oracle Enterprise Manager Cloud Control
The following procedure describes how to configure network service names in the
tnsnames.ora
file with Oracle Enterprise Manager Cloud Control:
Chapter 8
Configuring the Local Naming Method
8-11

1. Access the Net Services Administration page in Oracle Enterprise Manager
Cloud Control.
See Also:
"Accessing the Net Services Administration Page"
2. Select Local Naming from the Administer list, and then select the Oracle
home that contains the location of the configuration files.
3. The Local Naming page appears. You may be prompted to log in to the
database server.
4. Click Create Like.
The Create Net Service Name page appears.
5. Enter a name in the Net Service Name field.
You can qualify the network service name with the client's domain. The
network service name is automatically domain qualified if the s
qlnet.ora
file
parameter NAMES.DEFAULT_DOMAIN is set.
See Also:
"About the Default Domain for Clients"
6. In the Database Information section, configure service support as follows:
a. Enter a destination service name.
See Also:
"About Connect Descriptors" for additional information about the
service name string to use
b. Select a database connection type.
The default setting of Database Default is recommended for the
connection type. If dedicated server is configured in the initialization
parameter file, then you can select Dedicated Server to force the listener
to spawn a dedicated server, bypassing shared server configuration. If
shared server is configured in the initialization parameter file and you
want to guarantee the connection always uses shared server, then select
Shared Server.
Chapter 8
Configuring the Local Naming Method
8-12

See Also:
"Configuring a Shared Server Architecture " for additional information
about shared server configuration
7. In the Addresses section, configure protocol support, as follows:
a. Click Add.
The Add Address page appears.
b. From the Protocol list, select the protocol on which the listener is configured to
listen. This protocol must also be installed on the client.
c. Enter the appropriate parameter information for the selected protocol in the
fields provided.
See Also:
Oracle Database Net Services Reference for additional information
about protocol parameter settings
d. (Optional) In the Advanced Parameters section, specify the I/O buffer space limit
for send and receive operations of sessions in the Total Send Buffer Size and
Total Receive Buffer Size fields.
See Also:
"Configuring I/O Buffer Space " for additional information about buffer
space
e. Click OK.
The protocol address is added to the Addresses section.
8. Click OK to add the network service name.
The network service name is added to the Local Naming page.
9. Select connect-time failover and client load balancing option for the addresses.
10. Click OK.
Chapter 8
Configuring the Local Naming Method
8-13

See Also:
– "Creating a List of Listener Protocol Addresses" to configure
multiple protocol addresses
– "About the Advanced Connect Data Parameters" to configure
additional CONNECT_DATA options
• Net Services Names Configuration using Oracle Net Manager
The following procedure describes how to configure network service names in the
tnsnames.ora
file with Oracle Net Manager:
1. Start Oracle Net Manager.
See Also:
"Using Oracle Net Manager to Configure Oracle Net Services"
2. In the navigator pane, select Service Naming from Local.
3. Click the plus sign (+) from the toolbar, or select Create from the Edit menu.
The Welcome page of the Net Service Name wizard appears.
4. Enter a name in the Net Service Name field.
You can qualify the network service name with the client's domain. The
network service name is automatically domain qualified if the s
qlnet.ora
file
parameter NAMES.DEFAULT_DOMAIN is set.
See Also:
"About the Default Domain for Clients"
5. Click Next.
The Protocol page appears.
6. Select the protocol on which the listener is configured to listen. The protocol
must also be installed on the client.
7. Click Next.
The Protocol Settings page appears.
8. Enter the appropriate parameter information for the selected protocol in the
fields provided.
Chapter 8
Configuring the Local Naming Method
8-14

See Also:
Oracle Database Net Services Reference for additional information about
protocol parameter settings
9. Click Next.
The Service page appears.
10. Enter a destination service name, and optionally, select a database connection type.
Oracle recommends that you use the default setting of Database Default for the
connection type. If dedicated server is configured in the initialization parameter file,
then you can select Dedicated Server to force the listener to spawn a dedicated
server, bypassing shared server configuration. If shared server is configured in the
initialization parameter file and you want to guarantee the connection always uses
shared server, then select Shared Server.
See Also:
– Configuring a Shared Server Architecture for additional information
about shared server configuration
– "About Connect Descriptors" for additional information about the
service name string to use
11. Click Next.
The Test page appears.
12. Click Test to verify that the network service name works, or click Finish to dismiss
the Net Service Name wizard.
If you click Test, then Oracle Net connects to the database server by using the
connect descriptor information you configured. Therefore, the listener and database
must be running for a successful test. If they are not, then see "Starting Oracle Net
Listener and the Oracle Database Server" to start components before testing. During
testing, a Connection Test dialog box appears, providing status and test results. A
successful test results in the following message:
The connection test was successful.
If the test was successful, then click Close to close the Connect Test dialog box, and
proceed to Step 13.
If the test was not successful, then do the following:
a. Ensure that the database and listener are running, and then click Test.
b. Click Change Login to change the user name and password for the connection,
and then click Test.
13. Click Finish to close the Net Service Name wizard.
Chapter 8
Configuring the Local Naming Method
8-15

14. Select Save Network Configuration from the File menu.
See Also:
– "Creating a List of Listener Protocol Addresses" to configure
multiple protocol addresses
– "About the Advanced Connect Data Parameters" to configure
additional CONNECT_DATA options
• Net Services Names Configuration using Oracle Net Configuration Assistant
The following procedure describes how to configure network service names in the
tnsnames.ora
file with Oracle Net Configuration Assistant:
1. Start Oracle Net Configuration Assistant.
See Also:
"Using Oracle Net Configuration Assistant to Configure Network
Components"
The Welcome page appears.
2. Select Local Net Service Name Configuration, and then click Next.
The Net Service Name Configuration page appears.
3. Click Add, and then click Next.
The Service Name Configuration page appears.
4. Enter a service name in the Service Name field.
5. Click Next.
6. Follow the prompts in the wizard and online help to complete network service
name creation.
Task 2 Configure Local Naming as the First Naming Method
Configure local naming as the first method specified in the
NAMES.DIRECTORY_PATH parameter in the
sqlnet.ora
file. This parameter
specifies the order of naming methods Oracle Net uses to resolve connect identifiers
to connect descriptors.
To configure the local naming method as the first naming method, use one of the
following methods:
• Local Naming Configuration using Oracle Enterprise Manager Cloud Control
• Local Naming Configuration using Oracle Net Manager
Each method provides the same functionality.
Local Naming Configuration using Oracle Enterprise Manager Cloud Control
The following procedure describes how to specify local naming as the first naming
method using Oracle Enterprise Manager Cloud Control:
Chapter 8
Configuring the Local Naming Method
8-16

1. Access the Net Services Administration page in Oracle Enterprise Manager Cloud
Control.
See Also:
"Accessing the Net Services Administration Page"
2. Select Network Profile from the Administer list.
3. Click Go.
4. Select Naming Methods.
5. Select TNSNAMES from the Available Methods list.
6. Click Move to move the selection to the Selected Methods list.
7. Use the Promote button to move TNSNAMES to the top of the list.
8. Click OK.
Local Naming Configuration using Oracle Net Manager
The following procedure describes how to specify local naming as the first naming method
using Oracle Net Manager:
1. Start Oracle Net Manager.
See Also:
"Using Oracle Net Manager to Configure Oracle Net Services"
2. In the navigator pane, select Profile from the Local menu.
3. From the list in the right pane, select Naming.
4. Click the Methods tab.
5. From the Available Methods list, select TNSNAMES, and then click the right-arrow
button.
6. From the Selected Methods list, select TNSNAMES, and then use the Promote button
to move the selection to the top of the list.
7. Choose Save Network Configuration from the File menu.
The
sqlnet.ora
file updates with the NAMES.DIRECTORY_PATH parameter, listing
tnsnames
first:
NAMES.DIRECTORY_PATH=(tnsnames, EZCONNECT)
Task 3 Copy the Configuration to the Other Clients
After one client is configured, copy the
tnsnames.ora
and
sqlnet.ora
configuration files to
the same location on the other clients. This ensures that the files are consistent.
Alternatively, you can use Oracle Net Assistant on every client.
Chapter 8
Configuring the Local Naming Method
8-17

Task 4 Configure the Listener
Ensure that the listener located on the server is configured to listen on the same
protocol address configured for the network service name. By default, the listener is
configured for the TCP/IP protocol on port 1521.
See Also:
Configuring and Administering Oracle Net Listener for listener configuration
details
Task 5 Connect to the Database
Clients can connect to the database using the following syntax:
CONNECT
username
@
net_service_name
8.3 Configuring the Directory Naming Method
With the directory naming method, connect identifiers are mapped to connect
descriptors contained in an LDAP-compliant directory server, such as Oracle Internet
Directory and Microsoft Active Directory.
A directory provides central administration of database services and network service
names, making it easier to add or relocate services.
A database service entry is created during installation. Oracle Enterprise Manager
Cloud Control and Oracle Net Manager are used to create and modify network service
names and network service alias entries, and to modify the database service entry.
Clients can use these entries to connect to the database.
To configure the directory naming method, perform the following tasks:
Task 1 Verify Directory Compatibility
On the computer from which you plan to create network service names, do the
following verification steps:
1. Ensure the computer has the latest release of Oracle Net Services software. The
release information is located in the About Net Manager option on the help menu.
2. Run Oracle Internet Directory Configuration Assistant to verify directory server,
Oracle Context, and Oracle schema releases.
Task 2 Create Net Service Names in the Directory
You can configure clients to use a network service name rather than the database
service entry. The following procedure describes how to create network service
names:
Chapter 8
Configuring the Directory Naming Method
8-18

Note:
• Only users that are members of either the
OracleNetAdmins
or
OracleContextAdmins
group can create network service name entries in a
directory. To add or remove users from the
OracleNetAdmins
group, see "Who
Can Add or Modify Entries in the Directory Server".
• You can export existing network service names from a
tnsnames.ora
file. See
"Exporting Local Naming Entries to a Directory Naming Server".
1. Access the Net Services Administration page in Oracle Enterprise Manager Cloud
Control. See Accessing the Net Services Administration Page.
2. Select Directory Naming from the Administer list, and then select the Oracle home that
contains the location of the directory server.
3. Click Go.
The Directory Naming page appears.
4. Click the Net Service Names tab.
5. In the Results section, click Create.
The Create Net Service Name page with the General tab appears.
6. Enter a name in the Net Service Name field.
7. In the Database Information section, configure service support, as follows:
a. Enter a destination service name. See About Connect Descriptors.
b. Select a database connection type. Oracle recommends that you use the Database
Default for the connection type. If a shared server is configured in the initialization
parameter file, then the following options are available:
• Select Dedicated Server to force the listener to spawn a dedicated server, and
bypass shared server configuration.
• Select Shared Server to guarantee the connection always uses shared server.
See Configuring a Shared Server Architecture .
8. In the Addresses section, configure protocol support, as follows:
a. Click Add.
The Add Address page appears.
b. From the Protocol list, select the protocol that the listener is configured to listen. This
protocol must also be installed on the client.
c. Enter the appropriate parameter information for the selected protocol in the fields
provided. See Oracle Database Net Services Reference.
d. (Optional) In the Advanced Parameters section, specify the I/O buffer space limit for
send and receive operations of sessions in the Total Send Buffer Size and Total
Receive Buffer Size fields. See Configuring I/O Buffer Space .
Chapter 8
Configuring the Directory Naming Method
8-19

e. Click OK.
The protocol address is added to the Addresses section.
9. Click OK to add the network service name.
The network service name is added to the Results section of the Net Service
Names tab.
See "Creating a List of Listener Protocol Addresses" to configure multiple protocol
addresses. See "About the Advanced Connect Data Parameters" to configure
additional
CONNECT_DATA
options.
Task 3 Modify Connectivity Information for Database Service Entries
When database registration with the directory naming completes, a database service
entry is created in the directory. By default, this entry contains network route
information with the location of the listener through a protocol address. You can re-
create this information or modify the existing network route information.
Note:
Only users that are members of the
OracleNetAdmins
or
OracleContextAdmins
group can modify network information for a database
service in a directory. To add or remove users from these groups, see "Who
Can Add or Modify Entries in the Directory Server".
The following procedure describes how to create or modify network route information
for a database service:
1. Access the Net Services Administration page in Oracle Enterprise Manager Cloud
Control. See Accessing the Net Services Administration Page.
2. Select Directory Naming from the Administer list, and then select the Oracle
home that contains the location of the directory server.
3. Click Go. You may be prompted to log in to the database server and the directory
server.
The Directory Naming page appears.
4. Click the Database Services tab.
5. In the Simple Search section, select Oracle Context and search criteria to see
the network service names for Oracle Context.
The database service names display in the Results section.
6. In the Results section, select a database service, and then click Edit.
Task 4 Create Net Services Aliases
Net service aliases in a directory server enable clients to refer to a database service
or a network service name by an alternative name. For example, a network service
alias of
salesalias
can be created for a network service name of
sales
. When
salesalias
is used to connect to a database, as in
CONNECT scott@salesalias
, it
resolves to and use the connect descriptor information for
sales
.
There are two main uses of network service aliases:
Chapter 8
Configuring the Directory Naming Method
8-20

• Use a network service alias as a way for clients to refer to a database service or network
service name by another name.
• Use a network service alias in one Oracle Context for a database service or network
service name in a different Oracle Context. This enables a database service or network
service name to be defined once in the directory server, and referred to by clients that
use other Oracle Contexts. See "Understanding Net Service Alias Entries" for an
overview of network service aliases.
Note:
• Only users that are members of either the
OracleNetAdmins
or
OracleContextAdmins
group can create or modify network service alias entries
in a directory. To add or remove users from the
OracleNetAdmins
group, see
"Who Can Add or Modify Entries in the Directory Server".
• To create or access network service aliases, ensure that the Oracle home is at
least release 9.2.0.4.
• Net service aliases are not supported by Microsoft Active Directory.
• Ensure the NLS_LANG environment variable is set for the clients when using
network service aliases.
To create a network service alias, use one of the following methods:
Each method provides similar functionality.
Network Service Alias Configuration using Oracle Enterprise Manager Cloud Control
The following procedure describes how to configure a network service alias using Oracle
Enterprise Manager Cloud Control:
1. Access the Net Services Administration page in Oracle Enterprise Manager Cloud
Control. See Accessing the Net Services Administration Page.
2. Select Directory Naming from the Administer list, and then select the Oracle home that
contains the location of the directory server.
3. Click Go.
The Directory Naming page appears.
4. Click the Net Service Aliases tab.
5. In the Results section, click Create.
The Create Net Service Alias page appears.
6. Enter a name for the alias in the Net Service Alias Name field.
7. In the Referenced Service Detail section, enter the following information in the fields:
• Oracle Context: Select the Oracle Context of the database service or network
service name from the list or enter one in the field.
• Referenced Service Name: Select the DN of the database service or network service
name.
8. Click OK to add the network service alias.
The network service alias is added to the Directory Naming page.
Chapter 8
Configuring the Directory Naming Method
8-21

Network Service Alias Configuration using Oracle Net Manager
The following procedure describes how to configure a network service alias using
Oracle Net Manager:
1. Start Oracle Net Manager. See Using Oracle Net Manager to Configure Oracle
Net Services.
2. In the navigator pane, select Service Naming from Directory.
3. Select Aliases.
4. Select Create from the Edit menu.
5. Enter the network service alias in the Net Service Alias field.
6. Select Oracle Context and name.
7. Click Create.
8. Select Save Network Configuration from the File menu.
Task 5 Configure LDAP as the First Naming Method for Client Lookups
Configure directory naming as the first method to be used in the
NAMES.DIRECTORY_PATH
parameter in the
sqlnet.ora
file. This parameter specifies the
order of naming methods Oracle Net uses to resolve connect identifiers to connect
descriptors. To configure LDAP as the first naming method you can use one of the
following methods:
LDAP Configuration using Oracle Enterprise Manager Cloud Control
The following procedure describes how to specify directory naming as the first naming
method using Oracle Enterprise Manager Cloud Control:
1. Access the Net Services Administration page in Oracle Enterprise Manager Cloud
Control. See Accessing the Net Services Administration Page.
2. Select Network Profile from the Administer list.
3. Click Go.
4. Select Naming Methods.
5. Select LDAP from the Available Methods list.
6. Click Move to move the selection to the Selected Methods list.
7. Use the Promote button to move LDAP to the top of the list.
8. Click OK.
LDAP Configuration using Oracle Net Manager
The following procedure describes how to specify directory naming as the first naming
method using Oracle Net Manager:
1. Start Oracle Net Manager. See Using Oracle Net Manager to Configure Oracle
Net Services.
2. In the navigator pane, select Profile from the Local menu.
3. From the list in the right pane, select Naming.
4. Click the Methods tab.
5. From the Available Methods list, select LDAP, and then click the right-arrow
button.
Chapter 8
Configuring the Directory Naming Method
8-22

6. From the Selected Methods list, select LDAP, and then use the Promote button to move
the selection to the top of the list.
7. Select Save Network Configuration from the File menu.
The
sqlnet.ora
file updates with the NAMES.DIRECTORY_PATH parameter, listing
ldap
first, such as the following:
NAMES.DIRECTORY_PATH=(ldap, tnsnames, hostname)
Task 6 Configure the Listener
Ensure that the listener located on the server is configured to listen on the same protocol
address configured for the network service name. By default, the listener is configured to
listen on the TCP/IP protocol, port 1521. See Configuring and Administering Oracle Net
Listener for listener configuration details.
Task 7 Connect to the Database
Clients that are configured with a default directory entry that matches the directory location of
the database service or network service name can connect to the database using the
following syntax:
CONNECT
username
@
connect_identifier
Clients that are configured with a default directory entry that does not match the entry's
directory location must use the entry's distinguished name or its fully-qualified name. See
"Understanding the Directory Information Tree" for fully-qualified name usage.
• Creating Multiple Default Contexts in a Directory Naming Server
To enable multiple default contexts, define the
orclCommonContextMap
with a list of
associations between a domain and a DN to be used as the default
oracleContext
.
• Exporting Local Naming Entries to a Directory Naming Server
Learn how to export data stored in a
tnsnames.ora
file to a directory server. These tasks
assume the directory server has been installed and is running.
• Exporting Directory Naming Entries to a tnsnames.ora File
• Configuring the LDAP Naming Adapter to Use Wallets
The client LDAP naming adapter authenticates the LDAP bind while connecting to the
LDAP directory to resolve connect string names. You can configure the adapter to use an
Oracle wallet during the authentication.
Related Topics
• Oracle Fusion Middleware Administering Oracle Internet Directory
8.3.1 Creating Multiple Default Contexts in a Directory Naming Server
To enable multiple default contexts, define the
orclCommonContextMap
with a list of
associations between a domain and a DN to be used as the default
oracleContext
.
If you want clients to use discovery in directories which have more than one Oracle Context,
then you can define the
orclCommonContextMap
attribute in the base
admin
context. This
attribute overrides the
orclDefaultSubscriber
attribute. During name lookup the discovery
operation returns both values, and the client decides based on these which Oracle Context to
use.
Chapter 8
Configuring the Directory Naming Method
8-23

If the
orclCommonContextMap
attribute is not defined, then the
orclDefaultSubscriber
is used as the default. If
orclCommonContextMap
is defined, then the client finds the
default Oracle Context which is associated with its DNS domain in the
orclCommonContextMap
.
Here is a sample LDIF file entry:
$ ldapmodify -v -h sales-server -p 1389 -D cn=orcladmin -q
dn: cn=Common,cn=Products,cn=OracleContext
replace: orclCommonContextMap
orclCommonContextMap:
(contextMap=
(domain_map=(domain=us.example.com)(DN="dc=example,dc=com"))
(domain_map=(domain=uk.example.com)(DN="dc=sales,dc=com"))
)
You must enter a
contextMap
entry without line breaks.
Related Topics
• Oracle Fusion Middleware Administering Oracle Internet Directory
8.3.2 Exporting Local Naming Entries to a Directory Naming Server
Learn how to export data stored in a
tnsnames.ora
file to a directory server. These
tasks assume the directory server has been installed and is running.
If a
tnsnames.ora
file already exists, then its network service names can be exported
to a directory server. The export procedure is performed for one domain at a time.
Task 1 Create Structure in the Directory Server
In the directory server, create the directory information tree (DIT) with the structure in
which you want to import network service names. Create the structure leading to the
top of the Oracle Context.
For example, if the
tnsnames.ora
file supports a domain structure
example.com
and
you want to replicate this domain in the directory, then create domain component
entries of
dc=com
and
dc=example
in the directory, as shown in the following figure.
Figure 8-1 example.com in Directory Server
dc=example
dc=com
You can replicate the domain structure you currently use with
tnsnames.ora
, or you
can develop an entirely different structure. Introducing an entirely different structure
can change the way clients enter the network service name in the connect string.
Oracle recommends considering relative and fully-qualified naming issues before
changing the structure.
Task 2 Create Oracle Contexts
Create an Oracle Context under each DIT location that you created in Task 1 using
Oracle Internet Directory Configuration Assistant. Oracle Context has a relative
distinguished name (RDN) of
cn=OracleContext
. Oracle Context stores network
Chapter 8
Configuring the Directory Naming Method
8-24

object entries, as well as other entries for other Oracle components. In the following figure,
cn=OracleContext
is created under
dc=example,dc=com
.
Figure 8-2 Oracle Context
dc=example
cn=OracleContext
dc=com
Task 3 Configure Directory Server Usage
If not done as a part of creating Oracle Contexts, then configure the Oracle home for
directory server use. The Oracle home you configure should be the one that performs the
export.
Task 4 Export Objects to a Directory Server
To export network service names contained in a
tnsnames.ora
file to a directory, use either
Oracle Enterprise Manager Cloud Controlr or Oracle Net Manager.
• Export Objects using Oracle Enterprise Manager Cloud Control
The following procedure describes how to export objects using Oracle Enterprise
Manager Cloud Control
1. Access the Net Services Administration page in Oracle Enterprise Manager Cloud
Control. See Accessing the Net Services Administration Page.
2. Select Directory Naming from the Administer list, and then select the Oracle home
that contains the location of the directory server.
3. Click Go.
The Directory Naming page appears.
4. Click the Net Service Names tab.
5. In the Related Links section, click Import Net Service Names To Directory Server.
The Import Net Service Names To Directory Server page appears.
6. From the Oracle Context list in the Oracle Internet Directory Server Destination
section, select Oracle Context to which you want to export the selected network
service names.
7. In the Net Service Names to Import section, select the network service names.
8. Click Add to add the network service names to the directory.
The network service name is added to the Directory Naming page.
• Export Objects using Oracle Net Manager
The following procedure describes how to export objects using Oracle Net Manager:
1. Start Oracle Net Manager. See Using Oracle Net Manager to Configure Oracle Net
Services.
Chapter 8
Configuring the Directory Naming Method
8-25

2. If the
tnsnames.ora
file you want to export is not loaded in Oracle Net
Manager, then select Open Network Configuration from the File menu to
select the
tnsnames.ora
file to export to the directory.
3. Select Directory from the Command menu, and then select Export Net
Service Names.
The Directory Server Migration wizard starts.
4. Click Next.
If network service names with multiple domain were detected in the
tnsnames.ora
file, then the Select Domain page appears. Continue to Step 5.
If the network service names are not domain qualified, then the Select Net
Service Names page appears. Skip to Step 6.
5. Select the network domain whose network service names you want to export,
and then click Next.
The Select Net Service Names page appears.
6. Select the network service names from the list to export, and then click Next.
The Select Destination Context page appears.
7. In the Select Destination Context page, do the following:
a. From the Directory Naming Context list, select the directory entry that
contains the Oracle Context. The directory naming context is part of a
directory subtree that contains one or more Oracle Contexts.
b. From the Oracle Context list, select the Oracle Context to which you want
to export the selected network service names.
c. Click Next.
The Directory Server Update page appears with the status of the export
operation.
8. Click Finish to close the Directory Server Migration wizard.
Related Topics
• Client Connections Using Directory Naming
Most clients needing to perform name lookups in the directory server access the
directory server using anonymous authentication.
• Managing Network Address Information
• Oracle Fusion Middleware Administering Oracle Internet Directory
8.3.3 Exporting Directory Naming Entries to a tnsnames.ora File
After you create the directory naming entries, consider exporting the entries to a local
tnsnames.ora
file, and distributing that file to clients. Clients can use the locally saved
file when a directory server is temporarily unavailable.
The following procedure describes how to export directory naming entries to a local
tnsnames.ora
file:
1. Access the Net Services Administration page in Oracle Enterprise Manager Cloud
Control.
Chapter 8
Configuring the Directory Naming Method
8-26

See Also:
"Accessing the Net Services Administration Page"
2. Select Directory Naming from the Administer list, and then select the Oracle home that
contains the location of the directory server.
3. Click Go.
The Directory Naming page appears.
4. Click the Net Service Names tab.
5. In the Simple Search section, select Oracle Context and search criteria to see the
network service names for a particular Oracle Context.
The network service names display in the Results section.
6. In the Results section, click Save to tnsnames.ora.
The Processing: Create tnsnames.ora File page appears, informing you of the creation
process.
8.3.4 Configuring the LDAP Naming Adapter to Use Wallets
The client LDAP naming adapter authenticates the LDAP bind while connecting to the LDAP
directory to resolve connect string names. You can configure the adapter to use an Oracle
wallet during the authentication.
1. Obtain an LDAP server certificate, create an Oracle wallet, and store the certificate and
LDAP user credentials in the wallet truststore:
You use the
orapki
utility to create the wallet and add the LDAP server certificate to it.
Also, you use the
mkstore
utility to add LDAP user credentials to the wallet.
a. Obtain an LDAP server certificate from the LDAP directory server using
openssl
s_client
:
openssl s_client -connect LDAP server host:port -showcerts -outform
PEM
The
-connect LDAP server host:port
option specifies the LDAP directory server
host name and port for the connection. The
-showcerts
option displays the LDAP
server certificate list sent by the server. The
-outform PEM
option extracts the server
certificate to your file system directory (for example, /tmp/ldapservercert.txt)
in a
PEM
format.
b. Create an empty Oracle wallet:
orapki wallet create -wallet wallet_directory
The
-wallet wallet_directory
option specifies the location of the file system
directory where you want to create the wallet.
Chapter 8
Configuring the Directory Naming Method
8-27

c. Add the LDAP server certificate to the wallet:
orapki wallet add -wallet wallet_directory -trusted_cert -cert
The
-cert
option specifies the location of the file system directory (for
example, /tmp/ldapservercert.txt) where you have stored the LDAP
server certificate.
d. Create an entry in the wallet with the DN of the LDAP user name:
mkstore -wrl wallet_directory -createEntry oracle.ldap.client.dn
dn_of_ldap_username
For example:
mkstore -wrl /app/wallet -createEntry oracle.ldap.client.dn
cn=userinldap,dc=example,dc=com
For Microsoft Active Directory, you can also specify the
userPrincipalName
or
down-level logon name (
sAMAccountName
) attribute.
e. Create an entry in the wallet with the LDAP password:
mkstore -wrl wallet_directory -createEntry
oracle.ldap.client.password ldap_password
f. Enable auto-login for the wallet:
orapki wallet create -wallet wallet_directory -auto_login
Note:
Auto-login wallets are protected by file system permissions. Use
operating system utilities to protect the wallet directory by granting
read and write permissions only to the client.
2. Use the
WALLET_LOCATION
parameter to specify your wallet directory in the
sqlnet.ora file:
WALLET_LOCATION=
(SOURCE=
(METHOD=file)
(METHOD_DATA=
(DIRECTORY=wallet_directory)))
For example:
WALLET_LOCATION=
(SOURCE=
(METHOD=FILE)
(METHOD_DATA=
(DIRECTORY=/app/wallet/)))
Chapter 8
Configuring the Directory Naming Method
8-28

For detailed information on configuring this parameter, see WALLET_LOCATION.
3. Configure authentication settings for your LDAP connection in the sqlnet.ora file:
• Set
NAMES.LDAP_AUTHENTICATE_BIND=TRUE
to specify that the LDAP connection is
authenticated using the wallet directory (defined by
WALLET_LOCATION
).
• Set
NAMES.LDAP_AUTHENTICATE_BIND_METHOD=LDAPS_SIMPLE_AUTH
to use simple
authentication method over LDAPS (LDAP over TLS connection).
For detailed information on configuring these settings, see
NAMES.LDAP_AUTHENTICATE_BIND and
NAMES.LDAP_AUTHENTICATE_BIND_METHOD.
4. Using Oracle Net Manager, add one or more directory entries to the LDAP server.
5. Using SQL*Plus or any other database client, verify names resolution.
Related Topics
• Authentication Methods
Clients use different methods of authentication depending upon the task to be performed,
such as resolving connect string names and managing directory entries.
8.4 Configuring External Naming Methods
External naming refers to the method of resolving a network service name, stored in a third-
party naming service, to a network address, such as network information services (NIS).
Organizations and corporations using NIS as part of their systems infrastructure have the
option to store network service names and addresses in NIS, using NIS external naming.
For example, when a user gives a command with a network service name (
payroll
) such as
the following:
SQLPLUS scott@payroll
NIS external naming on the node running the client program or database server acting as a
client program contacts an NIS server located on the network, and passes the network
service name to the NIS server. The NIS server resolves the network service name into an
Oracle Net address and returns this address to the client program or server. The client
program then uses this address to connect to Oracle Database.
An NIS server runs a program called
ypserv
, which handles name requests. The
ypserv
program stores different types of data in special files called maps. For example, passwords
are stored in a map called
passwd.byname
. Oracle Database service names are stored in a
map called
tnsnames
.
When a user uses a connect string, NIS external naming uses an RPC call to contact the
ypserv
program, and passes the Oracle network service name and the name of the map. The
ypserv
program looks in the
tnsnames
map for the name, such as
payroll
, and its address
for the network service name. The address is returned to the client, and the client program
uses the address to contact the database server.
Chapter 8
Configuring External Naming Methods
8-29

Note:
The NIS external naming method is not available on all platforms. Use the
adapters
command to check availability of NIS external naming on your
system. If available, then it is listed under Oracle Net naming methods, as
follows:
$ adapters
Installed Oracle Net naming methods are:
Local Naming (tnsnames.ora)
Oracle Directory Naming
Oracle Host Naming
NIS Naming
See Oracle platform-specific documentation for additional information.
Perform the following tasks:
• Task 1: Configure NIS Servers to Support NIS External Naming
Before configuring servers to support NIS external naming, ensure that NIS is
configured and running on the NIS servers that need to resolve Oracle Database
network service names. Consult your NIS documentation for specifics. To
complete this task, add the
tnsnames
map to the existing NIS maps, and then
verify that the
tnsnames
map has been installed properly.
1. Create a
tnsnames.ora
file, as specified in "Configuring the Local Naming
Method".
Note:
Keep a copy of the
tnsnames.ora
file, preferably in the
ORACLE_BASE_HOME/network/admin
directory. You may need to use
this file again later to load network service names into the NIS map.
2. Convert the contents of the
tnsnames.ora
file to a
tnsnames
map using the
tns2nis
program using a command similar to the following:
tns2nis tnsnames.ora
The
tns2nis
program reads the
tnsnames.ora
file from the current directory. If
the
tnsnames.ora
file is not located in the current directory, then use a full path
name to specify its location, such as
/etc/tnsnames.ora
or
ORACLE_BASE_HOME/network/admin/tnsnames.ora
.
The
tnsnames
map is then written into the current working directory.
Chapter 8
Configuring External Naming Methods
8-30

Note:
The
tns2nis
program is supplied with NIS external naming.
3. Copy the
tnsnames
map to the NIS server.
4. Install the
tnsnames
map using
makedbm
, which is an NIS program.
Note:
This step must be performed by the person in charge of NIS administration.
The
makedbm
program converts the
tnsnames
map into two files that the NIS server
can read. The location of these files is operating system specific.
For example, to generate and install a
tnsnames
map on Linux, as the
root
user,
enter the following at the command line:
# makedbm tnsnames /var/yp/'domainname'/tnsnames
See Also:
Oracle operating system-specific documentation for details
5. Verify
tnsnames
has been installed properly using the following command:
ypmatch net_service_name tnsnames
For example, you might enter the following command:
ypmatch example.com tnsnames
This returns the length of the address in characters, followed by the address such as
the following:
99 (description=(address=(protocol=tcp) (host=sales)(port=1999)))
(connect_data=(service_name=dirprod)))
• Task 2: Configure the Clients
To configure clients, configure NIS as the first method specified in the
NAMES.DIRECTORY_PATH parameter in the
sqlnet.ora
file. This parameter specifies
the order of naming methods Oracle Net can use to resolve connect identifiers to connect
descriptors.
1. Start Oracle Net Manager.
Chapter 8
Configuring External Naming Methods
8-31

See Also:
"Using Oracle Net Manager to Configure Oracle Net Services"
2. In the navigator pane, select Profile from the Local menu.
3. From the list in the right pane, select Naming.
4. Click the Methods tab.
5. From the Available Methods list, select NIS, and then click the right-arrow
button.
6. In the Selected Methods list, select NIS, and then use the Promote button to
move the selection to the top of the list.
7. Select Save Network Configuration from the File menu.
The
sqlnet.ora
file updates with the NAMES.DIRECTORY_PATH parameter,
listing
nis
first:
NAMES.DIRECTORY_PATH=(nis, hostname, tnsnames)
Chapter 8
Configuring External Naming Methods
8-32

9
Configuring and Administering Oracle Net
Listener
Oracle Net Listener is a separate process that runs on the database server. It receives
incoming client connection requests and manages the traffic of these requests to the
database server. Find out how to configure the listener to accept client connections.
• Overview of Oracle Net Listener
• Configuring Dynamic Service Registration
• Configuring Oracle Net Listener During Installation
• Customizing Oracle Net Listener Configuration
• Administering the Listener
• Understanding Listener Redirects
Related Topics
• Identifying and Accessing the Database
• Understanding the Communication Layers
9.1 Overview of Oracle Net Listener
Note:
The release of the listener must be the same as or later than the latest release of all
Oracle databases being serviced through the listener.
A listener is configured with one or more listening protocol addresses, information about
supported services, and parameters that control its runtime behavior. The listener
configuration is stored in a configuration file named
listener.ora
.
Because the configuration parameters have default values, it is possible to start and use a
listener with no configuration. This default listener has a name of
LISTENER
, supports no
services on startup, and listens on the following TCP/IP protocol address:
(ADDRESS=(PROTOCOL=tcp)(HOST=
host_name
)(PORT=1521))
The listener forwards client requests to supported services. These services are dynamically
registered with the listener. This dynamic registration feature is called service registration.
The registration is performed by the Listener Registration (LREG) process. Dynamic service
registration does not require any manual configuration in the
listener.ora
file.
Service registration offers the following benefits:
• Connect-time failover
9-1

Because the listener always monitors the state of the instances, service
registration facilitates automatic failover of a client connect request to a different
instance if one instance is down.
• Connection load balancing
Service registration enables the listener to forward client connect requests to the
least-loaded instance and dispatcher or dedicated server. Service registration
balances the load across the service handlers and nodes.
• High-availability for Oracle Real Application Clusters and Oracle Data Guard
See Also:
• "Understanding Oracle Net Architecture "
• "Configuring Dynamic Service Registration"
• "About the Address List Parameters"
• "Understanding Connection Load Balancing"
9.2 Configuring Dynamic Service Registration
Service registration allows processes, such as an Oracle database, to identify their
available services to the listener, which then acts as a port mapper for those services.
The listener uses the dynamic service information about the database and instance
received through service registration.
Dynamic service registration is configured in the database initialization file. It does not
require any configuration in the
listener.ora
file. However, listener configuration
must be set to listen on the ports named in the database initialization file, and must not
have parameters set that prevent automatic registration, such as COST parameters.
This section contains the following configuration topics related to service registration:
• Setting Initialization Parameters for Service Registration
• Registering Information with a Local Listener
• Registering Information with a Remote Listener
• Registering Information with All Listeners in a Network
• Configuring a Naming Method
9.2.1 Setting Initialization Parameters for Service Registration
To ensure service registration works properly, the initialization parameter file should
contain the following parameters:
• SERVICE_NAMES for the database service name
• INSTANCE_NAME for the instance name
• LOCAL_LISTENER for the local listener
• REMOTE_LISTENER for the remote listener, if any
Chapter 9
Configuring Dynamic Service Registration
9-2

• FORWARD_LISTENER for the forward listener
For example:
SERVICE_NAMES=sales.us.example.com
INSTANCE_NAME=sales
The value for the SERVICE_NAMES parameter defaults to the global database name, a
name comprising the DB_NAME and DB_DOMAIN parameters in the initialization parameter
file. The value for the INSTANCE_NAME parameter defaults to the Oracle system identifier
(SID).
Note:
Starting with Oracle Database 19c, customer use of the
SERVICE_NAMES
parameter
is deprecated. To manage your services, Oracle recommends that you use the
SRVCTL
or
GDSCTL
command line utilities, or the
DBMS_SERVICE
package.
See Also:
Oracle Database Reference for additional information about the SERVICE_NAMES
and INSTANCE_NAME parameters
9.2.2 Registering Information with a Local Listener
By default, the LREG process registers service information with its local listener on the
default local address of TCP/IP, port 1521. If the listener configuration is synchronized with
the database configuration, then LREG can register service information with a nondefault
local listener or a remote listener on another node. Synchronization occurs when the protocol
address of the listener is specified in the
listener.ora
file and the location of the listener is
specified in the initialization parameter file.
To have the LREG process register with a local listener that does not use TCP/IP, port 1521,
configure the LOCAL_LISTENER parameter in the initialization parameter file to locate the
local listener.
For a shared server environment, you can use the
LISTENER
attribute of the DISPATCHERS
parameter in the initialization parameter file to register the dispatchers with a nondefault local
listener. Because the LOCAL_LISTENER parameter and the
LISTENER
attribute enable LREG
to register dispatcher information with the listener, it is not necessary to specify both the
parameter and the attribute if the listener values are the same.
LOCAL_LISTENER is a comma-delimited list parameter. If a comma appears in the string,
then the entire string must be enclosed in double quotation marks. Set the
LOCAL_LISTENER parameter as follows:
ALTER SYSTEM SET LOCAL_LISTENER=["]listener_address["][,...];
For example, if the listener address
"ab,cd"
is entered, then it resolves to one listener
address. If the address is entered as
ab,cd
, then it resolves to two listener addresses,
ab
and
cd
.
Chapter 9
Configuring Dynamic Service Registration
9-3

For shared server connections, set the
LISTENER
attribute as follows:
ALTER SYSTEM SET DISPATCHERS="(PROTOCOL=tcp)(LISTENER=listener_address)";
In the preceding command, listener_address is resolved to the listener protocol
addresses through a naming method, such as a
tnsnames.ora
file on the database
server.
Note:
• To dynamically update the LOCAL_LISTENER parameter, use the SQL
statement
ALTER SYSTEM
as follows:
ALTER SYSTEM SET LOCAL_LISTENER=["]listener_address["][,...]
If you set the parameter to null using the following statement, then the
default local address of TCP/IP, port 1521 is assumed:
ALTER SYSTEM SET LOCAL_LISTENER=''
• The
LISTENER
attribute overrides the LOCAL_LISTENER parameter. As
a result, the SQL statement
ALTER SYSTEM SET LOCAL_LISTENER
does
not affect the setting of this attribute.
In Example 9-1, a database resides on host
sales1-server
. The listener on this host
is named
listener_sales1
and is configured to listen on port 1421 instead of port
1521.
Example 9-1 Registering a Local Listener in a Dedicated Server Environment
1. On the host where the local listener resides, configure the
listener.ora
file with
the protocol address of the listener using Oracle Net Manager.
2. On the database, set the LOCAL_LISTENER parameter in the database
initialization parameter file to the alias of the local listener. For example:
ALTER SYSTEM SET LOCAL_LISTENER=listener_sales1;
If the database is configured for shared server connections, then you could set the
LISTENER
attribute as follows:
ALTER SYSTEM SET DISPATCHERS="(PROTOCOL=tcp)(LISTENER=listener_sales1)";
3. Resolve the listener name alias for the
LOCAL_LISTENER
setting through a
tnsnames.ora
file on the database host using a text editor, as follows:
listener_sales1=
(DESCRIPTION =
(ADDRESS = (PROTOCOL=tcp)(HOST=sales-server)(PORT=1421)))
Chapter 9
Configuring Dynamic Service Registration
9-4

Note:
• If you are registering a local listener and use Oracle Connection Manager,
then do not include
(DESCRIPTION =
or its closing parenthesis.
• A network service name entry can be created for the protocol address
without the CONNECT_DATA section of the connect descriptor.
See Also:
• See Oracle Database SQL Reference for additional information about the
ALTER
SYSTEM
statement.
• "Configuring Listening Protocol Addresses"
• "Configuring a Naming Method"
9.2.3 Registering Information with a Remote Listener
A remote listener is a listener residing on one computer that redirects connections to a
database instance on another computer. Remote listeners are typically used in an Oracle
Real Application Clusters (Oracle RAC) environment. You can configure registration to
remote listeners, such as with Oracle RAC, for dedicated or shared server environments.
In a dedicated server environment, you must enable the LREG background process to
register with a remote listener. You do this by configuring the REMOTE_LISTENER
parameter, which is a comma-delimited list parameter, in the initialization parameter file. The
syntax of REMOTE_LISTENER is as follows:
ALTER SYSTEM SET REMOTE_LISTENER=["]listener_address["][,...];
In the preceding command, listener_address is resolved to the listener protocol addresses
through a naming method such as a
tnsnames.ora
file on the database host. If a comma
appears in the listener address, then the entire string must be enclosed in quotation marks.
In a shared server environment, you can use the same registration technique as for a
dedicated server environment. Alternatively, you can set the
LISTENER
attribute of the
DISPATCHERS parameter in the initialization parameter file to register the dispatchers with
any listener. The syntax of the
LISTENER
attribute is as follows:
ALTER SYSTEM SET DISPATCHERS="(PROTOCOL=tcp)(LISTENER=listener_address)";
Chapter 9
Configuring Dynamic Service Registration
9-5

Note:
The
LISTENER
attribute overrides the REMOTE_LISTENER initialization
parameter. Because the REMOTE_LISTENER initialization parameter and
the
LISTENER
attribute enable LREG to register dispatcher information with
the listener, you do not need specify both the parameter and the attribute if
the listener values are the same.
For example, assume that a remote listener named
listener-sales2
listens on port
1521 on host
sales2-server
, and a database resides on host
sales1-server
. You
want the listener on
sales2-server
to redirect connection requests to this database.
Figure 9-1 illustrates this scenario.
Figure 9-1 Remote Listener
listener-sales2
sales1-server
Client
sales2-server
Listener
See Also:
Oracle Database SQL Reference for additional information about the
ALTER
SYSTEM SET
statement
Example 9-2 shows how to register a remote listener in a dedicated server
environment. In the example, the remote listener is
sales2-server
.
Example 9-2 Registering a Remote Listener in a Dedicated Server Environment
1. On the host where the remote listener resides, use Oracle Net Manager to
configure the
listener.ora
file with the protocol addresses of the remote listener.
2. On the database to which you want requests to be redirected, set the
REMOTE_LISTENER parameter in the database initialization parameter file to the
alias of the remote listener, for example:
ALTER SYSTEM SET REMOTE_LISTENER=listener_sales2;
Chapter 9
Configuring Dynamic Service Registration
9-6

For shared server connections, set the DISPATCHER parameter in the initialization file
for the database on host
sales1-server
as follows:
ALTER SYSTEM SET DISPATCHERS="(PROTOCOL=tcp)(LISTENER=listeners_sales2)";
Note:
To statically update the REMOTE_LISTENER initialization parameter, use a text
editor to de-register the information with the remote listener which it had
previously registered information.
3. Resolve the listener name alias for the remote listener through a
tnsnames.ora
file on the
database host. For example:
listener_sales2=
(DESCRIPTION=
(ADDRESS=(PROTOCOL=tcp)(HOST=sales2-server)(PORT=1521)))
See Also:
• "Configuring a Naming Method"
• "Configuring Listening Protocol Addresses"
• Oracle Database Reference to learn about the REMOTE_LISTENER
initialization parameter
• Oracle Real Application Clusters Administration and Deployment Guide to learn
how to configure remote listeners (also called SCAN listeners) in an Oracle
RAC environment
9.2.4 Registering Information with All Listeners in a Network
A network may contain multiple local and remote listeners. By default, all listeners are cross-
registered with each other. By specifying a set of listeners in the LISTENER_NETWORKS
initialization parameter, you can designate a subset of local listeners with a subset of remote
listeners. Listeners specified by the LISTENER_NETWORKS parameter should not be
specified by the LOCAL_LISTENER and REMOTE_LISTENER parameters.
The syntax of LISTENER_NETWORKS parameter is as follows:
LISTENER_NETWORKS = '((NAME=network_name)
(LOCAL_LISTENER=["]listener_address[,...]["])
[(REMOTE_LISTENER=["]listener_address[,...]["])])'
In the preceding syntax, listener_address is resolved according to the rules of
LOCAL_LISTENER and REMOTE_LISTENER.
Example 9-3 Using Two Networks on a Subnet
Assume there are two distinct networks,
network1
and
network2
. On
network1
, there is a
local listener named
local1
, and a remote listener named
remote1
. On
network2
, there is a
local listener named
local2
, and a remote listener named
remote2
. The following syntax sets
Chapter 9
Configuring Dynamic Service Registration
9-7

up registration so that the listeners only redirect connections to listeners on the same
network.
LISTENER_NETWORKS =
'((NAME=network1) (LOCAL_LISTENER=local1) (REMOTE_LISTENER=remote1))',
'((NAME=network2) (LOCAL_LISTENER=local2) (REMOTE_LISTENER=remote2))'
In the preceding example,
local1
is registered only with
remote1
, and
remote1
only
redirects connections to
local1
. The listener
local2
is registered only with
remote2
,
and
remote2
only redirects connections to
local2
.
Example 9-4 Configuring Multiple Listeners
Assume that multiple listeners are listening on a network named
sales-network
. The
following conditions are true:
• A database configured for dedicated server connections resides on host
sales1-
server
. It is the only database in the network.
• A local listener resides on
sales1-server
and listens on nondefault port 1421.
• A remote listener named resides on host
sales2-server
and listens on port 1521.
• Another remote listener resides on host
sales3-server
and listens on port 1521.
The following procedure describes how to register information with all listeners in a
dedicated server environment:
1. On the hosts where the remote listeners reside (in this example,
sales2-server
and
sales3-server
), configure the
listener.ora
file with the protocol addresses
of the remote listener.
2. On the database to which you want requests to be redirected, set the
REMOTE_LISTENER parameter in the database initialization parameter file to the
alias of the remote listeners, and the LOCAL_LISTENER parameter to the alias of
the local listener.
Set the parameters in the initialization file for the database on host
sales1-server
as follows:
REMOTE_LISTENER="listener_sales2,listener_sales3"
LOCAL_LISTENER=listener_sales1
3. Resolve the listener name alias for the LOCAL_LISTENER and
REMOTE_LISTENER setting through a
tnsnames.ora
file on the database host.
In the
tnsnames.ora
on
sales1-server
, resolve the local listener alias and remote
listener aliases
listener_sales1
,
listener_sales2
, and
listener_sales3
as
follows:
listener_sales1=
(DESCRIPTION=
(ADDRESS=(PROTOCOL=TCP)(HOST=sales1-server)(PORT=1421)))
listener_sales2=
(DESCRIPTION=
(ADDRESS=(PROTOCOL=TCP)(HOST=sales2-server)(PORT=1521)))
listener_sales3=
(DESCRIPTION=
(ADDRESS=(PROTOCOL=TCP)(HOST=sales3-server)(PORT=1521)))
Chapter 9
Configuring Dynamic Service Registration
9-8

listener_sales_local=
(DESCRIPTION=
(ADDRESS=(PROTOCOL=tcp)(HOST=salesl-server)(PORT=1421)))
listener_sales_remote=
(DESCRIPTION_LIST=
(DESCRIPTION=(ADDRESS=(PROTOCOL=tcp)(HOST=sales2-server)(PORT=1521)))
(DESCRIPTION=(ADDRESS=(PROTOCOL=tcp)(HOST=sales3-server)(PORT=1521))))
See Also:
• "Configuring a Naming Method"
• "Configuring Listening Protocol Addresses"
• Oracle Database Reference for additional information about the
REMOTE_LISTENER initialization parameter
9.2.5 Configuring a Naming Method
The listener name alias specified for the LOCAL_LISTENER or REMOTE_LISTENER
initialization parameters, or
LISTENER
attribute can be resolved using a
tnsnames.ora
file. For
example, a listener can be defined in the
init.ora
file as the following:
LOCAL_LISTENER = (ADDRESS=(PROTOCOL=tcp)(HOST=sales-server)(PORT=1421))
To use an alias for the listener, it can be defined in the
init.ora
and the
tnsnames.ora
files
as follows:
• In the
init.ora
file:
LOCAL_LISTENER = listener_sales1
• In the
tnsnames.ora
file:
listener_sales1 = (ADDRESS=(PROTOCOL=tcp)(HOST=sales-server)(PORT=1421))
The CONNECT_DATA information should not be included in the network service entry in the
tnsnames.ora
file. However, Oracle Enterprise Manager Cloud Control and Oracle Net
Manager cannot configure a
tnsnames.ora
file without the CONNECT_DATA information. To
use listener name aliases, Oracle recommends you modify the
tnsnames.ora
file using a text
editor.
Chapter 9
Configuring Dynamic Service Registration
9-9

Note:
• Multiple addresses are supported, but connect-time failover and client
load balancing features are not supported.
• If the listener alias specified in the LOCAL_LISTENER parameter is
invalid or not resolved, then the LREG process does not allow the
database to start. The following errors occur:
ORA-00119: invalid specification for system parameter
LOCAL_LISTENER
ORA-00132: syntax error or unresolved network name '%s'
See Also:
Enabling Advanced Features of Oracle Net Services for additional
information about multiple address configuration
9.3 Configuring Oracle Net Listener During Installation
Oracle Universal Installer launches Oracle Net Configuration Assistant during
installation. Oracle Net Configuration Assistant configures the listening protocol
address and service information for Oracle Database.
During an Enterprise Edition or Standard Edition installation on the database server,
Oracle Net Configuration Assistant automatically configures a listener with a name of
LISTENER
that has a TCP/IP listening protocol address for Oracle Database. During a
Custom installation, Oracle Net Configuration Assistant prompts for the listener name
and protocol address.
A listening IPC protocol address for external procedure calls is automatically
configured, regardless of the installation type. Oracle Net Configuration Assistant also
automatically configures service information for the external procedures in the
listener.ora
file.
If you are using the IPC protocol, then you can improve performance by specifying the
maximum number of concurrent IPC connection requests to match your expected
connection requests.
9.4 Customizing Oracle Net Listener Configuration
If the default or installed configuration is not adequate for a particular environment,
then you can use Oracle Net Manager to customize the
listener.ora
configuration.
• Configuring Listening Protocol Addresses
• Handling Large Volumes of Concurrent Connection Requests
Chapter 9
Configuring Oracle Net Listener During Installation
9-10

• Managing Oracle Net Listener Security
By default, Oracle Net Listener permits only local administration for security reasons. As
a policy, the listener can be administered only by the user who started it. This is enforced
through local operating system authentication.
9.4.1 Configuring Listening Protocol Addresses
Oracle Enterprise Manager Cloud Control and Oracle Net Manager can be used to configure
protocol support for the listener.
The Oracle Net Listener endpoint address configuration accepts both IPv6 addresses and
host names that resolve to IPv6 addresses, as explained in "IPv6 Interface and Address
Configurations". This technique can create listening endpoints that service IPv6 clients.
• Configuring Listening Protocol Addresses Using Oracle Enterprise Manager Cloud
Control
Configure protocol addresses for the listener from the Net Services Administration page
in Oracle Enterprise Manager Cloud Control.
• Configuring Listening Protocol Addresses Using Oracle Net Manager
9.4.1.1 Configuring Listening Protocol Addresses Using Oracle Enterprise Manager
Cloud Control
Configure protocol addresses for the listener from the Net Services Administration page in
Oracle Enterprise Manager Cloud Control.
1. Access the Net Services Administration page in Oracle Enterprise Manager Cloud
Control.
2. Click Edit. You may be prompted to log in to the database server.
The Edit Listener page appears.
3. In the Addresses section, configure protocol support:
a. Click Add.
The Add Address page appears.
b. From the Protocol list, select the protocol on which the listener is configured to listen.
For TCP/IP, if the computer has more than one IP address and you want the listener
to listen on all available IP addresses, then select TCP/IP or TCP/IP with TLS and
enter the host name of the computer in the Host field.
c. In Port, enter the port number.
When configuring the listener to listen on TCP/IP, enter the default port of 1521.
Otherwise, you must configure the LOCAL_LISTENER parameter in the initialization
parameter file and the non-default port number must be specified for use by any
naming method.
d. In Host, enter the host address.
e. (Optional) In the Advanced Parameters section, specify the I/O buffer space limit for
send and receive operations of sessions in the Total Send Buffer Size and Total
Receive Buffer Size fields.
f. Click OK.
The protocol address is added to the Addresses section.
Chapter 9
Customizing Oracle Net Listener Configuration
9-11

4. Repeat Step 3 for additional protocols.
Related Topics
• Accessing the Net Services Administration Page
• Configuring I/O Buffer Space
Reliable network protocols, such as TCP/IP, buffer data into send and receive
buffers while sending and receiving to or from lower and upper layer protocols.
The sizes of these buffers affect network performance by influencing flow control
decisions.
• Oracle Database Net Services Reference
9.4.1.2 Configuring Listening Protocol Addresses Using Oracle Net Manager
The following procedure describes how to configure protocol addresses for the listener
using Oracle Net Manager:
1. Start Oracle Net Manager.
See Also:
"Using Oracle Net Manager to Configure Oracle Net Services"
2. In the navigator pane, expand Local, and then select Listeners.
3. Select the listener.
4. From the list in the right pane, select Listener Locations.
5. Select the protocol from the Protocol list.
6. Enter the host name for the listener in the Host field.
7. Enter the port number in the Port field.
8. If you want to set send and receive buffer sizes, then click Show Advanced, and
then enter the sizes in the appropriate fields.
9. Select Save Network Configuration from the File menu to save the changes.
9.4.2 Handling Large Volumes of Concurrent Connection Requests
If you expect the listener to handle large volumes of concurrent connection requests,
then you can specify a listener queue size for its TCP/IP or IPC listening endpoints.
To specify the listener queue size, do the following:
• Specify the
QUEUESIZE
parameter at the end of the protocol address with its value
set to the expected number of concurrent requests.
The following example sets the queue size to 20:
LISTENER=
(DESCRIPTION=
(ADDRESS=(PROTOCOL=tcp)(HOST=sales-server)(PORT=1521)(QUEUESIZE=20)))
Chapter 9
Customizing Oracle Net Listener Configuration
9-12

Note:
The default number of concurrent connection requests is operating system-
specific. The defaults for TCP/IP on the Linux operating system and Microsoft
Windows follow:
– Linux operating system: 128
– Microsoft Windows XP Professional SP2: 10
– Microsoft Windows Server Enterprise Edition: 200
9.4.3 Managing Oracle Net Listener Security
By default, Oracle Net Listener permits only local administration for security reasons. As a
policy, the listener can be administered only by the user who started it. This is enforced
through local operating system authentication.
For example, if
user1
starts the listener, then only
user1
can administer it. Any other user
trying to administer the listener gets an error. The super user is the only exception.
Oracle recommends that you perform listener administration in the default mode (secure by
means of local operating system authentication), and access the system remotely using a
remote login. Oracle Enterprise Manager Cloud Control can also be used for remote
administration.
Connections coming to listener on an IP (TCP, TCPS, and SDP) based endpoint with firewall
functionality enabled, go through service ACL validation. The listener after receiving the
service name validates the connection IP with ACL list.
A new attribute FIREWALL is added in the endpoint to enable firewall functionality.
(ADDRESS=(PROTOCOL=TCP)(HOST=)(PORT=1521)(FIREWALL=ON))
You can configure the
FIREWALL
parameter as follows:
•
(FIREWALL=ON)
is explicitly set in endpoint: This enables strict ACL validation of all
connections coming on this endpoint. If no ACLs are configured for a service, all
connections are rejected for that service.
•
FIREWALL
is not set in endpoint: This implies relaxed validation. If ACL is configured for a
service, validation is done for that service. In the absence of ACLs, no validation is done
and all connections for that service are accepted.
•
(FIREWALL=OFF)
is set in endpoint: No validation is done and all connections are
accepted from this endpoint.
The server also enforces the ACLs.
The
DBMS_SFW_ACL_ADMIN
package provides interfaces for administering and managing the
access control policies.
• Specifying Valid Nodes and Subnets
Chapter 9
Customizing Oracle Net Listener Configuration
9-13

Related Topics
• Access Control Lists
• Firewall
• LOCAL_REGISTRATION_ADDRESS_listener_name
• DBMS_SFW_ACL_ADMIN
9.4.3.1 Specifying Valid Nodes and Subnets
Listener registration should be restricted to valid nodes and subnets. Valid nodes and
subnets can be specified for registration, and excluded nodes can also be specified for
registration. By default, every incoming connection for registration at the listener is
subjected to IP-based filtering. A connection is only allowed if it originates from the
local machine. If the other nodes and subnets are specified for registration, then the
local machine and the ones specified are allowed. The following parameters can be
set in the
listener.ora
file to specify valid and restricted nodes and subnets:
•
REGISTRATION_INVITED_NODES_listener_name
: Specifies the nodes that can
register with the listener. The list can be host names, or CIDR notation for IPv4
and IPv6 addresses. Presence of a host name in the list results in all IP addresses
mapped to it being invited.
•
REGISTRATION_EXCLUDED_NODES_listener_name
: Specifies the nodes that cannot
register with the listener. Nodes not specified on the list are allowed to register with
the listener.
If both parameters are set, then
REGISTRATION_EXCLUDED_NODES_listener_name
is
ignored.
By default, the SCAN listener agent sets
REMOTE_ADDRESS_REGISTRATION_listener_name
to a private IP endpoint. The SCAN
listener accepts registration requests only from the private network. Remote nodes
that are not accessible to the private network of the SCAN listener must be included in
the list of valid nodes by using the
registration_invited_nodes_alias
parameter in
the
listener.ora
file, or by modifying the SCAN listener using the command-line
interface, SRVCTL.
Note:
Starting with Oracle Grid Infrastructure 12c, for a SCAN listener, if the
VALID_NODE_CHECKING_REGISTRATION_listener_name
and
REGISTRATION_INVITED_NODES_listener_name
parameters are set in the
listener.ora
file, then the listener agent overwrites these parameters.
If you use the SRVCTL utility to set the
invitednodes
and
invitedsubnets
values,
then the listener agent automatically sets
VALID_NODE_CHECKING_REGISTRATION_listener_name
to SUBNET and sets
REGISTRATION_INVITED_NODES_listener_name
to the specified list in the
listener.ora
file.
For other listeners managed by CRS, the listener agent sets
VALID_NODE_CHECKING_REGISTRATION_listener_name
to be SUBNET in the
listener.ora
file only if it is not already set in the
listener.ora
file. The SRVCTL
Chapter 9
Customizing Oracle Net Listener Configuration
9-14

utility does not support setting the
invitednodes
and
invitedsubnets
values for a non-SCAN
listener. The listener agent does not update
REGISTRATION_INVITED_NODES_listener_name
in
the
listener.ora
file for a non SCAN listener.
See Also:
Oracle Database Net Services Reference for more information about the
VALID_NODE_CHECKING_REGISTRATION_listener_name
,
REGISTRATION_INVITED_NODES_listener_name
, and
REGISTRATION_EXCLUDED_NODES_listener_name
parameters
9.5 Administering the Listener
After the listener is configured, you can administer it with the Listener Control utility, Oracle
Enterprise Manager Cloud Control, and the Server Control utility (SRVCTL). This section
describes some of the administrative tasks for the listener. It contains the following topics:
• Starting and Stopping a Listener
• Managing a Listener in an Oracle Restart Configuration
• Determining the Current Status of a Listener
• Monitoring Services of a Listener
• Monitoring Listener Log Files
See Also:
• Oracle Database Net Services Reference for a complete list of the Listener
Control utility commands
• Oracle Enterprise Manager Cloud Control online help
9.5.1 Starting and Stopping a Listener
To stop or start a listener, use one of the following methods:
Note:
You can configure the listener to start automatically whenever the computer is
running or is restarted. Refer to "Managing a Listener in an Oracle Restart
Configuration" for additional information.
• Starting or Stopping a Listener Using the Listener Control Utility
• Starting or Stopping a Listener Using Oracle Enterprise Manager Cloud Control
Chapter 9
Administering the Listener
9-15

9.5.1.1 Starting or Stopping a Listener Using the Listener Control Utility
To start the listener from the command line, enter:
lsnrctl START [listener_name]
In the preceding command, listener_name is the name of the listener defined in the
listener.ora
file. It is not necessary to identify the listener if you are using the default
listener name
LISTENER
.
In addition to starting the listener, the Listener Control utility verifies connectivity to the
listener.
To stop a listener from the command line, enter:
lsnrctl STOP [listener_name]
In the preceding command, listener_name is the name of the listener defined in the
listener.ora
file. It is not necessary to identify the listener if you are using the default
listener name
LISTENER
.
Note:
When using the Oracle Home User, the listener control utility prompts for a
password on Microsoft Windows systems. This password is the operating
system password for the Oracle Home User. The password prompt is
displayed only if the listener service does not exist and needs to be created
as part of starting the listener.
See Also:
Oracle Database Platform Guide for Microsoft Windows for information about
the Oracle Home User
9.5.1.2 Starting or Stopping a Listener Using Oracle Enterprise Manager Cloud
Control
The following procedure describes how to start or stop a listener from Oracle
Enterprise Manager Cloud Control:
1. Access the Net Services Administration page in Oracle Enterprise Manager Cloud
Control.
Chapter 9
Administering the Listener
9-16

See Also:
"Using Oracle Enterprise Manager Cloud Control to Configure Oracle Net
Services"
2. Select Listeners from the Administer list, and then select the Oracle home that contains
the location of the configuration files.
3. Click Go.
The Listeners page appears.
4. Select the listener.
5. From the Actions list, select Start/Stop.
6. Click Go.
The Start/Stop page appears.
7. Depending on the current status of the selected listener, select either Stop or Start, and
then click OK.
9.5.2 Managing a Listener in an Oracle Restart Configuration
The Oracle Restart feature enhances availability for the processes and applications in a
single-instance database environment. The Oracle Restart agents monitor the health of
added components by periodically running check operations and restarting the components
when necessary.
You can add the listener as a component to the Oracle Restart configuration. The listener is
then automatically started by Oracle Restart when it fails or is not running. For example, if
you restart the database instance after a planned restart of the computer, then Oracle Restart
restarts the listener. Server Control (SRVCTL) is a command-line interface that you can use
to manage listeners in an Oracle Restart configuration.
• Viewing Configured Listeners Using the SRVCTL Utility
• Adding or Removing a Listener Using the SRVCTL Utility
• Starting or Stopping a Listener Using the SRVCTL Utility
9.5.2.1 Viewing Configured Listeners Using the SRVCTL Utility
To view all configured listeners, use the following command:
% srvctl config listener
See Also:
Oracle Database Administrator's Guide to learn how to configure Oracle Restart
and for SRVCTL syntax and semantics
Chapter 9
Administering the Listener
9-17

9.5.2.2 Adding or Removing a Listener Using the SRVCTL Utility
Adding a listener as an entry to the grid infrastructure enables the agent to monitor the
listener. Similarly, removing a listener removes as an entry. Use the
srvctl
command
at the operating system command line as follows:
• To add the listener, enter
srvctl add listener
The following command adds an entry for
listener_sales1
to the grid
infrastructure:
% srvctl add listener -listener listener_sales1
• To remove the listener, enter
srvctl remove listener
The following command removes the entry for
listener_sales1
from the grid
infrastructure:
% srvctl remove listener -listener listener_sales1
9.5.2.3 Starting or Stopping a Listener Using the SRVCTL Utility
The SRVCTL utility enables you to stop and start the listener. If you do not specify the
-listener
parameter, then the SRVCTL utility starts and stops the default listener.
• To start a listener, enter
srvctl start listener
In the following example, the first command starts the default listener, and the
second command starts
listener1
and
listener2
:
% srvctl start listener
% srvctl start listener -listener listener1,listener2
• To stop a listener, enter
srvctl stop listener
In the following example, the first command stops the default listener, and the
second command stops
listener1
and
listener2
:
% srvctl stop listener
% srvctl stop listener -listener listener1,listener2
9.5.3 Determining the Current Status of a Listener
To show the current status of a listener, use either the
STATUS
command of the Listener
Control utility or Oracle Enterprise Manager Cloud Control. The status output provides
basic status information about a listener, a summary of listener configuration settings,
the listening protocol addresses, and a summary of services registered with the
listener.
• Showing Status Using Listener Control
• Showing Status Using Oracle Enterprise Manager Cloud Control
9.5.3.1 Showing Status Using Listener Control
To show the status the listener from the command line, enter the following command:
lsnrctl STATUS [listener_name]
Chapter 9
Administering the Listener
9-18

In the preceding command, listener_name is the name of the listener defined in the
listener.ora
file. It is not necessary to identify the listener if you are using the default
listener name
LISTENER
.
Example 9-5 shows example output of the
STATUS
command.
Example 9-5 Listener Control Utility's STATUS Command Output
Connecting to (DESCRIPTION=(ADDRESS=(PROTOCOL=ipc)(KEY=net)))
STATUS of the LISTENER
------------------------
Alias LISTENER
Version TNSLSNR for Linux: Version 21.1.0.0.0
Start Date 15-JULY-2020 20:22:00
Uptime 65 days 10 hr. 5 min. 22 sec
Trace Level support
Security OFF
Listener Parameter File /oracle/admin/listener.ora
Listener Log File /oracle/network/log/listener.log
Listener Trace File /oracle/network/trace/listener.trc
Listening Endpoints Summary...
(DESCRIPTION=(ADDRESS=(PROTOCOL=ipc)(KEY=net)))
(DESCRIPTION=(ADDRESS=(PROTOCOL=tcp)(HOST=sales-server)(PORT=1521)))
(DESCRIPTION=(ADDRESS=(PROTOCOL=tcps)(HOST=sales-server)(PORT=2484)))
Services Summary...
Service "sales.us.example.com" has 1 instance(s).
Instance "sales", status READY, has 3 handler(s) for this service...
Service "hr.us.example.com" has 1 instance(s).
Instance "hr", status READY, has 2 handler(s) for this service...
The command completed successfully
The
STATUS
command output includes the sections described in Table 9-1.
Table 9-1 Listener Control Utility STATUS Command
Output Section Description
STATUS of the LISTENER Status of the listener, including the following:
• Alias of the listener
• Version of listener
• Start time and up time
• Trace level
•
listener.ora
file being used
• Logging and tracing configuration settings
Listening Endpoints
Summary
The protocol addresses the listener is configured to listen on.
Services Summary A summary of the services registered with the listener and the service
handlers allocated to each service.
Service The registered service.
Chapter 9
Administering the Listener
9-19

Table 9-1 (Cont.) Listener Control Utility STATUS Command
Output Section Description
Instance The name of the instance associated with the service.
The status field indicates if the instance can accept connections.
•
READY
means that the instance can accept connections.
•
BLOCKED
means that the instance cannot accept connections.
•
READY/SECONDARY
means that this is a secondary instance in an
Oracle Real Application Clusters primary/secondary configuration,
and is ready to accept connections.
•
RESTRICTED
means the instance is in restricted mode. The listener
blocks all connections to this instance.
•
UNKNOWN
means that the instance is registered statically in the
listener.ora
file rather than dynamically with service registration.
Therefore, the status is not known.
9.5.3.2 Showing Status Using Oracle Enterprise Manager Cloud Control
The following procedure describes how to show the status of a listener using Oracle
Enterprise Manager Cloud Control:
1. Access the Net Services Administration page in Oracle Enterprise Manager Cloud
Control.
See Also:
"Using Oracle Enterprise Manager Cloud Control to Configure Oracle
Net Services"
2. Select Listeners from the Administer list, and then select the Oracle home that
contains the location of the configuration files.
3. Click Go. You may be prompted to log in to the database server.
The Listeners page appears.
4. Select a listener.
5. From the Actions list, select Show Listener Control Status.
6. Click Go.
The Listener Control Status page appears.
7. After viewing the content, click the listener link at the top of the page.
9.5.4 Monitoring Services of a Listener
The
SERVICES
command of the Listener Control utility provides detailed information
about the services and instances registered with a listener and the service handlers
allocated to each instance. To show information about the services and instances from
the command line, enter:
lsnrctl SERVICES [listener_name]
Chapter 9
Administering the Listener
9-20

Example 9-6 shows example output of the
SERVICES
command.
Example 9-6 Listener Control Utility's SERVICES Command Output
Connecting to (DESCRIPTION=(ADDRESS=(PROTOCOL=ipc)(KEY=net)))
Services Summary...
Service "sales.us.example.com" has 1 instance(s).
Instance "sales", status READY, has 3 handler(s) for this service...
Handler(s):
"DEDICATED" established:0 refused:0 state:ready
LOCAL SERVER
"D000" established:0 refused:0 current:0 max:10000 state:ready
DISPATCHER <machine: sales-server, pid: 1689>
(ADDRESS=(PROTOCOL=tcp)(HOST=sales-server)(PORT=52414))
"D001" established:0 refused:0 current:0 max:10000 state:ready
DISPATCHER <machine: sales-server, pid: 1691>
(ADDRESS=(PROTOCOL=tcp)(HOST=sales-server)(PORT=52415))
Service "hr.us.example.com" has 1 instance(s).
Instance "hr", status READY, has 2 handler(s) for this service...
Handler(s):
"DEDICATED" established:0 refused:0 state:ready
LOCAL SERVER
"D000" established:0 refused:0 current:0 max:10000 state:ready
DISPATCHER <machine: sales-server, pid: 11326>
(ADDRESS=(PROTOCOL=tcp)(HOST=sales-server)(PORT=58361))
The command completed successfully
This output shows that two database services,
sales.us.example.com
and
hr.us.example.com
, are registered with the listener.
Client connection requests to
sales.us.example.com
are handled by two dispatchers named
D000
and
D001
and one dedicated server. All handlers have a status of
ready
, indicating that
they are ready to receive connections.
Client connection requests to
hr.us.example.com
are handled by one dispatcher named
D001
and one dedicated server.
The
SERVICES
command generates output with the following information as described in
Table 9-2.
Table 9-2 Listener Control Utility SERVICES Command
Output Section Description
Services The registered service.
Instance The name of the instance associated with the service
The status field indicates if the instance can accept connections.
•
READY
means the instance can accept connections.
•
BLOCKED
means the instance cannot accept connections.
•
READY/SECONDARY
means the is a secondary instance in an Oracle Real
Application Clusters primary/secondary configuration and is ready to
accept connections.
•
RESTRICTED
means the instance is in restricted mode. The listener blocks
all connections to this instance.
•
UNKNOWN
means the instance is registered statically in the
listener.ora
file rather than dynamically with service registration. Therefore, the status
is non known.
Chapter 9
Administering the Listener
9-21

Table 9-2 (Cont.) Listener Control Utility SERVICES Command
Output Section Description
Handlers The name of the service handler. Dispatchers are named
D000
through
D999
.
Dedicated servers have the name of
DEDICATED
.
This section also identifies the following about the service handler:
•
established
: The number of client connections this service handler has
established.
•
refused
: The number of client connections it has refused.
•
current
: The number of client connections it is handling, that is, its
current load.
•
max
: The maximum number of connections for the service handler, that is,
its maximum load.
•
state
: The state of the handler:
-
READY
means the service handler can accept new connections.
-
BLOCKED
means the service handler cannot accept new connections.
9.5.5 Monitoring Listener Log Files
When you notice any of the following conditions, review the listener log file for error
information:
• Long connection establishment times
• Connectivity problems and refusals
• Unexpected shutdown of the listener that could indicate a denial-of-service attack
See Also:
"Analyzing Listener Log Files"
9.6 Understanding Listener Redirects
Starting with Oracle Database 12c release 2 (12.2), the listener redirect feature allows
a client to connect to a pluggable database (PDB) using an unchanged connect
descriptor even after the PDB is migrated to a new location in the Oracle Public Cloud.
The Listener Registration (LREG) process registers a new handler with the local
listener for the PDB or the service which is in the process of migration. This handler
contains the new listener address of the database where the PDB or the service is
migrated. The new listener address can be that of a Single Client Access Name
(SCAN) listener in case of an Oracle RAC database or a local listener in case of a
single-instance database. The listener then redirects the client to the new address.
If a local listener redirects to a SCAN listener in an Oracle RAC configuration, then this
listener may need to further redirect the client connection request to another cluster
node. Such multiple redirects are not supported by Oracle Net listeners by default. To
allow the SCAN listener to forward the already redirected client connection request,
Chapter 9
Understanding Listener Redirects
9-22

add the
ALLOW_MULTIPLE_REDIRECTS_
listener_name parameter to its
listener.ora
file. Set
the parameter to
TRUE.
Do not set this parameter for node listeners because it may allow
infinite redirection loops in certain network configurations.
Chapter 9
Understanding Listener Redirects
9-23

10
Configuring and Administering Oracle
Connection Manager
Oracle Connection Manager is a proxy server that forwards connection requests to
databases or other proxy servers. It operates on the session level. It usually resides on a
computer separate from the database server and client computers. Oracle Connection
Manager is available for installation with Oracle Database 21c Enterprise Edition. It is a
custom installation option on the Client disk.
The primary functions of Oracle Connection Manager are:
• Access control: To use rule-based configuration to filter user-specified client requests and
accept others.
• Session multiplexing: To funnel multiple client sessions through a network connection to a
shared server destination.
Learn how to configure Oracle Connection Manager features.
• About the cman.ora File
You can set parameters in the
cman.ora
file to configure the computer that hosts Oracle
Connection Manager.
• Setting Up Oracle Connection Manager
In order to set up Oracle Connection Manager, you must configure the proxy server,
database, and clients.
• Configuring Oracle Connection Manager in Traffic Director Mode
Oracle Connection Manager in Traffic Director Mode is a proxy that is placed between the
database clients and the database instances.
• Configuring Oracle Connection Manager in Tunneling Mode for Reverse Connection
Oracle Connection Manager in tunnelling mode establishes tunnel connections between
server CMAN and client CMAN. Clients can make reverse connections over tunnels by
connecting to server cman.
• Using Oracle Connection Manager as a Bridge for IPv4 and IPv6
In some database connection environments, a client and database may use different
versions of the IP protocol so that complete connectivity does not exist. In this case, at
least two hops in the connection use different versions of the IP protocol.
• Starting and Stopping Oracle Connection Manager
After configuring Oracle Connection Manager, you can start and administer it using the
Oracle Connection Manager Control (CMCTL) utility.
• About CMCTL REST Interface
CMCTL REST interface helps you manage Oracle Connection Manager (Oracle CMAN)
instance from remote machines using REST interface. A client that supports HTTPS can
issue CMCTL equivalent commands. Each REST API call must have
WWW-Authenticate
HTTPS header with
Basic
authentication method.
10-1

• Migrating CMAN Sessions During Patching
You can migrate the established client/server sessions from one Oracle
Connection Manager (CMAN) instance to another Oracle CMAN instance during a
planned upgrade or patching of Oracle CMAN with zero downtime.
• Oracle Connection Manager Enhancements
Oracle Connection Manager proxies and screens request for Oracle Database
Server.
See Also:
• Introducing Oracle Net Services for an introduction to Oracle Connection
Manager concepts
• Understanding the Communication Layers for an architectural overview
of Oracle Connection Manager
10.1 About the cman.ora File
You can set parameters in the
cman.ora
file to configure the computer that hosts
Oracle Connection Manager.
The
cman.ora
file resides on the computer that hosts Oracle Connection Manager, and
is located in the
ORACLE_BASE_HOME/network/admin
directory. If the
cman.ora
file is not
present in the
ORACLE_BASE_HOME/network/admin
directory, then look for the file in
ORACLE_HOME/network/admin
directory.Oracle Connection Manager will not start if the
cman.ora
file does not exist. This file includes the following components:
• Listening endpoint
• Access control rule list
• Parameter list
Each Oracle Connection Manager configuration is encapsulated within a single name-
value (NV) string, which consists of the preceding components.
One computer can host any number of Oracle Connection Managers, each with its
own entry in the
cman.ora
file. When defining more than one Oracle Connection
Manager in the file, you can assign a default by giving only one a fully qualified host
name.
You can specify multiple rules for both client and Oracle Connection Manager Control
utility (CMCTL) connections. The following guidelines apply when making changes:
• You must enter at least one rule for client connections and one rule for CMCTL
connections. Omitting a rule results in the rejection of all connections for the rule
type omitted.
• Oracle Connection Manager does not support wildcards for partial IP addresses. If
you use a wildcard, then use it in place of a full IP address. The IP address of the
client may be, for example, (
SRV=*
).
• Oracle Connection Manager supports only the
/nn
notation for subnet addresses.
In Example 10-1, in the first rule,
/24
represents a subnet mask that comprises 24
Chapter 10
About the cman.ora File
10-2

left-most bits. Only the first 24 bits in the client's IP address are compared with the IP
address in the rule.
Note:
Oracle Connection Manager supports IPv6 addressing. See "Using Oracle
Connection Manager as a Bridge for IPv4 and IPv6".
Example 10-1 shows a
cman.ora
file that contains a configuration entry for an Oracle
Connection Manager called
CMAN1
.
Example 10-1 Sample cman.ora File
CMAN1=
(CONFIGURATION=
(ADDRESS=(PROTOCOL=tcp)(HOST=proxysvr)(PORT=1521))
(RULE_LIST=
(RULE=(SRC=192.0.2.32/24)(DST=sales-server)(SRV=*)(ACT=accept)
(ACTION_LIST=(AUT=on)(MCT=120)(MIT=30)))
(RULE=(SRC=192.0.2.32)(DST=proxysvr)(SRV=cmon)(ACT=accept)))
(PARAMETER_LIST=
(MAX_GATEWAY_PROCESSES=8)
(MIN_GATEWAY_PROCESSSES=3)))
Example 10-1 shows the following rules:
• In the first rule in the example, the following parameters are set:
–
SRC=192.0.2.32/24
is for client connections. It designates the IP address of the
client, or source.
–
DST=sales-server
designates the destination host name. The ACT parameter
specifies the action, that is, accept, reject, or drop. The ACTION_LIST parameter
sets attributes for a connection if it is accepted, enabling you to override default
parameter settings on a connection-by-connection basis.
• In the second rule, the following parameters are set:
–
SRC=192.0.2.32
and
DST=proxysvr
represent the same server, indicating that Oracle
Connection Manager and CMCTL must reside on the same computer.
See Also:
"Enabling Access Control"
Table 10-1 describes the rule-level parameters in the
cman.ora
file.
Chapter 10
About the cman.ora File
10-3

Table 10-1 Rule-Level Parameters in cman.ora File
Parameter Description
SRC The source host name or IP address of the client. The IP address
can be a subnet, such as
192.0.2.62/24
.
DST The destination host name or IP address of the database server.
The IP address can be a subnet, such as
192.0.2.62/24
.
SRV The service name of the Oracle database obtained from the
SERVICE_NAMES parameter in the initialization parameter file
(
init.ora
).
The service name is given by the client as part of the connect
descriptor when connecting to the listener. This service name is
compared to the service name specified in the rule list.
ACT To accept, reject, or drop incoming requests based on the
preceding three parameters.
You can define multiple rules in the RULE_LIST. The action (
ACT
) in the first matched
RULE
is applied to the connection request. If no rules are defined, then all connections
are rejected.
In the following example, client computer
client1-pc
is denied access to the service
sales.us.example.com
, but client
192.0.2.45
is granted access to the service
db1
.
(RULE_LIST=
(RULE=(SRC=client1-pc)(DST=sales-server)(SRV=sales.us.example.com)
(ACT=reject))
(RULE=(SRC=192.0.2.45)(DST=192.0.2.200)(SRV=db1)(ACT=accept)))
See Also:
Oracle Database Net Services Reference for additional information about
Oracle Connection Manager parameters
10.2 Setting Up Oracle Connection Manager
In order to set up Oracle Connection Manager, you must configure the proxy server,
database, and clients.
• Configuring the cman.ora file for the Oracle Connection Manager Host
• Configuring Clients for Oracle Connection Manager
• Configuring the Oracle Database Server for Oracle Connection Manager
Chapter 10
Setting Up Oracle Connection Manager
10-4

10.2.1 Configuring the cman.ora file for the Oracle Connection Manager
Host
You make changes to the
cman.ora
file manually. The following procedure describes how to
set parameters in the
cman.ora
file:
1. Navigate to the
cman.ora
file in the
ORACLE_BASE_HOME/network/admin
directory.
If the
cman.ora
file is not present in the
ORACLE_BASE_HOME/network/admin
directory, then
look for the file in
ORACLE_HOME/network/admin
directory.
2. Open the
cman.ora
file with a text editor.
3. Configure the listening endpoint (ADDRESS).
The listening endpoint specifies the protocol address for the Oracle Connection Manager
listener. CMON, the Oracle Connection Manager monitoring process, uses this address
to register information about gateway processes with the listener. The database uses the
address to register service information at the Oracle Connection Manager node.
The Oracle Connection Manager listener always listens on the TCP/IP protocol.
(ADDRESS=(PROTOCOL=tcp)(HOST=proxysvr)(PORT=1521))
Note:
Oracle Connection Manager can connect to the database using protocols such
as TCP/IP (version 4 and version 6). Starting with Oracle Database 12c release
2 (12.2), the TCPS protocol is also supported
4. Configure the access control rule list (RULE_LIST).
The access control rule list specifies which connections are accepted, rejected, or
dropped by the listener.
5. Configure the parameter list (PARAMETER_LIST).
The parameter list sets attributes for an Oracle Connection Manager. Parameters take
the following forms:
• If global, then the parameter applies to all Oracle Connection Manager connections
unless a rule-level parameter overrides it. To change a global parameter default
setting, enter it into the PARAMETER_LIST with an allowable value.
• If a rule-level parameter is enabled in the ACTION_LIST section of the RULE_LIST,
then it applies only to connections specified by the rule. It overrides its global
counterpart.
• Configuring Transport Layer Security on Oracle Connection Manager
Create a wallet on the Oracle Connection Manager (CMAN) server, and then specify the
TCP/IP with Transport Layer Security (TLS) listening endpoint and wallet location in the
cman.ora
file.
• Enabling Access Control
Chapter 10
Setting Up Oracle Connection Manager
10-5

10.2.1.1 Configuring Transport Layer Security on Oracle Connection Manager
Create a wallet on the Oracle Connection Manager (CMAN) server, and then specify
the TCP/IP with Transport Layer Security (TLS) listening endpoint and wallet location
in the
cman.ora
file.
Note:
Oracle Wallet Manager (OWM) is deprecated with Oracle Database 21c.
Instead of using Oracle Wallet Manager, Oracle recommends that you use
the command line tool
orapki
.
1. Confirm that a CMAN wallet has been created and that it has a certificate:
a. Log in to the Oracle Connection Manager server where the CMAN wallet
resides.
b. Run the following command using the
orapki
command-line tool:
orapki wallet display -wallet wallet_location
Where,
wallet_location
is the path to the directory where the wallet is
stored.
If your wallet directory contains the
cwallet.sso
file (auto-login wallet) and it
contains a user certificate, then this command displays a user certificate
without asking for a password.
Ensure that
cwallet.sso
contains a user certificate. If the wallet does not
contain a user certificate, create a wallet that contains a user certificate, and
then run the following command to create
cwallet.sso
in your wallet
directory:
orapki wallet create -wallet wallet_location -auto_login
2. In the
cman.ora
file, create a listening endpoint that uses TCP/IP with TLS (TCPS)
and set the
WALLET_LOCATION
parameter to specify the wallet location on the
CMAN side.
For example, this is a sample
cman.ora
file configured with the
TCPS
protocol
address and
WALLET_LOCATION
parameter settings:
CMAN_1=
(CONFIGURATION=
(ADDRESS_LIST=
(ADDRESS=(PROTOCOL=tcps)(HOST=proxysvr)(PORT=1522))
(ADDRESS=(PROTOCOL=tcp)(HOST=proxysvr)(PORT=1523))
)
(RULE_LIST=
(RULE=(SRC=*)(DST=*)(SRV=*)(ACT=accept))
)
(PARAMETER_LIST=
Chapter 10
Setting Up Oracle Connection Manager
10-6

(MAX_GATEWAY_PROCESSES=8)
(MIN_GATEWAY_PROCESSSES=3)
)
)
WALLET_LOCATION=
(SOURCE=
(METHOD=File)
(METHOD_DATA=
(DIRECTORY=wallet_location)
)
)
SQLNET.WALLET_OVERRIDE = TRUE
Related Topics
• Oracle Database Security Guide
10.2.1.2 Enabling Access Control
Use the RULE_LIST parameter to control client access to designated database servers in a
TCP/IP environment. By entering filtering rules under this parameter, you can allow or restrict
specific clients access to a database server.
The following procedure describes how to configure access control:
1. Open the
cman.ora
file with a text editor.
2. Update the RULE_LIST parameter using the following format:
(RULE_LIST=
(RULE=(SRC=
source_host
)
(DST=
destination_host
)
(SRV=
service
)
(ACT=accept | reject | drop)))
See Also:
Table 10-1
10.2.2 Configuring Clients for Oracle Connection Manager
To route clients to the database server through Oracle Connection Manager, configure the
tnsnames.ora
file with a connect descriptor that specifies the protocol address of Oracle
Connection Manager. This address enables clients to connect to the Oracle Connection
Manager computer. The connect descriptor looks similar to the following:
sales=
(DESCRIPTION=
(ADDRESS=
(PROTOCOL=tcp)
(HOST=cman-pc)
(PORT=1521))
(CONNECT_DATA=
(SERVICE_NAME=example.com)))
Chapter 10
Setting Up Oracle Connection Manager
10-7

The following procedure describes how to configure a protocol address for Oracle
Connection Manager:
1. Start Oracle Net Manager.
See Also:
"Using Oracle Net Manager to Configure Oracle Net Services"
2. In the navigator pane, select Service Naming from Directory or Local menus.
3. Click the plus sign (+) on the toolbar, or select Create from the Edit menu.
The Welcome page of the Net Service Name wizard appears.
4. Enter a name in the Net Service Name field.
5. Click Next.
The Protocol page appears.
6. Select the TCP/IP protocol for Oracle Connection Manager.
7. Click Next.
The Protocol Settings page appears.
8. Specify the Oracle Connection Manager port and protocol. The default port
number for Oracle Connection Manager is 1521, and the protocol is TCP/IP.
See Also:
Oracle Database Net Services Reference for protocol parameter settings
9. Click Next.
The Service page appears.
10. Enter a service name in the Service Name field, and then select the connection
type.
See Also:
"About Connect Descriptors" for additional information about setting the
service name string
11. Click Next.
Note:
Do not click Test, because a connection cannot be tested at this point.
12. Click Finish to save your configuration and close the Net Service Name wizard.
Chapter 10
Setting Up Oracle Connection Manager
10-8

The new network service name and the Oracle Connection Manager protocol address is
added to the Service Naming folder.
10.2.3 Configuring the Oracle Database Server for Oracle Connection
Manager
Configuring the database server involves registering database information remotely with
Oracle Connection Manager and, optionally, configuring the server for multiplexing.
Note:
If the database that you want to register with Oracle Connection Manager is located
on a remote node, then you must configure the
cman.ora
parameter
VALID_NODE_CHECKING_REGISTRATION
to allow remote registration.
• Configuring Service Registration for Use with Oracle Connection Manager
• Enabling Session Multiplexing for Oracle Connection Manager
Related Topics
• VALID_NODE_CHECKING_REGISTRATION
10.2.3.1 Configuring Service Registration for Use with Oracle Connection Manager
To enable the database server to communicate with Oracle Connection Manager, the
tnsnames.ora
file must include the service name entry, and the initialization parameter file
(init.ora)
must contain a descriptor that specifies the listening address of Oracle
Connection Manager. The following procedure describes how to configure service
registration:
1. Resolve the Oracle Connection Manager alias to a service name entry in the
tnsnames.ora
file as follows:
cman_listener_address
=
(DESCRIPTION=
(ADDRESS_LIST=
(ADDRESS=(PROTOCL=tcp) (HOST=
proxy_server_name
)( PORT=1521))))
For example, the alias
listener_cman
would be resolved to the following entry in the
tnsnames.ora
file:
listener_cman=
(DESCRIPTION=
(ADDRESS_LIST=
(ADDRESS=(PROTOCOL=tcp)(HOST=proxyserver1)(PORT=1521))))
2. Specify an alias for Oracle Connection Manager in the
init.ora
file as follows. This alias
is the one specified in the
tnsnames.ora
file in step 1.
REMOTE_LISTENER=
cman_listener_address
The alias must be specified because this address is TCP, port 1521 but it is not the
default local listening address of TCP, port 1521 of the database server.
Chapter 10
Setting Up Oracle Connection Manager
10-9

For example, the alias for the Oracle Connection Manager listener running on
host,
proxyserver1
, specified in step 1, might look like the following in the
init.ora
file:
REMOTE_LISTENER=
listener_cman
3. Configure
REGISTRATION_INVITED_NODES
in
cman.ora
if the database resides on a
remote node. For example:
(registration_invited_nodes=sales.us.example.com,10.245.129.60)
4. After the initialization parameter file is configured with the alias of Oracle
Connection Manager, the Listener Registration (LREG) process can register
database information with the Oracle Connection Manager listener. Use the
following command to register the change:
SQL> ALTER SYSTEM REGISTER
See Also:
"Registering Information with a Remote Listener"
10.2.3.2 Enabling Session Multiplexing for Oracle Connection Manager
To enable Oracle Connection Manager to take advantage of session multiplexing, set
the DISPATCHERS parameter in the initialization parameter file (
init.ora
) with the
attributes
PROTOCOL
and
MULTIPLEX
, similar to the following:
DISPATCHERS="(PROTOCOL=tcp)(MULTIPLEX=on)"
Table 10-2 lists the parameters to set different levels of multiplexing.
Table 10-2 Session Multiplexing Parameters
Attribute Description
PROTOCOL The network protocol for which the dispatcher generates a listening
endpoint.
MULTIPLEX This parameter is used to enable session multiplexing, as follows:
• If
1
,
on
,
yes
,
true
, or
both
is specified, then multiplexing is
enabled for both incoming and outgoing network sessions.
• If
in
is specified, then multiplexing is enabled for incoming
network sessions from the client.
• If
out
is specified, then multiplexing is enabled for outgoing
network sessions.
• If
0
,
off
,
no
, or
false
is specified, then multiplexing is
disabled for both incoming and outgoing network sessions.
Chapter 10
Setting Up Oracle Connection Manager
10-10

See Also:
• Configuring a Shared Server Architecture for additional information about
configuring shared servers
• Oracle Database Net Services Reference for a complete list of parameters and
their default and allowed values
10.3 Configuring Oracle Connection Manager in Traffic Director
Mode
Oracle Connection Manager in Traffic Director Mode is a proxy that is placed between the
database clients and the database instances.
• About Using Oracle Connection Manager in Traffic Director Mode
Oracle Connection Manager in Traffic Director Mode is a proxy that is placed between
supported database clients and database instances.
• Configuring cman.ora File for Oracle Connection Manager in Traffic Director Mode
You can set up Oracle Connection Manager in Traffic Director Mode using the
TDM=YES
setting in the
cman.ora
file.
• Configuring a Wallet for Oracle Connection Manager in Traffic Director Mode Proxy
Authentication
• Configuring Databases for Oracle Connection Manager in Traffic Director Mode Proxy
Authentication
• Configuring Service Registration with Oracle Connection Manager in Traffic Director
Mode
• Configuring Proxy Resident Connection Pool in Oracle Connection Manager in Traffic
Director Mode
• Configuring Oracle Connection Manager in Traffic Director Mode for Unplanned Events
• Configuring Oracle Connection Manager in Traffic Director Mode for Planned Down
Events
• Configuring Oracle Connection Manager in Traffic Director Mode for Service Affinity
Configure Oracle Connection Manager in Traffic Director Mode to modify the default load
distribution mechanism for routing incoming connection requests.
• Configuring Transport Layer Security on Oracle Connection Manager in Traffic Director
Mode
Create a wallet on the Oracle Connection Manager in Traffic Director Mode server, and
then specify the TCP/IP with Transport Layer Security (TLS) listening endpoint and wallet
location in the
cman.ora
file.
• Enhancements to Oracle Connection Manager in Traffic Director Mode
Oracle Connection Manager in Traffic Director Mode now supports database links, which
extends high availability and failover to databases.
• Oracle Connection Manager in Traffic Director Mode Restrictions
These features are not supported with Oracle Connection Manager in Traffic Director
Mode for all drivers.
Chapter 10
Configuring Oracle Connection Manager in Traffic Director Mode
10-11

10.3.1 About Using Oracle Connection Manager in Traffic Director
Mode
Oracle Connection Manager in Traffic Director Mode is a proxy that is placed between
supported database clients and database instances.
A current database OCI client or supported older version OCI client (Oracle Database
11g Release 2 (11.2) and later) can connect to Oracle Connection Manager in Traffic
Director Mode. Oracle Connection Manager in Traffic Director Mode provides
improved high availability (HA) (planned and unplanned), connection multiplexing
support, and load balancing. This feature also provides an inband client notification
mechanism to deliver planned shutdown for Oracle Connection Manager (CMAN)
down and service down events to the OCI client. Additional CMAN parameters must
be specified in the
cman.ora
configuration file to configure Oracle Connection Manager
in Traffic Director Mode.
To configure CMAN to act as an Oracle Connection Manager in Traffic Director Mode,
new parameters such as
tdm
and
tdm_threading_model
must be added in the
cman.ora
configuration file. Oracle Connection Manager (CMAN) is the standard
Oracle Net proxy for both Oracle RAC and non-RAC databases.
The databases that Oracle Connection Manager in Traffic Director Mode connects to
must have a user, for example,tdm with the
CONNECT THROUGH
privilege granted to
connect as application users. Oracle Connection Manager in Traffic Director Mode
uses proxy authentication and connects as this user.
See Also:
Oracle Database Net Services Reference for the existing parameters in the
cman.ora
file that support Oracle Connection Manager in Traffic Director
Mode.
Oracle Database Security Guide for more information about CONNECT
THROUGH.
In this release, Oracle Connection Manager in Traffic Director Mode furnishes support
for:
• Transparent performance enhancements and connection multiplexing
• Zero Application Downtime
– Planned database maintenance or PDB relocation
– Unplanned database outages for read-mostly workloads
• High Availability of Oracle Connection Manager in Traffic Director Mode, this
means no single point of failure
• Security and Isolation
Modes of Operation
• Pooled Connection mode
Chapter 10
Configuring Oracle Connection Manager in Traffic Director Mode
10-12

This includes any application using the following database client releases:
– OCI and Open Source Drivers (11.2.0.4 and later)
– JDBC (12.1 and later)
– ODP.NET (12.2 and later)
In addition, applications must be Database Resident Connection Pool (DRCP) aware.
This means specifying (SERVER=POOLED) in the application's connect string.
• Non-pooled Connection (or Dedicated) mode
This includes any application using database client releases 11.2.0.4 and later. In this
mode, some capabilities such as connection multiplexing are not available.
Transparent Performance Enhancements and Session Multiplexing
• Statement caching, rows prefetching and Result set caching are auto-enabled for all
mode of operations.
• Database session multiplexing (pooled mode only) using the proxy resident connection
pool (PRCP, a proxy mode of DRCP). Applications get transparent connect-time load
balancing and run-time load balancing between TDM and Database.
• Multiple Oracle Connection Manager in Traffic Director Mode instances: applications get
increased scalability through client-side connect time load balancing or load balancer
(BigIP, NGINX, others)
Zero Application Downtime - Planned Database Maintenance or PDB Relocation
• Pooled mode
Oracle Connection Manager in Traffic Director Mode responds to ONS events for planned
outages and re-directs work. The connections are drained from the pool on Oracle
Connection Manager in Traffic Director Mode when the request completes.
Service relocation support is available for database release 11.2.0.4 and later.
PDB Relocation: Oracle Connection Manager in Traffic Director Mode responds to in-
band notifications when a PDB is relocated, even when ONS is not configured (18.1 and
later for server only)
• Non-pooled or Dedicated mode
No request boundary information is received from the client. Oracle Connection Manager
in Traffic Director Mode supports planned outage for many applications (as long as only
simple session state and cursor state need to be preserved across the request or
transaction boundaries). This involves the following:
– Stop Service or PDB at Transaction Boundary or Leverage Oracle Database 18c
“Continuous Application Availability” to stop service at request boundary.
– Oracle Connection Manager in Traffic Director Mode leverages “TAF Failover
Restore” to reconnect and restore simple states.
Unplanned Database Outages
For both pooled and non-pooled (dedicated) modes, Oracle Connection Manager in Traffic
Director Mode supports unplanned outage for read–mostly applications by leveraging “TAF
Failover Restore” to restore simple session state or cursor state and replay SELECT
statements and first DML statement.
Security and Isolation
Oracle Connection Manager in Traffic Director Mode provides:
Chapter 10
Configuring Oracle Connection Manager in Traffic Director Mode
10-13

• Database Proxy supporting TCP/TCPS and protocol conversion
• Firewall based on IP address, Service name and TLS wallets
• Tenant isolation in a multitenant environment
• Protection against denial-of-service and fuzzing attacks
• Secure tunneling of database traffic across on-premises database and Oracle
Cloud
High Availability of Oracle Connection Manager in Traffic Director Mode
This involves:
• Multiple instances of Oracle Connection Manager in Traffic Director Mode using
Load Balancer or client– side load balancing or failover in connect string
• Rolling upgrade of Oracle Connection Manager in Traffic Director Mode instances
• Closure of existing connections from client to Oracle Connection Manager in
Traffic Director Mode for planned outages
• In-band notifications to Oracle Database release 18c and later clients. For earlier
release clients, notifications are sent with the response of the current request.
10.3.2 Configuring cman.ora File for Oracle Connection Manager in
Traffic Director Mode
You can set up Oracle Connection Manager in Traffic Director Mode using the
TDM=YES
setting in the
cman.ora
file.
cman.ora
CMAN_1=
(CONFIGURATION=
(ADDRESS_LIST=
(ADDRESS=(PROTOCOL=tcp)(HOST=TDMHOST)(PORT=1522))
)
(RULE_LIST=
(RULE=(SRC=*)(DST=*)(SRV=*)(ACT=accept))
)
(PARAMETER_LIST=
(TDM=YES)
(TDM_THREADING_MODE=DEDICATED)
(MAX_GATEWAY_PROCESSES=8)
(MIN_GATEWAY_PROCESSSES=3)
)
)
wallet_location =
(SOURCE=
(METHOD=File)
(METHOD_DATA=(DIRECTORY=wallet_location)
)
)
SQLNET.WALLET_OVERRIDE = TRUE
Chapter 10
Configuring Oracle Connection Manager in Traffic Director Mode
10-14

10.3.3 Configuring a Wallet for Oracle Connection Manager in Traffic
Director Mode Proxy Authentication
Oracle Connection Manager in Traffic Director Mode connects to the databases using the
wallet that must be configured with
cman.ora
file. This wallet has the user name and the
password information for the tdm user used by Oracle Connection Manager in Traffic Director
Mode for proxy authentication. This tdm user must exist on all the databases that the Oracle
Connection Manager in Traffic Director Mode connects to.
See Also:
Oracle Database Enterprise User Security Administrator's Guide
The following setting causes all outbound connections from Oracle Connection Manager in
Traffic Director Mode to use the credentials in the wallet at the specified location for proxy
authentication:
WALLET_LOCATION =
(SOURCE =
(METHOD = FILE)
(METHOD_DATA =
(DIRECTORY = wallet_location)
)
)
SQLNET.WALLET_OVERRIDE = TRUE
The wallet must be configured for each service. If a new service is added, then you must
supply the credentials for the new service using the same wallet.
Note:
Whenever a new service is added and the credentials for the new service are
added to the wallet, the Oracle Cloud Traffic Manager should be restarted for the
changes to take effect.
• Enabling Oracle Connection Manager in Traffic Director Mode to Use External Password
Store
Steps involve creating an Oracle wallet and creating database connection credentials in
that wallet for each database service.
Related Topics
• Configuring Databases for Oracle Connection Manager in Traffic Director Mode Proxy
Authentication
Chapter 10
Configuring Oracle Connection Manager in Traffic Director Mode
10-15

10.3.3.1 Enabling Oracle Connection Manager in Traffic Director Mode to Use
External Password Store
Steps involve creating an Oracle wallet and creating database connection credentials
in that wallet for each database service.
Step 1: Create a wallet on Oracle Connection Manager in Traffic Director Mode
by using the following syntax at the command line:
mkstore -wrl wallet_location -create
wallet_location
is the path to the directory where you want to create and store the
wallet. This command creates an Oracle wallet with the auto-login feature enabled at
the specified location. The auto-login feature enables Oracle Connection Manager in
Traffic Director Mode to access the wallet contents without supplying a password.
Step 2: Create database connection credentials in the wallet by using the
following syntax at the command line:
mkstore -wrl wallet_location -createCredential db_service_name
username password
wallet_location
is the path to the directory where you created the wallet in Step 1.
The
db_service_name
is the service name used by the application in its connect string
while connecting to Oracle Connection Manager. The username and password are the
tdm user name and password.
Repeat this step for each database service that must be accessed by using Oracle
Connection Manager in Traffic Director Mode.
Note:
• The same tdm user can be used across all services for a given
database. However, if required, a different tdm user can also be
associated for each service.
• For pluggable database (PDB) services, there are two choices for setting
up the tdm user:
Common tdm user: tdm user can be a common user, in which case
Oracle Connection Manager in Traffic Director Mode uses a single set of
credentials for proxy authenticating users from different PDBs in a
multitenant container database (CDB).
Per PDB tdm user: tdm user can be a PDB–specific user, in which case
Oracle Connection Manager in Traffic Director Mode uses PDB–specific
proxy user for proxy authenticating users in a specific PDB.
• For
TCP/IP
with
TLS (TCPS)
configuration, Oracle Connection Manager
in Traffic Director Mode wallet is already created. So, skip Step 1 and
specify
wallet_location
in
mkstore
as the same location used for
TCPS
configuration.
Chapter 10
Configuring Oracle Connection Manager in Traffic Director Mode
10-16

10.3.4 Configuring Databases for Oracle Connection Manager in Traffic
Director Mode Proxy Authentication
Every database to which an application connects through Oracle Connection Manager in
Traffic Director Mode must have a user, for example,
tdm
. Oracle Connection Manager in
Traffic Director Mode uses proxy authentication and connects to the database as the
tdm
user. All the users that must connect through Oracle Connection Manager in Traffic Director
Mode must be granted
CONNECT THROUGH
tdm privilege as follows:
ALTER user SCOTT GRANT CONNECT THROUGH tdm
10.3.5 Configuring Service Registration with Oracle Connection Manager in
Traffic Director Mode
See Configuring Service Registration for Use with Oracle Connection Manager.
10.3.6 Configuring Proxy Resident Connection Pool in Oracle Connection
Manager in Traffic Director Mode
Oracle Connection Manager in Traffic Director Mode 18.1 supports Proxy Resident
Connection Pooling (PRCP). PRCP provides connection services for a larger number of client
connections that are routed by using a connection pool comprising of a fewer number of
server connections to target databases. PRCP can reduce connection load (connection
memory usage) on the database tier and also perform runtime load balancing (RLB) to
provide better performance. This can help reduce connection load on the database.
The proxy resident connection pool is configured by specifying the following set of
parameters in the
oraaccess.xml
configuration file.
•
<session_pool>
– Sets up session pool parameters.
•
<enable>
–
true
or
false
to make the session pool configuration effective. It is a must
have parameter that means if the
<session_pool>
is configured, then
<enable>
must be
configured.
•
<min_size>
— Minimum number of connections in the pool. The default value is
0
. Since
Oracle Connection Manager in Traffic Director Mode is a heterogeneous pool scenario,
so all other values are ignored.
•
<max_size>
— Maximum number of connections in the pool. There is no default
parameter as it is a must have parameter. It means that if the
<session_pool>
is
configured, then
<max_size>
must be configured.
•
<increment>
— Amount of increase in the number of connections in the pool as the pool
expands. The default value is
1
.
•
<inactivity_timeout>
— Maximum time in seconds for which a connection stays idle in
the pool, after which it is terminated. The default value is
0
. It means that there is no limit.
•
<max_use_session>
— Maximum number of times a connection can be taken and
released to the pool. The default value is
0
. It means that there is no limit.
Chapter 10
Configuring Oracle Connection Manager in Traffic Director Mode
10-17

•
<max_life_time_session>
— Time, in seconds, to live for a connection in the
pool. The default value is
0
. It means that there is no limit.
Using the
oraaccess.xml
file allows you to configure a proxy resident connection pool
for each needed connection service. The following example shows two groups of
connection parameters associated with its respective config alias, the
sales_config
and the
hr_config
, where each connection string that the application uses is mapped
with its respective config alias, thus providing two proxy resident connection pools.
<oraaccess xmlns="http://xmlns.oracle.com/oci/oraaccess"
xmlns:oci="http://xmlns.oracle.com/oci/oraaccess"
schemaLocation="http://xmlns.oracle.com/oci/oraaccess
http://xmlns.oracle.com/oci/oraaccess.xsd">
<default_parameters>
</default_parameters>
<!--
Create configuration descriptions, which are
groups of connection parameters associated with
a config_alias.
-->
<config_descriptions>
<config_description>
<config_alias> sales_config </config_alias>
<parameters>
<session_pool>
<enable>true</enable>
<min_size> 10 </min_size>
<max_size> 100 </max_size>
<increment> 5 </increment>
</session_pool>
</parameters>
</config_description>
<config_description>
<config_alias> hr_config </config_alias>
<parameters>
<session_pool>
<enable>true</enable>
<max_size> 10 </max_size>
</session_pool>
</parameters>
</config_description>
</config_descriptions>
<!--
Now map the connection string used by the application
with a config_alias.
-->
<connection_configs>
<connection_config>
<connection_string>sales.us.example.com</connection_string>
<config_alias>sales_config</config_alias>
</connection_config>
<connection_config>
<connection_string>hr.us.example.com</connection_string>
<config_alias>hr_config</config_alias>
</connection_config>
Chapter 10
Configuring Oracle Connection Manager in Traffic Director Mode
10-18

</connection_configs>
</oraaccess>
See Also:
Overview of Oracle CMAN configuration file in Oracle Database Net Services
Reference
10.3.7 Configuring Oracle Connection Manager in Traffic Director Mode for
Unplanned Events
Oracle Connection Manager in Traffic Director Mode implicitly subscribes to Fast Application
Notification (FAN) events. For this
events
must be enabled in
oraaccess.xml.
Use
DBMS_SERVICE
or
SRVCTL
(for an Oracle RAC database) to specify
COMMIT_OUTCOME
for
this specific service.
See Also:
• Oracle Database PL/SQL Packages and Types Reference for information about
DBMS_SERVICE
• Oracle Clusterware Administration and Deployment Guide for information about
SRVCTL
10.3.8 Configuring Oracle Connection Manager in Traffic Director Mode for
Planned Down Events
Oracle Connection Manager in Traffic Director Mode implicitly subscribes to Fast Application
Notification (FAN) events. For this
events
must be enabled in
oraaccess.xml.
For planned down events, use
DBMS_SERVICE
or
SRVCTL
to configure the service and set
failover_mode
to
select
,
commit_outcome
to
TRUE
, and
failover_restore
to
LEVEL1
.
See Also:
• Oracle Database PL/SQL Packages and Types Reference for information about
DBMS_SERVICE
• Oracle Clusterware Administration and Deployment Guide for information about
SRVCTL
Chapter 10
Configuring Oracle Connection Manager in Traffic Director Mode
10-19

10.3.9 Configuring Oracle Connection Manager in Traffic Director
Mode for Service Affinity
Configure Oracle Connection Manager in Traffic Director Mode to modify the default
load distribution mechanism for routing incoming connection requests.
By default, Oracle Connection Manager in Traffic Director Mode uses service affinity to
select a gateway for routing incoming connection requests. All new connection
requests are routed to the gateways associated with database services.
Use the cman.ora parameter
SERVICE_AFFINITY
to modify the default behavior and
set the parameter to
ON
or
OFF
.
When using Proxy Resident Connection Pooling (PRCP), Oracle recommends that
you set the
SERVICE_AFFINITY
parameter to
OFF
for better performance and resource
utilization of gateway processes.
Related Topics
• Oracle Database Net Services Reference
• Oracle Multitenant Administrator's Guide
10.3.10 Configuring Transport Layer Security on Oracle Connection
Manager in Traffic Director Mode
Create a wallet on the Oracle Connection Manager in Traffic Director Mode server, and
then specify the TCP/IP with Transport Layer Security (TLS) listening endpoint and
wallet location in the
cman.ora
file.
Note:
Oracle Wallet Manager (OWM) is deprecated with Oracle Database 21c.
Instead of using Oracle Wallet Manager, Oracle recommends that you use
the command line tool
orapki
.
1. Confirm that a wallet has been created and that it has a certificate:
a. Log in to the Oracle Connection Manager in Traffic Director Mode server
where the wallet resides.
b. Run the following command using the
orapki
command-line tool:
orapki wallet display -wallet wallet_location
Where,
wallet_location
is the path to the directory where the wallet is
stored.
If your wallet directory contains the
cwallet.sso
file (auto-login wallet) and it
contains a user certificate, then this command displays a user certificate
without asking for a password.
Chapter 10
Configuring Oracle Connection Manager in Traffic Director Mode
10-20

Ensure that
cwallet.sso
contains a user certificate. If the wallet does not contain a
user certificate, create a wallet that contains a user certificate, and then run the
following command to create
cwallet.sso
in your wallet directory:
orapki wallet create -wallet wallet_location -auto_login
2. In the
cman.ora
file, create a listening endpoint that uses TCP/IP with TLS (TCPS) and
use the
WALLET_LOCATION
parameter to specify the wallet location on Oracle Connection
Manager in Traffic Director Mode.
For example, this is a sample
cman.ora
file with the
TCPS
protocol address and
WALLET_LOCATION
parameter settings:
CMAN_1=
(CONFIGURATION=
(ADDRESS_LIST=
(ADDRESS=(PROTOCOL=tcps)(HOST=proxysvr)(PORT=1522))
(ADDRESS=(PROTOCOL=tcp)(HOST=proxysvr)(PORT=1523))
)
(RULE_LIST=
(RULE=(SRC=*)(DST=*)(SRV=*)(ACT=accept))
)
(PARAMETER_LIST=
(MAX_GATEWAY_PROCESSES=8)
(MIN_GATEWAY_PROCESSSES=3)
)
)
WALLET_LOCATION=
(SOURCE=
(METHOD=File)
(METHOD_DATA=
(DIRECTORY=wallet_location)
)
)
SQLNET.WALLET_OVERRIDE = TRUE
Related Topics
• Oracle Database Security Guide
10.3.11 Enhancements to Oracle Connection Manager in Traffic Director
Mode
Oracle Connection Manager in Traffic Director Mode now supports database links, which
extends high availability and failover to databases.
Starting with Oracle Database 21c, Oracle Connection Manager in Traffic Director Mode
(TDM) supports the following types of database links:
• Fixed User: The user connects to the remote database using the username and
password specified during the creation of the database link.
• Connected User: The user connects to the remote database using the credentials of the
user accessing the database link. These credentials can either be a username and
password, or external, such as Kerberos ticket.
Chapter 10
Configuring Oracle Connection Manager in Traffic Director Mode
10-21

You can use database links with Traffic Director Mode in the following scenarios:
• Scenario 1:
When a client connects directly to the database
In this scenario, both fixed user and connected user database links work.
• Scenario 2:
When a client connects to the database through the Traffic Director Mode
In this scenario, only fixed user database link works. The connected user database
link does not work as the session between TDM and the database is a proxy user
session. Proxy user sessions are not allowed over a database link for security
reasons.
Note:
For the database links to work with TDM, the TDM should not be running
in Proxy Resident Connection Pool (PRCP) mode for the particular
database service.
10.3.12 Oracle Connection Manager in Traffic Director Mode
Restrictions
These features are not supported with Oracle Connection Manager in Traffic Director
Mode for all drivers.
• Advanced Queuing (AQ)
• Database Startup or Database Shutdown calls
• Sharding
• XML
• SQL Translation
• Proxy Authentication and TLS External Authentication (such as DN)
• Object REF
• Session switching
• OCIObject* calls for navigational access
• OCIPickerImage* calls
• OCIAnyData* calls
• OCIDirPath* calls
• OCISubscription* calls
• OCILCR*, OCIXStream* calls
• OCIStmtExecute:
– Scrollable Cursor
– Implicit Results
• Change Notification (CQN)
Chapter 10
Configuring Oracle Connection Manager in Traffic Director Mode
10-22

• Client Result Cache
• OCI_MIGRATE mode
• DRCP: Multi-property Tag and PLSQL callback
• Application Continuity
• OCIConnectionPool
• Authentication as SYSDBA, SYSOPER etc
• Real Application Security (only in Java)
• Bulk Copy (ODP.Net only)
• Self-Tuning (ODP.Net only)
• ASO encryption and supported algorithms (ASO only)
10.4 Configuring Oracle Connection Manager in Tunneling
Mode for Reverse Connection
Oracle Connection Manager in tunnelling mode establishes tunnel connections between
server CMAN and client CMAN. Clients can make reverse connections over tunnels by
connecting to server cman.
Complete the tasks in the following topics to configure Oracle Connection Manager in
tunneling mode:
• Configure cman.ora for Oracle Connection Manager in Server Tunneling Mode
Use the tunneling parameter to set up Oracle Connection Manager in server tunnelling
mode.
• Configure cman.ora for Oracle Connection Manager in Client Tunnelling Mode
You must set the tunnel_address parameter in the cman.ora file to set up Oracle
Connection Manager in client tunnelling mode.
• Configure Clients to Make Reverse Connection
When connecting to the server CMAN, the clients must specify client CMAN identifier.
• Configure Rules in Server CMAN for Tunnel Registration and Client Access
The client CMAN connects to the server CMAN using tunnel service.
• Configure Oracle Database Server for Client Oracle Connection Manager
You must register the database with client Oracle Connection Manager.
10.4.1 Configure cman.ora for Oracle Connection Manager in Server
Tunneling Mode
Use the tunneling parameter to set up Oracle Connection Manager in server tunnelling mode.
Set the tunneling parameter to
ON
in the
cman.ora
file.
A sample
cman.ora
configuration for Oracle Connection Manager in server tunnelling mode.
CMAN_SERVER=
(CONFIGURATION =
Chapter 10
Configuring Oracle Connection Manager in Tunneling Mode for Reverse Connection
10-23

(ADDRESS= (PROTOCOL=TCP)(HOST=SERVERCMAN)(PORT=1522))
(RULE_LIST=
(RULE=(SRC=*)(DST=*)(SRV=*)(ACT=accept))
)
(PARAMETER_LIST=
(TUNNELING=ON)
(GATEWAY_PROCESSES=16)
(NON_TUNNEL_GATEWAYS=8)
(TUNNEL_CAPACITY=32)
(TUNNEL_PROBE_INTERVAL=7)
)
)
10.4.2 Configure cman.ora for Oracle Connection Manager in Client
Tunnelling Mode
You must set the tunnel_address parameter in the cman.ora file to set up Oracle
Connection Manager in client tunnelling mode.
A sample
cman.ora
configuration for Oracle Connection Manager in client tunnelling
mode.
CMAN_CLIENT=
(CONFIGURATION=
(TUNNEL_ADDRESS=
(DESCRIPTION=
(ADDRESS=(PROTOCOL=TCP)(HOST=SERVERCMAN)
(PORT=1522))
(CONNECT_DATA=(TUNNEL_ID=south))
)
)
(ADDRESS=(PROTOCOL=TCP)(HOST=CLIENTCMAN)(PORT=1523))
(RULE_LIST=
(RULE=(SRC=*)(DST=*)(SRV=*)(ACT=accept))
)
(PARAMETER_LIST=
(MAX_TUNNELS=2)
(GATEWAY_PROCESSES=16)
(NON_TUNNEL_GATEWAYS=8)
)
)
The default name for
tunnel_id
is
RC
.
10.4.3 Configure Clients to Make Reverse Connection
When connecting to the server CMAN, the clients must specify client CMAN identifier.
Use the
TUNNEL_SERVICE_NAME
parameter to specify the client CMAN identifier.
Chapter 10
Configuring Oracle Connection Manager in Tunneling Mode for Reverse Connection
10-24

A sample
tnsnames.ora
configuration for client.
SOUTH_SALES_DB=
(DESCRIPTION=
(ADDRESS=(PROTOCOL=TCP)(HOST=SERVERCMAN)(PORT=1522))
(CONNECT_DATA =
(TUNNEL_SERVICE_NAME=south)
(SERVICE_NAME=SALES)
)
)
Note:
source_route
is not supported for reverse connection.
10.4.4 Configure Rules in Server CMAN for Tunnel Registration and Client
Access
The client CMAN connects to the server CMAN using tunnel service.
The tunnel ID of client CMAN is registered as a service in server CMAN.
• Configure Rules in Server CMAN using rule_list Syntax
You must add a rule for each client CMAN as source, and service as tunnel. To allow
client connections to a client CMAN, add a rule for service that identifies the client CMAN.
• Configure Rules in Server CMAN Using rule_group Syntax
Add a group for each tunnel ID. The rule list in the group grants access to the required
source addresses.
10.4.4.1 Configure Rules in Server CMAN using rule_list Syntax
You must add a rule for each client CMAN as source, and service as tunnel. To allow client
connections to a client CMAN, add a rule for service that identifies the client CMAN.
You must set destination as
*
or localhost.
A sample
cman.ora
configuration for server Oracle Connection Manager in tunnelling mode
using
rule_list
.
CMAN_SERVER=
(CONFIGURATION=
(ADDRESS=
(PROTOCOL=TCP)(HOST=SERVERCMAN)(PORT=1522))
(RULE_LIST=
(RULE=(SRC=CLIENTCMAN)(DST=*)(SRV=tunnel)
(ACT=accept))
(RULE=(SRC=CLIENTHOST)(DST=*)(SRV=south)(ACT=accept))
)
(PARAMETER_LIST=
Chapter 10
Configuring Oracle Connection Manager in Tunneling Mode for Reverse Connection
10-25

(TUNNELING=ON)
(GATEWAY_PROCESSES=16)
(NON_TUNNEL_GATEWAYS=8)
(TUNNEL_CAPACITY=32)
(TUNNEL_PROBE_INTERVAL=7)
)
)
10.4.4.2 Configure Rules in Server CMAN Using rule_group Syntax
Add a group for each tunnel ID. The rule list in the group grants access to the required
source addresses.
You must set destination as
*
or localhost.
A sample
cman.ora
configuration for server Oracle Connection Manager in tunnelling
mode using
rule_group
.
CMAN_SERVER=
(CONFIGURATION=
(ADDRESS=(PROTOCOL=TCP)(HOST=SERVERCMAN)(PORT=1522))
(RULE_GROUP=
(GROUP=
(DESCRIPTION=(NAME=south))
(RULE_LIST=(RULE=(SRC=CLIENTCMAN)(DST=*)(SRV=*)
(ACT=accept)))
(RULE_LIST=(RULE=(SRC=CLIENTHOST)(DST=*)(SRV=*)(ACT=accept)))
)
(GROUP=
(DESCRIPTION=(NAME=cmon))
(RULE_LIST=(RULE=(SRC=*)(DST=*)(SRV=*)(ACT=accept)))
)
)
(PARAMETER_LIST=
(TUNNELING=ON)
(GATEWAY_PROCESSES=16)
(NON_TUNNEL_GATEWAYS=8)
(TUNNEL_CAPACITY=32)
(TUNNEL_PROBE_INTERVAL=7)
)
)
10.4.5 Configure Oracle Database Server for Client Oracle Connection
Manager
You must register the database with client Oracle Connection Manager.
Section Configuring the Oracle Database Server for Oracle Connection Manager of
this guide explains how to register the database with Oracle Connection Manager.
Chapter 10
Configuring Oracle Connection Manager in Tunneling Mode for Reverse Connection
10-26

Note:
Static routing is not supported by Oracle connection manager in tunnelling mode.
Related Topics
• Configuring the Oracle Database Server for Oracle Connection Manager
10.5 Using Oracle Connection Manager as a Bridge for IPv4
and IPv6
In some database connection environments, a client and database may use different versions
of the IP protocol so that complete connectivity does not exist. In this case, at least two hops
in the connection use different versions of the IP protocol.
For example, a request passes from an IPv4 source to an IPv6 destination, from an IPv6
source to an IPv4 destination, or from IPv6 to IPv6 through an IPv4 network.
You can use Oracle Connection Manager as a network bridge between IPv4 and IPv6. To
serve as a bridge, Oracle Connection Manager must run on a dual-stack host configured with
at least one IPv4 interface and at least one IPv6 interface.
Use the Oracle Connection Manager filtering feature to filter based on an IPv6 address. You
can base rules on complete or partial IP addresses. The following figure shows the format of
an IPv6 address:
Figure 10-1 IPv6 Address Format
Subnet IDNLA IDRES TLA ID Interface ID
3 13 8 24 16 64
The numbers at the top of the diagram indicate the number of bits in the address. Each
hexadecimal character in an IPv6 address represents 4 bits. Bits 4-16 are the Top-Level
Aggregation Identifier (TLA ID) portion of the address. Bits 25-49 are the Next-Level
Aggregation Identifiers (NLA ID).
For example, in the address
2001:0db8::203:BAFF:FE0F:C74B
, the binary representation of
the first four hexademical characters (
2001
) is as follows:
0010000000000001
Thus, the first 3 bits in the address are
001
. The TLA ID portion of the address is
0000000000001
.
The following procedure describes how to create a rules filter for IPv6 address:
1. Navigate to the
cman.ora
file located in the
ORACLE_BASE_HOME/network/admin
directory.
If the
cman.ora
file is not present in the
ORACLE_BASE_HOME/network/admin
directory, then
check for the file in the
ORACLE_HOME/network/admin
directory.
Chapter 10
Using Oracle Connection Manager as a Bridge for IPv4 and IPv6
10-27

2. Open the
cman.ora
file with a text editor.
3. Create a
RULE
in the
RULE_LIST
based on IPv6 address format.
For example, assume that the source host is an IPv6-only host with address
2001:0db8::203:BAFF:FE0F:C74B
, whereas the destination is an IPv4-only host
named
SALESL1593
. You configure Oracle Connection Manager as an IPv6-to-IPv4
bridge by creating one of the following rules:
Type of Rule Description Example
Filter based on
subnet ID
Filtering is based on the
64 bits up to and including
the subnet ID
(RULE = (SRC =
2001:0db8::203:BAFF:FE0F:C74B/
64
)
(DST = SALESL1593)
(SRV = SALES)
(ACT = ACCEPT)
(ACTION_LIST = (AUT=ON)
(MOCT=10)(MIT=30)
(CONN_STATE=YES))
)
Filter based on NLA
ID
Filtering is based on the
48 bits up to and including
the NLA ID
(RULE = (SRC =
2001:0db8::203:BAFF:FE0F:C74B/
48
)
(DST = SALESL1593)
(SRV = SALES)
(ACT = ACCEPT)
(ACTION_LIST = (AUT=ON)
(MOCT=10)(MIT=30)
(CONN_STATE=YES))
)
Filter based on TLA
ID
Filtering is based on the
16 bits up to and including
the TLA ID
(RULE = (SRC =
2001:0db8::203:BAFF:FE0F:C74B/
16
)
(DST = SALESL1593)
(SRV = SALES)
(ACT = ACCEPT)
(ACTION_LIST = (AUT=ON)
(MOCT=10)(MIT=30)
(CONN_STATE=YES))
)
Filter based on
number of bits
Filtering is based on the
first 60 bits of the address
(RULE = (SRC =
2001:0db8::203:BAFF:FE0F:C74B/
60
)
(DST = SALESL1593)
(SRV = SALES)
(ACT = ACCEPT)
(ACTION_LIST = (AUT=ON)
(MOCT=10)(MIT=30)
(CONN_STATE=YES))
)
Related Topics
• About TCP/IP Protocol
TCP/IP (Transmission Control Protocol/Internet Protocol) is the standard
communication protocol suite used for client/server communication over a
network.
Chapter 10
Using Oracle Connection Manager as a Bridge for IPv4 and IPv6
10-28

• About IPv6 Addresses in Connect Descriptors
• Configuring Listening Protocol Addresses
10.6 Starting and Stopping Oracle Connection Manager
After configuring Oracle Connection Manager, you can start and administer it using the
Oracle Connection Manager Control (CMCTL) utility.
At the operating system command line, the basic syntax for this utility is:
cmctl [command] [argument1 . . . argumentN] [-c instance_name]
The
-c
parameter specifies the Oracle Connection Manager instance that you want to
administer. Instances are defined in the cman.ora file.
Note:
You are prompted for the password, if specified during installation or a previous
Oracle Connection Manager session. However, this exposes the password on the
screen and is a potential security risk. Oracle recommends that you do not use the
password option (
-p
) on the command line.
To start and stop Oracle Connection Manager using the Oracle Connection Manager Control
utility:
1. Create the cman.ora file.
A sample file is located in the ORACLE_BASE_HOME/network/admin/samples
directory after installation of Oracle Connection Manager.
2. Start Oracle Connection Manager using one of the following methods:
• At the command line:
Run the
STARTUP
command. For example:
cmctl STARTUP -c [cman_example_instance]
The command starts the listener, Connection Manager Administration (CMADMIN),
and gateway processes for an instance named
cman_example_instance
.
• At the
CMCTL
prompt:
At the command line, enter
cmctl
with no arguments to obtain the
CMCTL
prompt, and
then run the
ADMINISTER
and
STARTUP
commands. For example:
cmctl
CMCTL> ADMINISTER [cman_example_instance]
CMCTL> STARTUP
3. Stop a running instance of Oracle Connection Manager using one of the following
methods:
• At the command line:
Chapter 10
Starting and Stopping Oracle Connection Manager
10-29

Run the
SHUTDOWN
command. For example:
cmctl SHUTDOWN -c [cman_example_instance]
• At the
CMCTL
prompt:
At the command line, enter
cmctl
with no arguments to obtain the
CMCTL
prompt, and then run the
ADMINISTER
and
SHUTDOWN
commands. For example:
cmctl
CMCTL> ADMINISTER [cman_example_instance]
CMCTL> SHUTDOWN
Related Topics
• Understanding Oracle Connection Manager Architecture
• Oracle Database Net Services Reference
10.7 About CMCTL REST Interface
CMCTL REST interface helps you manage Oracle Connection Manager (Oracle
CMAN) instance from remote machines using REST interface. A client that supports
HTTPS can issue CMCTL equivalent commands. Each REST API call must have
WWW-
Authenticate
HTTPS header with
Basic
authentication method.
• Configuring CMCTL REST Interface
Use the
cman.ora
REST_ADDRESS
parameter to configure REST endpoint hostname
and port. The CMCTL REST interface authentication uses user name and
password available in an Oracle CMAN wallet. Use the
orapki
and
mkstore
utilities to create and configure the wallet.
• REST APIs for CMCTL Commands
Use CMCTL REST interface to automate CMAN tasks in cloud deployments. This
functionality is similar to the CMAN
cmctl
control utility.
10.7.1 Configuring CMCTL REST Interface
Use the
cman.ora
REST_ADDRESS
parameter to configure REST endpoint hostname and
port. The CMCTL REST interface authentication uses user name and password
available in an Oracle CMAN wallet. Use the
orapki
and
mkstore
utilities to create and
configure the wallet.
1. Add the
REST_ADDRESS
attribute under the parameters section of the
cman.ora
file.
2. Create an Oracle wallet.
An Oracle wallet is a file that stores certificates and authentication credentials. Use
the
orapki
utility to create an Oracle wallet.
You can import a certificate from a recognized authority into an Oracle wallet or
you can create your own authorized and signed certificate and use it with CMAN
Oracle wallet. You can also use a self-signed Oracle wallet.
Chapter 10
About CMCTL REST Interface
10-30

For example, to create a wallet with a self-signed certificate, run the following commands:
$ORACLE_HOME/bin/orapki wallet create -wallet wallet directory
$ORACLE_HOME/bin/orapki wallet add -wallet wallet directory -dn
‘cn=root_test, c=US’ -keysize 2048 -self_signed -validity 365
Where
wallet directory
is the file system directory location where the wallet is created.
Note:
Ensure that this directory is not readable by any group or other users.
3. Add CMAN REST client user name to the wallet.
CMCTL REST interface process supports only HTTPS protocol. HTTP protocol is not
supported. This wallet file must not have read permission to any group or other users. It
should have read permissions only to the user owning the CMAN instance.
Use the
mkstore
utility to store user name and password in an Oracle CMAN wallet.
For example:
mkstore -wrl wallet_directory -createEntry myusername my_password
4. Create an auto-login wallet.
Oracle CMAN requires auto-login wallet to start HTTPS endpoint. Run the following
command to create an auto-login wallet:
$ORACLE_HOME/bin/orapki wallet create -wallet wallet_location -auto_login
where
wallet_location
is the directory where you have created the CMAN wallet.
5. Specify the wallet location in the
cman.ora
file. Update the
cman.ora
file with wallet
directory outside of cman alias:
CMAN=
(CONFIGURATION=
.. ..
(RULE_LIST=
. . . )
(PARAMETER_LIST=
. . . ))
Wallet_location= …
For example:
WALLET_LOCATION=
(SOURCE=(METHOD=FILE)
(METHOD_DATA=
(DIRECTORY=wallet directory))
)
Chapter 10
About CMCTL REST Interface
10-31

Related Topics
• Oracle Database Security Guide
• Oracle Database Net Services Reference
10.7.2 REST APIs for CMCTL Commands
Use CMCTL REST interface to automate CMAN tasks in cloud deployments. This
functionality is similar to the CMAN
cmctl
control utility.
CMCTL REST interface uses local operating system authentication between REST
interface process and Oracle CMAN listener.
After you start an Oracle CMAN instance with REST configuration, you can make a
REST call with HTTPS basic authentication.
Use the
curl
command line tool to verify CMAN REST API. For example to list the
services that are running, use the following command:
Note:
The
curl
command is used for testing and verification purposes only.
curl -X GET -u username:password https://cmanhostname:rest_port/show/
services
Related Topics
• Oracle Database Net Services Reference
10.8 Migrating CMAN Sessions During Patching
You can migrate the established client/server sessions from one Oracle Connection
Manager (CMAN) instance to another Oracle CMAN instance during a planned
upgrade or patching of Oracle CMAN with zero downtime.
You can migrate live sessions with data in-transit without disrupting the service. Any
operations that are running either on a client or on a server continue to run seamlessly
during the migration without loss of service. You can also add new client connections
during the migration.
Perform the following steps to migrate client/server sessions:
You must have either upgraded Oracle CMAN to the latest release or applied the latest
patch.
1. Install the upgraded Oracle CMAN or the patched Oracle CMAN in a new
ORACLE_HOME
.
2. Use the same
cman.ora
file that you used for configuring Oracle CMAN to
configure the new Oracle CMAN instance.
Chapter 10
Migrating CMAN Sessions During Patching
10-32

3. Start the new Oracle CMAN instance from the new
ORACLE_HOME
in migration mode. Use
the following command:
cmctl startup –migrate -c cman_alias
This command starts a new Oracle CMAN instance and initiates migrating of sessions
from old Oracle CMAN instances. An old Oracle CMAN instance will exit as soon as the
migration is complete or after 7 minutes timeout.
The address of the old Oracle CMAN instance is added in the
cman.ora
file with the alias,
cman_alias_old
. You can use this alias to control and check the status of old Oracle
CMAN instance during migration.
You can migrate the sessions in the following scenarios:
• If both client to Oracle CMAN and Oracle CMAN to server use TCP.
• If either a client or a server uses TCPS (TLS) on one end and TCP on the other end. You
must install Oracle Database 19c or later on both, the client using TCPS and the server
using TCPS.
Unsupported connections will remain connected till the timeout duration.
Note:
• Session migration is supported only for Oracle CMAN in regular mode and not
for Oracle CMAN in Traffic Director Mode.
• If both client to Oracle CMAN and Oracle CMAN to server use TCPS, then the
migration is not supported.
• Currently, session migration is not supported on Microsoft Windows.
10.9 Oracle Connection Manager Enhancements
Oracle Connection Manager proxies and screens request for Oracle Database Server.
• Oracle Connection Manager provides a more secure access to the server by supporting
the Transport Layer Security (TLS) protocol. With this support, the database client can
communicate to the server through Oracle Connection Manager over TCPS protocol. You
can also configure the Oracle Connection Manager to have TLS connection on one side
and non-TLS connection on the other side. This also acts as a secure way to hide the
internal database servers for the outside clients connecting from the internet.
Multiplexing: If the gateway already has the TCPS connection to the endpoint requested
by the database client, then it multiplexes the new connect request on the same
connection.
• It can listen on multiple protocol addresses. With multiple listening endpoints, Oracle
Connection Manager is now able to support both TCP and TCPS at the same time. The
existing single protocol address configuration is still supported. For example:
CMAN_ALIAS=
(configuration=
(address_list=
Chapter 10
Oracle Connection Manager Enhancements
10-33

(address=(protocol=TCP)(host=a.b.c.d)(port=12522))
(address=(protocol=TCPS)(host=a.b.c.d)(port=12523))
)
..
)
• It has the addition of network data compression facility to improve network
throughput and make data transfer faster between the Oracle Database Client and
the Oracle Database Server. This is done in different ways according to the
database client, database server, and the next hop compression ability.
Compression is enabled between any two nodes if it is negotiated by them
If more than two consecutive nodes support and negotiate compression, such
case is handled in a way that the intermediate node just relays the compressed
data to the next node without performing decompression.
Compression is supported between the Oracle Connection Manager and the
server, even if the Oracle Database Client is earlier than the Oracle Database 12c
release and cannot support compression.
• It supports up to 2 MB SDU enabling the Oracle Database Client and the Oracle
Database Server to negotiate higher SDU when establishing connection through
Oracle Connection Manager.
• Starting with this release, valid node checking for registration is enabled by default
in Oracle Connection Manager. By default, only the databases on local node are
allowed to register with Oracle Connection Manager. The databases on remote
node can be permitted or denied to register with Oracle Connection Manager
through the use of parameters
REGISTRATION_INVITED_NODES
and
REGISTRATION_EXCLUDED_NODES
.
• Starting with Oracle Database 21c, you can manage distribution of bandwidth
across services using Oracle Connection Manager.
Oracle Connection Manager has the following enhancements:
– REST APIs for CMCTL Commands
– GROUP syntax for rules
– BANDWIDTH in bytes per second at service level
Related Topics
• Oracle Database Net Services Reference
Chapter 10
Oracle Connection Manager Enhancements
10-34

11
Configuring a Shared Server Architecture
You can manage server loads on Oracle Database by managing dispatchers, and configuring
your clients to take advantages of Oracle Net Services features.
• How Oracle Net Manages Client Loads
Learn how Oracle Net manages system resource loads using shared server architecture.
• About Dispatchers
• Enabling Session Multiplexing
• Configuring Clients for Environments with Both Shared and Dedicated Servers
11.1 How Oracle Net Manages Client Loads
Learn how Oracle Net manages system resource loads using shared server architecture.
When client loads cause a strain on memory and other system resources, you can alleviate
load issues by starting shared server resources. The shared server architecture enables a
database server to allow many client processes to share very few server processes, so the
number of users that the database can support is increased. With the shared server
architecture, many client processes connect to a dispatcher. The dispatcher directs multiple
incoming network session requests to a common queue. An idle shared server process from
a shared pool of server processes picks up a request from the queue. This means a small
pool of server processes can serve a large number of clients. This is useful when a system is
overloaded or has limited memory.
11.2 About Dispatchers
Shared memory resources for dispatchers, virtual circuits, and shared servers are
preconfigured enable shared servers at runtime. Database administrators can start
dispatchers and shared servers with the SQL
ALTER SYSTEM
statement without having to
restart the instance. When shared server mode is turned on, a dispatcher is started
automatically on the TCP/IP protocol even if the DISPATCHERS parameter has not been set.
Using a shared server is equivalent to setting the DISPATCHERS parameter in the database
initialization parameter file as follows:
DISPATCHERS="(PROTOCOL=tcp)"
Configure the DISPATCHERS parameter directly if either of the following conditions apply:
• You need to configure a protocol other than TCP/IP.
• You want to configure one or more of the optional dispatcher attributes, such as
multiplexing.
You can specify the following attributes for the DISPATCHERS parameter. The
PROTOCOL
attribute is required, and the others are optional. The
ADDRESS
attribute is used to set a
specify port number, such as when using a firewall.
•
ADDRESS
11-1

•
CONNECTIONS
•
DESCRIPTION
•
DISPATCHERS
•
LISTENER
•
MULTIPLEX
•
PROTOCOL
(required)
•
SERVICE
•
SESSIONS
You change the dispatcher configuration using the SQL statement
ALTER SYSTEM
. You
do not need to restart the instance after setting the parameters.
• Grouping Services by Dispatcher
• Monitoring Dispatchers
See Also:
Oracle Database Administrator's Guide for additional information about
configuring dispatchers
11.2.1 Grouping Services by Dispatcher
An Oracle database can be represented by multiple service names. A pool of
dispatchers can be allocated exclusively for clients requesting a particular service.
This way, the mission critical requests may be given more resources and in effect
increase their priority.
For example, the following initialization parameter file shows two dispatchers. The first
dispatcher services requests for clients requesting
sales.us.example.com.
The other
dispatcher services requests only for clients requesting
adminsales.us.example.com
.
SERVICE_NAMES=sales.us.example.com
INSTANCE_NAME=sales
DISPATCHERS="(PROTOCOL=tcp)"
DISPATCHERS="(PROTOCOL=tcp)(SERVICE=adminsales.us.example.com)"
Note:
You must manually start services on pluggable databases.
11.2.2 Monitoring Dispatchers
Use the following views to check configurations and monitor dispatchers:
Chapter 11
About Dispatchers
11-2

• V$QUEUE: Contains information about the shared server message queues. This view is
only available to the
SYS
user, and users who have
SELECT ANY TABLE
system privilege,
such as
SYSTEM
.
• V$DISPATCHER: Provides information about the dispatcher processes, including name,
network address, status, various usage statistics, and index number.
• V$DISPATCHER_CONFIG: Provides configuration information about the dispatchers.
• V$DISPATCHER_RATE: Provides rate statistics for the dispatcher processes.
See Also:
• Oracle Database Performance Tuning Guide and Oracle Database Reference
for additional information these views
• Oracle Database Administrator's Guide for additional information about shared
server configuration
• Oracle Database Reference for additional information about configuring the
DISPATCHERS parameter and supported attributes
• Oracle Database SQL Reference for additional information about the
ALTER
SYSTEM
statement
11.3 Enabling Session Multiplexing
Session multiplexing, available with Oracle Connection Manager, enables multiple client
sessions to funnel through a single protocol connection. For example, several client
processes can connect to one dispatcher by way of a single connection from Oracle
Connection Manager.
Oracle Connection Manager allows communication by users to the dispatcher by way of a
shared connection. At any one time, users might need the connection, while other client
processes linked to the dispatcher by way of the connection manager process are idle.
Session multiplexing is beneficial because it maximizes use of the dispatcher process
connections.
Session multiplexing is also useful for database link connections between dispatchers. The
limit on the number of sessions for each dispatcher is operating system specific.
To enable session multiplexing, set the attribute
MULTIPLEX
in the DISPATCHERS parameter
to
on
or an equivalent value.
DISPATCHERS="(PROTOCOL=tcp)(MULTIPLEX=on)"
See Also:
"Enabling Session Multiplexing for Oracle Connection Manager" for configuration
details
Chapter 11
Enabling Session Multiplexing
11-3

11.4 Configuring Clients for Environments with Both Shared
and Dedicated Servers
If a shared server is configured on the server side, and a client connection request
arrives when no dispatchers are registered, then the request is processed by a
dedicated server process. If you want a particular client always to use a dispatcher,
then configure
(SERVER=shared)
in the
CONNECT_DATA
section of the connect
descriptor. For example:
sales=
(DESCRIPTION=
(ADDRESS=(PROTOCOL=tcp)(HOST=sales-server)(PORT=1521))
(CONNECT_DATA=
(SERVICE_NAME=sales.us.example.com)
(SERVER=shared)))
If the
(SERVER=shared)
attribute is configured and a dispatcher is not available, then
the client connection request is rejected, and a message is sent to the client.
If the database is configured for a shared server and a particular client requires a
dedicated server, then you can configure the client to use a dedicated server in one of
the following ways:
• You can configure a network service name with a connect descriptor that contains
(SERVER=dedicated)
in the
CONNECT_DATA
section. For example:
sales=
(DESCRIPTION=
(ADDRESS=(PROTOCOL=tcp)(HOST=sales-server)(PORT=1521))
(CONNECT_DATA=
(SERVICE_NAME=sales.us.example.com)
(SERVER=dedicated)))
• You can configure the client profile file,
sqlnet.ora
, with
USE_DEDICATED_SERVER=on
. This adds
(SERVER=dedicated)
to the
CONNECT_DATA
section of the connect descriptor the client uses.
Note:
If
USE_DEDICATED_SERVER
is set to
ON
, then existing
(SERVER=value)
entries in connect descriptors are overwritten with
(SERVER=dedicated)
.
Chapter 11
Configuring Clients for Environments with Both Shared and Dedicated Servers
11-4

See Also:
• "About the Advanced Connect Data Parameters" to set the SERVER parameter
• "Routing Connection Requests to a Process" to set the
USE_DEDICATED_SERVER parameter
• Oracle Call Interface Programmer's Guide and Oracle Database Administrator's
Guide
Chapter 11
Configuring Clients for Environments with Both Shared and Dedicated Servers
11-5

12
Configuring Profiles
Learn how to configure client and server configuration parameters in profiles. A profile is a
collection of parameters that specifies preferences for enabling and configuring Oracle Net
features on the client or database server. A profile is stored and implemented through the
sqlnet.ora
file.
• Overview of Profile Configuration
• Configuring the Profile During Installation
• Understanding Client Attributes for Names Resolution
• Settings for Database Access Control
• About Advanced Profile Information
These are the advanced
sqlnet.ora
file settings that you can set.
• Configuring External Naming Methods
• Configuring Oracle Network Security
Oracle network security features enable data encryption, integrity checking, enhanced
authentication, and single sign-on. The features also provide centralized user
management on LDAP-compliant directory servers and certificate-based single sign-on.
This functionality relies on the Transport Layer Security (TLS) protocol.
12.1 Overview of Profile Configuration
You can use a profile to do the following:
• Specify the client domain to append to unqualified names
• Prioritize naming methods
• Enable logging and tracing features
• Route connections through specific processes
• Configure parameters for an external procedure
• Configure Oracle Advanced Security
• Use protocol-specific parameters to restrict access to the database
12.2 Configuring the Profile During Installation
Oracle Universal Installer launches Oracle Net Configuration Assistant after software
installation on the client and server. Oracle Net Configuration Assistant configures the order
of the naming methods that the computer uses to resolve a connect identifier to a connect
descriptor.
Configuration with the Oracle Net Configuration Assistant during installation results in an
entry in the
sqlnet.ora
file similar to the following:
NAMES.DIRECTORY_PATH=(ezconnect,tnsnames)
12-1

The NAMES.DIRECTORY_PATH parameter specifies the priority order of the naming
methods to use to resolve connect identifiers. If the installed configuration is not
adequate, then use Oracle Net Manager to change the
sqlnet.ora
configuration.
12.3 Understanding Client Attributes for Names Resolution
The following sections describe available client configuration options:
• About the Default Domain for Clients
• Prioritizing Naming Methods
• Routing Connection Requests to a Process
12.3.1 About the Default Domain for Clients
In environments where the client often requests names from a specific domain, it is
appropriate to set a default domain in the client
sqlnet.ora
file with the
NAMES.DEFAULT_DOMAIN parameter. This parameter is available to the local and
external naming methods.
When a default domain is set, it is automatically appended to any unqualified network
service name given in the connect string, and then compared to network service
names stored in a
tnsnames.ora
file.
For example, if the client
tnsnames.ora
file contains a network service name of
sales.us.example.com
, and the default domain is
us.example.com
, then the user can
enter the following connect string:
CONNECT scott@sales
Enter password:
password
In the preceding example,
sales
gets searched as
sales.us.example.com
.
If the connect string includes the domain extension, such as in
CONNECT
, then the domain is not appended.
If a network service name in a
tnsnames.ora
file is not domain qualified and the
NAMES.DEFAULT_DOMAIN parameter is set, then the network service name must be
entered with a period (
.
) at the end of the name. For example, if the domain is set to
us.example.com
and the client
tnsnames.ora
file contains a network service name of
sales2
, then the user would enter the following connect string:
CONNECT scott@sales2.
Enter password:
password
In the preceding example, the client would connect to
sales2
, not
sales2.us.example.com
.
• Specifying a Default Domain
12.3.1.1 Specifying a Default Domain
The following procedure describes how to specify a default domain:
1. Start Oracle Net Manager.
Chapter 12
Understanding Client Attributes for Names Resolution
12-2

See Also:
"Using Oracle Net Manager to Configure Oracle Net Services"
2. In the navigator pane, select Profile from the Local menu.
3. From the list in the right pane, select Naming.
4. Click the Methods tab.
5. In the Default Domain field, enter the domain.
6. Select Save Network Configuration from the File menu.
The
sqlnet.ora
file should contain an entry that looks similar to the following:
NAMES.DEFAULT_DOMAIN=us.example.com
12.3.2 Prioritizing Naming Methods
After naming methods are configured, as described in Configuring Naming Methods, they
must be prioritized. Naming methods to resolve a connect identifier are tried in the order they
appear in the list. If the first naming method in the list cannot resolve the connect identifier,
then the second method in the list is used, and so on.
The following procedure describes how to specify the order of naming methods:
1. Start Oracle Net Manager.
See Also:
"Using Oracle Net Manager to Configure Oracle Net Services"
2. In the navigator pane, select Profile from the Local menu.
3. From the list in the right pane, select Naming.
4. Click the Methods tab.
Table 12-1 describes the naming method values listed in the Methods tab.
Table 12-1 Naming Method Values
Naming Method Value Description
TNSNAMES Resolve a network service name through the
tnsnames.ora
file on
the client.
See Also: "Configuring the Local Naming Method"
LDAP Resolve a database service name, network service name, or network
service alias through a directory server.
See Also: "Configuring the Directory Naming Method"
Chapter 12
Understanding Client Attributes for Names Resolution
12-3

Table 12-1 (Cont.) Naming Method Values
Naming Method Value Description
EZCONNECT Enable clients to use a TCP/IP connect identifier, consisting of a host
name and optional port and service name, or resolve a host name alias
through an existing names resolution service or centrally maintained
set of
/etc/hosts
files.
See Also: "Understanding the Easy Connect Naming Method"
NIS Resolve service information through an existing network information
service (NIS).
5. Select naming methods from the Available Methods list, and then click the right-
arrow button.
The selected naming methods move to the Selected Methods list.
6. Order the naming methods according to the order in which you want Oracle Net to
try to resolve the network service name or database service name. Select a
naming method in the Selected Methods list, and then click Promote or Demote
to move the selection up or down in the list.
7. Select Save Network Configuration from the File menu.
The
sqlnet.ora
file updates with the NAMES.DIRECTORY_PATH parameter,
such as the following:
NAMES.DIRECTORY_PATH=(ldap, tnsnames)
12.3.3 Routing Connection Requests to a Process
Clients and servers can be configured so connection requests are directed to a
specific process. The following procedure describes how to route connection requests
to a process:
1. Start Oracle Net Manager.
See Also:
"Using Oracle Net Manager to Configure Oracle Net Services"
2. In the navigator pane, select Profile from the Local menu.
3. From the list in the right pane, select General.
4. Click the Routing tab.
5. Select the preferred way for routing connections.
Chapter 12
Understanding Client Attributes for Names Resolution
12-4

Note:
To configure all connections to use a particular server, you select the Always
Use Dedicated Server option in Oracle Net Manager. This sets the
USE_DEDICATED_SERVER parameter in the
sqlnet.ora
file to force the
listener to spawn a dedicated server for all network sessions from the client.
The result is a dedicated server connection, even if a shared server is
configured.
6. Choose Save Network Configuration from the File menu.
See Also:
Table 12-3 for a description of the fields and options
12.4 Settings for Database Access Control
You can configure the
sqlnet.ora
file to allow access to some clients and deny access to
others. Table 12-2 describes the available settings.
Table 12-2 Access Control Settings in sqlnet.ora
Oracle Net Manager
Field/Option
sqlnet.ora File Parameter Description
Check TCP/IP client
access rights
TCP.VALIDNODE_CHECKING Specify whether to screen access to the database.
If this field is selected, then Oracle Net Manager
checks the parameters TCP.EXCLUDED_NODES and
TCP.INVITED_NODES to determine which clients to
allow access to the database. If this field is deselected,
then Oracle Net Manager does not screen clients.
Clients excluded from
access
TCP.EXCLUDED_NODES Specify which clients using the TCP/IP protocol are
excluded access to the database.
Clients allowed access TCP.INVITED_NODES Specify which clients using the TCP/IP protocol are
allowed access to the database.
If the TCP.INVITED_NODES parameter does not include the listener node, then the Listener
Control utility cannot connect to the listener. This will prevent start, stop and administration
commands from being performed on the listener.
If there are invalid host names or IP addresses listed in the TCP.INVITED_NODES parameter
or the TCP.EXCLUDED_NODES parameter, then the Listener Control utility cannot contact
the listener.
• Configuring Database Access Control
12.4.1 Configuring Database Access Control
The following procedure describes how to configure database access control:
Chapter 12
Settings for Database Access Control
12-5

1. Start Oracle Net Manager.
See Also:
"Using Oracle Net Manager to Configure Oracle Net Services"
2. In the navigator pane, select Profile from the Local menu.
3. From the list in the right pane, select General.
4. Click the Access Rights tab.
5. Select the Check TCP/IP client access rights option.
6. In the Clients allowed to access fields and Clients excluded from access field,
enter either a host name or an IP address for a client that you want to include or
exclude, using commas to delimit entries placed on the same line.
12.5 About Advanced Profile Information
These are the advanced
sqlnet.ora
file settings that you can set.
Table 12-3 Advanced Settings in sqlnet.ora
Oracle Net Manager
Field/Option
sqlnet.ora File
Parameter
Description
Send operation Time
Out
SQLNET.SEND_TIMEOUT
Specify the time, in ms, seconds, or minutes, for a database
client or server to to wait for data from the peer after
establishing a connection.
Setting this parameter for clients ensure that receive operation
is not left in wait state indefinitely or for a long period due to an
unusual termination of server process or server busy state. If a
client does not receive response data in time specified, then it
logs
ORA-12535: TNS:operation timed out
and
ORA-12609: TNS: Receive timeout occurred
errors in
the
sqlnet.log
file.
You can also set this parameter on the server-side to specify
the time, in ms, sec, or min, for a server to wait for client data
after connection establishment. If a client does not send any
data in the specified time, then the database server logs
ORA-12535: TNS:operation timed out
and
ORA-12609:
TNS: Receive timeout occurred
messages to the
sqlnet.log
file. Without this parameter, the database server
may continue to wait for data from clients that may be down or
are experiencing difficulties. The server usually blocks on input
from the client and gets these timeouts frequently if set to a
low value.
Chapter 12
About Advanced Profile Information
12-6

Table 12-3 (Cont.) Advanced Settings in sqlnet.ora
Oracle Net Manager
Field/Option
sqlnet.ora File
Parameter
Description
Receive operation
Time Out
SQLNET.RECV_TIMEOUT
Specify the time, in seconds, for a database server to wait for
client data after connection establishment. A client must send
some data within the specified time interval.
Setting this parameter is recommended for environments in
which clients shut down unusually. If a client does not send
any data in the time specified, then the database server logs
ORA-12535: TNS:operation timed out
and
ORA-12609:
TNS: Receive timeout occurred
errors to the
sqlnet.log
file.
Without this parameter, the database server continues to wait
for data from clients that may be down or are experiencing
difficulties.
You can also use this setting on the client side to specify the
time, in seconds, for a client to wait for response data from the
database server after connection establishment. Without this
parameter, the client may wait for a long period of time for a
response from a database server overwhelmed with requests.
Connection Time Out
SQLNET.INBOUND_CONNE
CT_TIMEOUT
Specify the time, in seconds, for a client to connect with the
database server and provide the necessary authentication
information.
Total Send Buffer Size
SEND_BUF_SIZE
Specify the buffer space limit for send operations of sessions.
Total Receive Buffer
Size
RECV_BUF_SIZE
Specify the buffer space limit for receive operations of
sessions.
TNS Time Out Value
SQLNET.EXPIRE_TIME
Specify time intervals, in minutes, to send a probe to verify that
client/server connections are active. Setting a value greater
than 0 ensures that connections are not left open indefinitely,
due to an unusual client termination. If the probe finds a
terminated connection, or a connection that is no longer in
use, then it returns an error, causing the server process to exit.
This setting is intended for the database server, which typically
handles multiple connections at any one time.
You can also use this parameter for database clients to verify if
the server connection is active.
Limitations on using this terminated connection detection
feature are:
• You cannot use it on bequeathed connections.
• Though very small, a probe packet generates additional
traffic that may degrade your network performance.
• Depending on your operating system, the server may
need to perform additional processing to distinguish the
connection probing event from other events. This can also
result in degraded network performance.
Client Registration ID
SQLNET.CLIENT_REGIST
RATION
Specify a unique identifier for a client. This identifier is passed
to the listener with any connection request. The identifier can
be any string up to 128 characters long.
Chapter 12
About Advanced Profile Information
12-7

Table 12-3 (Cont.) Advanced Settings in sqlnet.ora
Oracle Net Manager
Field/Option
sqlnet.ora File
Parameter
Description
Logon Authentication
Protocol Version
SQLNET.ALLOWED_LOGON
_VERSION_CLIENT
SQLNET.ALLOWED_LOGON
_VERSION_SERVER
Define the minimum authentication protocol allowed when
connecting to Oracle Database instances. The term
VERSION
in the parameter name refers to the version of the
authentication protocol, not the Oracle Database release. If the
client or server does not meet the minimum release specified
by its partner, then authentication fails with an
ORA-28040
error.
Supported values include:
•
12a
for Oracle Database 12c authentication protocols
(strongest protection)
•
12
for the critical patch updates CPUOct2012 and later
Oracle Database 11g authentication protocols
(recommended)
•
11
for Oracle Database 11g authentication protocols
10
for Oracle Database 10g authentication protocols
•
9
for Oracle9i Database authentication protocol
•
8
for Oracle8i Database authentication protocol
The default value is
12
or
12a
. Note the following implications
of setting the value to
11
or
12
:
• To take advantage of the password protections introduced
in Oracle Database 11g, users must change their
passwords.
• Releases of OCI clients before Oracle Database 10g and
all versions of JDBC thin clients cannot authenticate to the
Oracle database using password-based authentication.
When an Oracle Database 12c server has a database link to a
server running an earlier Oracle Database release, set the
value of the
SQLNET.ALLOWED_LOGON_VERSION_CLIENT
parameter on the Oracle Database 12c server to match the
SQLNET.ALLOWED_LOGON_VERSION
setting of the server
running the earlier release.
Turn Off UNIX Signal
Handling
BEQUEATH_DETACH
Turn on or off UNIX signal handling.
Because the client application spawns a server process
internally through the bequeath protocol as a child process,
the client application becomes responsible for cleaning up the
child process when it completes. When the server process
completes its connection responsibilities, it becomes a
terminated process. Signal handlers are responsible for
cleaning up these terminated processes. Setting this
parameter configures the client profile to pass this process to
the UNIX initialization process by disabling signal handlers.
Disable Out-of-Band
Break
DISABLE_OOB
Turn on or off out-of-band breaks.
If deselected or set to
off
, then Oracle Net can send and
receive break messages using urgent data requests provided
by the underlying protocol. Once enabled, this feature applies
to all protocols used by this client.
If selected or set to
on
, then it disables the ability to send and
receive break messages using urgent data requests of the
underlying protocol.
Chapter 12
About Advanced Profile Information
12-8

Table 12-3 (Cont.) Advanced Settings in sqlnet.ora
Oracle Net Manager
Field/Option
sqlnet.ora File
Parameter
Description
Disable Out-of-Band
Auto Break option
DISABLE_OOB_AUTO
Checks TCP OOB (Out of Band) support in client to server
path at the connection time. The client enables OOB only if the
server path supports OOB.
• Setting the Advanced Features in the sqlnet.ora File Using Oracle Net Services
See Also:
• "Limiting Resource Consumption by Unauthorized Users" for complete
information about configuring the SQLNET.INBOUND_CONNECT_TIMEOUT
setting
• "Configuring I/O Buffer Space " for complete information about configuring the
SEND_BUF_SIZE and RECV_BUF_SIZE settings
• Oracle Database Security Guide for additional information about the
SQLNET.ALLOWED_LOGON_VERSION_CLIENT and
SQLNET.ALLOWED_LOGON_VERSION_SERVER settings
• Oracle Database Net Services Reference for additional information about the
SQLNET.ALLOWED_LOGON_VERSION_CLIENT and
SQLNET.ALLOWED_LOGON_VERSION_SERVER settings
• Oracle operating system-specific documentation to determine if the protocol
supports urgent data requests. TCP/IP is an example of a protocol that
supports this feature.
12.5.1 Setting the Advanced Features in the sqlnet.ora File Using Oracle
Net Services
The following procedure describes how to set advanced features in the
sqlnet.ora
file:
1. Start Oracle Net Manager.
See Also:
"Using Oracle Net Manager to Configure Oracle Net Services"
2. In the navigator pane, select Profile from the Local menu.
3. From the list in the right pane, select General.
4. Click the Advanced tab.
5. Enter the values for the fields or options you want to set.
6. Select Save Network Configuration from the File menu.
Chapter 12
About Advanced Profile Information
12-9

12.6 Configuring External Naming Methods
The
sqlnet.ora
file is used to configure required client parameters needed for
Network Information Service (NIS) external naming. The following procedure describes
how to configure the NIS parameter in the
sqlnet.ora
file:
1. Start Oracle Net Manager.
See Also:
"Using Oracle Net Manager to Configure Oracle Net Services"
2. In the navigator pane, select Profile from the File menu.
3. From the list in the right pane, select Naming.
4. Click the External tab.
5. Enter
NAMES.NIS.META_MAP
in the Meta Map field.
6. Select Save Network Configuration from the File menu.
12.7 Configuring Oracle Network Security
Oracle network security features enable data encryption, integrity checking, enhanced
authentication, and single sign-on. The features also provide centralized user
management on LDAP-compliant directory servers and certificate-based single sign-
on. This functionality relies on the Transport Layer Security (TLS) protocol.
The following procedure describes how to configure a client or server to use Oracle
network security features:
1. Start Oracle Net Manager.
2. In the navigator pane, select Profile from the Local menu.
3. From the list in the right pane, select Network Security.
Each Network Security tab page enables you to configure a separate set of
parameters. The tab pages are as follows:
• Authentication: For configuration of available authentication methods, such as
KERBEROS5 and RADIUS.
• Other Params: For configuration of the authentication service.
• Integrity: For configuration of the type of integrity, checksum level and
available methods.
• Encryption: For configuration of the encryption type and method.
• TLS: For setting the use of TLS.
4. Select or edit options as applicable.
5. Select Save Network Configuration from the File menu.
Chapter 12
Configuring External Naming Methods
12-10

Note:
For additional details, refer to the help button on a tab page or the network security
topics in the Oracle Net Manager online help. To access the network security topics,
select Network Security, and then select the How To option.
Related Topics
• Configuring Oracle Network Security
Oracle network security features enable data encryption, integrity checking, enhanced
authentication, and single sign-on. The features also provide centralized user
management on LDAP-compliant directory servers and certificate-based single sign-on.
This functionality relies on the Transport Layer Security (TLS) protocol.
• Oracle Database Security Guide
Chapter 12
Configuring Oracle Network Security
12-11

13
Enabling Advanced Features of Oracle Net
Services
Understand how to configure the advanced features of Oracle Net Services, including
advanced connect data parameters, load balancing, failover, and connections to non-
database services.
• Configuring Advanced Network Address and Connect Data Information
A database service can be accessed by several routes and protocol addresses. You
configure which routes to use by setting a list of protocol addresses. You configure order
addresses by specifying address parameters.
• Understanding Connection Load Balancing
The connection load balancing feature improves connection performance by balancing
the number of active connections among multiple dispatchers.
• Configuring Transparent Application Failover
Transparent Application Failover (TAF) instructs Oracle Net to transparently reconnect a
failed connection to a different listener in the event of the failure of a database instance.
This enables you to continue your work using the new connection as if the original
connection never failed.
• Specifying the Instance Role for Primary and Secondary Instance Configurations
The
INSTANCE_ROLE
parameter is an optional parameter for the
CONNECT_DATA
section of a
connect descriptor. It enables you to specify a connection to the primary or secondary
instance of Oracle RAC configurations.
• Configuring Static Service Registration
The listener uses the dynamic service information about the database and instance
before using statically configured information in the
listener.ora
file.
• Configuring Connections to Third-Party Database Services
Learn about external procedures settings in the
listener.ora
file, changing the default
configuration for external procedures, configuring the Oracle database server for
connecting to Heterogeneous Services agents, and configuring clients for connecting to
the Oracle Rdb database.
13.1 Configuring Advanced Network Address and Connect Data
Information
A database service can be accessed by several routes and protocol addresses. You
configure which routes to use by setting a list of protocol addresses. You configure order
addresses by specifying address parameters.
• Creating a List of Listener Protocol Addresses
• About the Address List Parameters
• About the Advanced Connect Data Parameters
13-1

13.1.1 Creating a List of Listener Protocol Addresses
A database service may be accessed by more than one network route, or protocol
address. In the following example,
sales.us.example.com
can connect to the
sales.us.example.com
service using listeners on either
sales1-server
or
sales2-
server
.
sales.us.example.com=
(DESCRIPTION=
(ADDRESS_LIST=
(ADDRESS=(PROTOCOL=tcp)(HOST=sales1-server)(PORT=1521))
(ADDRESS=(PROTOCOL=tcp)(HOST=sales2-server)(PORT=1521)))
(CONNECT_DATA=
(SERVICE_NAME=sales.us.example.com)))
To add a network protocol address to an existing network service name or database
service, use one of the following procedures:
• Adding a Network Protocol Using Oracle Enterprise Manager Cloud Control
• Adding a Network Protocol Using Oracle Net Manager
Adding a Network Protocol Using Oracle Enterprise Manager Cloud Control
The following procedure describes how to add a network protocol to an existing
network service name or database service using Oracle Enterprise Manager Cloud
Control:
1. Access the Directory Naming or Local Naming page in Oracle Enterprise Manager
Cloud Control:
a. Access the Net Services Administration page in Oracle Enterprise Manager
Cloud Control.
See Also:
"Using Oracle Enterprise Manager Cloud Control to Configure Oracle
Net Services"
b. Select Local Naming or Directory Naming from the Administer list, and then
select the Oracle home for the directory server or the location of the local
configuration files.
c. Click Go.
The Local Naming or Directory Naming page appears.
2. Select the directory service or network service name.
• For Local Naming, select a network service from the list, and then click Edit.
• For Directory Naming, perform a search of the network service name in the
Simple Search section, then select the network service or database service
from the Results list, and then click Edit.
3. In the Addresses section, click Add.
The Add Address page appears.
Chapter 13
Configuring Advanced Network Address and Connect Data Information
13-2

4. From the Protocol list, select the protocol which the listener is configured to listen. This
protocol must also be installed on the client.
5. Enter the appropriate parameter information for the selected protocol in the fields
provided.
See Also:
Oracle Database Net Services Reference for protocol parameter settings
6. (Optional) In the Advanced Parameters section, specify the I/O buffer space limit for send
and receive operations of sessions in the Total Send Buffer Size and Total Receive Buffer
Size fields.
See Also:
"Configuring I/O Buffer Space " for additional information about buffer space
7. Click OK.
The protocol address is added to the Addresses section.
8. Click OK to update the address information.
Adding a Network Protocol Using Oracle Net Manager
The following procedure describes how to add a network protocol to an existing network
service name or database service using Oracle Net Manager:
1. Start Oracle Net Manager.
See Also:
"Using Oracle Net Manager to Configure Oracle Net Services"
2. In the navigator pane, select Service Naming from the Directory or Local menus.
3. Select either the network service name or a database service.
The right pane displays the current destination service and address list.
4. In the Address Configuration box, click the plus sign (+) to add a new address.
A new Address tab appears:
a. Select the protocol and enter appropriate address information.
See Also:
Oracle Database Net Services Reference for details about protocol address
parameters
Chapter 13
Configuring Advanced Network Address and Connect Data Information
13-3

b. (Optional) On the Address tab, click Advanced to specify the I/O buffer space
limit for send and receive operations of sessions in the Total Send Buffer Size
and Total Receive Buffer Size fields.
See Also:
"Configuring I/O Buffer Space " for additional information about
buffer space
c. Order the protocol addresses using the left-arrow and right-arrow buttons. This
will order the addresses in the protocol address list. Unless multiple address
options are configured, the first address in the list is contacted.
5. Select Save Network Configuration from the File menu.
13.1.2 About the Address List Parameters
When a database service is accessible by multiple listener protocol addresses, specify
the order in which the addresses are to be used, such as chosen randomly or tried
sequentially. The following table lists the parameters used with multiple protocol
addresses.
Table 13-1 Address List Parameters in the tnsnames.ora File
Parameter Description
FAILOVER At connect time, this parameter instructs Oracle Net to fail over to a
different listener if the first listener fails when set to
on
. The number
of addresses in the list determines how many addresses are tried.
When set to
off
, instructs Oracle Net to try one address.
Connect-time failover is turned
on
by default for multiple address
lists (ADDRESS_LIST), connect descriptors (DESCRIPTION), and
multiple connect descriptors (DESCRIPTION_LIST).
LOAD_BALANCE When set to
on
, this parameter instructs Oracle Net to progress
through the list of protocol addresses in a random sequence,
balancing the load on the various listeners. When set to
off
,
instructs Oracle Net to try the addresses sequentially until one
succeeds.
Client load balancing is turned
on
by default for multiple connect
descriptors (DESCRIPTION_LIST).
SOURCE_ROUTE When set to
on
, this parameter instructs Oracle Net to use each
address in the order presented until the destination is reached. This
parameter is required for reaching the destination using a specific
route, that is, by specific computers. This parameter is used to
enable connections to Oracle Connection Manager.
Chapter 13
Configuring Advanced Network Address and Connect Data Information
13-4

Note:
You cannot set source routing (SOURCE_ROUTE) at the same level as connect-
time failover (FAILOVER) or client load balancing (LOAD_BALANCE). Source
routing connects to each address in the list sequentially whereas connect-time
failover and client load balancing select a single address from a list.
When a connect descriptor in a
tnsnames.ora
file contains at least two protocol
addresses for an Oracle Connection Manager hop, then parameters for connect-
time failover and load balancing within the hop can be included in the file.
The following table describes the address list options.
Table 13-2 Address List Options Dialog Box
Option Parameter Setting
Try each address, in order, until one succeeds. FAILOVER=on
Try each address, randomly, until one succeeds. LOAD_BALANCE=on
FAILOVER=on
Try one address, selected at random. LOAD_BALANCE=on
Use each address in order until destination reached. SOURCE_ROUTE=on
Use only the first address. LOAD_BALANCE=off
FAILOVER=off
SOURCE_ROUTE=off
The following example shows a
tnsnames.ora
file configured for client load balancing:
sales.us.example.com=
(DESCRIPTION=
(ADDRESS_LIST=
(LOAD_BALANCE=on)
(ADDRESS=(PROTOCOL=tcp)(HOST=sales1-server)(PORT=1521))
(ADDRESS=(PROTOCOL=tcp)(HOST=sales2-server)(PORT=1521)))
(CONNECT_DATA=
(SERVICE_NAME=sales.us.example.com)))
The following example shows a
tnsnames.ora
file configured for connect-time failover:
sales.us.example.com=
(DESCRIPTION=
(ADDRESS_LIST=
(LOAD_BALANCE=off)
(FAILOVER=on)
(ADDRESS=(PROTOCOL=tcp)(HOST=sales1-server)(PORT=1521))
(ADDRESS=(PROTOCOL=tcp)(HOST=sales2-server)(PORT=1521)))
(CONNECT_DATA=
(SERVICE_NAME=sales.us.example.com)))
The following example shows a tnsnames.ora file configured for Oracle Connection Manager
and load balancing:
sales.us.example.com=
(DESCRIPTION=
Chapter 13
Configuring Advanced Network Address and Connect Data Information
13-5

(SOURCE_ROUTE=ON)
(ADDRESS=(PROTOCOL=tcp)(HOST=cman-pc1)(PORT=1630))
(ADDRESS=
(LOAD_BALANCE=ON)
(ADDRESS=(PROTOCOL=tcp)(HOST=cman-pc2)(PORT=1521))
(ADDRESS=(PROTOCOL=tcp)(HOST=cman-pc3)(PORT=1521)))
(CONNECT_DATA=
(SERVICE_NAME=sales.us.example.com)))
• Configuring Address List Parameters
See Also:
"Configuring Clients for Oracle Connection Manager" for additional
information about configuring clients for source routing
13.1.2.1 Configuring Address List Parameters
The following procedure describes how to configure address list parameters:
1. Perform the procedure in "Creating a List of Listener Protocol Addresses".
2. Use Oracle Enterprise Manager Cloud Control or Oracle Net Manager to configure
address list options.
• For Oracle Enterprise Manager Cloud Control, select the appropriate option in
the Connect-time Failover and Client Load Balancing section.
• For Oracle Net Manager, click Advanced in the Address Configuration box.
The Address List Options dialog box appears. Select the appropriate option.
13.1.3 About the Advanced Connect Data Parameters
Starting with Oracle Database 12c release 2 (12.2), data compression can be set in
the
sqlnet.ora
file. The parameters that set compression are
SQLNET.COMPRESSION and SQLNET.COMPRESSION_LEVELS. Setting these
parameters in the
sqlnet.ora
file affects all the connections using the
sqlnet.ora
file,
except for Oracle Data Guard streaming redo and SecureFiles LOBs (Large Objects).
The following example shows how to set compression:
SQLNET.COMPRESSION = on
SQLNET.COMPRESSION_LEVELS =(low,high)
The CONNECT_DATA section of a connect descriptor in the
tnsnames.ora
file defines
the destination database service. In the following example, SERVICE_NAME defines a
service called
sales.us.example.com
:
sales.us.example.com=
(DESCRIPTION=
(ADDRESS=(PROTOCOL=tcp)(HOST=sales-server)(PORT=1521))
(CONNECT_DATA=
(SERVICE_NAME=sales.us.example.com)))
In addition to the service name, you can optionally configure the connect data
information with the parameters described in Table 13-3.
Chapter 13
Configuring Advanced Network Address and Connect Data Information
13-6

Table 13-3 Advanced Connect Data Settings in the tnsnames.ora File
Oracle Enterprise
Manager Cloud
Control/Oracle Net
Manager Option
tnsnames.ora File
Parameter
Description
Instance Name INSTANCE_NAME The database instance to access. The instance name can be
obtained from the INSTANCE_NAME parameter in the
initialization parameter file.
Session Data Unit
Size
SDU The transfer rate of data packets being sent across the network.
You can specify the session data unit (SDU) size to change the
performance characteristics having to do with the packets sent
across the network. The SDU size limit is 2 MB.
Use for
Heterogeneous
Services
HS If you want an Oracle database server to access a third-party
system through Heterogeneous Services, then set this option to
on
.
Oracle RDB
Database
RDB_DATABASE The file name of the Oracle Rdb database.
Type of Service TYPE_OF_SERVICE The type of service to use for the Oracle Rdb database.
Global Database
Name
GLOBAL_NAME Oracle Rdb database identifier.
In the following example, the transfer rate for data packets is set:
sales.us.example.com=
(DESCRIPTION=
(ADDRESS=(PROTOCOL=tcp)(HOST=sales-server)(PORT=1521))
(CONNECT_DATA=
(SERVICE_NAME=sales.us.example.com)
(SDU=8192)
))
Use Oracle Enterprise Manager Cloud Control or Oracle Net Manager to configure advanced
CONNECT_DATA parameters for either a network service name or a database service.
Configuring Advanced Connect Descriptor Parameters Using Oracle Enterprise
Manager Cloud Control
The following procedure describes how to configure advanced connect descriptor parameters
using Oracle Enterprise Manager Cloud Control:
1. Access the Directory Naming or Local Naming page in Oracle Enterprise Manager Cloud
Control, as follows:
a. Access the Net Services Administration page in Oracle Enterprise Manager Cloud
Control.
See Also:
"Using Oracle Enterprise Manager Cloud Control to Configure Oracle Net
Services"
b. Select Local Naming or Directory Naming from the Administer list, and then select
the Oracle home for the directory server or the location of the local configuration files.
Chapter 13
Configuring Advanced Network Address and Connect Data Information
13-7

c. Click Go.
The Directory Naming or Local Naming pages appear.
2. Select the directory service or network service name.
• For Local Naming, select a network service from the list, and then click Edit.
• For Directory Naming, search the network service name in the Simple Search
section by selecting the network service or database service from the Results
list, and then clicking Edit.
3. Click the Advanced tab.
4. Enter fields or select options as appropriate, and then click OK.
5. Click OK to update the connect data information.
Configuring Advanced Connect Descriptor Parameters Using Oracle Net
Manager
The following procedure describes how to configure advanced connect descriptor
parameters using Oracle Net Manager:
1. Start Oracle Net Manager.
See Also:
"Using Oracle Net Manager to Configure Oracle Net Services"
2. In the navigator pane, select Service Naming from Directory or Local menus.
3. Select either the network service name or a database service.
The right pane displays the current destination service and address list.
4. In the Service Identification box, click Advanced.
The Advanced Service Options dialog box appears.
5. Enter fields or select options as appropriate, and then click OK.
6. If you are making these changes to the Local folder, then select Save Network
Configuration from the File menu. Changes to the Directory folder are saved
automatically.
13.2 Understanding Connection Load Balancing
The connection load balancing feature improves connection performance by balancing
the number of active connections among multiple dispatchers.
In an Oracle Real Application Clusters (Oracle RAC) environment, connection load
balancing can also balance the number of active connections among multiple
instances.
Because the Listener Registration (LREG) process can register with remote listeners,
a listener can always be aware of all instances and dispatchers, regardless of their
location. Depending on the load information, a listener decides which instance and, if
shared server is configured, which dispatcher to send the incoming client request.
In a shared server configuration, a listener selects a dispatcher in the following order:
Chapter 13
Understanding Connection Load Balancing
13-8

1. Least loaded node.
2. Least loaded instance.
3. Least loaded dispatcher for that instance.
In a dedicated server configuration, a listener selects an instance in the following order:
1. Least loaded node.
2. Least loaded instance.
Load Balancing across nodes for HTTP presentation is introduced in this release. The remote
listener can load balance across instances that are on different nodes for HTTP presentation
using HTTP redirect.
An Oracle RAC environment requires that the dispatchers on each instance be cross-
registered with the other listeners on the other nodes. This is achieved by the use of the
LISTENER
attribute of the DISPATCHERS parameter.
Note:
For optimum connection load balancing results, the instances that belong to the
same database service should be on equivalent hardware and software
configurations.
• Example of Connection Load Balancing for Shared Server Configuration
• Example of Connection Load Balancing for Dedicated Server Configuration
• COLOCATION_TAG of Client Connections
The
COLOCATION_TAG
parameter is an alphanumeric string that you can use with the
CONNECT_DATA
parameter of the TNS connect string.
See Also:
• "Registering Information with a Remote Listener" for additional information
about cross-registration
• Oracle Database Reference for complete information about the
SERVICE_NAMES and INSTANCE_NAME parameters
• Configuring a Shared Server Architecture for additional information about the
LISTENER
attribute
• Oracle Database Global Data Services Concepts and Administration Guide for
information about management of global services
13.2.1 Example of Connection Load Balancing for Shared Server
Configuration
Figure 13-1 shows an Oracle RAC shared server database with two instances,
sales1
and
sales2
, of the same service,
sales.us.example.com
. The instances
sales1
and
sales2
Chapter 13
Understanding Connection Load Balancing
13-9

reside on computers
sales1-server
and
sales2-server
, respectively. Instance
sales1
has one dispatcher and instance
sales2
has two dispatchers. Listeners named
listener
run on nodes 1 and 2. The
listener
attribute in the DISPATCHERS
parameter has been configured to allow for service registration of information to both
listeners.
Figure 13-1 Load Balancing Environment for a Shared Server Configuration
dispatcher2 dispatcher3
sales2
dispatcher1
sales1
sales1-server sales2-server
SERVICE_NAMES=sales.us.example.com
INSTANCE_NAME=sales1
DISPATCHERS=(PROTOCOL=tcp)
(DISPATCHERS=1) (LISTENER=listeners_sales)
SERVICE_NAMES=sales.us.example.com
INSTANCE_NAME=sales2
DISPATCHERS=(PROTOCOL = tcp)
(DISPATCHERS=2) (LISTENER=listeners_sales)
Listener
Listener
In this example,
sales2-server
is the least loaded node,
sales2
is the least loaded
instance, and
dispatcher2
is the least loaded dispatcher. The following load
information is registered.
• The one minute load average for each instance is 600 for
sales1
and 400 for
sales2
. This can happen if more processing is required on
sales1-server
.
• The number of connections to each instance is 200 for
sales1
and 300 for
sales2
.
• The number of dispatcher connections to each instance is 200 for
dispatcher1
,
100 for
dispatcher2
, and 200 for
dispatcher3
.
• The number of connections to
sales1
(200) is the same as that of its only
dispatcher,
dispatcher1
.
• The number of connections on
sales2
(300) is the sum of the connections on its
two dispatchers,
dispatcher2
(100) and
dispatcher3
(200).
Chapter 13
Understanding Connection Load Balancing
13-10

The
listeners_sales
value in
(LISTENER=listeners_sales)
is resolved through a local
tnsnames.ora
file on both servers as follows:
listeners_sales=
(DESCRIPTION=
(ADDRESS_LIST=
(ADDRESS=(PROTOCOL=tcp)(HOST=sales1-server)(PORT=1521))
(ADDRESS=(PROTOCOL=tcp)(HOST=sales2-server)(PORT=1521))))
Based on the environment, the following actions occur. The numbered actions correspond to
the arrows shown in Figure 13-2:
1. LREG processes for instances
sales1
and
sales2
register with both listeners. The
listeners are updated dynamically on the load of the instances and dispatchers.
2. The client sends a connect request. A connect descriptor is configured to try each
protocol address randomly until one succeeds:
sales.us.example.com=
(DESCRIPTION=
(
LOAD_BALANCE=on
)
(
FAILOVER=on
)
(ADDRESS=(PROTOCOL=tcp)(HOST=sales1-server)(PORT=1521))
(ADDRESS=(PROTOCOL=tcp)(HOST=sales2-server)(PORT=1521))
(CONNECT_DATA=(SERVICE_NAME=sales.us.example.com)))
The listener on
sales1-server
was randomly chosen to receive the client connect
request.
The listener on
sales1-server
compares the load of the instances
sales1
and
sales2
.
The comparison takes into account the load on nodes
sales1-server
and
sales2-
server
, respectively. Because
sales2-server
is less loaded than
sales1-server
, the
listener selects
sales2-server
over
sales1-server
.
3. The listener compares the load on dispatchers
dispatcher2
and
dispatcher3
. Because
dispatcher2
is less loaded than
dispatcher3
, the listener redirects the client connect
request to
dispatcher2
.
4. The client connects directly to
dispatcher2
.
Figure 13-2 Load Balancing Example for a Shared Server Configuration
Client
dispatcher1
sales1
dispatcher2
dispatcher3
sales2
sales.us.example.com
2
4
1
CONNECT scott@
sales.us.example.com
3
Listener
Listener
Chapter 13
Understanding Connection Load Balancing
13-11

13.2.2 Example of Connection Load Balancing for Dedicated Server
Configuration
Figure 13-3 shows an Oracle RAC dedicated server database with two instances,
sales1
and
sales2
, of the same service,
sales.us.example.com
. The instances
sales1
and
sales2
reside on computers
sales1-server
and
sales2-server
,
respectively. Listeners named
listener
run on nodes 1 and 2. The
REMOTE_LISTENER initialization parameter has been configured to allow for service
registration of information to both listeners.
Figure 13-3 Load Balancing Environment for a Dedicated Server Configuration
sales2sales1
sales1-server sales2-server
SERVICE_NAMES=sales.us.example.com
INSTANCE_NAME=sales1
REMOTE_LISTENER=listener_sales2
SERVICE_NAMES=sales.us.example.com
INSTANCE_NAME=sales2
REMOTE_LISTENER=listener_sales1
ListenerListener
In this example, the following load information is registered:
•
sales1-server
has a node load average of 450 per minute.
•
sales2-server
has a node load average of 200 per minute.
•
sales1
has 200 connections.
•
sales2
has 150 connections.
The
listener_sales1
value in
(REMOTE_LISTENER=listener_sales1)
is resolved
through a local
tnsnames.ora
file on the
sales2-server
as follows:
listener_sales1=
(DESCRIPTION=
(ADDRESS=(PROTOCOL=tcp)(HOST=sales1-server)(PORT=1521)))
Chapter 13
Understanding Connection Load Balancing
13-12

The
listener_sales2
value in
(REMOTE_LISTENER=listener_sales2)
is resolved through a
local
tnsnames.ora
file on the
sales1-server
as follows:
listener_sales2=
(DESCRIPTION=
(ADDRESS=(PROTOCOL=tcp)(HOST=sales2-server)(PORT=1521)))
Based on the environment, the following actions occur. The numbered actions correspond to
the arrows shown in Figure 13-4:
1. LREG processes for instances
sales1
and
sales2
register with both listeners. The
listeners are dynamically updated on the load of the instances.
Based on the preceding information,
sales2-server
is the least loaded node and
sales2
is the least loaded instance.
2. The client sends a connect request.
A connect descriptor is configured to try each protocol address randomly until one
succeeds:
sales.us.example.com=
(DESCRIPTION=
(ADDRESS_LIST=
(
LOAD_BALANCE=on
)
(FAILOVER=on)
(ADDRESS=(PROTOCOL=tcp)(HOST=sales1-server)(PORT=1521))
(ADDRESS=(PROTOCOL=tcp)(HOST=sales2-server)(PORT=1521)))
(CONNECT_DATA=(SERVICE_NAME=sales.us.example.com)))
The listener on
sales1-server
was randomly chosen to receive the client connect
request.
The listener on
sales1-server
compares the load of the instances
sales1
and
sales2
.
The comparison takes into account the load on nodes
sales1-server
and
sales2-
server
, respectively. Because
sales2-server
is less loaded than
sales1-server
, the
listener selects
sales2-server
over
sales1-server
.
3. The listener on
sales1-server
redirects the client connect request to the listener on
sales2-server
.
4. The client connects to the listener on
sale2-server
. The listener starts a dedicated
server process, and the dedicated server process inherits the connection request from
the listener.
Chapter 13
Understanding Connection Load Balancing
13-13

Figure 13-4 Load Balancing Example for a Dedicated Server Configuration
Client
sales1
sales2
sales.us.example.com
2
3
4
1
CONNECT scott@
sales.us.example.com
1
Dedicated
Server
Process
Listener
Listener
13.2.3 COLOCATION_TAG of Client Connections
The
COLOCATION_TAG
parameter is an alphanumeric string that you can use with the
CONNECT_DATA
parameter of the TNS connect string.
When you set the
colocation_tag
within the
CONNECT_DATA
parameter, load balancing
is ignored. The listener makes an effort to send all connections that have the same
colocation_tag
to the same database instance. The instance selection algorithm is
based on the
colocation_tag
, and the list of available instances for the specified
service.
For example, the listener will try to route all clients to the same database instance that
have the
COLOCATION_TAG
set to
interactive
in the connection descriptor.
sales.us.example.com=
(DESCRIPTION=
(ADDRESS=(PROTOCOL=tcp)(HOST=sales-scan)(PORT=1521))
(CONNECT_DATA=(SERVICE_NAME=sales.us.example.com)
(COLOCATION_TAG=interactive)))
Note:
Under certain conditions, such as, when maximum load of an instance is
reached or when new instances are added or deleted for a service, the
colocation of client connections that have the same
colocation_tag
to the
same database instance may not be consistent.
Chapter 13
Understanding Connection Load Balancing
13-14

Related Topics
• COLOCATION_TAG
13.3 Configuring Transparent Application Failover
Transparent Application Failover (TAF) instructs Oracle Net to transparently reconnect a
failed connection to a different listener in the event of the failure of a database instance. This
enables you to continue your work using the new connection as if the original connection
never failed.
TAF involves manual configuration of a network service name that includes the
FAILOVER_MODE
parameter included in the
CONNECT_DATA
section of the connect descriptor.
Note:
For TAF and Application Continuity, Oracle recommends that you configure failover
on the connected service. It overrides the client-side settings.
Learn about the TAF functionality and how to configure it in the connect string.
• About Transparent Application Failover
Transparent Application Failover enables a client to automatically reconnect to a
database instance if the current instance to which the connection is made fails.
Notifications are used by the server to trigger TAF callbacks on the client-side.
• What Transparent Application Failover Restores
TAF automatically restores some or all of these elements associated with active database
connections. Other elements may need to be embedded in the application code to enable
TAF and recover a connection.
• About the FAILOVER_MODE Parameters
The
FAILOVER_MODE
parameter supports these additional parameters. You can specify
these in the
CONNECT_DATA
section of a connect descriptor.
• Implementing Transparent Application Failover
Depending on the
FAILOVER_MODE
parameters, you can implement TAF in several ways.
Oracle recommends these methods.
• Verifying Transparent Application Failover
You can query the
FAILOVER_TYPE
,
FAILOVER_METHOD
, and
FAILED_OVER
columns in the
V$SESSION
view to verify that TAF is correctly configured.
Related Topics
• Connection Load Balancing
• Ensuring Application Continuity
13.3.1 About Transparent Application Failover
Transparent Application Failover enables a client to automatically reconnect to a database
instance if the current instance to which the connection is made fails. Notifications are used
by the server to trigger TAF callbacks on the client-side.
Chapter 13
Configuring Transparent Application Failover
13-15

You can configure TAF using server-side service attributes. This is the preferred
method. Alternatively, you can configure TAF in the application connect string. The
server-side service attributes take precedence over the values specified in the connect
string.
TAF operates in one of the following modes:
• Session Failover: Re-creates lost connections and sessions.
• Select Failover: Replays in-progress queries.
When there is a failure, callback functions are initiated on the client-side using Oracle
Call Interface (OCI) callbacks. This works with standard OCI connections as well as
connection pool and session pool connections.
TAF operates with Oracle Data Guard to provide automatic failover. TAF works with
the following database configurations to effectively mask a database failure:
• Oracle Real Application Clusters
• Replicated systems
• Standby databases
• Single instance Oracle database
Related Topics
• Oracle Real Application Clusters Administration and Deployment Guide
• Oracle Call Interface Programmer's Guide
13.3.2 What Transparent Application Failover Restores
TAF automatically restores some or all of these elements associated with active
database connections. Other elements may need to be embedded in the application
code to enable TAF and recover a connection.
• Client-server database connections: TAF automatically reestablishes the
connection using the same connect string or an alternate connect string that you
specify when configuring failover.
• Users' database sessions: TAF automatically logs a user in with the same user ID
as was used before the failure. If multiple users were using the connection, then
TAF automatically logs them in as they attempt to process database commands.
Unfortunately, TAF cannot automatically restore other session properties. These
properties can be restored by invoking a callback function.
• Completed commands: If a command was completed at the time of connection
failure, and it changed the state of the database, then TAF does not resend the
command. If TAF reconnects in response to a command that may have changed
the database, then TAF issues an error message to the application.
• Open cursors used for fetching: TAF allows applications that began fetching rows
from a cursor before failover to continue fetching rows after failover. This is called
select failover. It is accomplished by re-running a
SELECT
statement using the
same snapshot, discarding those rows already fetched and retrieving those rows
that were not fetched initially. TAF verifies that the discarded rows are those that
were returned initially, or it returns an error message.
Chapter 13
Configuring Transparent Application Failover
13-16

• Active transactions: Any active transactions are rolled back at the time of failure because
TAF cannot preserve active transactions after failover. The application instead receives
an error message until a
ROLLBACK
command is submitted.
• Server-side program variables: Server-side program variables, such as PL/SQL package
states, are lost during failures, and TAF cannot recover them. They can be initialized by
making a call from the failover callback.
Related Topics
• Oracle Call Interface Programmer's Guide
13.3.3 About the FAILOVER_MODE Parameters
The
FAILOVER_MODE
parameter supports these additional parameters. You can specify these
in the
CONNECT_DATA
section of a connect descriptor.
Table 13-4 Additional Parameters of the FAILOVER_MODE Parameter
Parameter Description
BACKUP
A different network service name for backup connections. A backup should be
specified when using
preconnect
to pre-establish connections.
DELAY
The amount of time in seconds to wait between connect attempts. If
RETRIES
is specified, then
DELAY
defaults to one second.
If a callback function is registered, then this parameter is ignored.
METHOD
The setting for fast failover from the primary node to the backup node:
•
basic
: Set to establish connections at failover time. This option requires
almost no work on the backup server until failover time.
•
preconnect
: Set to pre-established connections. This provides faster
failover but requires that the backup instance be able to support all
connections from every supported instance.
RETRIES
The number of times to attempt to connect after a failover. If
DELAY
is
specified, then
RETRIES
defaults to five retry attempts.
If a callback function is registered, then this parameter is ignored.
TYPE
The type of failover. Three types of Oracle Net failover functionality are
available by default to Oracle Call Interface (OCI) applications:
•
session
: Set to fail over the session. If the user's connection is lost, then
a new session is automatically created for the user on the backup. This
type of failover does not attempt to recover select operations.
•
select
: Set to enable users with open cursors to continue fetching on
them after failure. However, this mode involves overhead on the client side
in normal select operations.
•
none
: This is the default. No failover functionality is used. This can also be
explicitly specified to prevent failover from happening.
Note:
Oracle Net Manager does not provide support for TAF parameters. These
parameters must be set manually.
Chapter 13
Configuring Transparent Application Failover
13-17

13.3.4 Implementing Transparent Application Failover
Depending on the
FAILOVER_MODE
parameters, you can implement TAF in several
ways. Oracle recommends these methods.
Important:
Do not set the
GLOBAL_DBNAME
parameter in the
SID_LIST_listener_name
section of the
listener.ora
file. A statically configured global database
name disables TAF.
• TAF with Connect-Time Failover and Client Load Balancing
Implement TAF with connect-time failover and client load balancing for multiple
addresses.
• TAF Retrying a Connection
TAF enables you to automatically retry connecting if the first connection attempt
fails with the
RETRIES
and
DELAY
parameters.
• TAF Pre-establishing a Connection
TAF enables you to pre-establish a backup connection. You must explicitly specify
the initial and backup connections.
13.3.4.1 TAF with Connect-Time Failover and Client Load Balancing
Implement TAF with connect-time failover and client load balancing for multiple
addresses.
In the following example, Oracle Net connects randomly to one of the protocol
addresses on
sales1-server
or
sales2-server
. If the instance fails after the
connection, then the TAF application fails over to the other node's listener, reserving
any
SELECT
statements in progress.
sales.us.example.com=
(DESCRIPTION=
(LOAD_BALANCE=on)
(FAILOVER=on)
(ADDRESS=
(PROTOCOL=tcp)
(HOST=sales1-server)
(PORT=1521))
(ADDRESS=
(PROTOCOL=tcp)
(HOST=sales2-server)
(PORT=1521))
(CONNECT_DATA=
(SERVICE_NAME=sales.us.example.com)
(FAILOVER_MODE=
(TYPE=select)
(METHOD=basic))))
Although the preceding example has multiple addresses, the optional
ADDRESS_LIST
parameter is not used.
Chapter 13
Configuring Transparent Application Failover
13-18

13.3.4.2 TAF Retrying a Connection
TAF enables you to automatically retry connecting if the first connection attempt fails with the
RETRIES
and
DELAY
parameters.
In the following example, Oracle Net tries to reconnect to the listener on
sales1-server
. If
the failover connection fails, then Oracle Net waits 15 seconds before trying to reconnect
again. Oracle Net attempts to reconnect up to 20 times.
sales.us.example.com=
(DESCRIPTION=
(ADDRESS=
(PROTOCOL=tcp)
(HOST=sales1-server)
(PORT=1521))
(CONNECT_DATA=
(SERVICE_NAME=sales.us.example.com)
(FAILOVER_MODE=
(TYPE=select)
(METHOD=basic)
(RETRIES=20)
(DELAY=15))))
13.3.4.3 TAF Pre-establishing a Connection
TAF enables you to pre-establish a backup connection. You must explicitly specify the initial
and backup connections.
In the following example, clients that use network service name
sales1.us.example.com
to
connect to the listener on
sales1-server
are also preconnected to
sales2-server
. If
sales1-server
fails after the connection, then Oracle Net fails over to
sales2-server
,
preserving any
SELECT
statements in progress. Similarly, Oracle Net preconnects to
sales1-
server
for those clients that use
sales2.us.example.com
to connect to the listener on
sales2-server
.
sales1.us.example.com=
(DESCRIPTION=
(ADDRESS=
(PROTOCOL=tcp)
(HOST=sales1-server)
(PORT=1521))
(CONNECT_DATA=
(SERVICE_NAME=sales.us.example.com)
(INSTANCE_NAME=sales1)
(FAILOVER_MODE=
(BACKUP=sales2.us.example.com)
(TYPE=select)
(METHOD=preconnect))))
sales2.us.example.com=
(DESCRIPTION=
(ADDRESS=
(PROTOCOL=tcp)
(HOST=sales2-server)
(PORT=1521))
(CONNECT_DATA=
(SERVICE_NAME=sales.us.example.com)
(INSTANCE_NAME=sales2)
(FAILOVER_MODE=
Chapter 13
Configuring Transparent Application Failover
13-19

(BACKUP=sales1.us.example.com)
(TYPE=select)
(METHOD=preconnect))))
13.3.5 Verifying Transparent Application Failover
You can query the
FAILOVER_TYPE
,
FAILOVER_METHOD
, and
FAILED_OVER
columns in the
V$SESSION
view to verify that TAF is correctly configured.
To view the columns, use a query similar to the following:
SELECT MACHINE, FAILOVER_TYPE, FAILOVER_METHOD, FAILED_OVER, COUNT(*)
FROM V$SESSION
GROUP BY MACHINE, FAILOVER_TYPE, FAILOVER_METHOD, FAILED_OVER;
The output before failover looks similar to the following:
MACHINE FAILOVER_TYPE FAILOVER_METHOD FAILED_OVER COUNT(*)
-------------------- ------------- ---------- --- ----------
sales1 NONE NONE NO 11
sales2 SELECT PRECONNECT NO 1
The output after failover looks similar to the following:
MACHINE FAILOVER_TYPE FAILOVER_METHOD FAILED_OVER COUNT(*)
-------------------- ------------- ---------- --- ----------
sales2 NONE NONE NO 10
sales2 SELECT PRECONNECT YES 1
Note:
You can monitor each step of TAF using an appropriately configured
OCI TAF
CALLBACK
function.
Related Topics
• Oracle Call Interface Programmer's Guide
• Oracle Database Reference
13.4 Specifying the Instance Role for Primary and
Secondary Instance Configurations
The
INSTANCE_ROLE
parameter is an optional parameter for the
CONNECT_DATA
section
of a connect descriptor. It enables you to specify a connection to the primary or
secondary instance of Oracle RAC configurations.
This parameter is useful when:
• You want to explicitly connect to a primary or secondary instance. The default is
the primary instance.
• You want to use TAF to preconnect to a secondary instance.
Chapter 13
Specifying the Instance Role for Primary and Secondary Instance Configurations
13-20

Table 13-5 describes the INSTANCE_ROLE parameters.
Table 13-5 INSTANCE_ROLE Parameters
INSTANCE_ROLE Parameter Description
PRIMARY Specifies a connection to the primary instance.
SECONDARY Specifies a connection to the secondary instance.
ANY Specifies a connection to whichever instance has the lowest load,
regardless of primary or secondary instance role.
Connection to Instance Role Type
In the following example of the
tnsnames.ora
file, network service name
sales_primary
enables connections to the primary instance, and network service name
sales_secondary
enables connections to the secondary instance.
sales_primary=
(DESCRIPTION=
(ADDRESS_LIST=
(ADDRESS=
(PROTOCOL=tcp)
(HOST=sales1-server)
(PORT=1521))
(ADDRESS=
(PROTOCOL=tcp)
(HOST=sales2-server)
(PORT=1521)))
(CONNECT_DATA=
(SERVICE_NAME=sales.us.example.com)
(INSTANCE_ROLE=primary)))
sales_secondary=
(DESCRIPTION=
(ADDRESS_LIST=
(ADDRESS=
(PROTOCOL=tcp)
(HOST=sales1-server)
(PORT=1521))
(ADDRESS=
(PROTOCOL=tcp)
(HOST=sales2-server)
(PORT=1521)))
(CONNECT_DATA=
(SERVICE_NAME=sales.us.example.com)
(INSTANCE_ROLE=secondary)))
Connection to a Specific Instance
There are times when Oracle Enterprise Manager Cloud Control and other system
management products need to connect to a specific instance regardless of its role to perform
administrative tasks. For these types of connections, configure
(
INSTANCE_NAME=instance_name)
and (
INSTANCE_ROLE=any)
to connect to the instance
regardless of its role.
In the following example, network service name
sales1
enables connections to the instance
on
sales1-server
and
sales2
enables connections to the instance on
sales2-server
.
(SERVER=dedicated)
is specified to force a dedicated server connection.
Chapter 13
Specifying the Instance Role for Primary and Secondary Instance Configurations
13-21

sales1=
(DESCRIPTION=
(ADDRESS=
(PROTOCOL=tcp)
(HOST=sales1-server)
(PORT=1521))
(CONNECT_DATA=
(SERVICE_NAME=sales.us.example.com)
(INSTANCE_ROLE=any)
(INSTANCE_NAME=sales1)
(SERVER=dedicated)
))
sales2=
(DESCRIPTION=
(ADDRESS=
(PROTOCOL=tcp)
(HOST=sales2-server)
(PORT=1521))
(CONNECT_DATA=
(SERVICE_NAME=sales.us.example.com)
(INSTANCE_ROLE=any)
(INSTANCE_NAME=sales2)
(SERVER=dedicated)
))
Note:
Failover is incompatible with the preceding settings.
TAF Pre-establishing a Connection
If TAF is configured, then a backup connection can be pre-established to the
secondary instance. The initial and backup connections must be explicitly specified. In
the following example, Oracle Net connects to the listener on
sales1-server
and
preconnects to
sales2-server
, the secondary instance. If
sales1-server
fails after
the connection, then the TAF application fails over to
sales2-server
, the secondary
instance, preserving any
SELECT
statements in progress.
sales1.example.com=
(DESCRIPTION=
(ADDRESS=
(PROTOCOL=tcp)
(HOST=sales1-server)
(PORT=1521))
(CONNECT_DATA=
(SERVICE_NAME=sales.us.example.com)
(INSTANCE_ROLE=primary)
(FAILOVER_MODE=
(BACKUP=sales2.example.com)
(TYPE=select)
(METHOD=preconnect))
))
sales2.example.com=
(DESCRIPTION=
(ADDRESS=
(PROTOCOL=tcp)
(HOST=sales2-server)
(PORT=1521))
(CONNECT_DATA=
Chapter 13
Specifying the Instance Role for Primary and Secondary Instance Configurations
13-22

(SERVICE_NAME=sales.us.example.com)
(INSTANCE_ROLE=secondary)))
13.5 Configuring Static Service Registration
The listener uses the dynamic service information about the database and instance before
using statically configured information in the
listener.ora
file.
Configuration of static service information is necessary in the following cases:
• Use of external procedure calls
• Use of Oracle Heterogeneous Services
• Use of Oracle Data Guard
• Remote database startup from a tool other than Oracle Enterprise Manager Cloud
Control
• Connections to Oracle databases earlier than Oracle8i release 2 (8.1)
• Parameters for Static Service Registration
Understand the static service settings in the
listener.ora
file for static service
registration.
• Configuring Static Service Information for the Listener
Learn how to statically configure database service information for the listener using
Oracle Enterprise Manager Cloud Control.
13.5.1 Parameters for Static Service Registration
Understand the static service settings in the
listener.ora
file for static service registration.
Example listener.ora File
This example shows a
listener.ora
file configured for static service registration. The
LISTENER
entry defines the listening protocol address for a listener named
Listener
, and the
SID_LIST_LISTENER entry provides information about the external services statically
supported by the
Listener
listener.
LISTENER=
(DESCRIPTION=
(ADDRESS_LIST=
(ADDRESS=(PROTOCOL=tcp)(HOST=sales-server)(PORT=1521))
(ADDRESS=(PROTOCOL=ipc)(KEY=extproc) (queuesize=50))))
SID_LIST_listener=
(SID_LIST=
(SID_DESC=
(SID_NAME=plsextproc)
(ORACLE_HOME=/oracle8)
(PROGRAM=extproc)))
The SID_LIST_listener_name parameter setting in the
listener.ora
file specifies information
about the databases served by the listener. When services are configured statically, a listener
starts a dedicated server process when it receives a client request. If the instance is not up,
then the server returns an
Oracle not available
error message.
If a database cannot find the listener, then configure the
listener.ora
file with the
GLOBAL_DBNAME parameter, as shown in the following example
Chapter 13
Configuring Static Service Registration
13-23

SID_LIST_listener=
(SID_LIST=
(SID_DESC=
(
GLOBAL_DBNAME
=sales.example.com)
(SID_NAME=sales)
(ORACLE_HOME=/u01/app/oracle))
Note:
A statically-configured global database name disables TAF. To use TAF, do
not set the GLOBAL_DBNAME parameter in the SID_LIST_listener_name
section of the
listener.ora
file.
Static Service Settings in listener.ora
Oracle Net
Manager Field
listener.ora File
Parameter
Description
SID SID_NAME The Oracle system identifier (SID) of the instance. You can obtain the
SID value from the INSTANCE_NAME parameter in the initialization
parameter file.
Service Name GLOBAL_DBNAME The database service.
While processing a client connection request, the listener tries to
match the value of this parameter with the value of the
SERVICE_NAME parameter in the client connect descriptor. If the
client connect descriptor uses the SID parameter, then the listener
does not attempt to map the values. This parameter is primarily
intended for configurations with Oracle8 databases (where dynamic
service registration is not supported for dedicated servers). This
parameter may also be required for use with Oracle8i and later
database services by some configurations.
The value for this parameter is typically obtained from the
combination of the DB_NAME and DB_DOMAIN parameters
(DB_NAME.DB_DOMAIN) in the initialization parameter file, but the
value can also contain any valid name used by clients to identify the
service.
When using a connect descriptor with a SERVICE_NAME parameter,
ensure that any SID_DESC entry does not have the value
GLOBAL_DBNAME
.
Oracle Home
Directory
ORACLE_HOME The Oracle home location of the instance. Without this setting, the
listener assumes its Oracle home for the instance.
On Linux and UNIX, this setting is optional.
On Microsoft Windows, this setting is ignored. The Oracle home
specified by the ORACLE_HOME parameter in
HKEY_LOCAL_MACHINE\SOFTWARE\ORACLE\HOMEID
of the
Microsoft Windows registry is used.
Not applicable SID_LIST_listener_na
me
The section of the
listener.ora
file that defines the database
served by the listener.
Chapter 13
Configuring Static Service Registration
13-24

13.5.2 Configuring Static Service Information for the Listener
Learn how to statically configure database service information for the listener using Oracle
Enterprise Manager Cloud Control.
Note:
If you are using connect-time failover or TAF, such as in an Oracle Real Application
Clusters environment, then do not set the GLOBAL_DBNAME parameter.
1. Access the Net Services Administration page in Oracle Enterprise Manager Cloud
Control.
2. Select Listeners from the Administer list, and then select the Oracle home that contains
the configuration files.
3. Click Go. You may be prompted to log in to the database server.
The Listeners page appears.
4. Select a listener, and then click Edit.
The Edit Listener page appears.
5. Click the Static Database Registration tab, and then click Add.
The Add Database Service page appears. Enter the required information in the fields.
6. Click OK.
Note:
You can also configure static service information with Oracle Net Manager. See
Statically Configure Database Service Information in the online help for
additional information.
Related Topics
• Using Oracle Enterprise Manager Cloud Control to Configure Oracle Net Services
• Configuring Dynamic Service Registration
13.6 Configuring Connections to Third-Party Database Services
Learn about external procedures settings in the
listener.ora
file, changing the default
configuration for external procedures, configuring the Oracle database server for connecting
to Heterogeneous Services agents, and configuring clients for connecting to the Oracle Rdb
database.
• Default Configuration for External Procedures
• About Oracle Net Services for Oracle Heterogeneous Services
• Configuring Oracle Net Services for an Oracle Rdb Database
Chapter 13
Configuring Connections to Third-Party Database Services
13-25

13.6.1 Default Configuration for External Procedures
An external procedure is a procedure called from another program, written in a
different language. An example is a PL/SQL program calling one or more C routines
that are required to perform special-purpose processing.
When an application calls an external procedure, Oracle Database starts an external
procedure agent named
extproc
. Using the network connection established by Oracle
Database, the application passes the following information to the agent:
• DLL or shared library name
• External procedure name
• Any parameters
The agent then loads the DLL or the shared library, and runs the external procedure
and passes back to the application any values returned by the external procedure. The
agent must reside on the same computer as the application making the external
procedure call.
When you use the default configuration for external procedures, the
extproc
agent is
spawned directly by Oracle Database. There are no configuration changes required for
either the
listener.ora
or
tnsnames.ora
file. However, you must define the
environment variables to be used by external procedures in the
extproc.ora
file
located in the
ORACLE_BASE_HOME/hs/admin
directory. If the default configuration for
external procedures is not used, then the parameters listed in Table 13-6 must be set.
Table 13-6 External Procedures Settings in listener.ora
Oracle Enterprise
Manager Cloud
Control Field
listener.ora
Parameter
Description
Program Name PROGRAM The name of the external procedure agent executable.
Note: On Microsoft Windows, the executable must reside in the
ORACLE_HOME\bin
directory.
Chapter 13
Configuring Connections to Third-Party Database Services
13-26

Table 13-6 (Cont.) External Procedures Settings in listener.ora
Oracle Enterprise
Manager Cloud
Control Field
listener.ora
Parameter
Description
Environment Variables ENVS The environment variables to be used by external procedures in the
extproc.ora
file located in the
ORACLE_BASE_HOME/hs/admin
directory.
Note: When
extproc.ora
is in use, it precedes the same
environment variables of
ENVS
in
listener.ora
.
Syntax:
SET name=value
Example:
SET EXTPROC_DLLS=ANY
Specify the EXTPROC_DLLS environment variable to restrict the DLLs
that the extproc agent is allowed to load. Without the EXTPROC_DLLS
environment variable, the extproc agent loads DLLs from the
ORACLE_HOME/lib
directory on UNIX operating systems and the
ORACLE_HOME\bin
directory on Microsoft Windows.
Set EXTPROC_DLLS to one of the following values:
• Colon-separated list of DLLs
1
Syntax:
"DLL:DLL"
This value allows the extproc agent to load the specified DLLs and
the DLLs from the
ORACLE_HOME/lib
directory on UNIX
operating systems and the
ORACLE_HOME\bin
directory on
Microsoft Windows. You must enter the complete directory path
and file name of the DLLs.
•
ONLY
(Recommended for maximum security)
1
Syntax:
"ONLY:DLL:DLL"
This value allows the extproc agent to load only the specified
DLLs. You must enter the complete directory path and file name of
the DLLs.
•
ANY
Syntax:
"ANY"
Description: This value allows the extproc agent to load any DLL.
ANY
disables DLL checking.
Examples:
"EXTPROC_DLLS=/home/xyz/mylib.so:/home/abc/urlib.so,
LD_LIBRARY_PATH=/private/xpm/lib:/private/mylibs,
MYPATH=/usr/ucb:/usr/local/packages,APL_ENV_FILE=/apl/conf/env.txt"
"EXTPROC_DLLS=ONLY:/home/xyz/mylib.so:/home/abc/urlib.so,
LD_LIBRARY_PATH=/private/xpm/lib:/private/mylibs,
MYPATH=/usr/ucb:/usr/local/packages,APL_ENV_FILE=/apl/conf/env.txt"
"EXTPROC_DLLS=ANY,LD_LIBRARY_PATH=/private/xpm/lib:/private/
mylibs,
MYPATH=/usr/ucb:/usr/local/packages,APL_ENV_FILE=/apl/conf/env.txt"
Note:
If effective user and real user, or effective
group and real group are different, then
Chapter 13
Configuring Connections to Third-Party Database Services
13-27

Table 13-6 (Cont.) External Procedures Settings in listener.ora
Oracle Enterprise
Manager Cloud
Control Field
listener.ora
Parameter
Description
LD_LIBRARY_PATH
environment setting
is ignored.
Oracle Home Directory ORACLE_HOM
E
The Oracle home location of the agent.
Oracle System Identifier
(SID)
SID_NAME A system identifier for the external procedure agent by any name.
See the examples in Configuring Oracle Net Services for External
Procedures for more information about how to work with the external
procedure agent spawned by Oracle listener.
1
The DLLs are separated by semi-colons (;) on Microsoft Windows.
Note:
The default configuration for external procedures does not require a network
listener to work with Oracle Database and the
extproc
agent. The
extproc
agent is spawned directly by Oracle Database and eliminates the risks that
the
extproc
agent might be spawned by Oracle Listener unexpectedly. This
default configuration is recommended for maximum security.
You can change the default configuration for external procedures and have
the
extproc
agent spawned by Oracle Listener. To do this, you must perform
additional network configuration steps.
Having the
extproc
agent spawned by Oracle Listener is necessary if you
use:
• Multi-threaded agent
• Oracle Database in MTS mode on Microsoft Windows
• The AGENT clause of the LIBRARY specification or the AGENT IN
clause of the PROCEDURE specification such that you can redirect
external procedures to a different
extproc
agent.
• Configuring Oracle Net Services for External Procedures
See Also:
Oracle Database Security Guide for additional information about securing
external procedures
Chapter 13
Configuring Connections to Third-Party Database Services
13-28

13.6.1.1 Configuring Oracle Net Services for External Procedures
You can change the default configuration for external procedures and have the extproc agent
spawned by the listener similar to earlier releases of Oracle Database. Here is the process:
1. Configure an existing listener or create a new listener to serve external procedures.
Example 13-1 shows a sample configuration in the
listener.ora
file.
Example 13-1 listener.ora File with an External Procedure
LISTENER=
(DESCRIPTION=
(ADDRESS_LIST=
(ADDRESS=(PROTOCOL=tcp)(HOST=sale-server)(PORT=1521))
(ADDRESS=(PROTOCOL=ipc)(KEY=extproc))))
SID_LIST_LISTENER=
(SID_LIST=
(SID_DESC=
(GLOBAL_DBNAME=sales.us.example.com)
(ORACLE_HOME=/oracle)
(SID_NAME=sales))
(SID_DESC=
(SID_NAME=plsextproc)
(ORACLE_HOME=/oracle)
(PROGRAM=extproc)))
2. Add a new entry in
tnsnames.ora
.
Example 13-2 shows a sample configuration in the
tnsnames.ora
file.
Example 13-2 tnsnames.ora File with an External Procedure
EXTPROC_CONNECTION_DATA_1=
(DESCRIPTION=
(ADDRESS=(PROTOCOL=ipc)
(KEY=extproc)
)
(CONNECT_DATA=
(SID=plsextproc)
))
3. Use
AGENT
clause of the
LIBRARY
specification or
AGENT IN
clause of the
PROCEDURE
specification such that you can redirect external procedures to a different
extproc
agent (for
example,
extproc
spawned by Oracle listener).
$ cat test.c
#include <stdlib.h>
int negative(char* db, int n)
{
return -1*n;
}
char* mygetenv(const char* env)
{
return getenv(env);
}
$ gcc -shared -fPIC -o test.so test.c
Chapter 13
Configuring Connections to Third-Party Database Services
13-29

$ cp test.so $ORACLE_HOME/lib
In
SQL*PLUS
, run:
DROP DATABASE LINK extproclink;
CREATE DATABASE LINK extproclink USING 'extproc_connection_data_1';
CREATE OR REPLACE LIBRARY test1 AS '$ORACLE_HOME/lib/test.so';
/
--
-- Use 'AGENT' clause in LIBRARY SPEC
--
CREATE OR REPLACE LIBRARY test2 AS '$ORACLE_HOME/lib/test.so' AGENT
'extproclink';
/
--
-- Use 'AGENT IN' clause in FUNCTION
--
CREATE OR REPLACE FUNCTION ftest1(x VARCHAR2, y BINARY_INTEGER)
RETURN BINARY_INTEGER
AS LANGUAGE C
LIBRARY test1
NAME "negative"
PARAMETERS(x STRING, y INT)
AGENT IN ( x );
/
CREATE OR REPLACE FUNCTION ftest2(x VARCHAR2)
RETURN VARCHAR2
AS LANGUAGE C
LIBRARY test2
NAME "mygetenv";
/
$ select ftest1('extproclink', 123) from dual;
$ select ftest2('LD_LIBRARY_PATH') from dual;
The listener for external procedures should have a user account that does not have
general access to the files owned by the
oracle
user. Specifically, this user should not
have permission to read or write to database files or to the Oracle server address
space. In addition, this user should have read access to the
listener.ora
file, but
must not have write access to it.
Running the listener with lower privileges also prevents using the Listener Control
SET
commands to alter the configuration of the listener in the
listener.ora
file. For this
reason, Oracle recommends that you complete
listener.ora
file configuration before
running the listener.
• Modifying the Default Configuration for External Procedures
Chapter 13
Configuring Connections to Third-Party Database Services
13-30

• Creating a New Listener to Run External Procedures
13.6.1.1.1 Modifying the Default Configuration for External Procedures
To modify the default configuration for external procedures, configure and run a separate or
existing listener to serve external procedures. The following procedure describes how to
modify the default configuration:
1. Configure an existing listener to serve external procedures using Oracle Net
Configuration Assistant as follows. For most installation types, this listener is named
LISTENER
.
a. Access the Net Services Administration page in Oracle Enterprise Manager Cloud
Control.
b. Select Listeners from the Administer list, and then select the Oracle home that
contains the location of the configuration files.
c. Click Go.
The Listeners page appears.
d. Select the existing listener created by Oracle Net Configuration Assistant, and then
click Edit.
The Edit Listeners page appears.
e. In the Addresses section, select the protocol address for external procedures, and
then click Add.
f. Click the Other Services tab.
g. Select the row representing the service information for external procedures, and then
click Add.
2. Add service information about the extproc agent in the
listener.ora
file, including the
parameters described in Table 13-6.
13.6.1.1.2 Creating a New Listener to Run External Procedures
To configure and run a separate listener to serve external procedures, create the external
procedure entries for a different listener using Oracle Net Configuration Assistant. The
following procedure describes how to create a new listener:
1. Create a listener to exclusively handle external procedures, as follows:
a. Navigate to the Listeners page.
b. Click Create.
The Create Listener page appears.
c. In the Listener Name field, enter a unique listener name, such as
LISTENEREXTPROC
,
in the Listener Name field.
2. In the Addresses section, configure an IPC protocol address, as follows:
a. Click Add.
The Add Address page appears.
b. From the Protocol list, select IPC.
c. In the Key field, enter a key value of the extproc agent.
Chapter 13
Configuring Connections to Third-Party Database Services
13-31

d. Click OK.
See Also:
"Configuring Listening Protocol Addresses" for additional information
about configuring listener protocol addresses
3. Add service information about the extproc agent in the
listener.ora
file, including
the parameters described in Table 13-6, as follows:
a. Click the Other Services tab.
b. Click Add.
The Create Other Service page appears.
c. Enter the following values in the fields:
•
extproc
in the Program Name field.
• The Oracle home where the
extproc
executable resides in the Oracle
Home Directory field.
• System identifier, such as
extproc
, in the SID field.
d. In the Environment Variables section, click Add Another Row.
e. Enter the EXTPROC_DLLS environment variable in the Name field, and the
directory path and file name of the DLLs in the Value field.
f. Click OK.
The Create Listener page appears.
g. Click OK to add the listener.
The listener is added to the Listeners page.
The
listener.ora
file updates with information for external procedures, as
shown in the following output:
LISTENEREXTPROC=
(DESCRIPTION=
(ADDRESS=
(PROTOCOL=ipc)(KEY=extproc)))
4. Start the listener for external procedures from a user account with lower privileges
than the
oracle
user.
See Also:
• "Starting Oracle Net Listener and the Oracle Database Server" for
instructions on using the Listener Control utility
START
command to start
the listener
• Oracle Database Development Guide for instruction on enabling external
procedure calls
Chapter 13
Configuring Connections to Third-Party Database Services
13-32

13.6.2 About Oracle Net Services for Oracle Heterogeneous Services
Heterogeneous Services is an integrated component within the Oracle database server, and
provides the generic technology for accessing third-party systems from the Oracle database
server. Heterogeneous Services enables you to:
• Use Oracle SQL to transparently access data stored in third-party systems as if the data
resides within an Oracle database server.
• Use Oracle procedure calls to transparently access third-party systems, services, or
application programming interfaces (APIs) from your Oracle distributed environment.
While Heterogeneous Services provides the generic technology in the Oracle database
server, a Heterogeneous Services agent is required to access a particular third-party system.
• Configuring Oracle Database to Connect to Agents
13.6.2.1 Configuring Oracle Database to Connect to Agents
To initiate a connection to the third-party system, the Oracle database server starts an agent
process through the listener on the gateway. The following procedure describes how to
configure the Oracle database server to be able to connect to the agents:
1. Configure the listener on the gateway to listen for incoming requests from the Oracle
database server and spawn Heterogeneous Services agents by configuring the following
parameters in the
listener.ora
file:
• PROGRAM: The name of the agent executable
• ORACLE_HOME: The Oracle home location of the agent executable
• SID_NAME: The Oracle system identifier (SID)
2. Configure the PROGRAM, ORACLE_HOME, and SID parameters in Oracle Enterprise
Manager Cloud Control.
a. Access the Net Services Administration page in Oracle Enterprise Manager Cloud
Control.
See Also:
"Using Oracle Enterprise Manager Cloud Control to Configure Oracle Net
Services"
b. Select Listeners from the Administer list, and then select the Oracle home that
contains the location of the configuration files.
c. Click Go.
The Listeners page appears.
d. Select the listener created by Oracle Net Configuration Assistant, and then click Edit.
The Edit Listeners page appears.
e. Click the Other Services tab.
f. Click Add.
Chapter 13
Configuring Connections to Third-Party Database Services
13-33

The Create Other Service page appears.
g. Enter the program name in the Program Name field that will be run to create a
gateway, the Oracle home where the agent executable resides in the Oracle
Home Directory field, and the Oracle System Identifier (SID) or service name
of the third-party system in the SID field.
h. Click OK.
The Edit Listener page appears.
i. Click OK to modify the listener.
The Listeners page appears.
The
listener.ora
file updates information about the Heterogeneous Services,
as shown in the following:
SID_LIST_LISTENER=
(SID_LIST=
(SID_DESC=
(SID_NAME=sybasegw)
(ORACLE_HOME=/oracle12c)
(PROGRAM=tg4sybs)))
3. On the computer where the Oracle database resides, set up a network service
name to connect to the listener on the gateway. The connect descriptor must
include the
HS=ok
clause to ensure the connection uses Heterogeneous Services,
as follows:
a. Create a network service name that can be used for connections from the
Oracle database server to a third-party system.
See Also:
Task 1, Configure Net Services Names for local naming instructions
and Task 2, Create Net Service Names in the Directory for directory
naming instructions
b. Use either Oracle Enterprise Manager Cloud Control or Oracle Net Manager to
configure
HS=ok
.
• For Oracle Enterprise Manager Cloud Control, access the Net Services
Administration page, select Local Naming for the listener, and then click
the Advanced tab in the Create Net Service Name page. Next, click Use
for Heterogeneous Services.
• For Oracle Net Manager, click Advanced in the Service Identification box.
The Advanced Service Options dialog box appears. Click Use for
Heterogeneous Services.
c. Click OK to confirm the change.
The
tnsnames.ora
file updates with the new network service name configured
for Heterogeneous Services, as shown in the following:
sybase_gtw=
(DESCRIPTION=
(ADDRESS=(PROTOCOL=tcp)(HOST=gate-server)(PORT=1521))
(CONNECT_DATA=
(SERVICE_NAME=sybasegw)
Chapter 13
Configuring Connections to Third-Party Database Services
13-34

)
(HS=ok)))
)
See Also:
Oracle Database Heterogeneous Connectivity Administrator's Guide
13.6.3 Configuring Oracle Net Services for an Oracle Rdb Database
Oracle Rdb is a database for Digital 64-bit operating systems. Because Oracle Rdb has its
own listener, the client interacts with Rdb in the same manner as it does with an Oracle
database.
To initiate a connection to an Oracle Rdb, set up a network service name to connect to the
Oracle Rdb database using the parameters described in Table 13-7.
Table 13-7 Oracle RDB Database Settings in a Connect Descriptor
Oracle Enterprise
Manager Cloud
Control Field
tnsnames.ora Parameter Description
Rdb Database RDB_DATABASE The file name of an Oracle Rdb database.
Type of Service TYPE_OF_SERVICE The type of service to use for an Oracle Rdb database. It is
used by Rdb interface tools. This feature should only be
used if the application supports both Oracle Rdb and Oracle
database services, and you want the application to load
balance between the two.
Global Database Name GLOBAL_NAME The Oracle Rdb database. Optional.
The following procedure describes how to configure a client for an Oracle Rdb database:
1. Create a network service name that can be used for connections from the Oracle server
to a third-party system.
See Also:
Task 1, Configure Net Services Names for local naming instructions and Task 2,
Create Net Service Names in the Directory for directory naming instructions
2. Use either Oracle Enterprise Manager Cloud Control or Oracle Net Manager to set the
Oracle Rdb parameters.
• For Oracle Enterprise Manager Cloud Control, access the Net Services
Administration page, select Local Naming for the listener, and then click the
Advanced tab in the Create Net Service Name page.
• For Oracle Net Manager, click Advanced in the Service Identification section. The
Advanced Service Options dialog box appears.
3. Enter the file name of an Oracle Rdb database in the Rdb Database field.
Chapter 13
Configuring Connections to Third-Party Database Services
13-35

4. (Optional) Specify the type of service in the Type of Service field, if needed, and
enter the global database name in the Global Database Name field, and then click
OK.
The
tnsnames.ora
file updates with the new network service name configured for
the Oracle Rdb database, similar to the following:
alpha5=
(DESCRIPTION=
(ADDRESS=...)
(CONNECT_DATA=
(SERVICE_NAME=generic)
(RDB_DATABASE=[.mf]mf_personnel.rdb)
(GLOBAL_NAME=alpha5)))
In the following example, the TYPE_OF_SERVICE parameter is used to load
balance between an Oracle Rdb database service and an Oracle database
service:
alpha5=
(DESCRIPTION_LIST=
(DESCRIPTION=
(ADDRESS=...)
(CONNECT_DATA=
(SERVICE_NAME=generic)
(RDB_DATABASE=[.mf]mf_personnel.rdb)
(GLOBAL_NAME=alpha5)))
(DESCRIPTION=
(ADDRESS=...)
(CONNECT_DATA=
(SERVICE_NAME=sales.us.example.com))
(TYPE_OF_SERVICE=oracle_database))
Chapter 13
Configuring Connections to Third-Party Database Services
13-36

14
Optimizing Performance
Learn how to optimize connection performance.
• Understanding the Benefits of Network Data Compression
• Configuring Session Data Unit
• Determining the Bandwidth-Delay Product
• Configuring I/O Buffer Space
Reliable network protocols, such as TCP/IP, buffer data into send and receive buffers
while sending and receiving to or from lower and upper layer protocols. The sizes of
these buffers affect network performance by influencing flow control decisions.
• Configuring SDP Support for InfiniBand Connections
• Configuring Exadirect Support for InfiniBand Connections
Oracle Net Services provides support for the Exadirect for InfiniBand high-speed
networks.. Use the new transport to improve latency and throughput by leveraging
Remote Direct Memory Access (RDMA) in an InfiniBand environment
• Limiting Resource Consumption by Unauthorized Users
• Configuring Key-Based Routing for Client-Server Connections
Learn how to establish client-server connections in a sharded database by using key-
based (or direct) routing. In key-based routing to a shard, a connection is established to a
single, relevant shard that contains the data pertinent to the required transaction using a
sharding key.
14.1 Understanding the Benefits of Network Data Compression
Network data compression reduces the size of the session data unit (SDU) transmitted over a
data connection. Reducing the size of data reduces the time required to transmit a SQL query
and result across the network. In addition, compressed data uses less bandwidth which
allows transmission of larger data in less time. The data compression process is transparent
to the application layer.
The following are some of the benefits of using data compression:
• Increased network throughput means constrained bandwidth environments can utilize
compression to reduce query response time.
• Reduced bandwidth utilization allows other applications to use the bandwidth.
• Reduction in the amount of data transferred between sites.
14.2 Configuring Session Data Unit
Under typical database configuration, Oracle Net encapsulates data into buffers the size of
the SDU before sending the data across the network. Oracle Net sends each buffer when it is
filled, flushed, or when an application tries to read data. Adjusting the size of the SDU buffers
relative to the amount of data provided to Oracle Net to send at any one time can improve
14-1

performance, network utilization, and memory consumption. When large amounts of
data are being transmitted, increasing the SDU size can improve performance and
network throughput. SDU size can be adjusted lower or higher to achieve higher
throughput for a specific deployment.
The amount of data provided to Oracle Net to send at any one time is referred to as
the message size.
The SDU size can range from 512 bytes to 2 MB. The wide range of sizes allows the
network administrator to tune the SDU size for optimal network performance for a
given deployment. A high SDU size value requires more memory. The default SDU
size for the client and a dedicated server is 8192 bytes. The default SDU size for a
shared server is 65535 bytes.
The actual SDU size used is negotiated between the client and the server at connect
time and is the smaller of the client and server values. Configuring an SDU size
different from the default requires configuring the SDU on both the client and server
computers, unless you are using shared servers.
You should consider changing the SDU size when the predominant message size is
smaller or larger than 8192. The SDU size should be 70 bytes more than the
predominant message size. If the predominant message size plus 70 bytes exceeds
the maximum SDU, then the SDU should be set such that the message size is divided
into the smallest number of equal parts where each part is 70 bytes less than the SDU
size. To change the default, change the DEFAULT_SDU_SIZE parameter in the
sqlnet.ora
file.
For example, if the majority of the messages sent and received by the application are
smaller than 8 KB, taking into account the 70 bytes for overhead, then setting the SDU
to 8 KB will likely produce good results. If sufficient memory is available, then using the
maximum value for the SDU minimizes the number of system calls and overhead for
Oracle Net Services.
Note:
In Oracle Database 11g, Oracle Net Services optimized bulk data transfer for
components, such as Oracle SecureFiles LOBs and Oracle Data Guard redo
transport services. The SDU size limit, as specified in the network parameter
files, does not apply to these bulk data transfers. Bulk data transfer
optimization does not apply when ASO options are enabled or TLS transport
is used.
• Setting the SDU Size for the Database
• Setting the SDU Size for the Client
See Also:
• "Session Data Unit Size for Data Transfer Optimization"
• "Statistics Example"
Chapter 14
Configuring Session Data Unit
14-2

14.2.1 Setting the SDU Size for the Database
To set the SDU size for the database server, configure the following files:
•
sqlnet.ora
Configure the DEFAULT_SDU_SIZE parameter in the
sqlnet.ora
file, such as the
following:
DEFAULT_SDU_SIZE=32767
• Initialization parameter file
If using shared server processes, then set the SDU size in the DISPATCHERS parameter
in the initialization parameter file, as follows:
DISPATCHERS="(DESCRIPTION=(ADDRESS=(PROTOCOL=tcp))(SDU=8192))"
•
listener.ora
If the listener was configured with a list of targets in the
listener.ora
file, then the value
for SDU in the SID_LIST parameter overrides the current setting in the
sqlnet.ora
file
when using dedicated server processes.
14.2.2 Setting the SDU Size for the Client
To set the SDU size for the client, configure the following files:
•
sqlnet.ora
For global configuration on the client side, configure the DEFAULT_SDU_SIZE parameter
in the
sqlnet.ora
file, such as the following:
DEFAULT_SDU_SIZE=32767
•
tnsnames.ora
For a particular connect descriptor, you can specify the SDU parameter in the
DESCRIPTION parameter.
sales.us.example.com=
(DESCRIPTION=
(
SDU=11280)
(ADDRESS=(PROTOCOL=tcp)(HOST=sales-server)(PORT=1521))
(CONNECT_DATA=
(SERVICE_NAME=sales.us.example.com))
)
The SDU size applies to all Oracle Net protocols for the particular connect descriptor.
14.3 Determining the Bandwidth-Delay Product
Bandwidth-delay product is the product of network bandwidth and the round trip time of data
going over the network. A simple way to determine the round trip time, is to use a command
such as
ping
from one host to another and use the response times returned by
ping
.
For example, if a network has a bandwidth of 100 Mbps and a round trip time of 5ms, then
the send and receive buffers should be at least (100*10ˆ6) * (5/10ˆ3) bits or approximately
62.5 Kilobytes.
Chapter 14
Determining the Bandwidth-Delay Product
14-3

The following equation shows the relationships between the units and factors involved:
100,000,000 bits 1 byte 5 seconds
---------------- x ------ x --------- = 62,500 bytes
1 second 8 bits 1000
Setting the SEND_BUF_SIZE and RECV_BUF_SIZE parameters to at least the
bandwidth-delay product insures that when large amounts of data are being sent that
the network bandwidth will be optimally utilized.
Based on the preceding equation, the bandwidth-delay product of this network link is
approximately 64 KB. If the largest message used to transfer redo data between a
primary database and a standby database is 1 MB, then the value for the
SEND_BUF_SIZE and RECV_BUF_SIZE parameters could be 1 MB. However, if the
average message is less, then a setting of 64 KB should be sufficient to optimize use
of the available bandwidth.
For most network protocols, ensure that the RECV_BUF_SIZE parameter at one end
of the network connection, typically at the client, equals the value of the
SEND_BUF_SIZE parameter at the other end, typically at the server.
See Also:
"Statistics Example" for additional information about determining messages
sizes
14.4 Configuring I/O Buffer Space
Reliable network protocols, such as TCP/IP, buffer data into send and receive buffers
while sending and receiving to or from lower and upper layer protocols. The sizes of
these buffers affect network performance by influencing flow control decisions.
The
RECV_BUF_SIZE
and
SEND_BUF_SIZE
parameters specify sizes of socket buffers
associated with an Oracle Net connection. To ensure the continuous flow of data and
better utilization of network bandwidth, specify the I/O buffer space limit for receive and
send operations of sessions with the
RECV_BUF_SIZE
and
SEND_BUF_SIZE
parameters.
The
RECV_BUF_SIZE
and
SEND_BUF_SIZE
parameter values do not have to match, but
should be set according to your environment.
For best performance, the size of the send and receive buffers should be set large
enough to hold all the data that may be sent concurrently on the network connection.
For optimal network performance, these buffers should be set to at least the
bandwidth-delay product.
Use these parameters with caution as they affect network and system performance.
The default values for these parameters are operating system specific. The following
are the defaults for the Linux operating system:
•
SEND_BUF_SIZE
: 131,072 bytes (128k)
•
RECV_BUF_SIZE
: 174,700 bytes
These parameters are supported for TCP, TCP/IP with TLS, and SDPs. Additional
protocols may support these parameters on certain operating systems. The
Chapter 14
Configuring I/O Buffer Space
14-4

recommended values for these parameters are specified in the installation guide. Refer to
operating system specific documentation for additional information.
Note:
• The actual value of the
SEND_BUF_SIZE
and
RECV_BUF_SIZE
parameters may be
less than the value specified because of limitations in the host operating system
or due to memory constraints.
• It is important to consider the total number of concurrent connections that your
system must support and the available memory resources. The total amount of
memory consumed by these connections depends on the number of concurrent
connections and the size of their respective buffers.
• Configuring I/O Buffer Size on the Server
• Configuring I/O Buffer Space on the Client
Related Topics
• Oracle Call Interface Programmer's Guide
14.4.1 Configuring I/O Buffer Size on the Server
Because the database server writes data to clients, setting the SEND_BUF_SIZE parameter
on the server-side is typically adequate. If the database server is receiving large requests,
then also set the RECV_BUF_SIZE parameter.To configure the database server, set the
buffer space size in the
listener.ora
and
sqlnet.ora
files.
In the
listener.ora
file, specify the buffer space parameters for a particular protocol address
or for a description. The following is an example of the settings:
LISTENER=
(DESCRIPTION=
(ADDRESS=(PROTOCOL=tcp)(HOST=sales-server)(PORT=1521)
(SEND_BUF_SIZE=11784)
(RECV_BUF_SIZE=11784)
)
(ADDRESS=(PROTOCOL=ipc)(KEY=extproc)
(SEND_BUF_SIZE=11784)
(RECV_BUF_SIZE=11784)))
LISTENER2=
(DESCRIPTION=
(SEND_BUF_SIZE=8192)
(RECV_BUF_SIZE=16384)
(ADDRESS=(PROTOCOL=tcp)(HOST=sales-server)(PORT=1521)))
Although the preceding example has multiple addresses, the
ADDRESS_LIST
parameter was
not used. This is because the
ADDRESS_LIST
parameter is not mandatory.
The following is an example of the settings in the
sqlnet.ora
file:
RECV_BUF_SIZE=65536
SEND_BUF_SIZE=65536
• Setting the Buffer Size Parameter for Shared Server Processes
Chapter 14
Configuring I/O Buffer Space
14-5

14.4.1.1 Setting the Buffer Size Parameter for Shared Server Processes
If using shared server processes, then you can override the current settings obtained
from the server
sqlnet.ora
file by setting the buffer space parameters in the
DISPATCHERS initialization parameter as follows:
DISPATCHERS="(ADDRESS=(PROTOCOL=tcp)(SEND_BUF_SIZE=65536))"
14.4.2 Configuring I/O Buffer Space on the Client
To configure the client, set the buffer space size in the following locations in the
specified file:
• Setting only the RECV_BUF_SIZE parameter is typically adequate. If the client is
sending large requests, then also set the SEND_BUF_SIZE parameter. These
parameters are set in the client's
sqlnet.ora
file.
• For a particular connect descriptor, you can override the current settings in the
client
sqlnet.ora
file. You can specify the buffer space parameters for a particular
protocol address or description in the
tnsnames.ora
file similar to the following:
sales.us.example.com=
(DESCRIPTION=
(ADDRESS_LIST=
(ADDRESS=(PROTOCOL=tcp)(HOST=sales1-server)(PORT=1521)
(SEND_BUF_SIZE=11784)
(RECV_BUF_SIZE=11784))
(ADDRESS=(PROTOCOL=tcp)(HOST=sales2-server)(PORT=1521)
(SEND_BUF_SIZE=11784)
(RECV_BUF_SIZE=11784))
(CONNECT_DATA=
(SERVICE_NAME=sales.us.example.com)))
hr.us.example.com=
(DESCRIPTION=
(SEND_BUF_SIZE=8192)
(RECV_BUF_SIZE=8192)
(ADDRESS=(PROTOCOL=tcp)(HOST=hr1-server)(PORT=1521))
(CONNECT_DATA=
(SERVICE_NAME=hr.us.example.com)))
14.5 Configuring SDP Support for InfiniBand Connections
Oracle Net Services provides support for the Sockets Direct Protocol (SDP) for
InfiniBand high-speed networks.
SDP is a standard communication protocol for clustered server environments. SDP is
an interface between a network interface card and the application. By using SDP,
applications place most of the messaging burden upon the network interface card,
freeing the CPU for other tasks. As a result, SDP decreases network latency and CPU
utilization.
SDP is designed specifically for System Area Networks (SANs). A SAN is
characterized by short-distance, high-performance communications between multiple
server systems, such as Oracle WebLogic Server or any other third-party middle-tier
client and database servers clustered on one switch.
Chapter 14
Configuring SDP Support for InfiniBand Connections
14-6

Note:
Check with your individual vendor for their version compatibility with Oracle
Database 21c.
Visit the Oracle Technology Network for additional information about SDP support at
http://www.oracle.com/technetwork/index.html
The following sections describe how to set up Oracle Net support of SDP for middle tier and
database server communication. It contains the following topics:
• Prerequisites for Using SDP
• Configuring SDP on the Server
• Configuring SDP on the Client
See Also:
"Understanding Performance " for an overview of supported deployments
14.5.1 Prerequisites for Using SDP
Prior to configuring support for SDP, install the required hardware, and set up InfiniBand
hardware and software compatible with OpenFabrics Enterprise Distribution (OFED) 1.4 or
1.5 from a designated vendor on both the application web server and database server.
During installation of the InfiniBand software, identify the constant that defines SDP or the
address family for the system. This can be obtained from the operating system or OFED
documentation.
See Also:
Vendor documentation for installation information
14.5.2 Configuring SDP on the Server
To configure the database server, configure an SDP address in the
listener.ora
file on the
database server.
Chapter 14
Configuring SDP Support for InfiniBand Connections
14-7

Note:
If the SDP or address protocol family constant is not 27, the default value for
Oracle Net Services, then define the constant in the SDP.PF_INET_SDP
parameter in the
sqlnet.ora
file.
The following example shows an SDP endpoint that uses port number 1521 on the
computer
sales-server
.
LISTENER=
(DESCRIPTION=
(ADDRESS_LIST=
(ADDRESS=(PROTOCOL=sdp)(HOST=sales-server)(PORT=1521))
(ADDRESS=(PROTOCOL=tcp)(HOST=sales-server)(PORT=1521))
(ADDRESS=(PROTOCOL=ipc)(KEY=extproc))))
See Also:
"Creating a List of Listener Protocol Addresses"
14.5.3 Configuring SDP on the Client
Note:
If the SDP or address protocol family constant is not 27, the default value for
Oracle Net Services, then define the constant in the SDP.PF_INET_SDP
parameter in the
sqlnet.ora
file.
The following procedure describes how to configure the Oracle WebLogic Server
servers or third-party middle-tier client:
1. If configuring third-party middle-tier client, then upgrade the clients to use Oracle
Database 21c client software, as follows:
a. Run Oracle Universal Installer.
b. Select Oracle Database 21c Client from the Available Products page.
2. For both Oracle WebLogic Server servers and third-party middle-tier client, create
a network service name to connect to the database server, as follows:
• For Oracle WebLogic Server servers, specify a network service name that
uses the same TCP/IP protocol address configured in the
tnsnames.ora
file.
For example:
sales=
(DESCRIPTION=
(ADDRESS=(PROTOCOL=tcp)(HOST=sales-server)))
Chapter 14
Configuring SDP Support for InfiniBand Connections
14-8

(CONNECT_DATA=
(SERVICE_NAME=sales.us.example.com)))
• For third-party middle-tier clients, specify a network service name that uses the same
SDP address configured in the
tnsnames.ora
file.
For example:
sales=
(DESCRIPTION=
(ADDRESS=(PROTOCOL=sdp)(HOST=sales-server)))
(CONNECT_DATA=
(SERVICE_NAME=sales.us.example.com)))
See Also:
Configuring Naming Methods for additional information about creating
connect descriptors
14.6 Configuring Exadirect Support for InfiniBand Connections
Oracle Net Services provides support for the Exadirect for InfiniBand high-speed networks..
Use the new transport to improve latency and throughput by leveraging Remote Direct
Memory Access (RDMA) in an InfiniBand environment
Exadirect protocol uses TCP for control communication and IB RC transport for data. The
Exadirect protocol adapter is supported only on Oracle Linux in this release.
Note:
Exadirect does not support DRCP.
The following sections describe how to set up Oracle Net support of Exadirect for middle tier
and database server communication.
• Prerequisites for Using Exadirect
• Configuring Exadirect on the Server
To configure the database server, configure an Exadirect address in the
listener.ora
file on the database server.
• Configuring Exadirect on the Client
Specify a network service name that uses the same Exadirect address that is configured
in the
tnsnames.ora
file.
14.6.1 Prerequisites for Using Exadirect
Exadirect can be used as a transport protocol between Exadata nodes. The Exadata version
must be 12.1.2.3.3 or higher for Exadirect to work.
Chapter 14
Configuring Exadirect Support for InfiniBand Connections
14-9

14.6.2 Configuring Exadirect on the Server
To configure the database server, configure an Exadirect address in the
listener.ora
file on the database server.
Configure
enable_exadirect_listener_name=on
parameter in
listener.ora
file.
The following example shows an Exadirect endpoint that uses port number
1522
on
the computer having IB interface as
192.168.10.1
.
LISTENER
=
(DESCRIPTION=
(ADDRESS_LIST=
(ADDRESS=(PROTOCOL=exadirect)(HOST=192.168.10.1)(PORT=1522))
(ADDRESS=(PROTOCOL=tcp)(HOST=sales-server)(PORT=1521))
(ADDRESS=(PROTOCOL=ipc)(KEY=extproc))))
ENABLE_EXADIRECT_LISTENER=on
Note:
To enable Exadirect flow control, set
exadirect_flow_control=on
in
sqlnet.ora
file. This is a negotiated parameter and should be set in both the
server and the client
sqlnet.ora
file.
EXADIRECT_RECVPOLL
parameter
specifies the time that a receiver polls for incoming data. Exadirect adapter
uses HugePages.
14.6.3 Configuring Exadirect on the Client
Specify a network service name that uses the same Exadirect address that is
configured in the
tnsnames.ora
file.
Enable Exadirect flow control by setting
exadirect_flow_control=on
in
sqlnet.ora
file.
(DESCRIPTION=
(ADDRESS=(PROTOCOL=exadirect)(HOST=192.168.10.1)(port=1522))
(CONNECT_DATA=
(SERVICE_NAME=sales.us.example.com)))
14.7 Limiting Resource Consumption by Unauthorized
Users
Unauthorized access to the listener or database server can result in denial-of-service
attacks, whereby an unauthorized client attempts to block authorized users' ability to
access and use the system when needed. Malicious clients may attempt to flood the
listener or database server with connect requests that have the sole purpose of
Chapter 14
Limiting Resource Consumption by Unauthorized Users
14-10

consuming resources, such as connections, processes, or threads. To mitigate these types of
attacks, configure limits that constrain the time in which resources can be held prior to
authentication. Client attempts to exceed the configured limits result in connection
terminations and an audit trail containing the IP address of the client being logged.
To limit the resource consumption by unauthorized users and enable the audit trail, set time-
limit values for the parameters described in Table 14-1. These parameters do not have
default values.
Table 14-1 Connect-Timeout Parameters
Parameter File Description
INBOUND_CONNECT_TIM
EOUT_listener_name
listener.ora
The time, in seconds, for the client to complete its connect
request to the listener after the network connection had been
established.
If the listener does not receive the client request in the time
specified, then it terminates the connection. In addition, the
listener logs the IP address of the client and an ORA-12525:
Listener Has Not Received Client's Request in Time Allowed
error message to the
listener.log
file.
SQLNET.INBOUND_CONN
ECT_TIMEOUT
sqlnet.ora
on
the database
server
The time, in seconds, for a client to connect with the database
server and provide the necessary authentication information.
If the client fails to establish a connection and complete
authentication in the time specified, then the database server
terminates the connection. In addition, the database server logs
the IP address of the client and an ORA-12170: Connect Timeout
Occurred error message to the
sqlnet.log
file. The client
receives either an ORA-12547: TNS:lost contact, or an
ORA-12637: Packet receive failed error message.
When specifying values for these parameters, consider the following recommendations:
• Set both parameters to an initial low value.
• Set the value of the INBOUND_CONNECT_TIMEOUT_listener_name parameter to a
lower value than the SQLNET.INBOUND_CONNECT_TIMEOUT parameter.
For example, you can set INBOUND_CONNECT_TIMEOUT_listener_name to 2 seconds
and INBOUND_CONNECT_TIMEOUT parameter to 3 seconds. If clients are unable to
complete connections within the specified time due to system or network delays that are
normal for the particular environment, then increment the time as needed.
See Also:
• "Resolving the Most Common Error Messages for Oracle Net Services" for a
description of error message workarounds
• "Analyzing Listener Log Files" for additional information about entries in the
listener.log
file
• "About Advanced Profile Information" for additional information about
configuring these parameters
Chapter 14
Limiting Resource Consumption by Unauthorized Users
14-11

14.8 Configuring Key-Based Routing for Client-Server
Connections
Learn how to establish client-server connections in a sharded database by using key-
based (or direct) routing. In key-based routing to a shard, a connection is established
to a single, relevant shard that contains the data pertinent to the required transaction
using a sharding key.
• About Key-Based Routing
• Specifying a Sharding Key in the Connect String
You can directly connect to shards by specifying a sharding key in the
CONNECT_DATA
section of a connect string or
tnsnames.ora
file. You can also
specify shard directors (as endpoints), global service name, and region name for
your sharding deployment.
14.8.1 About Key-Based Routing
Oracle Sharding enables you to horizontally partition data across multiple,
independent Oracle databases. Each physical database in such a configuration is
called a shard. Sharded table partitions are distributed across shards at the tablespace
level, based on a sharding key. Examples of keys include customer ID, account
number, and country ID. With key-based or direct routing, a database connection is
established directly from the client to a shard according to the value of the sharding
key specified in the connect string.
A shard director is a specific implementation of a Global Service Manager (GSM) that
acts as a regional listener for clients that connect to a sharded database. Based on the
sharding key passed during a connection request, the shard director establishes a
connection to an appropriate shard as follows:
• The shard director performs a lookup for the service and key value, and then
redirects the client to a shard containing the data.
• The client runs a SQL statement and receives results directly from the shard.
Direct routing assumes that all the database requests that are issued within a
connection are related to the data associated with the specified key value. If a client
needs to access data with a different key value, then it must establish a new database
connection.
The connect string contains a single sharding key if an Oracle Database is sharded by
consistent hash, list, or range. Oracle Database also supports composite sharding that
enables two levels of sharding. First the data is sharded by list or range and then it is
further sharded by consistent hash. In composite sharding method, the connect string
contains both a sharding key (for sharding by consistent hash) and a super sharding
key (for sharding by list or range).
Related Topics
• Using Oracle Sharding
• Oracle Database Global Data Services Concepts and Administration Guide
Chapter 14
Configuring Key-Based Routing for Client-Server Connections
14-12

14.8.2 Specifying a Sharding Key in the Connect String
You can directly connect to shards by specifying a sharding key in the
CONNECT_DATA
section
of a connect string or
tnsnames.ora
file. You can also specify shard directors (as endpoints),
global service name, and region name for your sharding deployment.
Specify a shard (partition) key value using one of the following parameters:
•
SHARDING_KEY
: To specify a sharding key for a particular shard in simplified text format.
•
SUPER_SHARDING_KEY
: To specify a shardspace key for a collection of shards in simplified
text format.
•
SHARDING_KEY_B64
: To specify a sharding key for a particular shard in base64-encoded
binary format.
•
SUPER_SHARDING_KEY_B64
: To specify a shardspace key for a collection of shards in
base64-encoded binary format.
The connect string must be in the format required to connect to a global service.
SHARDING_KEYSUPER_SHARDING_KEY
(DESCRIPTION=
(FAILOVER=on)
(ADDRESS_LIST=
(LOAD_BALANCE=ON)
(ADDRESS=(host=sales-east1)(port=1522))
(ADDRESS=(host=sales-east2)(port=1522))
(ADDRESS=(host=sales-east3)(port=1522)))
(ADDRESS_LIST=
(LOAD_BALANCE=ON)
(ADDRESS=(host=sales-west1)(port=1522))
(ADDRESS=(host=sales-west2)(port=1522))
(ADDRESS=(host=sales-west3)(port=1522)))
(CONNECT_DATA=
(SERVICE_NAME=sales)
(SHARDING_KEY=40598230)(SUPER_SHARDING_KEY=gold)
(REGION=east))
)
Related Topics
• Using Oracle Sharding
• SHARDING_KEY
• SUPER_SHARDING_KEY
Chapter 14
Configuring Key-Based Routing for Client-Server Connections
14-13


15
Testing Connections
After you have configured the network, you should connect and test each component to
ensure that the network is functioning properly. Oracle Net Services provides tools to help
you test the listener, database, and Oracle Connection Manager.
• Testing the Network
• Using the TNSPING Utility to Test Connectivity from the Client
• Using the TRCROUTE Utility to Test Connectivity from the Client
15.1 Testing the Network
The following is the recommended sequence for testing the network:
1. Start and test each listener. To start the listener, use the procedure described in "Starting
Oracle Net Listener and the Oracle Database Server".
To test a listener, initiate a connection from a client to any active database controlled by
that listener.
2. Start and test each Oracle Connection Manager, if included in your network. To start
Oracle Connection Manager, use the procedure described in "Starting Oracle Connection
Manager".
To test Oracle Connection Manager, initiate a connection from a client to any active
database that has been registered with Oracle Connection Manager.
3. Test the server with a loopback test or Oracle Net Manager.
A loopback test uses Oracle Net to go from the database server back to itself, bypassing
the Interprocess Communication (IPC). Performing a successful loopback verifies that
Oracle Net is functioning on the database server. The following procedure describes how
to perform a loopback test using Oracle Net Manager:
a. Start Oracle Net Manager.
See Also:
"Using Oracle Net Manager to Configure Oracle Net Services"
b. In the navigator, expand Directory or Local, and then select Service Naming.
c. Select the network service name or database service.
d. Choose Command, and then select Test Net Service.
Testing assumes the listener and database are running. If they are not, then see
"Starting Oracle Net Listener and the Oracle Database Server" to start components.
During testing, a Connection Test dialog box appears, providing status and test
results. A successful test results in the following message:
15-1

The connection test was successful.
If the test was successful, then proceed to step 3.e.
If the test was not successful, then use the error message to determine further
action. For example, if the error message is the following:
Attempting to connect using userid: scott
The test did not succeed.
ORA-28000: the account is locked
There may be an error in the fields entered,
or the server may not be ready for a connection.
Change the user name to an account known to be unlocked. To change the
user name, click Change Login. You are prompted for the password.
e. Click Close to close the Connect Test dialog box.
4. Test client with a connection.
To test several different clients in your network, initiate a connection to a database
server from each of them using the following command:
CONNECT
username
@
connect_identifier
15.2 Using the TNSPING Utility to Test Connectivity from the
Client
The TNSPING utility determines whether the listener for a service on an Oracle Net
network can be reached successfully.
If you can connect successfully from a client to a server (or a server to another server)
using the TNSPING utility, then it displays an estimate of the round trip time (in
milliseconds) it takes to establish a SQLNET connection to the Oracle listener
corresponding to the server.
If it fails, then it displays a message describing the error that occurred. This enables
you to see the network error that is occurring without the overhead of a database
connection.
Use the following command to test connectivity:
tnsping
net_service_name
count
In the preceding command, the following arguments are used:
• net_service_name must exist in
tnsnames.ora
file or the name service in use,
such as NIS.
• count determines how many times the program attempts to reach the server. This
argument is optional.
If the network service name specified is a database name, then TNSPING attempts to
contact the corresponding listener. It does not actually determine whether the
database is running. Use SQL*Plus to attempt a connection to the database.
The following are some examples of TNSPING.
Chapter 15
Using the TNSPING Utility to Test Connectivity from the Client
15-2

Note:
Different platforms may have different interfaces, but the program accepts the same
arguments. Invoke TNSPING for the display of the proper interface requirements.
Example 15-1 is an example of checking a listener for a database using a network service
name of
sales
using the
TNSPING
command.
Example 15-1 Checking a Listener with TNSPING
TNSPING sales
This produces the following message:
TNS Ping Utility for Linux: Version 21.1.0.0.0 - Production on 21-JAN-2020
Copyright (c) 1997, 2020 Oracle Corporation. All rights reserved.
Used parameter files:
Used TNSNAMES adapter to resolve the alias
Attempting to contact (DESCRIPTION = (ADDRESS_LIST = (ADDRESS = (PROTOCOL =
TCP)(HOST = sales-server)(PORT = 1521))) (CONNECT_DATA = (SERVICE_NAME =
sales.us.example.com)))
OK (10 msec)
To determine whether the listener for the
sales
database is available, and to specify that
TNSPING try to connect eight times and then give up, use the following syntax:
tnsping sales 8
This command produces the following message:
TNS Ping Utility for Linux: Version 21.1.0.0.0 - Production on 21-JAN-2020
Copyright (c) 1997, 2020 Oracle Corporation. All rights reserved.
Used parameter files:
Used TNSNAMES adapter to resolve the alias
Attempting to contact (DESCRIPTION = (ADDRESS_LIST = (ADDRESS = (PROTOCOL =
TCP)(HOST = sales-server)(PORT = 1521))) (CONNECT_DATA = (SERVICE_NAME =
sales.us.example.com)))
OK (10 msec)
OK (0 msec)
OK (10 msec)
OK (0 msec)
OK (10 msec)
OK (10 msec)
OK (10 msec)
OK (0 msec)
Example 15-2 is an example of TNSPING attempting to check using an invalid network
service name.
Example 15-2 Checking an Invalid Net Service Name with TNSPING
tnsping badname
This attempt produces the following message:
Chapter 15
Using the TNSPING Utility to Test Connectivity from the Client
15-3

TNS Ping Utility for Linux: Version 21.1.0.0.0 - Production on 21-MAY-2020
Copyright (c) 1997, 2020 Oracle Corporation. All rights reserved.
Used parameter files:
TNS-03505: Failed to resolve name
Example 15-3 is an example of output when using TNSPING to check a name that is
valid, but resolves to an address where no listener is located, for example, the listener
may not be started.
Example 15-3 Checking Valid Net Service Name but No Listener with TNSPING
tnsping sales
TNS Ping Utility for Linux: Version 21.1.0.0.0 - Production on 21-JAN-2020
Copyright (c) 1997, 2020 Oracle Corporation. All rights reserved.
Used parameter files:
Used TNSNAMES adapter to resolve the alias
Attempting to contact (DESCRIPTION = (ADDRESS_LIST = (ADDRESS = (PROTOCOL =
TCP)(HOST = sales-server)(PORT = 1521))) (CONNECT_DATA = (SERVICE_NAME =
sales.us.example.com)))
TNS-12541: TNS:no listener
15.3 Using the TRCROUTE Utility to Test Connectivity from
the Client
The Trace Route Utility (TRCROUTE), in Linux and UNIX environments, enables
administrators to discover the path or route a connection takes from a client to a
server. If TRCROUTE encounters a problem, then it returns an error stack to the client
instead of a single error. These additional error messages make troubleshooting
easier.
TRCROUTE is different from TNSPING in that it travels as a special type of connect
packet, and is routed as such. As it travels toward its destination, the TRCROUTE
connect packet collects the TNS addresses of every node it travels through. If an error
occurs, then TRCROUTE collects error information that shows where the error
occurred. The TRCROUTE displays the information collected on the client screen. You
can redirect the TRCROUTE output to a file, and print it.
The TRCROUTE uses minimal resources. It gathers information in the connect data of
a special connect packet. Standard connect packets are not affected.
The server is not affected by TRCROUTE. The listener receives and processes the
TRCROUTE connect packet. It returns the information to the client by putting it into a
refuse packet. The server does not need to start any new processes or deal with
dummy connections.
To use the TRCROUTE utility, enter the following command:
trcroute
net_service_name
Example 15-4 shows a successful trace route packet that traveled from a client to a
listener.
Chapter 15
Using the TRCROUTE Utility to Test Connectivity from the Client
15-4

Example 15-4 Successful Trace Route
trcroute sales
Trace Route Utility for Linux: Version 21.1.0.0.0 - Production on 21-JAN-2020
Copyright (c) 1999, 2020 Oracle Corporation. All rights reserved.
Route of TrcRoute:
------------------
Node: Client Time and address of entry into node:
-------------------------------------------------------------
09-NOV-2012 21:48:48 ADDRESS= PROTOCOL=TCP HOST=10.150.21.136 PORT=14001
Node: Server Time and address of entry into node:
-------------------------------------------------------------
09-NOV-2012 21:48:05 ADDRESS= PROTOCOL=TCP HOST=10.150.21.136 PORT=14001
Example 15-5 shows an unsuccessful trace route packet that could not reach the listener
because the listener was not up.
Example 15-5 Trace Route with Error
trcroute sales
Trace Route Utility for Linux: Version 21.1.0.0.0 - Production on 21-JAN-2020
Copyright (c) 1999, 2020 Oracle Corporation. All rights reserved.
Route of TrcRoute:
------------------
Node: Client Time and address of entry into node:
-------------------------------------------------------------
25-FEB-2012 14:43:05 ADDRESS= PROTOCOL=TCP HOST=sales-server PORT=1521
TNS-12543: TNS:unable to connect to destination
TNS-12541: TNS:no listener
TNS-12560: TNS:protocol adapter error
TNS-03601: Failed in route information collection
Chapter 15
Using the TRCROUTE Utility to Test Connectivity from the Client
15-5

16
Troubleshooting Oracle Net Services
Oracle Net Services provides methods for understanding, testing and resolving network
problems. Oracle Database includes utilities, and log and trace files for testing and
diagnosing network connection and problems. The TNSPING and TRCROUTE utilities test
connectivity. The log and trace files keep track of the interaction between network
components as errors occur. Evaluating this information helps to diagnose and troubleshoot
network problems.
Understand the common testing procedures and network errors, and outline procedures for
resolving problems. Also, learn methods for logging and tracing error information to diagnose
and troubleshoot more complex network problems.
• Understanding Automatic Diagnostic Repository
• Diagnosing Oracle Net Services
Any underlying fault, noticeable or not, is reported by Oracle Net Services with an error
number or message. The error number and message provide useful information for
diagnosing the problem, but may not always identify the actual problem.
• Resolving the Most Common Error Messages for Oracle Net Services
• Troubleshooting Suggestions for Oracle Net Services
These are the suggestions for diagnosing network problems and troubleshooting Oracle
Connection Manager in Traffic Director Mode.
• Example of Troubleshooting a TNS-12154 Error
• Logging Error Information for Oracle Net Services
• Tracing Error Information for Oracle Net Services
• Contacting Oracle Support Services
16.1 Understanding Automatic Diagnostic Repository
The Automatic Diagnostic Repository (ADR) (ADR) is a systemwide tracing and logging
central repository. The repository is a file-based hierarchical data store for depositing
diagnostic information, including network tracing and logging information.
The ADR home is the unit of the ADR directory that is assigned to an instance of an Oracle
product. Each database instance has its own ADR home. Similarly, each listener, Oracle
Connection Manager, and client instance has its own ADR home.
In case of a process failure, an incident is generated. The incident dump files are located in
the
ADR_BASE/ADR_HOME/incident/
directory, By default, ADR_BASE is ORACLE_BASE if
the ORACLE_BASE variable is set. If the variable is not set, then ADR_BASE is
ORACLE_HOME/log
. ADR_BASE can be set to any location.
The incident dump file location can be found inside the process trace file.
The location of an ADR home is given by the following path, which starts at the ADR base
directory:
16-1

diag/
product_type
/
product_id
/
instance_id
The following table lists the values of the path components for an Oracle Net Listener
instance.
Table 16-1 ADR Home Path Components for an Oracle Net Listener Instance
Path Component Value for Oracle Net Listener
product_type tnslsnr
product_id host name
instance_id listener alias name
The following figure illustrates the directory hierarchy of the ADR for an Oracle Net
Listener instance. Other ADR homes for other Oracle products or components, such
as Automatic Storage Management (ASM) or Oracle Database, can exist within this
hierarchy, under the same ADR base.
Figure 16-1 Directory Structure for an Oracle Net Listener Instance
diag
tnslsnr
alert cdump incident trace (others)
ADR
base
ADR
home
host_name
listener_alias_name
The following table lists the values of the path components for an Oracle Connection
Manager instance.
Table 16-2 ADR Home Path Components for an Oracle Connection Manager
Instance
Path Component Value for Oracle Connection Manager
product_type netcman
product_id host name
instance_id Oracle Connection Manager instance name
Chapter 16
Understanding Automatic Diagnostic Repository
16-2

The following figure illustrates the directory hierarchy of the ADR for an Oracle Connection
Manager instance. Other ADR homes for other Oracle products or components, such as
Oracle ASM or Oracle Database, can exist within this hierarchy, under the same ADR base.
Figure 16-2 Directory Structure for an Oracle Connection Manager Instance
diag
netcman
alert cdump incident trace (others)
ADR
base
ADR
home
host_name
cman_instance_name
Within the ADR home directory are subdirectories where each instance, such as the
database, listener, Oracle Connection Manager, or client, stores diagnostic data. The
following table lists all the subdirectories shown in the preceding figure and their contents.
Table 16-3 ADR Home Subdirectories
Subdirectory Name Contents
alert
The XML-formatted log named
log.xml
.
cdump
Core files.
incident
Multiple subdirectories, in which each subdirectory is named for a
particular incident, and each contains dumps pertaining only to that
incident.
trace
Background and server process trace files, SQL trace files, and text
version of the
log.xml
file in the alert directory.
(others)
Other subdirectories of ADR home, which store incident packages,
health monitor reports, and other information.
The
ADR_BASE
directory is the physical location in which one or more ADR homes are placed.
Conceptually, it is the root directory of ADR.
Non-ADR (meaning that the DIAG_ADR_ENABLED parameter is set to
OFF
) diagnostic and
tracing methods are still current and applicable but the parameters are ignored if ADR is
enabled. ADR is enabled by default.
Diagnostic parameters are found in the following configuration files:
Chapter 16
Understanding Automatic Diagnostic Repository
16-3

•
sqlnet.ora
for clients
•
listener.ora
for listeners
•
cman.ora
for Oracle Connection Managers
The following table compares usage of diagnostic parameters found in the
sqlnet.ora
file used in both ADR-based and non-ADR-based diagnostics.
Table 16-4 sqlnet.ora File Diagnostic Parameter Comparison
Parameter DIAG_ADR_ENABL
ED=ON
DIAG_ADR_ENABL
ED=OFF
ADR_BASE Enabled Disabled
TRACE_LEVEL_CLIENT Enabled Enabled
TRACE_LEVEL_SERVER Enabled Enabled
TRACE_DIRECTORY_CLIENT Disabled Enabled
TRACE_FILE_CLIENT Disabled Enabled
TRACE_UNIQUE_CLIENT Disabled Enabled
LOG_DIRECTORY_CLIENT Disabled Enabled
LOG_FILE_CLIENT Disabled Enabled
LOG_DIRECTORY_SERVER Disabled Enabled
TRACE_DIRECTORY_SERVER Disabled Enabled
TRACE_FILE_SERVER Disabled Enabled
The following table compares usage of diagnostic parameters found in the
listener.ora
file used in both ADR-based and non-ADR-based diagnostics.
Table 16-5 listener.ora File Diagnostic Parameter Comparison
Parameter DIAG_ADR_ENABL
ED=ON
DIAG_ADR_ENABL
ED=OFF
ADR_BASE_listener_name Enabled Disabled
LOGGING_listener_name Enabled Enabled
TRACE_LEVEL_listener_name Enabled Enabled
TRACE_TIMESTAMP_listener_name Enabled Enabled
LOG_DIRECTORY_CLIENT_listener_name Disabled Enabled
LOG_FILE_CLIENT_listener_name Disabled Enabled
TRACE_DIRECTORY_CLIENT_listener_name Disabled Enabled
TRACE_FILELEN_listener_name Disabled Enabled
TRACE_FILENO_listener_name Disabled Enabled
Table 16-6 compares usage of diagnostic parameters found in the
cman.ora
file used
in both ADR-based and non-ADR-based diagnostics.
Chapter 16
Understanding Automatic Diagnostic Repository
16-4

Table 16-6 cman.ora File Diagnostic Parameter Comparison
Parameter DIAG_ADR_ENABLE
D=ON
DIAG_ADR_ENABLE
D=OFF
ADR_BASE Enabled Disabled
LOG_LEVEL Enabled Enabled
TRACE_LEVEL Enabled Enabled
TRACE_TIMESTAMP Enabled Enabled
LOG_DIRECTORY Disabled Enabled
TRACE_DIRECTORY Disabled Enabled
TRACE_FILELEN Disabled Enabled
TRACE_FILENO Disabled Enabled
• ADRCI: ADR Command Interpreter
See Also:
• Oracle Call Interface Programmer's Guide for additional information about the
location of the client ADR Home
• Oracle Database Administrator's Guide for additional information about ADR
• Oracle Database Net Services Reference for descriptions of the diagnostic
parameters
16.1.1 ADRCI: ADR Command Interpreter
ADRCI is a command-line tool that is part of the fault diagnosability infrastructure. ADRCI
enables you to do the following:
• View diagnostic data within ADR
• Package incident and problem information into a zip file for transmission to Oracle
Support Services
Diagnostic data includes incident and problem descriptions, trace files, dumps, health monitor
reports, alert log entries, and so on.
ADRCI has a rich command set, and can be used in interactive mode or within scripts. In
addition, ADRCI can run scripts of ADRCI commands in the same way that SQL*Plus runs
scripts with SQL and PL/SQL commands.
To view trace files using ADRCI, enter
ADRCI
at a command line. The following are common
ADRCI commands used to check a client:
Client Side
adrci> SHOW ALERT
adrci> SHOW BASE -product client
adrci> SET BASE -product
client
Chapter 16
Understanding Automatic Diagnostic Repository
16-5

adrci> SHOW TRACEFILE
adrci> SHOW TRACE
trace_file
.trc
adrci> SHOW SPOOL
In the preceding commands, the
SHOW ALERT
command shows the
log.xml
file in a text
editor, such as VI. The
SHOW BASE -product client
command displays the value of
the
ADR_BASE
directory for the client. Use that value for client in the
SET BASE
command.
The following are common ADRCI commands used to check a server:
Server Side
adrci> SHOW BASE
adrci> SHOW TRACEFILE
adrci> SHOW TRACE
trace_file
.trc
Other ADRCI command options are available for a more targeted Oracle Net trace file
analysis. Type
HELP
at the ADRCI prompt for help documentation.
See Also:
Oracle Database Utilities for additional information about ADRCI
16.2 Diagnosing Oracle Net Services
Any underlying fault, noticeable or not, is reported by Oracle Net Services with an error
number or message. The error number and message provide useful information for
diagnosing the problem, but may not always identify the actual problem.
This section helps you determine the parts of Oracle Net Services that function
properly. You can also determine one of the following categories to which the fault
belongs:
• Oracle software
• Operating system layer
• Other network layers
Testing the various network layers progressively should, in most cases, uncover any
problem.
Starting with Oracle Database 21c, a connection identifier is available for each network
connection. The connection identifier uniquely identifies a connection in trace and logs
of different network elements and helps in correlating diagnostic data from these
elements.
When a SQL*Net connection has multiple hops, such as from a client to Oracle
Connection Manager (CMAN) and then to a server, correlating diagnostic information
from the existing logs and traces becomes difficult. However, with the availability of a
connection identifier, you can correlate diagnostics, track network data traffic, and
resolve connectivity errors.
Chapter 16
Diagnosing Oracle Net Services
16-6

The connection identifier consists of two components, namely,
CONNECTION_ID
and
CONNECTION_ID_PREFIX
. The
CONNECTION_ID
parameter contains a unique value, which is
generated when the connection originates at the client. The
CONNECTION_ID_PREFIX
is an
application specific prefix parameter that is added to the connection identifier.
• Diagnosing Server Problems
• Diagnosing Client Problems
16.2.1 Diagnosing Server Problems
To start diagnosing server problems, you should answer the following questions:
• Is any other system such as a workstation or server able to connect to the server using
Oracle Net?
• Has the server, database, or listener configuration remained the same for some time?
If you answered yes to either of the preceding questions, then go to "Diagnosing Client
Problems".
If you are unsure, or answered no to any of the preceding questions, then use the tasks in
this section to diagnose the problem. Diagnosing Oracle Net Services on the server involves
the following tasks:
• Task 1, Verify the Database is Running
• Task 2, Perform a Loopback Test
Task 1 Verify the Database is Running
To check that the database is up, log in to the database and connect with a valid username
and password. For example:
SQLPLUS system
Enter password:
password
A message appears, confirming that you are connected with the database. If you receive the
following errors, then ask the database administrator to assist you:
•
ORA-1017: invalid U/P
•
ORA-1034: Oracle not available
Task 2 Perform a Loopback Test
A loopback test uses Oracle Net to go from the database server back to itself, bypassing the
Interprocess Communication (IPC) protocol. Many network protocols provide a means of
testing network connections. The PING utility can be used with a TCP/IP network.
Performing a successful loopback verifies that Oracle Net is functioning on the database
server.
The following procedure describes how to perform a loopback test from the server to the
database:
1. Ensure that the
listener.ora
,
tnsnames.ora
, and
sqlnet.ora
files exist in the correct
locations, as described in "Using Localized Management".
2. Start Oracle Net Manager.
Chapter 16
Diagnosing Oracle Net Services
16-7

See Also:
"Using Oracle Net Manager to Configure Oracle Net Services"
3. In the navigator, expand the Directory or Local option.
4. Expand Service Naming to view the available network service and database
names.
5. Select the network service name or database service.
6. Choose Command, and then select Test Net Service.
Testing assumes the listener and database are running. If they are not, then see
"Starting Oracle Net Listener and the Oracle Database Server" to start
components.
During testing, a Connection Test dialog box appears, providing status and test
results. A successful test results in the following message:
The connection test was successful.
If the test was successful, then proceed to step 7.
If the test was not successful, then do the following:
a. Ensure the database and listener are running, and then click Test.
b. Click Change Login to change the username and password for the
connection, and then click Test.
• If the loopback test passes, then go to "Diagnosing Client Problems".
• If the loopback test continues to fail, then contact Oracle Support Services.
7. Click Close to close the Connect Test dialog box.
16.2.2 Diagnosing Client Problems
Verify at least one of the following statements. This will help you decide if it is a client
problem.
• The database server passed a loopback test, showing the connection worked.
• Other computers connect using Oracle Net Services to the same database.
• Connections from this workstation worked before making changes on this
computer, such as the installation of a new product or modification to the network
configuration.
The following procedure describes how to perform diagnostics on the client:
1. Check that you have installed the same protocol support that was installed on the
database server.
On Linux and UNIX platforms you can use the
ADAPTERS
utility to verify protocol
support. On the database server, run the following command from the
ORACLE_HOME/bin
directory to display the protocol support, naming methods, and
security options linked with the
oracle
executable:
adapters ./oracle
Chapter 16
Diagnosing Oracle Net Services
16-8

The
adapters
utility displays output similar to the following:
Installed Oracle Net transport protocols are:
IPC
BEQ
TCP/IP
SSL
RAW
SDP/IB
Installed Oracle Net naming methods are:
Local Naming (tnsnames.ora)
Oracle Directory Naming
Oracle Host Naming
NIS Naming
Installed Oracle Advanced Security options are:
RC4 40-bit encryption
RC4 56-bit encryption
RC4 128-bit encryption
RC4 256-bit encryption
DES40 40-bit encryption
DES 56-bit encryption
3DES 112-bit encryption
3DES 168-bit encryption
AES 128-bit encryption
AES 192-bit encryption
AES 256-bit encryption
MD5 crypto-checksumming
SHA crypto-checksumming (for FIPS)
SHA-1 crypto-checksumming
Kerberos v5 authentication
RADIUS authentication
On the client, run the
adapters
command from the
ORACLE_HOME/bin
directory to display
the configured Oracle protocol support, naming methods, and security options. The
ADAPTERS
utility displays output similar to the following:
Installed Oracle Net transport protocols are:
IPC
BEQ
TCP/IP
SSL
RAW
SDP/IB
Exadirect
Installed Oracle Net naming methods are:
Local Naming (tnsnames.ora)
Oracle Directory Naming
Oracle Host Naming
Installed Oracle Advanced Security options are:
RC4 40-bit encryption
RC4 56-bit encryption
Chapter 16
Diagnosing Oracle Net Services
16-9

RC4 128-bit encryption
RC4 256-bit encryption
DES40 40-bit encryption
DES 56-bit encryption
3DES 112-bit encryption
3DES 168-bit encryption
AES 128-bit encryption
AES 192-bit encryption
AES 256-bit encryption
MD5 crypto-checksumming
SHA-1 crypto-checksumming
Kerberos v5 authentication
RADIUS authentication
Note:
• The
DES
,
DES40
,
3DES 112
,
3DES 168
,
RC4 40
,
RC4 56
,
RC4 128
,
RC4
256
, and
MD5
algorithms are deprecated in this release.
To transition your Oracle Database environment to use stronger
algorithms, download and install the patch described in My Oracle
Support note 2118136.2.
• RAW is an internal protocol used by Oracle Net.
See Also:
Oracle Database Administrator's Reference for additional information
about the
adapters
utility
2. Check base connectivity for underlying network transport. Oracle Net technology
depends on the underlying network for a successful connection.
Table 16-7 Verify Base Connectivity for Network Transport
Protocol Verify that you can...
TCP/IP Use terminal emulation or file transfer utilities, (PING, FTP,
TELNET) from the client to the database server.
Named Pipes • See other computers or servers on the Microsoft network.
• Ensure that you are able to share drives within the network.
3. Ensure that the Oracle Net foundation layer and the appropriate Oracle protocol
support are present by verifying that all Oracle Net Services software has been
installed for the client.
4. Ensure that the client computer has the
tnsnames.ora
and the
sqlnet.ora
files in
the correct locations.
Chapter 16
Diagnosing Oracle Net Services
16-10

See Also:
"Using Localized Management"
If any other working client computers are connecting to the selected Oracle Database,
then back up your existing files and copy both the working
tnsnames.ora
and
sqlnet.ora
files from the working client computer to the non-working clients. This eliminates the
possibility of errors in the files.
5. Test the Oracle Net foundation layer. You can test using the following command to
connect to SQL*Plus:
SQLPLUS
user
/
password
@
connect_string
Note:
Do not use the TNSPING utility. The TNSPING utility works like the TCP/IP ping
utility and does not create and open a socket, nor does it connect with the
listener. It only shows that the listener is present on the database server.
6. If the connection still fails, then do the following:
a. Use tracing, as described in section "Tracing Error Information for Oracle Net
Services".
b. Check the Oracle Support Services website for a specific diagnostics bulletin on the
error received.
c. Contact Oracle Support Services.
16.3 Resolving the Most Common Error Messages for Oracle
Net Services
Due to the complexity of network communications, network errors may originate from a
variety of sources, for a variety of reasons. If an error occurs, then applications such as
SQL*Plus, that depend on network services from Oracle Net Services, normally generate an
error message.
A list of the most common network error messages follows:
For information about the specific error messages, use the Oracle error tool
oerr
, by entering
the following command at any command line:
oerr
code
error_number
In the preceding command, code is the type of message, such as ORA and TNS, and
error_number is the number associated with the error message.
• ORA-03113: End-of-file on Communication Channel
• ORA-12154: Could Not Resolve the Connect Identifier Specified
• ORA-12170: Connect Timeout Occurred
Chapter 16
Resolving the Most Common Error Messages for Oracle Net Services
16-11

• TNS-12500 or ORA-12500: Listener Failed to Start a Dedicated Server Process
• ORA-12514: Listener Does Not Currently Know of Service Requested in Connect
Descriptor
• ORA-12520: Listener Could Not Find Available Handler for Requested Type of
Server
• ORA-12521: Listener Does Not Currently Know of Instance Requested in Connect
Descriptor
• ORA-12525: Listener Has Not Received Client's Request in Time Allowed
• ORA-12533: Illegal Address Parameters
• TNS-12540 or ORA-12540: TNS:Internal Limit Restriction Exceeded and
TNS-00510: Internal Limit Restriction Exceeded
• TNS-12541 or ORA-12541: TNS:No Listener
• TNS-12549 or ORA-12549: TNS:Operating System Resource Quota Exceeded
and TNS-00519: Operating System Resource Quota Exceeded
• TNS-12560 or ORA-12560: TNS:Protocol Adapter Error Occurred
• Directory Naming Errors
See Also:
Oracle Database Error Messages for a complete listing of error messages
16.3.1 ORA-03113: End-of-file on Communication Channel
This message indicates that an error has occurred on the database server.
Check the
alert_sid.log
file on the server. An unexpected end of file was processed
on the communication channel. This may be an indication that the communications link
may have gone down at least temporarily, or it may indicate that the server has gone
down.You may need to modify your retransmission count.
16.3.2 ORA-12154: Could Not Resolve the Connect Identifier
Specified
This message indicates that a connection to a database or other service was
requested using a connect identifier, and the connect identifier specified could not be
resolved into a connect descriptor using one of the naming methods configured. For
example, if the type of connect identifier used was a network service name then the
network service name could not be found in a naming method repository, or the
repository could not be located or reached.
Perform the following steps:
1. Check the type of naming adapters listed in the NAMES.DIRECTORY_PATH
parameter in the
sqlnet.ora
file. If none are configured, then use the
adapters
command to determine which adapters are in use. The following example shows
the adapters:
Chapter 16
Resolving the Most Common Error Messages for Oracle Net Services
16-12

$ adapters
...
Installed Oracle Net naming methods are:
Local Naming (tnsnames.ora)
Oracle Directory Naming
Oracle Host Naming
NIS Naming
The network service name given in the connect string should be defined for at least one
of the naming methods.
2. Check the resolution path for each adapter for possible problems. For example, ensure
that the name given in the connect string is correct and complete, using the full name of
the network service if necessary.
In addition to the preceding steps, perform the steps depending on your naming methods:
• ORA-12154 Error When Using the Local Naming Method
• ORA-12154 Error When Using the Directory Naming Method
• ORA-12154 Error When Using the Easy Connect Naming Method
• ORA-12154 Error When Using the External Naming Method
16.3.2.1 ORA-12154 Error When Using the Local Naming Method
Perform the following steps when using the local naming method:
1. Verify that the
tnsnames.ora
file exists and is in the correct location.
You can find the
tnsnames.ora
file in any of the following locations:
• The directory specified by the TNS_ADMIN environment variable, if it is set.
• The
ORACLE_BASE_HOME/network/admin
directory. If the file is not present in the
ORACLE_BASE_HOME/network/admin
directory, then look for the file in
ORACLE_HOME/
network/admin
directory.
2. Verify there is an entry in the
tnsnames.ora
file for the name given in the connect string.
This network service name should match the name in the
tnsnames.ora
file exactly if the
name is simple and there is not NAMES_DEFAULT_DOMAIN in the
sqlnet.ora
file, or
the network service name is a fully-qualified name. If the network service name in the
connect string is simple, then check the NAMES_DEFAULT_DOMAIN parameter in the
sqlnet.ora
file. Its value is appended to the network service name given in the connect
string. This fully-qualified name should be the entry in the
tnsnames.ora
file.
3. If you are connecting from a login dialog box, then verify that you are not placing an at
sign (@) before the connect network service name.
4. Activate client tracing, and repeat the operation.
16.3.2.2 ORA-12154 Error When Using the Directory Naming Method
Perform the following steps when using the directory naming method:
1. Verify the
ldap.ora
file exists and is in the correct location. The following directories are
searched for
ldap.ora
file in the order given. The
ldap.ora
file found will be used.
• The directory specified by the TNS_ADMIN environment variable.
Chapter 16
Resolving the Most Common Error Messages for Oracle Net Services
16-13

• The
ORACLE_BASE_HOME/network/admin
directory. If the file is not present in
the
ORACLE_BASE_HOME/network/admin
directory, then look for the file in
ORACLE_HOME/network/admin
directory.
• The directory specified by the LDAP_ADMIN environment variable.
• The
ORACLE_BASE_HOME/network/admin
directory for a read-only Oracle home.
• The
ORACLE_HOME/network/admin
directory for a read/write Oracle home.
2. Verify that the parameters defined in the
ldap.ora
file are correct, as follows:
• The DIRECTORY_SERVERS parameter defines the correct host and port for
one or more valid LDAP servers.
• The DEFAULT_ADMIN_CONTEXT parameter defines the location of the
Oracle Context in this directory which should include the network service entry.
If the
ldap.ora
file does not exist, then these parameters are resolved using
automatic discovery.
3. Verify that the LDAP server host and port are defined in DNS.
4. Verify that the directory has the default Oracle Context defined.
5. Use the ldapsearch utility or a directory administration tool to verify that the
network service object exists in the Oracle Context at the location given by the
value of the DEFAULT_ADMIN_CONTEXT parameter.
16.3.2.3 ORA-12154 Error When Using the Easy Connect Naming Method
Verify that the host name give is correct, and is defined in the local host name
resolution service, such as local hosts file, DNS, and so on.
16.3.2.4 ORA-12154 Error When Using the External Naming Method
Perform the following steps when using the external naming method:
1. Verify that the NIS file for
tnsnames
map is properly set up.
2. Check that the network service name matches the
tnsnames
entry as described in
"ORA-12154 Error When Using the Local Naming Method".
See Also:
• "Example of Troubleshooting a TNS-12154 Error" for additional
information about troubleshooting the error
• "Using Localized Management" for configuration file location information
• Configuring Naming Methods for naming information
16.3.3 ORA-12170: Connect Timeout Occurred
This message indicates that the client failed to establish a connection and complete
authentication in the time specified by the SQLNET.INBOUND_CONNECT_TIMEOUT
parameter in the
sqlnet.ora
file. This error may be a result of network or system
Chapter 16
Resolving the Most Common Error Messages for Oracle Net Services
16-14

delays, or it may indicate that a malicious client is trying to cause a denial-of-service attack
on the database server.
• If the error occurred due to system or network delays that are normal for the particular
environment, then perform the following steps:
1. Turn on tracing to determine which clients are timing out.
See Also:
"Tracing Error Information for Oracle Net Services"
2. Reconfigure the SQLNET.INBOUND_CONNECT_TIMEOUT,
SQLNET.SEND_TIMEOUT, or SQLNET.RECV_TIMEOUT parameters in the
sqlnet.ora
file to larger values.
• If you suspect a malicious client, then perform the following steps:
1. Restrict access to the client. You can configure parameters for access rights in the
sqlnet.ora
file.
2. Locate the IP address of the client in the
sqlnet.log
file on the database server to
identify the source. Keep in mind that an IP address can be forged.
For example, the following
sqlnet.log
excerpt shows a client IP address of
192.0.2.35
.
Fatal NI connect error 12170.
VERSION INFORMATION:
TNS for Linux: Version 21.1.0.0.0
Oracle Bequeath NT Protocol Adapter for Linux: Version 21.1.0.0.0
TCP/IP NT Protocol Adapter for Linux: Version 21.1.0.0.0
Time: 03-JAN-2020 13:51:12
Tracing to file: /ora/trace/svr_13279.trc
Tns error struct:
nr err code: 0
ns main err code: 12637
TNS-12637: Packet receive failed
ns secondary err code: 12604
nt main err code: 0
nt secondary err code: 0
nt OS err code: 0
Client address: (ADDRESS=(PROTOCOL=tcp)(HOST=192.0.2.35)(PORT=52996))
If the time out occurs before the IP address can be retrieved by the database server,
then enable listener tracing to determine the client that made the request.
Chapter 16
Resolving the Most Common Error Messages for Oracle Net Services
16-15

See Also:
• "Limiting Resource Consumption by Unauthorized Users" for additional
information about setting the SQLNET.INBOUND_CONNECT_TIMEOUT
parameter
• "Settings for Database Access Control"
• "Tracing Error Information for Oracle Net Services"
16.3.4 TNS-12500 or ORA-12500: Listener Failed to Start a Dedicated
Server Process
These messages indicate that the listener failed to start the Oracle program. Possible
reasons include:
• The maximum number of processes allowed for a single user was exceeded
• The listener does not have execute permission on the Oracle program
• The associated Microsoft Windows service is not started
In some cases, these errors can be caused by the same conditions which cause the
following errors:
• TNS-12549 or ORA-12549
• TNS-00519
• TNS-12540 or ORA-12540
• TNS-00510
• TNS-12560 or ORA-12560
Perform the appropriate action:
• Increase the number of processes by setting the PROCESSES parameter in the
database initialization file to a larger value.
• Check the
listener.log
file for detailed error stack information.
16.3.5 ORA-12514: Listener Does Not Currently Know of Service
Requested in Connect Descriptor
This message indicates that the listener received a request to establish a connection
to a database or other service. The connect descriptor received by the listener
specified a service name for a service (usually a database service) that has either not
yet dynamically registered with the listener or has not been statically configured for the
listener. This may be a temporary condition such as after the listener has started, but
before the database instance has registered with the listener.
Perform the following steps:
1. Wait a moment, and then try to connect a second time.
Chapter 16
Resolving the Most Common Error Messages for Oracle Net Services
16-16

2. Check which services are currently known by the listener by running the Listener Control
utility
STATUS
or
SERVICES
command.
3. Check that the SERVICE_NAME parameter in the connect descriptor specifies a service
name known by the listener.
4. Check for an event in the
listener.log
file.
See Also:
• "Determining the Current Status of a Listener" and "Monitoring Services of
a Listener"
• "Analyzing Listener Log Files"
16.3.6 ORA-12520: Listener Could Not Find Available Handler for
Requested Type of Server
This message indicates that the type of service handler requested by the client is incorrect or
not registered for the requested SERVICE_NAME/INSTANCE_NAME parameters, or the
database instance is not registered with the listener.
If you suspect the problem is the wrong type of service handler, then perform the following
steps:
1. If (
server=value
) is set in the connect descriptor, then ensure that the value is set to the
appropriate service handler type for the database, that is,
dedicated
for dedicated server
or
shared
for dispatchers. You can use the Listener Control utility
SERVICES
command to
see what service handlers are currently registered with the listener.
2. If the USE_DEDICATED_SERVER parameter is set to
ON
in the
sqlnet.ora
file, then
ensure the database is configured to use dedicated servers. If it is not, then set this
parameter to
OFF
.
3. Ensure that the database instance is running. If the instance not running, then start it so
that it can register with the listener.
See Also:
"Monitoring Services of a Listener" for additional information about service handlers
16.3.7 ORA-12521: Listener Does Not Currently Know of Instance
Requested in Connect Descriptor
This message indicates that the instance name in the connect descriptor is incorrect, or the
database instance is not registered with the listener.
Perform the following steps:
1. Ensure the service name specified in the connect descriptor is correct.
Chapter 16
Resolving the Most Common Error Messages for Oracle Net Services
16-17

2. Ensure the database instance is running. If the instance not running, then start it
so that it can register with the listener. You can use the Listener Control utility
SERVICES
command to see what instances are currently registered with the
listener.
See Also:
"Monitoring Services of a Listener" for additional information about
SERVICES
command
16.3.8 ORA-12525: Listener Has Not Received Client's Request in
Time Allowed
This message indicates that the client failed to complete its connect request in the time
specified by the INBOUND_CONNECT_TIMEOUT_listener_name parameter in the
listener.ora
file. This error may be a result of network or system delays, or it may
indicate that a malicious client is trying to cause a denial-of-service attack on the
listener.
• If the error occurred due to system or network delays that are normal for the
particular environment, then reconfigure the
INBOUND_CONNECT_TIMEOUT_listener_name parameter in
listener.ora
to a
larger value.
• If you suspect a malicious client, then perform the following steps:
1. Locate the IP address of the client in the
listener.log
file to identify the
source. Keep in mind that an IP address can be forged.
For example, the following
listener.log
file excerpt shows a client IP
address of
192.0.2.35
.
03-MAY-2012 16:42:35 * <unknown connect data> *
(ADDRESS=(PROTOCOL=tcp)(HOST=192.0.2.35)(PORT=53208)) * establish *
<unknown sid> * 12525
TNS-12525: TNS:listener has not received client's request in time
allowed
TNS-12604: TNS: Application timeout occurred
2. Restrict access to the client. You can configure parameters for access rights in
the
sqlnet.ora
file.
See Also:
• "Limiting Resource Consumption by Unauthorized Users" for additional
information about setting the
INBOUND_CONNECT_TIMEOUT_listener_name parameter
• "Settings for Database Access Control"
Chapter 16
Resolving the Most Common Error Messages for Oracle Net Services
16-18

16.3.9 ORA-12533: Illegal Address Parameters
This message indicates that the protocol specific parameters in the ADDRESS section of the
designated connect descriptor are incorrect.
Correct the protocol address.
Note:
This error is often caused by hand-editing of the
tnsnames.ora
file. Only edit the
tnsnames.ora
file using Oracle Enterprise Manager Cloud Control or Oracle Net
Manager.
See Also:
Oracle Database Net Services Reference for correct protocol syntax
16.3.10 TNS-12540 or ORA-12540: TNS:Internal Limit Restriction
Exceeded and TNS-00510: Internal Limit Restriction Exceeded
These messages indicate that an internal limit has been exceeded. Possible limits include the
following:
• Number of open connections that Oracle Net can process simultaneously
• Number of memory buffers that can be used simultaneously
• Number of processes a particular database instance is allowed
The first two are examples of hard limits. The third is an example of a limit which can be
increased by setting PROCESSES parameter in the database initialization file to a larger
value. In this case, a TNS-12500 or ORA-12500 error is also returned. In some cases, these
errors can be caused by the same conditions which cause TNS-12549 or ORA-12549, and
TNS-00519 errors.
Wait for the open connections to close and retry. If the error persists, then check the
sqlnet.log
or
listener.log
file for detailed error stack information.
16.3.11 TNS-12541 or ORA-12541: TNS:No Listener
These messages indicate that the connection request could not be completed because the
listener is not running.
Perform the following actions:
• Ensure the supplied destination address matches one of the addresses used by the
listener.
• Verify the listener is running at the address specified by the request.
Chapter 16
Resolving the Most Common Error Messages for Oracle Net Services
16-19

• Ensure the listener is listening on the host and port specified by the request.
• Verify the client is pointing to the listener.
16.3.12 TNS-12549 or ORA-12549: TNS:Operating System Resource
Quota Exceeded and TNS-00519: Operating System Resource Quota
Exceeded
These messages indicate that a quota or hard limit imposed by the operating system
has been exceeded.
Possible limits include:
• The maximum number of processes allowed for a single user
• The operating system is running low on paging space
Perform the appropriate action:
• Increase the number of processes by setting the PROCESSES parameter in the
database initialization file to a larger value.
• Check the
sqlnet.log
or
listener.log
file for detailed error stack information,
such as an operating system error code to help identify which quota has been
exceeded.
16.3.13 TNS-12560 or ORA-12560: TNS:Protocol Adapter Error
Occurred
These messages indicate that there was an error when using a particular protocol.
This error may be due to incorrect configuration of an ADDRESS parameter or may
occur due to errors returned from the underlying protocol or operating system
interface.
In some cases, these errors are caused by the same conditions which cause
TNS-00510, TNS-00519, TNS-12540, ORA-12540, TNS-12549 or ORA-12549 errors.
These errors occur on Microsoft Windows systems only. Perform the following actions:
1. Select Run from the Microsoft Windows Start menu.
2. Enter
MSCONFIG
in the Open field.
3. Go to the Services tab.
4. Enable
OracleServicesid
if it is disabled.
5. Restart the computer.
6. Check that Oracle Services started.
16.3.14 Directory Naming Errors
Directory naming issues associated with connectivity errors for database service or
network service name entries in a directory server require analysis of the data. You
can analyze the data contained within a directory server with the
ldifwrite
command
line tool. The
ldifwrite
tool is an Oracle Internet Directory tool.
Chapter 16
Resolving the Most Common Error Messages for Oracle Net Services
16-20

The
ldifwrite
tool can be used to convert all or part of the information residing in a directory
server to LDIF. The
ldifwrite
tool performs a subtree search, including all entries following
the specified distinguished name (DN), including the DN itself.
The
ldifwrite
tool syntax is as follows:
ldifwrite -c
net_service_name/database_service
-b
base_DN
-f
ldif_file
The following table lists
ldifwrite
tool arguments and descriptions for each.
Table 16-8 ldifwrite Arguments
Argument Description
-c net_service_name/
database_service
The network service name or database service name
that connects to the directory server.
-b base_DN
The base of the subtree to be written out in LDIF format.
-f ldif_file
The output file name.
The following example writes all the directory naming entries under
dc=us,dc=example,dc=com
to the
output1.ldi
file:
ldifwrite -c ldap -b "dc=us,dc=example,dc=com" -f output.ldif
Note:
Check the
ldap.ora
file to determine the base_DN value. It is the same as the
DEFAULT_ADMIN_CONTEXT entry in the
ldap.ora
file.
16.4 Troubleshooting Suggestions for Oracle Net Services
These are the suggestions for diagnosing network problems and troubleshooting Oracle
Connection Manager in Traffic Director Mode.
• Suggestions for Diagnosing Network Problems
These suggestions may be useful when diagnosing and resolving network connectivity
errors.
• Troubleshooting Oracle Connection Manager in Traffic Director Mode
Learn how to resolve errors that you may encounter while executing SELECT statements
using Oracle Connection Manager in Traffic Director Mode.
• Questions to Consider When Troubleshooting Oracle Net Services
These questions help you in diagnosing network problems.
16.4.1 Suggestions for Diagnosing Network Problems
These suggestions may be useful when diagnosing and resolving network connectivity errors.
• Use the node or network address during configuration instead of the name of the server
computer. This eliminates any internal lookup problems and make the connection slightly
faster.
Chapter 16
Troubleshooting Suggestions for Oracle Net Services
16-21

• If you are using TCP/IP addresses, then use the IP address rather than the host
name. For example, change the
HOST=server_name
line in the
tnsnames.ora
file to
the IP address, such as
HOST=192.0.2.5
.
• Perform a loopback test on the server as described in Task 2, Perform a Loopback
Test. If the test passes, then use FTP to send the
tnsnames.ora
and
sqlnet.ora
files to the client.
• Check the systems between the client and the server. If it is a wide area network
(WAN), then identify any intermediate systems that may not work correctly. If all
computers are fine, then the problem may be a timing issue.
• Verify whether there is a timing issue. Timing issues are associated with an
ORA-12535
error in the client log files.
To resolve a timing issue, try speeding up the connection by using exact
addresses instead of names and increase the
INBOUND_CONNECT_TIMEOUT_listener_name parameter in the
listener.ora
file. The default value for this parameter is 10 seconds.
• Determine which Oracle applications are failing. SQL*Plus may work, but CASE
tools may not. If you determine the problem is a data volume issue, then try to
transfer a large (5 MB) file with the base connectivity.
16.4.2 Troubleshooting Oracle Connection Manager in Traffic Director
Mode
Learn how to resolve errors that you may encounter while executing SELECT
statements using Oracle Connection Manager in Traffic Director Mode.
If an application runs a SELECT statement using Oracle Connection Manager in Traffic
Director Mode, then the
ORA-24449
error message may appear in the following
scenarios:
• If you modify data type or maximum length of a select list column on the database
server side while Oracle Connection Manager is running.
To resolve the error, applications need to close or return the SELECT statements
and run the query again.
• If you select columns with different formats (for example,
TO_CHAR(<datecolumn>)
with different
NLS_DATE_FORMAT
values) and modify the session property either in
the same connection or with different connections having different format settings,
using Proxy Resident Connection Pooling (PRCP).
To resolve the error, use column aliases to distinguish statements in the same
connection. For PRCP connections, use connection classes or tags.
16.4.3 Questions to Consider When Troubleshooting Oracle Net
Services
These questions help you in diagnosing network problems.
• Do all computers have a problem, or is it just one?
If one computer works and another does not, and the same software (Oracle and
third-party products) is installed on each computer, then, if possible, swap out the
Chapter 16
Troubleshooting Suggestions for Oracle Net Services
16-22

network cables to see if the problem occurs on the second client. If it does occur, then it
indicates that the problem has something to do with the client/server connection and is
not local to the client.
• What kind of connections exist between the client and the server, for example, X.25,
ISDN, or leased line?
Sniffers and LAN analyzers are useful for locating intermittent connection failures, and
detecting time outs and resent packets. You can also see which side is waiting for a
response.
16.5 Example of Troubleshooting a TNS-12154 Error
This section offers some solutions for the TNS-12154 error. The TNS-12154 error is
encountered when SQL*Net cannot find the connect identifier specified for a connection in
the
tnsnames.ora
file or other naming adapter.
Before attempting to resolve the problem, it may be helpful to print out or view the
tnsnames.ora
file and the
sqlnet.ora
file. Looking at these files at the same time is helpful
because references are made to both.
In this example, the
tnsnames.ora
and
sqlnet.ora
files are located in the default network
administration directory on the client system.
Be sure that the
tnsnames.ora
file and the
sqlnet.ora
file resemble the following examples.
Example 16-1 shows an example of a
tnsnames.ora
file.
Example 16-1 tnsnames.ora Sample
DEV1.WORLD =
(DESCRIPTION =
(ADDRESS =
(PROTOCOL = TCP)
(HOST = 192.0.2.56)
(PORT = 1521)
)
(CONNECT_DATA =
(SERVICE_NAME = sales.example.com)
)
)
Example 16-2 shows an example of a
sqlnet.ora
file.
Example 16-2 sqlnet.ora Sample
TRACE_LEVEL_CLIENT = OFF
SQLNET.AUTHENTICATION_SERVICES = (NONE)
NAMES.DIRECTORY_PATH = (TNSNAMES)
AUTOMATIC_IPC = OFF
The alias in Example 16-1 is
DEV1.WORLD
. However, the NAMES.DEFAULT_DOMAIN =
WORLD parameter does not exist in Example 16-2. To fix this problem, add the
NAMES.DEFAULT_DOMAIN = WORLD parameter anywhere in the
sqlnet.ora
file. Save the
file, and try the connection again.
Chapter 16
Example of Troubleshooting a TNS-12154 Error
16-23

16.6 Logging Error Information for Oracle Net Services
All errors encountered by Oracle Net Services are appended to a log file for evaluation
by a network or database administrator. The log file provides additional information for
an administrator about on-screen error messages. The error stack in the log file shows
the state of the software at various layers.
To ensure that all errors are recorded, logging cannot be disabled on clients or name
servers. Furthermore, only an administrator may replace or erase log files. The log file
for the listener includes audit trail information about every client connection request,
and most listener control commands.
• Oracle Net Error Stacks
• Oracle Net Services Log File Names
• Oracle Network Log File Segmentation
The maximum size and number of text log files can be configured for Oracle
Network components such as Oracle Net Listener, Oracle Connection Manager,
and Global Service Manager.
• About the Logging Parameters
• Setting Logging Parameters in Configuration Files
• Setting Logging During Control Utilities Runtime
• Using Log Files
• Analyzing Listener Logs
The listener log file records information about audit trails, service registration-
related events, direct hand-off events, subscriptions for Oracle Notification Service
(ONS) node-down events, and Oracle Clusterware notifications.
• Analyzing Oracle Connection Manager Logs
Oracle Connection Manager (CMAN) generates the cman_alias.log file in the
specified log directory. This log file records messages related to the CMAN
listener, gateway, CMADMIN processes, and alerts.
16.6.1 Oracle Net Error Stacks
Log files provide information contained in an error stack. An error stack refers to the
information that is produced by each layer in an Oracle communications stack as the
result of a network error.
The error stack components are described in Table 16-9.
Table 16-9 Error Stack Components
Error Stack Component Description
NI Network Interface. This layer provides a generic interface for
Oracle clients, servers, or external processes to access Oracle
Net functions. The NI layer handles the "break" and "reset"
requests for a connection.
Chapter 16
Logging Error Information for Oracle Net Services
16-24

Table 16-9 (Cont.) Error Stack Components
Error Stack Component Description
NS Network Session (main and secondary layers). These layers
receive requests from NI, and settle all generic computer-level
connectivity issues, such as:
• The location of the server or destination (open, close
functions).
• Whether one or more protocols are involved in the
connection (open, close functions).
• How to handle interrupts between client and server based
on the capabilities of each (send, receive functions).
NA Network Authentication. This layer negotiates authentication and
encryption requirements.
NT Network Transport (main, secondary, and operating system
layers). These layers map Oracle Net foundation layer
functionality to industry-standard protocols.
• Understanding Error Stack Messages
16.6.1.1 Understanding Error Stack Messages
Suppose that a user of a client application tries to establish a connection with a database
server using Oracle Net and TCP/IP, by entering the following commands:
SQLPLUS [email protected]
Enter password:
password
When the commands are entered, the following error displays:
ORA-12543: TNS:Unable to connect to destination
This message indicates that the connection to the server failed because the database could
not be contacted. Although the application displays only a one-line error message, an error
stack that is much more informative is recorded in the log file by the network layer.
On the client side, the
sqlnet.log
file as shown in Example 16-3 contains an error stack
corresponding to the
ORA-12543
error.
Example 16-3 sqlnet.log File
Fatal OSN connect error 12543, connecting to:
(DESCRIPTION=(CONNECT_DATA=(SID=trace)(CID=(PROGRAM=)
(HOST=lala)(USER=scott)))(ADDRESS_LIST=(ADDRESS=
(PROTOCOL=ipc)(KEY=trace))(ADDRESS=(PROTOCOL=tcp)
(HOST=lala)(PORT=1521))))
VERSION INFORMATION:
TNS for Linux:
Oracle Bequeath NT Protocol Adapter for Linux:
Unix Domain Socket IPC NT Protocol Adaptor for Linux:
TCP/IP NT Protocol Adapter for Linux:
Tracing to file: /home/db_tracefiles/trace_admin.trc
Tns error struct:
TNS-12543: TNS:unable to connect to destination
Chapter 16
Logging Error Information for Oracle Net Services
16-25

ns main err code: 12541
TNS-12541: TNS:no listener
ns secondary err code: 12560
nt main err code: 511
TNS-00511: No listener
nt secondary err code: 61
nt OS err code: 0
16.6.2 Oracle Net Services Log File Names
Each Oracle Net Services component produces its own log file. When using ADR, the
default, the log file names are
log.xml
in the appropriate alert directory. Table 16-10
lists the default log file names and lists the components that generate the log files that
appear in the
ADR/diag/instance_name/trace
directory.
Table 16-10 Log File Names When Using ADR
Component Log File
Listener
listener.log
Client or database server
sqlnet.log
Oracle Connection Manager listener
instance-name_pid.log
Oracle Connection Manager CMGW (Oracle Connection Manager
Gateway) process
instance-
name_cmgw_pid.log
Oracle Connection Manager CMADMIN (Oracle Connection
Manager Administration) process
instance-
name_cmadmin_pid.log
Oracle Connection Manager alert log
instance-
name_alert.log
16.6.3 Oracle Network Log File Segmentation
The maximum size and number of text log files can be configured for Oracle Network
components such as Oracle Net Listener, Oracle Connection Manager, and Global
Service Manager.
This feature allows better management of log files, particularly in Cloud environments.
This is an ADR only feature and applicable to both text and XML log files.
16.6.4 About the Logging Parameters
Parameters that control logging, including the type and amount of information logged,
and the location where the files are stored, are set in the configuration file of each
network component as described in Table 16-11.
Table 16-11 Location of Log Parameters
Network Component Configuration File
Oracle Connection Manager processes
cman.ora
Listener
listener.ora
Chapter 16
Logging Error Information for Oracle Net Services
16-26

Table 16-11 (Cont.) Location of Log Parameters
Network Component Configuration File
Client
sqlnet.ora
Database server
sqlnet.ora
Note:
If the ADR_ENABLED parameter is set to
ON
, then all logging parameters are set by
ADR. Using Oracle Net Manager to change the parameters will not work.
This section contains the following topics:
• sqlnet.ora Log Parameters
• listener.ora Log Parameters
• cman.ora Log Parameters
See Also:
Oracle Database Net Services Reference for additional information about the
parameters
16.6.4.1 sqlnet.ora Log Parameters
Table 16-12 describes the log parameters settings that can be set in the
sqlnet.ora
file.
Table 16-12 sqlnet.ora Log Parameters
sqlnet.ora Parameter Oracle Net Manager
Field
Description
ADR_BASE You must set this
parameter manually.
The ADR_BASE parameter specifies the base directory for
storing tracing and logging incidents.
Use this parameter when DIAG_ADR_ENABLED is set to
ON
.
DIAG_ADR_ENABLED You must set this
parameter manually.
The DIAG_ADR_ENABLED parameter indicates whether ADR
tracing is enabled.
When the DIAG_ADR_ENABLED parameter is set to
OFF
,
non-ADR file tracing is used.
LOG_DIRECTORY_CLI
ENT
Client Information: Log
Directory
The destination directory for the client log file. By default, the
client directory is the current working directory. This parameter
is disabled when ADR_ENABLED is set to
ON
.
LOG_DIRECTORY_SER
VER
Server Information: Log
Directory
The destination directory for the database server log files. By
default the server directory is
ORACLE_HOME/network/log
.
This parameter is disabled when ADR_ENABLED is set to
ON
.
Chapter 16
Logging Error Information for Oracle Net Services
16-27

Table 16-12 (Cont.) sqlnet.ora Log Parameters
sqlnet.ora Parameter Oracle Net Manager
Field
Description
LOG_FILE_CLIENT Client Information: Log
File
The name of the log file for the client. By default the log name
is
sqlnet.log
.
LOG_FILE_SERVER You must set this
parameter manually.
The name of the log file for the database server. By default the
log name is
sqlnet.log
.
16.6.4.2 listener.ora Log Parameters
Table 16-13 describes the log parameters settings that can be set in the
listener.ora
file.
Table 16-13 listener.ora Log Parameters
listener.ora Parameter Oracle Net Manager
Field
Description
ADR_BASE_listener_name You must set this
parameter manually.
The ADR_BASE_listener_name parameter
specifies the base directory for storing which tracing
and logging incidents.
Use when DIAG_ADR_ENABLED_listener_name is
set to
ON
.
DIAG_ADR_ENABLED_listener_na
me
You must set this
parameter manually.
The DIAG_ADR_ENABLED_listener_name
parameter indicates whether ADR tracing is
enabled.
When DIAG_ADR_ENABLED_listener_name is set
to
OFF
, non-ADR file tracing is used.
LOG_DIRECTORY_listener_name
LOG_FILE_listener_name
Log File The destination directory and file for the log file that
is automatically generated for listener events. By
default the directory is
ORACLE_HOME/network/
log
, and the file name is
listener.log
. These
parameters are disabled when ADR_ENABLED is
set to
ON
.
16.6.4.3 cman.ora Log Parameters
Table 16-14 describes the log parameters settings that can be set in the
cman.ora
file.
Table 16-14 cman.ora Log Parameters
cman.ora Parameter Description
ADR_BASE The ADR_BASE parameter specifies the base directory for
storing tracing and logging incidents.
Use this parameter when DIAG_ADR_ENABLED is set to
ON
.
DIAG_ADR_ENABLED The DIAG_ADR_ENABLED parameter indicates whether ADR
tracing is enabled.
When the DIAG_ADR_ENABLED parameter is set to
OFF
, non-
ADR file tracing is used.
Chapter 16
Logging Error Information for Oracle Net Services
16-28

Table 16-14 (Cont.) cman.ora Log Parameters
cman.ora Parameter Description
EVENT_GROUP The event groups that are logged. Multiple events may be
designated using a comma-delimited list. This parameter
accepts the following values:
•
INIT_AND_TERM
: initialization and termination
•
MEMORY_OPS
: memory operations
•
CONN_HDLG
: connection handling
•
PROC_MGMT
: process management
•
REG_AND_LOAD
: registration and load update
•
WAKE_UP
: events related to CMADMIN wakeup queue
•
TIMER
: gateway timeouts
•
CMD_PROC
: command processing
•
RELAY
: events associated with connection control blocks
LOG_DIRECTORY The destination directory for log files.
By default, the directory is
ORACLE_HOME/network/log
.
This parameter is disabled when ADR_ENABLED is set to
ON
.
LOG_LEVEL The level of logging. Four levels are supported:
•
off
(default): no logging
•
user
: user log information
•
admin
: administrative log information
•
support
: Oracle Support Services information
16.6.5 Setting Logging Parameters in Configuration Files
You configure logging parameters for the
sqlnet.ora
file with Oracle Net Manager and for
the
listener.ora
file with either Oracle Enterprise Manager Cloud Control or Oracle Net
Manager. You must manually configure
cman.ora
file logging parameters.
• Setting Parameters for the sqlnet.ora File Using Oracle Net Manager
• Setting Parameters for the listener.ora File Using Oracle Enterprise Manager Cloud
Control
• Setting Parameters for the listener.ora File Using Oracle Net Manager
16.6.5.1 Setting Parameters for the sqlnet.ora File Using Oracle Net Manager
The following procedure describes how to set the logging parameters in the
sqlnet.ora
file.
1. Start Oracle Net Manager.
See Also:
"Using Oracle Net Manager to Configure Oracle Net Services"
2. In the navigator pane, expand Profile under the Local heading.
3. From the list in the right pane, select General.
Chapter 16
Logging Error Information for Oracle Net Services
16-29

4. Click the Logging tab.
5. Specify the settings.
6. Choose Save Network Configuration from the File menu.
The name of the log file is
sqlnet.log
.
16.6.5.2 Setting Parameters for the listener.ora File Using Oracle Enterprise
Manager Cloud Control
The following procedure describes how to set the logging parameters in the
listener.ora
file using Oracle Enterprise Manager Cloud Control:
1. Access the Net Services Administration page in Oracle Enterprise Manager Cloud
Control.
See Also:
"Using Oracle Enterprise Manager Cloud Control to Configure Oracle
Net Services"
2. Select Listeners from the Administer list, and then select the Oracle home that
contains the location of the configuration files.
3. Click Go to display the Listeners page.
4. Select a listener, and then click Edit to display the Edit Listeners page.
5. Click the Logging & Tracing tab.
6. Specify the settings.
7. Click OK.
The name of the log file is
listener.log
.
16.6.5.3 Setting Parameters for the listener.ora File Using Oracle Net Manager
The following procedure describes how to set the logging parameters in the
listener.ora
file using Oracle Net Manager:
1. Start Oracle Net Manager.
See Also:
"Using Oracle Net Manager to Configure Oracle Net Services"
2. In the navigator pane, expand Listeners under the Local heading.
3. Select a listener.
4. From the list in the right pane, select General.
5. Click the Logging and Tracing tab.
6. Specify the settings.
Chapter 16
Logging Error Information for Oracle Net Services
16-30

7. Choose Save Network Configuration from the File menu.
The name of the log file is
listener.log
.
See Also:
Oracle Database Net Services Reference
16.6.6 Setting Logging During Control Utilities Runtime
You can set logging during control utility runtime. Setting logging with a control utility does not
set parameters in the
*.ora
files, and the setting is only valid for the control utility session.
The following settings can be set for a control utility:
• For a listener, use the
SET LOG_FILE
and
SET LOG_DIRECTORY
commands from the
Listener Control utility.
• For an Oracle Connection Manager, use the
SET LOG_DIRECTORY
,
SET LOG_LEVEL
, and
SET EVENT
commands from the Oracle Connection Manager control utility.
Note:
If the ADR_ENABLED parameter is set to
ON
, then all logging parameters are set by
ADR. Using Oracle Connection Manager to change the parameters will not work.
See Also:
Oracle Database Net Services Reference
16.6.7 Using Log Files
The following procedure describes how to use a log file to diagnose a network error:
1. Review the log file for the most recent error number received from the application. This is
usually the last entry in the log file.
2. Starting from the bottom of the file, locate the first nonzero entry in the error report. This
is usually the actual cause.
3. If that error does not provide the information, then review the next error in the log until
you locate the correct error information.
4. If the cause of the error is still not clear, then turn on tracing and repeat the command
that produced the error message.
Chapter 16
Logging Error Information for Oracle Net Services
16-31

16.6.8 Analyzing Listener Logs
The listener log file records information about audit trails, service registration-related
events, direct hand-off events, subscriptions for Oracle Notification Service (ONS)
node-down events, and Oracle Clusterware notifications.
• Listener Log Audit Trails
The audit trail information in the listener log file enables you to analyze network
usage statistics, client connection requests, commands issued by the Listener
Control utility, and so on.
• Listener Service Registration Events
The service registration events information in the listener log file enables you to
analyze registration-related statistics, such as service names for instances,
instance names, service handlers, load information, dynamic listening endpoints,
and so on.
• Listener Direct Hand-Off Information
The direct hand-off information in the listener log file enables you to analyze direct
hand-off events to dispatchers.
• Listener Subscription for ONS Node-Down Event Information
The listener subscribes to the Oracle Notification Service (ONS) node-down event
on startup if the ONS configuration file is available. The ONS node-down event
information in the listener log file enables you to analyze these messages.
• Listener Oracle Clusterware Notification Information
If the required Oracle Clusterware libraries are installed and Oracle Clusterware is
started on the host, then the listener notifies Oracle Clusterware about its status
during start and stop processes. The Oracle Clusterware notification information in
the listener log file enables you to analyze these messages.
16.6.8.1 Listener Log Audit Trails
The audit trail information in the listener log file enables you to analyze network usage
statistics, client connection requests, commands issued by the Listener Control utility,
and so on.
• Listener Log Audit Trail Information
The audit trail information comprises statistics about network usage, client
connection requests, and commands issued by the Listener Control utility (such as
RELOAD
,
START
,
STOP
,
STATUS
, or
SERVICES
).
• Format of the Listener Log Audit Trail
This is the format in which audit trail text fields are captured in the listener log file.
16.6.8.1.1 Listener Log Audit Trail Information
The audit trail information comprises statistics about network usage, client connection
requests, and commands issued by the Listener Control utility (such as
RELOAD
,
START
,
STOP
,
STATUS
, or
SERVICES
).
You can use the audit trail information to view trends and user activity by first storing it
in a table and then collating it in a report format. To import the data into a table, use an
import utility such as SQL*Loader.
Chapter 16
Logging Error Information for Oracle Net Services
16-32

16.6.8.1.2 Format of the Listener Log Audit Trail
This is the format in which audit trail text fields are captured in the listener log file.
Timestamp * Connect Data [* Protocol Info] * Event [* SID | Service] * Return Code
Properties of the audit trail are:
• Each field is delimited by an asterisk (
*
).
• Protocol address information and service name or SID information appear only when a
connection is attempted.
• A successful connection or command returns a code of zero.
• A failure produces a code that maps to an error message.
Example 16-4 shows a log file excerpt with
RELOAD
command request.
Example 16-4 Listener Log Event for Successful RELOAD Request
14-MAY-2012 00:29:54 *
(connect_data=(cid=(program=)(host=sales-server)(user=jdoe))(command=reload)
(arguments=64)(service=listener)(version=135290880))
* reload * 0
Example 16-5 shows a log file excerpt with a successful connection request.
Example 16-5 Listener Log Events for a Successful Connection Request
14-MAY-2012 15:28:58 *
(connect_data=(service_name=sales.us.example.com)(cid=(program=)(host=sales-server)
(user=jdoe)))
* (address=(protocol=tcp)(host=192.0.2.35)(port=41349)) * establish
* sales.us.example.com * 0
Example 16-6 shows a log file excerpt with a successful execution of the
STATUS
command by
host
sales-server
. It is followed by an unsuccessful connection attempt by a client with an IP
address of
192.0.2.35
. This connection attempt resulted in an ORA-12525: Listener Has Not
Received Client's Request in Time Allowed error message. This error occurs when a client
fails to complete its connection request in the time specified by the
INBOUND_CONNECT_TIMEOUT_listener_name parameter in the
listener.ora
file. This
client could be attempting a denial-of-service attack on the listener.
Example 16-6 Listener Log Events for an Unsuccessful Connection Request
03-MAY-2012 16:41:57 *
(CONNECT_DATA=(CID=(PROGRAM=)(HOST=sales-server)(USER=jdoe))(COMMAND=status)
(ARGUMENTS=64)(SERVICE=LISTENER)(VERSION=153092352)) * status * 0
03-MAY-2012 16:42:35 * <unknown connect data> *
(ADDRESS=(PROTOCOL=tcp)(HOST=192.0.2.35)(PORT=53208)) * establish *
<unknown sid> * 12525
TNS-12525: TNS:listener has not received client's request in time allowed
TNS-12604: TNS: Application timeout occurred
Related Topics
• Oracle Database Error Messages Reference
Chapter 16
Logging Error Information for Oracle Net Services
16-33

16.6.8.2 Listener Service Registration Events
The service registration events information in the listener log file enables you to
analyze registration-related statistics, such as service names for instances, instance
names, service handlers, load information, dynamic listening endpoints, and so on.
• Listener Service Registration Event Information
The service registration information comprises statistics related to database
service registration events, such as
service_register
,
service_update
, and
service_died
.
• Format of the Listener Service Registration Information
This is the format for database service registration event messages captured in
the listener log file.
16.6.8.2.1 Listener Service Registration Event Information
The service registration information comprises statistics related to database service
registration events, such as
service_register
,
service_update
, and
service_died
.
During service registration, the Listener Registration (LREG) process provides the
listener with information about the following:
• Service names for each running instance of the database
• Instance names of the database
• Service handlers (dispatchers or dedicated servers) available
• Dispatcher, instance, and node load information
• Dynamic listening endpoints
The recorded service registration-related events mentioned in the following table are
listed in the
listener.log
file:
Table 16-15 Service Registration Event Log Information
Event Description
service_register
Registration information that the listener receives for an instance.
service_update
Updated registration information that the listener receives for a
particular instance, such as dispatcher or instance load
information.
service_died
Lost connection information for the connections that the listener is
unable to establish with LREG. All registration information for the
instance is discarded. Clients are unable to connect to the
instance until LREG registers it again.
16.6.8.2.2 Format of the Listener Service Registration Information
This is the format for database service registration event messages captured in the
listener log file.
Timestamp * Event * Instance Name * Return Code
Properties of service registration fields are:
Chapter 16
Logging Error Information for Oracle Net Services
16-34

• Each field is delimited by an asterisk (
*
).
• It is normal for the events to appear multiple times in a row for one instance.
• A successful registration returns a code of zero, meaning the client can connect to the
instance.
• A failure produces a code that maps to an error message.
Example 16-7 shows a log file with service registration events. The listener is able to receive
a client request after a successful
service_register
event, but is unable to receive client
requests after a
service_died
event.
Example 16-7 Listener Log with Service Registration Events
-------------------------------
14-MAY-2012 15:28:43 * service_register * sales * 0
14-MAY-2012 15:28:43 * service_register * sales * 0
14-MAY-2012 15:28:58 *
(connect_data=(service_name=sales.us.example.com)
(cid=(program=)(host=sales-server)(user=jdoe)))
* (address=(protocol=tcp)(host=192.0.2.35)(port=41349)) * establish
* sales.us.example.com * 0
14-MAY-2012 15:38:44 * service_update * sales * 0
14-MAY-2012 15:38:44 * service_update * sales * 0
14-MAY-2012 15:48:45 * service_update * sales * 0
14-MAY-2012 15:48:45 * service_update * sales * 0
14-MAY-2012 15:50:57 *
(connect_data=(service_name=sales.us.example.com)(cid=(program=)
(host=sales-server)(user=jdoe)))
* (address=(protocol=tcp)(host=192.0.2.35)(port=41365)) * establish
* sales.us.example.com * 0
14-MAY-2012 15:51:26 * service_died * sales * 12537
14-MAY-2012 15:51:26 * service_died * sales * 12537
14-MAY-2012 15:52:06 *
(connect_data=(service_name=sales.us.example.com)
(cid=(program=)(host=sales-server)(user=jdoe)))
* (address=(protocol=tcp)(host=192.0.2.35)(port=41406)) * establish
* sales.us.example.com * 12514
TNS-12514: TNS:listener could not resolve SERVICE_NAME given in connect descriptor
--------------------------------
Related Topics
• Oracle Database Error Messages Reference
16.6.8.3 Listener Direct Hand-Off Information
The direct hand-off information in the listener log file enables you to analyze direct hand-off
events to dispatchers.
These events are formatted into the following fields:
Timestamp * Presentation * Handoff * Error Code
Properties of direct hand-off fields are as follows:
• Each field is delimited by an asterisk (
*
).
• A successful connection or command returns a code of zero.
• A failure produces a code that maps to an error message.
Chapter 16
Logging Error Information for Oracle Net Services
16-35

The following example shows a direct hand-off event in the log file.
Example 16-8 Listener Log Event for Direct Hand-Off
21-MAY-2012 10:54:55 * oracle.aurora.net.SALESHttp2 * handoff * 0
16.6.8.4 Listener Subscription for ONS Node-Down Event Information
The listener subscribes to the Oracle Notification Service (ONS) node-down event on
startup if the ONS configuration file is available. The ONS node-down event
information in the listener log file enables you to analyze these messages.
The subscription enables the listener to remove the affected service when it receives
node-down event notification from ONS. The listener uses asynchronous subscription
for the event notification.
The following warning message is recorded to the listener log file on each
STATUS
command if the subscription has not completed, such as the ONS daemon is not
running on the host.
WARNING: Subscription for node down event still pending
The listener cannot receive the ONS event while subscription is pending. Other than
that, no other listener functionality is affected.
16.6.8.5 Listener Oracle Clusterware Notification Information
If the required Oracle Clusterware libraries are installed and Oracle Clusterware is
started on the host, then the listener notifies Oracle Clusterware about its status during
start and stop processes. The Oracle Clusterware notification information in the
listener log file enables you to analyze these messages.
After a successful notification to Oracle Clusterware (shown as CRS in the following
log messages), listeners record the event in the log. No message is recorded if the
notification fails.
Listener completed notification to CRS on start
Listener completed notification to CRS on stop
16.6.9 Analyzing Oracle Connection Manager Logs
Oracle Connection Manager (CMAN) generates the cman_alias.log file in the
specified log directory. This log file records messages related to the CMAN listener,
gateway, CMADMIN processes, and alerts.
The alert log entry is a chronological list of all critical errors. In addition to logging
critical errors, it captures information about instance startup and shutdown. It also
records values of all configuration parameters at the beginning and end of a session.
Each log entry consists of a timestamp and an event. You can configure the
cman.ora
file to log events for the following categories:
• Initialization and termination
• Memory operations
• Connection handling
• Process management
Chapter 16
Logging Error Information for Oracle Net Services
16-36

• Registration and load update
• Events related to CMADMIN wakeup queue
• Gateway timeouts
• Command processing
• Events associated with connection control blocks
Use the
SET EVENT
command to specify the type of events that you want to log.
Table 16-16 CMADMIN and Gateway Log Entry Details
Log Entry Event Description
CMADMIN Failed to get procedure ID The CMCTL session connected to CMADMIN has
disconnected.
CMADMIN GMON attributes validated Informational message. The parameters needed for
CMADMIN to come up are specified correctly.
CMADMIN Invalid connect data An unknown client is trying to connect to
CMADMIN. This is most likely a denial of service
attack.
CMADMIN No connect data An unknown client is trying to connect to
CMADMIN. This is most likely a denial of service
attack.
Gateway Connected to monitor The gateway has connected to CMADMIN.
Gateway Housekeeping Informational message. Internal housekeeping for
the gateway process is in order. The gateway
process is properly connected to the CMADMIN
process.
Gateway Idle timeout The connection is disconnected because it was idle
longer than the time specified in the
cman.ora
file.
Gateway Out of connection control
block (CCB)
CMADMIN cannot process a connection request.
There could be two reasons:
• Faulty load update between CMADMIN and
listener.
• Someone is trying to connect to CMADMIN
directly (possibly a denial of service attack).
Gateway Session timeout The connection is disconnected because it
exceeded the session timeout specified in the
cman.ora
file.
Gateway State change from Empty to
Init
State change message from the gateway. After it
reaches the Init state, the gateway begins some
internal data initialization.
Gateway State change from Init to
Ready
State change message from the gateway. After it
reaches the Ready state, the gateway begins
accepting connections from the client.
Example 16-9 Sample CMADMIN Log Messages
-------------------------------
(LOG_RECORD=(TIMESTAMP=08-MAY-2022 08:46:40)(EVENT=Parameter list)
(listener_address=(address=(protocol=tcp)(host=sales1)(port=1574)))
(aso_authentication_filter=OFF)
(connection_statistics=ON)
(log_directory=/home/user/network/admin/log)
Chapter 16
Logging Error Information for Oracle Net Services
16-37

(log_level=support)
(max_connections=256)
(idle_timeout=5)
(inbound_connect_timeout=0)
(session_timeout=20)
(outbound_connect_timeout=0)
(max_gateway_processes=1)
(min_gateway_processes=1)
(password=OFF)
(trace_directory=/home/user/network/admin/log)
(trace_level=off)
(trace_timestamp=OFF)
(trace_filelen=0)
(trace_fileno=0)
)
(LOG_RECORD=(TIMESTAMP=08-MAY-2022 08:46:40)(EVENT=Shared Memory Size)
(BYTES=82524))
(LOG_RECORD=(TIMESTAMP=08-MAY-2022 08:46:40)(EVENT=GMON Attributes validated)
(Type=Information))
(LOG_RECORD=(TIMESTAMP=08-MAY-2022 08:46:40)(EVENT=NS Listen Successful)
((ADDRESS=(PROTOCOL=tcp)(HOST=sales1)(PORT=1574))))
(LOG_RECORD=(TIMESTAMP=08-MAY-2022 08:46:44)(EVENT=Received command)(CMD=verify
password))
(LOG_RECORD=(TIMESTAMP=08-MAY-2022 08:46:44)(EVENT=Received command)
(CMD=version))
(LOG_RECORD=(TIMESTAMP=08-MAY-2022 08:46:44)(EVENT=Received command)
(CMD=show status))
(LOG_RECORD=(TIMESTAMP=08-MAY-2022 08:46:44)(EVENT=Failed to get procedure id))
(LOG_RECORD=(TIMESTAMP=08-MAY-2022 08:49:12)(EVENT=Received command)(CMD=verify
password))
(LOG_RECORD=(TIMESTAMP=08-MAY-2022 08:49:15)(EVENT=Failed to get procedure id))
(LOG_RECORD=(TIMESTAMP=08-MAY-2022 08:49:29)(EVENT=Received command)(CMD=verify
password))
(LOG_RECORD=(TIMESTAMP=08-MAY-2022 08:49:46)(EVENT=Failed to get procedure id))
(LOG_RECORD=(TIMESTAMP=08-MAY-2022 08:49:50)(EVENT=Received command)(CMD=verify
password))
(LOG_RECORD=(TIMESTAMP=08-MAY-2022 08:49:50)(EVENT=Received command)
(CMD=probe monitor))
(LOG_RECORD=(TIMESTAMP=08-MAY-2022 08:49:50)(EVENT=Received command)
(CMD=shutdown normal))
-------------------------------
Example 16-10 Sample Gateway Log Messages
-------------------------------
(LOG_RECORD=(TIMESTAMP=08-MAY-2022 08:46:41)(EVENT=NS Initialised))
(LOG_RECORD=(TIMESTAMP=08-MAY-2022 08:46:41)(EVENT=Memory Allocated)
(BYTES=1024))
(LOG_RECORD=(TIMESTAMP=08-MAY-2022 08:46:41)(EVENT=NCR Initialised))
(LOG_RECORD=(TIMESTAMP=08-MAY-2022 08:46:41)(EVENT=Connected to Monitor))
(LOG_RECORD=(TIMESTAMP=08-MAY-2022 08:46:41)(EVENT=State Change from Empty to
Init))
(LOG_RECORD=(TIMESTAMP=08-MAY-2022 08:46:41)(EVENT=Memory Allocated)
(BYTES=251904))
(LOG_RECORD=(TIMESTAMP=08-MAY-2022 08:46:41)(EVENT=Memory Allocated)
(BYTES=2048))
(LOG_RECORD=(TIMESTAMP=08-MAY-2022 08:46:41)(EVENT=CCB Initialised))
(LOG_RECORD=(TIMESTAMP=08-MAY-2022 08:46:41)(EVENT=Started Listening))
(LOG_RECORD=(TIMESTAMP=08-MAY-2022 08:46:41)(EVENT=State Change from Init to
Ready))
(LOG_RECORD=(TIMESTAMP=08-MAY-2022 08:46:47)(EVENT=Housekeeping))
Chapter 16
Logging Error Information for Oracle Net Services
16-38

(LOG_RECORD=(TIMESTAMP=08-MAY-2022 08:48:06)(EVENT=Ready)(CONN NO=0))
(LOG_RECORD=(TIMESTAMP=08-MAY-2022 08:48:06)(EVENT=Ready)(CONN NO=0))
(LOG_RECORD=(TIMESTAMP=08-MAY-2022 08:48:07)(EVENT=Housekeeping))
(LOG_RECORD=(TIMESTAMP=08-MAY-2022 08:48:12)(EVENT=Housekeeping))
(LOG_RECORD=(TIMESTAMP=08-MAY-2022 08:48:13)(EVENT=Idle Timeout)(CONN NO=0))
(LOG_RECORD=(TIMESTAMP=08-MAY-2022 08:48:17)(EVENT=Housekeeping))
(LOG_RECORD=(TIMESTAMP=08-MAY-2022 08:48:22)(EVENT=Housekeeping))
(LOG_RECORD=(TIMESTAMP=08-MAY-2022 08:48:25)(EVENT=Ready)(CONN NO=0))
(LOG_RECORD=(TIMESTAMP=08-MAY-2022 08:48:25)(EVENT=Ready)(CONN NO=0))
(LOG_RECORD=(TIMESTAMP=08-MAY-2022 08:48:27)(EVENT=Housekeeping))
(LOG_RECORD=(TIMESTAMP=08-MAY-2022 08:48:30)(EVENT=Idle Timeout)(CONN NO=0))
(LOG_RECORD=(TIMESTAMP=08-MAY-2022 08:48:32)(EVENT=Housekeeping))
(LOG_RECORD=(TIMESTAMP=08-MAY-2022 08:48:37)(EVENT=Housekeeping))
(LOG_RECORD=(TIMESTAMP=08-MAY-2022 08:48:42)(EVENT=Ready)(CONN NO=0))
(LOG_RECORD=(TIMESTAMP=08-MAY-2022 08:48:42)(EVENT=Ready)(CONN NO=0))
(LOG_RECORD=(TIMESTAMP=08-MAY-2022 08:48:42)(EVENT=Housekeeping))
(LOG_RECORD=(TIMESTAMP=08-MAY-2022 08:48:47)(EVENT=Housekeeping))
(LOG_RECORD=(TIMESTAMP=08-MAY-2022 08:48:52)(EVENT=Housekeeping))
(LOG_RECORD=(TIMESTAMP=08-MAY-2022 08:48:57)(EVENT=Housekeeping))
(LOG_RECORD=(TIMESTAMP=08-MAY-2022 08:49:02)(EVENT=Session Timeout)(CONN NO=0))
(LOG_RECORD=(TIMESTAMP=08-MAY-2022 08:49:02)(EVENT=Housekeeping))
-------------------------------
Related Topics
• Oracle Database Net Services Reference
16.7 Tracing Error Information for Oracle Net Services
Tracing produces a detailed sequence of statements that describe network events as they
are run. Tracing an operation enables you to obtain more information about the internal
operations of the components of Oracle Net Services than is provided in a log file. This
information is output to files that can be evaluated to identify the events that led to an error.
Note:
Tracing uses a large amount of disk space and may have a significant impact upon
system performance. Therefore, you should enable tracing only when necessary.
This section contains the following topics:
• Understanding Oracle Net Services Trace File Names
• Setting Tracing Parameters
• Setting Tracing During Control Utilities Runtime
• Evaluating Oracle Net Services Trace Files
• Using the Trace Assistant to Examine Trace Files
16.7.1 Understanding Oracle Net Services Trace File Names
Each Oracle Net Services component produces its own trace file. Table 16-17 provides the
default trace file names and lists the components that generate the trace files.
Chapter 16
Tracing Error Information for Oracle Net Services
16-39

Table 16-17 Trace Files Names
Trace File Component
instance-name_pid.trc
Oracle Connection Manager listener
instance-name_cmgw_pid.trc
Oracle Connection Manager CMGW process
instance-name_cmadmin_pid.trc
Oracle Connection Manager CMADMIN process
listener.trc
Listener
sqlnet.trc
Client
svr_pid.trc
Database server
tnsping.trc
TNSPING utility
16.7.2 Setting Tracing Parameters
Parameters that control tracing, including the type and amount of information trace,
and the location where the files are stored, are set in the configuration file of each
network component as described in Table 16-18.
Table 16-18 Location of Trace Parameters
Configuration File Component
cman.ora
Oracle Connection Manager processes
listener.ora
Listener
sqlnet.ora
Client
Database server
TNSPING utility
This section contains the following topics:
• cman.ora Trace Parameters
• listener.ora Trace Parameters
• sqlnet.ora Trace Parameters
• Setting Tracing Parameters in Configuration Files
See Also:
Oracle Database Net Services Reference for additional information about
these parameters
16.7.2.1 cman.ora Trace Parameters
Table 16-19 describes the trace parameters settings for Oracle Connection Manager
that can be set in the
cman.ora
file.
Chapter 16
Tracing Error Information for Oracle Net Services
16-40

Table 16-19 cman.ora Trace Parameters
cman.ora Parameter Description
TRACE_DIRECTORY The destination directory for trace files.
By default, the directory is
ORACLE_HOME/network/trace
.
TRACE_FILELEN The size of the trace file in KB. When the size is reached, the trace
information is written to the next file. The number of files is specified
with the TRACE_FILENO parameter.
TRACE_FILENO The number of trace files for tracing. When this parameter is set along
with the TRACE_FILELEN parameter, trace files are used in a cyclical
fashion. The first file is filled, then the second file, and so on. When
the last file has been filled, the first file is reused, and so on.
The trace file names are distinguished from one another by their
sequence number. For example, if this parameter is set to 3, then the
Oracle Connection Manager trace files for the gateway processes
would be named
instance-name_cmgw1_pid.trc
,
instance-
name_cmgw2_pid.trc
and
instance-name_cmgw3_pid.trc
.
In addition, trace events in the trace files are preceded by the
sequence number of the file.
TRACE_LEVEL The level of detail the trace facility records for the listener. The trace
level value can either be a value within the range of 0 (zero) to 16
where 0 is no tracing and 16 represents the maximum amount of
tracing or one of the following values:
•
off
(equivalent to 0) provides no tracing.
•
user
(equivalent to 4) traces to identify user-induced error
conditions.
•
admin
(equivalent to 6) traces to identify installation-specific
problems.
•
support
(equivalent to 16) provides trace information for
troubleshooting by Oracle Support Services.
The Oracle Connection Manager listener, gateway, and CMADMIN
processes create trace files on both Linux and Microsoft Windows.
TRACE_TIMESTAMP If the TRACING parameter is enabled, then a time stamp in the form
of
dd-mon-yyyy hh:mi:ss:mil
is created for every trace event in
the listener trace file.
16.7.2.2 listener.ora Trace Parameters
Table 16-20 describes the trace parameters settings for the listener that can be set in the
listener.ora
file.
Chapter 16
Tracing Error Information for Oracle Net Services
16-41

Table 16-20 listener.ora Trace Parameters
listener.ora Parameter Oracle
Enterprise
Manager Cloud
Control/Oracle
Net Manager
Field
Description
TRACE_LEVEL_listener
_name
Select a trace
level/Trace Level
The level of detail the trace facility records for
the listener. The trace level value can either be a
value within the range of 0 (zero) to 16 where 0
is no tracing and 16 represents the maximum
amount of tracing or one of the following values:
•
off
(equivalent to 0) provides no tracing.
•
user
(equivalent to 4) traces to identify
user-induced error conditions.
•
admin
(equivalent to 6) traces to identify
installation-specific problems.
•
support
(equivalent to 16) provides trace
information for troubleshooting by Oracle
Support Services.
TRACE_DIRECTORY_lis
tener_name
TRACE_FILE_listener_n
ame
Trace File The destination directory and file for the trace
file. By default, the directory is
ORACLE_HOME/
network/trace
, and the file name is
listener.trc
.
TRACE_FILEAGE_listen
er_name
You must set this
parameter
manually.
The maximum age of listener trace files in
minutes. When the age limit is reached, the
trace information is written to the next file. The
number of files is specified with the
TRACE_FILENO_listener_name parameter.
TRACE_FILEAGE_SER
VER
You must set this
parameter
manually.
Specifies the maximum age of server trace files
in minutes. When the age limit is reached, the
trace information is written to the next file. The
number of files is specified with the
TRACE_FILENO_SERVER parameter.
TRACE_FILELEN_listen
er_name
You must set this
parameter
manually.
The size of the listener trace files in KB. When
the size is reached, the trace information is
written to the next file. The number of files is
specified with the
TRACE_FILENO_listener_name parameter
Chapter 16
Tracing Error Information for Oracle Net Services
16-42

Table 16-20 (Cont.) listener.ora Trace Parameters
listener.ora Parameter Oracle
Enterprise
Manager Cloud
Control/Oracle
Net Manager
Field
Description
TRACE_FILENO_listene
r_name
You must set this
parameter
manually.
The number of trace files for listener tracing.
When this parameter is set along with the
TRACE_FILELEN_listener_name parameter,
trace files are used in a cyclical fashion. The first
file is filled, then the second file, and so on.
When the last file has been filled, the first file is
re-used, and so on.
The trace file names are distinguished from one
another by their sequence number. For example,
if the default trace file of
listener.trc
is used,
and this parameter is set to 3, then the trace files
would be named
listener1.trc
,
listener2.trc
and
listener3.trc
.
In addition, trace events in the trace files are
preceded by the sequence number of the file.
When this parameter is set with the
TRACE_FILEAGE_listener_name parameter,
trace files are cycled based on the age of the
trace file. The first file is used until the age limit
is reached, then the second file is use, and so
on. When the last file's age limit is reached, the
first file is re-used, and so on.
When this parameter is set with both the
TRACE_FILELEN_listener_name and
TRACE_FILEAGE_listener_name parameters,
trace files are cycled when either the size limit or
the age limit is reached.
TRACE_TIMESTAMP_
lis
tener_name
You must set this
parameter
manually.
A time stamp in the form of
dd-mon-yyyy
hh:mi:ss:mil
for every trace event in the
listener trace file.
16.7.2.3 sqlnet.ora Trace Parameters
Table 16-21 describes the trace parameters settings that can be set in the
sqlnet.ora
file.
Table 16-21 sqlnet.ora Trace Parameters
sqlnet.ora Parameter Oracle Net Manager
Field
Description
TRACE_DIRECTORY_CLIENT Client Information:
Trace Directory
The destination directory for the client trace output. By
default, the client directory is
ORACLE_HOME/network/
trace
.
TRACE_DIRECTORY_SERVE
R
Server Information:
Trace Directory
The destination directory for the database server trace
output. By default, the server directory is
ORACLE_HOME/
network/trace
.
Chapter 16
Tracing Error Information for Oracle Net Services
16-43

Table 16-21 (Cont.) sqlnet.ora Trace Parameters
sqlnet.ora Parameter Oracle Net Manager
Field
Description
TRACE_FILE_CLIENT Client Information:
Trace File
The name of the trace file for the client. By default, the
trace file name is
sqlnet.trc
.
TRACE_FILE_SERVER Server Information:
Trace File
The name of the trace file for the database server. By
default the trace file name is
svr_pid.trc
.
TRACE_FILEAGE_CLIENT You must set this
parameter manually.
Specifies the maximum age of client trace files in
minutes. When the age limit is reached, the trace
information is written to the next file. The number of files
is specified with the TRACE_FILENO_CLIENT
parameter.
TRACE_FILEAGE_SERVER You must set this
parameter manually.
Specifies the maximum age of server trace files in
minutes. When the age limit is reached, the trace
information is written to the next file. The number of files
is specified with the TRACE_FILENO_SERVER
parameter.
TRACE_FILELEN_CLIENT You must set this
parameter manually.
The size of the client trace files in KB. When the size is
reached, the trace information is written to the next file.
The number of files is specified with the
TRACE_FILENO_CLIENT parameter.
TRACE_FILELEN_SERVER You must set this
parameter manually.
The size of the database server trace files in KB. When
the size is reached, the trace information is written to the
next file. The number of files is specified with the
TRACE_FILENO_SERVER parameter.
TRACE_FILENO_CLIENT You must set this
parameter manually.
The number of trace files for client tracing. When this
parameter is set along with the
TRACE_FILELEN_CLIENT parameter, trace files are
used in a cyclical fashion. The first file is filled, then the
second file, and so on. When the last file has been filled,
the first file is re-used, and so on.
The trace file names are distinguished from one another
by their sequence number. For example, if the default
trace file of
sqlnet.trc
is used, and this parameter is
set to 3, then the trace files would be named
sqlnet1_pid.trc
,
sqlnet2_pid.trc
and
sqlnet3_pid.trc
.
In addition, trace events in the trace files are preceded
by the sequence number of the file.
When this parameter is set with the
TRACE_FILEAGE_CLIENT parameter, trace files are
cycled based on the age of the trace file. The first file is
used until the age limit is reached, then the second file is
use, and so on. When the last file's age limit is reached,
the first file is re-used, and so on.
When this parameter is set with both the
TRACE_FILELEN_CLIENT and
TRACE_FILEAGE_CLIENT parameters, trace files are
cycled when either the size limit or age limit is reached.
Chapter 16
Tracing Error Information for Oracle Net Services
16-44

Table 16-21 (Cont.) sqlnet.ora Trace Parameters
sqlnet.ora Parameter Oracle Net Manager
Field
Description
TRACE_FILENO_SERVER You must set this
parameter manually.
The number of trace files for database server tracing.
When this parameter is set along with the
TRACE_FILELEN_SERVER parameter, trace files are
used in a cyclical fashion. The first file is filled, then the
second file, and so on. When the last file has been filled,
the first file is re-used, and so on.
The trace file names are distinguished from one another
by their sequence number. For example, if the default
trace file of
svr_pid.trc
is used, and this parameter is
set to 3, then the trace files would be named
svr1_pid.trc
,
svr2_pid.trc
and
svr3_pid.trc
.
In addition, trace events in the trace files are preceded
by the sequence number of the file.
When this parameter is set with the
TRACE_FILEAGE_SERVER parameter, trace files are
cycled based on the age of the trace file. The first file is
used until the age limit is reached, then the second file is
use, and so on. When the last file's age limit is reached,
the first file is re-used, and so on.
When this parameter is set with both the
TRACE_FILELEN_SERVER and
TRACE_FILEAGE_SERVER parameters, trace files are
cycled when either the size limit or age limit is reached.
TRACE_LEVEL_CLIENT Client Information:
Trace Level
The level of detail the trace facility records for the client.
The trace level value can either be a value within the
range of 0 (zero) to 16 where 0 is no tracing and 16
represents the maximum amount of tracing or one of the
following values:
•
off
(equivalent to 0) provides no tracing.
•
user
(equivalent to 4) traces to identify user-
induced error conditions.
•
admin
(equivalent to 6) traces to identify
installation-specific problems.
•
support
(equivalent to 16) provides trace
information for troubleshooting by Oracle Support
Services.
TRACE_LEVEL_SERVER Server Information:
Trace Level
The level of detail the trace facility records for the
database server. The trace level value can either be a
value within the range of 0 (zero) to 16 where 0 is no
tracing and 16 represents the maximum amount of
tracing or one of the following values:
•
off
(equivalent to 0) provides no tracing.
•
user
(equivalent to 4) traces to identify user-
induced error conditions.
•
admin
(equivalent to 6) traces to identify
installation-specific problems.
•
support
(equivalent to 16) provides trace
information for troubleshooting by Oracle Support
Services.
Chapter 16
Tracing Error Information for Oracle Net Services
16-45

Table 16-21 (Cont.) sqlnet.ora Trace Parameters
sqlnet.ora Parameter Oracle Net Manager
Field
Description
TRACE_TIMESTAMP_CLIENT You must set this
parameter manually.
A time stamp in the form of
dd-mon-yyyy
hh:mi:ss:mil
for every trace event in the client trace
file,
sqlnet.trc
.
TRACE_TIMESTAMP_SERVE
R
You must set this
parameter manually.
A time stamp in the form of
dd-mon-yyyy
hh:mi:ss:mil
for every trace event in the client trace
file,
sqlnet.trc
.
TRACE_UNIQUE_CLIENT Client Information:
Unique Trace File
Name
When the value is set to
on
, Oracle Net creates a unique
file name for each trace session by appending a process
identifier to the name of each trace file generated, and
enabling several files to coexist. For example, trace files
named
sqlnetpid.trc
are created if default trace file
name
sqlnet.trc
is used. When the value is set to
off
, data from a new client trace session overwrites the
existing file.
You can manually add the TNSPING utility tracing parameters described in
Table 16-22 to the
sqlnet.ora
file. The TNSPING utility determines whether a service,
such as a database or other TNS services on an Oracle Net network can be
successfully reached.
Table 16-22 TNSPING Trace Parameters
sqlnet.ora Parameter Description
TNSPING.TRACE_DIRECT
ORY
The destination directory for TNSPING trace file,
tnsping.trc
.
By default, the directory is
ORACLE_HOME/network/trace
.
TNSPING.TRACE_LEVEL The level of detail the trace facility records for the TNSPING
utility. The trace level value can either be a value within the
range of 0 (zero) to 16 where 0 is no tracing and 16 represents
the maximum amount of tracing or one of the following values:
•
off
(equivalent to 0) provides no tracing.
•
user
(equivalent to 4) traces to identify user-induced error
conditions.
•
admin
(equivalent to 6) traces to identify installation-specific
problems.
•
support
(equivalent to 16) provides trace information for
troubleshooting by Oracle Support Services.
16.7.2.4 Setting Tracing Parameters in Configuration Files
Configure tracing parameters for the
sqlnet.ora
file with Oracle Net Manager and
listener.ora
file with either Oracle Enterprise Manager Cloud Control or Oracle Net
Manager. You must manually configure
cman.ora
file tracing parameters.
• Setting Tracing Parameters for sqlnet.ora File Using Oracle Net Manager
• Setting Tracing Parameters for the Listener Using Oracle Enterprise Manager
Cloud Control
Chapter 16
Tracing Error Information for Oracle Net Services
16-46

• Setting Tracing Parameters for the Listener Using Oracle Net Manager
16.7.2.4.1 Setting Tracing Parameters for sqlnet.ora File Using Oracle Net Manager
The following procedure describes how to set the tracing parameters for the
sqlnet.ora
file
using Oracle Net Manager:
1. Start Oracle Net Manager.
See Also:
"Using Oracle Net Manager to Configure Oracle Net Services"
2. In the navigator pane, expand Profile under the Local heading.
3. From the list in the right pane, select General.
4. Click the Tracing tab.
5. Specify the settings.
6. Choose Save Network Configuration from the File menu.
The name of the trace file for the client is
sqlnet.trc
. The name of the trace file for the
server is
svr_pid.trc
.
16.7.2.4.2 Setting Tracing Parameters for the Listener Using Oracle Enterprise Manager Cloud
Control
The following procedure describes how to set the tracing parameters for the listener using
Oracle Enterprise Manager Cloud Control:
1. Access the Net Services Administration page in Oracle Enterprise Manager Cloud
Control.
See Also:
"Using Oracle Enterprise Manager Cloud Control to Configure Oracle Net
Services"
2. Select Listeners from the Administer list, and then select the Oracle home that contains
the location of the configuration files.
3. Click Go to display the Listeners page.
4. Select a listener, and then click Edit to display the Edit Listeners page.
5. Click the Logging & Tracing tab.
6. Specify the settings.
7. Click OK.
The name of the trace file is
listener.trc
.
Chapter 16
Tracing Error Information for Oracle Net Services
16-47

16.7.2.4.3 Setting Tracing Parameters for the Listener Using Oracle Net Manager
The following procedure describes how to set the tracing parameters for the listener
using Oracle Net Manager:
1. Start Oracle Net Manager.
See Also:
"Using Oracle Net Manager to Configure Oracle Net Services"
2. In the navigator pane, expand Listeners from the Local heading.
3. Select a listener.
4. From the list in the right pane, select General.
5. Click the Logging and Tracing tab.
6. Specify the settings.
7. Choose Save Network Configuration from the File menu.
16.7.3 Setting Tracing During Control Utilities Runtime
You can set tracing during control utility runtime. Setting tracing with a control utility
does not set parameters in the
*.ora
files. The setting is only valid for the session of
the control utility:
• For the listener, use the
SET TRC_DIRECTORY
,
SET TRC_FILE
, and
SET TRC_LEVEL
commands from the Listener Control utility.
• For Oracle Connection Manager, use the
SET TRACE_DIRECTORY
and
SET
TRACE_LEVEL
, and
SET TRACE_TIMESTAMP
commands from the Oracle Connection
Manager control utility.
16.7.4 Evaluating Oracle Net Services Trace Files
Trace files can help Oracle Support Services diagnose and troubleshoot network
problems. This section explains how to perform basic analysis of trace files.
• Flow of Data Packets Between Network Nodes
• Oracle Net Data Packet Formats
• Pertinent Oracle Net Trace Error Output
16.7.4.1 Flow of Data Packets Between Network Nodes
Oracle Net performs its functions by sending and receiving data packets. You can view
the actual contents of the Oracle Net packet in your trace file by specifying a trace
level of
support
. The order of the packet types sent and received help to determine
how the connection was established.
Chapter 16
Tracing Error Information for Oracle Net Services
16-48

16.7.4.2 Oracle Net Data Packet Formats
Each line in the trace file begins with a procedure followed by a message. Following each
procedure is a line of hexadecimal data representing actual data. The actual data that flows
inside the packet is sometimes viewable to the right of the hexadecimal data.
Each packet has a keyword that denotes the packet type. All packet types begin with the
prefix "
nsp
". This is helpful when reviewing trace files for specific packet information. The
following keywords are used in a trace file:
• NSPTCN: Used with connect packet types.
• NSPTAC: Used with accept packet types.
• NSPTRF: Used with refuse packet types.
• NSPTRS: Used with resend packet types.
• NSPTDA: Used with data packet types.
• NSPCNL: Used with control packet types.
• NSPTMK: Used with marker packet types.
Example 16-11 shows typical packet information. In the example, the
nscon
procedure sends
an NSPTCN packet over the network.
Example 16-11 Packet Information
nscon: entry
nscon: doing connect handshake...
nscon: sending NSPTCN packet
nspsend: entry
nspsend: plen=187, type=1
nspsend: 187 bytes to transport
nspsend:packet dump
nspsend:00 BB 00 00 01 00 00 00 |........|
nspsend:01 33 01 2C 0C 01 08 00 |.3.,....|
nspsend:7F FF 7F 08 00 00 00 01 |........|
nspsend:00 99 00 22 00 00 08 00 |..."....|
nspsend:01 01 28 44 45 53 43 52 |..(DESCR|
nspsend:49 50 54 49 4F 4E 3D 28 |IPTION=(|
nspsend:43 4F 4E 4E 45 43 54 5F |CONNECT_|
nspsend:44 41 54 41 3D 28 53 49 |DATA=(SI|
nspsend:44 3D 61 70 33 34 37 64 |D=ap347d|
nspsend:62 31 29 28 43 49 44 3D |b1)(CID=|
nspsend:28 50 52 4F 47 52 41 4D |(PROGRAM|
nspsend:3D 29 28 48 4F 53 54 3D |=)(HOST=|
nspsend:61 70 32 30 37 73 75 6E |sales-12|
nspsend:29 28 55 53 45 52 3D 6D |)(USER=m|
nspsend:77 61 72 72 65 6E 29 29 |scott))|
nspsend:29 28 41 44 44 52 45 53 |)(ADDRES|
nspsend:53 5F 4C 49 53 54 3D 28 |S_LIST=(|
nspsend:41 44 44 52 45 53 53 3D |ADDRESS=|
nspsend:28 50 52 4F 54 4F 43 4F |(PROTOCO|
nspsend:4C 3D 74 63 70 29 28 48 |L=tcp)(H|
nspsend:4F 53 54 3D 61 70 33 34 |OST=sale|
nspsend:37 73 75 6E 29 28 50 4F |s-12)(PO|
nspsend:52 54 3D 31 35 32 31 29 |RT=1521)|
nspsend:29 29 29 00 00 00 00 00 |))).....|
nspsend: normal exit
nscon: exit (0)
Chapter 16
Tracing Error Information for Oracle Net Services
16-49

16.7.4.3 Pertinent Oracle Net Trace Error Output
When there is a problem, the error code is logged in the trace file. Example 16-12
illustrates typical trace file output for a failed SQL*Plus connection to a database
server. The error message and error stack are shown in bold.
Example 16-12 Trace Example
[22-MAY-2012 13:34:07:687] nsprecv: entry
[22-MAY-2012 13:34:07:687] nsbal: entry
[22-MAY-2012 13:34:07:687] nsbgetfl: entry
[22-MAY-2012 13:34:07:687] nsbgetfl: normal exit
[22-MAY-2012 13:34:07:687] nsmal: entry
[22-MAY-2012 13:34:07:687] nsmal: 44 bytes at 0x132d90
[22-MAY-2012 13:34:07:687] nsmal: normal exit
[22-MAY-2012 13:34:07:687] nsbal: normal exit
[22-MAY-2012 13:34:07:687] nsprecv: reading from transport...
[22-MAY-2012 13:34:07:687] nttrd: entry
[22-MAY-2012 13:35:09:625] nttrd: exit
[22-MAY-2012 13:35:09:625] ntt2err: entry
[22-MAY-2012 13:35:09:625] ntt2err: Read unexpected EOF ERROR on 10
[22-MAY-2012 13:35:09:625] ntt2err: exit
[22-MAY-2012 13:35:09:625] nsprecv: transport read error
[22-MAY-2012 13:35:09:625] nsprecv: error exit
[22-MAY-2012 13:35:09:625] nserror: entry
[22-MAY-2012 13:35:09:625] nserror: nsres: id=0, op=68, ns=12537,
ns2=12560;
nt[0]=507, nt[1]=0, nt[2]=0; ora[0]=0, ora[1]=0, ora[2]=0
[22-MAY-2012 13:35:09:625] nscon: error exit
[22-MAY-2012 13:35:09:625] nsdo: nsctxrnk=0
[22-MAY-2012 13:35:09:625] nsdo: error exit
[22-MAY-2012 13:35:09:625] nscall: unexpected response
[22-MAY-2012 13:35:09:625] nsclose: entry
[22-MAY-2012 13:35:09:625] nstimarmed: entry
[22-MAY-2012 13:35:09:625] nstimarmed: no timer allocated
[22-MAY-2012 13:35:09:625] nstimarmed: normal exit
[22-MAY-2012 13:35:09:625] nsdo: entry
[22-MAY-2012 13:35:09:625] nsdo: cid=0, opcode=98, *bl=0, *what=0,
uflgs=0x440, cflgs=0x2
[22-MAY-2012 13:35:09:625] nsdo: rank=64, nsctxrnk=0
[22-MAY-2012 13:35:09:625] nsdo: nsctx: state=1, flg=0x4201, mvd=0
[22-MAY-2012 13:35:09:625] nsbfr: entry
[22-MAY-2012 13:35:09:625] nsbaddfl: entry
[22-MAY-2012 13:35:09:625] nsbaddfl: normal exit
[22-MAY-2012 13:35:09:625] nsbfr: normal exit
[22-MAY-2012 13:35:09:625] nsbfr: entry
[22-MAY-2012 13:35:09:625] nsbaddfl: entry
[22-MAY-2012 13:35:09:625] nsbaddfl: normal exit
[22-MAY-2012 13:35:09:625] nsbfr: normal exit
[22-MAY-2012 13:35:09:625] nsdo: nsctxrnk=0
[22-MAY-2012 13:35:09:625] nsdo: normal exit
[22-MAY-2012 13:35:09:625] nsclose: closing transport
[22-MAY-2012 13:35:09:625] nttdisc: entry
[22-MAY-2012 13:35:09:625] nttdisc: Closed socket 10
[22-MAY-2012 13:35:09:625] nttdisc: exit
[22-MAY-2012 13:35:09:625] nsclose: global context check-out (from slot 0)
complete
[22-MAY-2012 13:35:09:703] nsnadisc: entry
[22-MAY-2012 13:35:09:703] nadisc: entry
Chapter 16
Tracing Error Information for Oracle Net Services
16-50

[22-MAY-2012 13:35:09:703] nacomtm: entry
[22-MAY-2012 13:35:09:703] nacompd: entry
[22-MAY-2012 13:35:09:703] nacompd: exit
[22-MAY-2012 13:35:09:703] nacompd: entry
[22-MAY-2012 13:35:09:703] nacompd: exit
[22-MAY-2012 13:35:09:703] nacomtm: exit
[22-MAY-2012 13:35:09:703] nas_dis: entry
[22-MAY-2012 13:35:09:703] nas_dis: exit
[22-MAY-2012 13:35:09:703] nau_dis: entry
[22-MAY-2012 13:35:09:703] nau_dis: exit
[22-MAY-2012 13:35:09:703] naeetrm: entry
[22-MAY-2012 13:35:09:703] naeetrm: exit
[22-MAY-2012 13:35:09:703] naectrm: entry
[22-MAY-2012 13:35:09:703] naectrm: exit
[22-MAY-2012 13:35:09:703] nagbltrm: entry
[22-MAY-2012 13:35:09:703] nau_gtm: entry
[22-MAY-2012 13:35:09:703] nau_gtm: exit
[22-MAY-2012 13:35:09:703] nagbltrm: exit
[22-MAY-2012 13:35:09:703] nadisc: exit
[22-MAY-2012 13:35:09:703] nsnadisc: normal exit
[22-MAY-2012 13:35:09:703] nsbfr: entry
[22-MAY-2012 13:35:09:703] nsbaddfl: entry
[22-MAY-2012 13:35:09:703] nsbaddfl: normal exit
[22-MAY-2012 13:35:09:703] nsbfr: normal exit
[22-MAY-2012 13:35:09:703] nsmfr: entry
[22-MAY-2012 13:35:09:703] nsmfr: 2256 bytes at 0x130508
[22-MAY-2012 13:35:09:703] nsmfr: normal exit
[22-MAY-2012 13:35:09:703] nsmfr: entry
[22-MAY-2012 13:35:09:703] nsmfr: 484 bytes at 0x1398a8
[22-MAY-2012 13:35:09:703] nsmfr: normal exit
[22-MAY-2012 13:35:09:703] nsclose: normal exit
[22-MAY-2012 13:35:09:703] nscall: connecting...
[22-MAY-2012 13:35:09:703] nsclose: entry
[22-MAY-2012 13:35:09:703] nsclose: normal exit
[22-MAY-2012 13:35:09:703] nladget: entry
[22-MAY-2012 13:35:09:734] nladget: exit
[22-MAY-2012 13:35:09:734] nsmfr: entry
[22-MAY-2012 13:35:09:734] nsmfr: 144 bytes at 0x132cf8
[22-MAY-2012 13:35:09:734] nsmfr: normal exit
[22-MAY-2012 13:35:09:734] nsmfr: entry
[22-MAY-2012 13:35:09:734] nsmfr: 156 bytes at 0x138e70
[22-MAY-2012 13:35:09:734] nsmfr: normal exit
[22-MAY-2012 13:35:09:734] nladtrm: entry
[22-MAY-2012 13:35:09:734] nladtrm: exit
[22-MAY-2012 13:35:09:734] nscall: error exit
[22-MAY-2012 13:35:09:734] nioqper: error from nscall
[22-MAY-2012 13:35:09:734] nioqper: ns main err code: 12537
[22-MAY-2012 13:35:09:734] nioqper: ns (2) err code: 12560
[22-MAY-2012 13:35:09:734] nioqper: nt main err code: 507
[22-MAY-2012 13:35:09:734] nioqper: nt (2) err code: 0
[22-MAY-2012 13:35:09:734] nioqper: nt OS err code: 0
[22-MAY-2012 13:35:09:734] niomapnserror: entry
[22-MAY-2012 13:35:09:734] niqme: entry
[22-MAY-2012 13:35:09:734] niqme: reporting NS-12537 error as ORA-12537
[22-MAY-2012 13:35:09:734] niqme: exit
[22-MAY-2012 13:35:09:734] niomapnserror: returning error 12537
[22-MAY-2012 13:35:09:734] niomapnserror: exit
[22-MAY-2012 13:35:09:734] niotns: Couldn't connect, returning 12537
[22-MAY-2012 13:35:10:734] niotns: exit
[22-MAY-2012 13:35:10:734] nsbfrfl: entry
[22-MAY-2012 13:35:10:734] nsbrfr: entry
Chapter 16
Tracing Error Information for Oracle Net Services
16-51

[22-MAY-2012 13:35:10:734] nsbrfr: nsbfs at 0x132d90, data at 0x132dc8.
[22-MAY-2012 13:35:10:734] nsbrfr: normal exit
[22-MAY-2012 13:35:10:734] nsbrfr: entry
[22-MAY-2012 13:35:10:734] nsbrfr: nsbfs at 0x1248d8, data at 0x132210.
[22-MAY-2012 13:35:10:734] nsbrfr: normal exit
[22-MAY-2012 13:35:10:734] nsbrfr: entry
[22-MAY-2012 13:35:10:734] nsbrfr: nsbfs at 0x12d820, data at 0x1319f0.
[22-MAY-2012 13:35:10:734] nsbrfr: normal exit
[22-MAY-2012 13:35:10:734] nsbfrfl: normal exit
[22-MAY-2012 13:35:10:734] nigtrm: Count in the NI global area is now 1
[22-MAY-2012 13:35:10:734] nigtrm: Count in the NL global area is now 1
Note:
In the error stack in the preceding example, an operating system error code
is shown. Each operating system has its own error codes, refer to your
system documentation for information about operating system error codes.
The most efficient way to evaluate error codes is to find the most recent
nserror
entry
logged, as the session layer controls the connection. The most important error
messages are the ones at the bottom of the file. They are the most recent errors and
the source of the problem with the connection.
For information about the specific return codes, use the Oracle error tool
oerr
, by
entering the following at any command line:
oerr tns
error_number
As an example, consider the following
nserror
entry logged in the trace file shown in
Example 16-12:
[22-MAY-2012 13:35:09:625] nserror: nsres: id=0, op=68, ns=12537, ns2=
12560
;
nt[0]=507, nt[1]=0, nt[2]=0; ora[0]=0, ora[1]=0, ora[2]=0
In the preceding example, the main TNS error is 12537, and its secondary error is
12560. The protocol adapter error is 507. Using
oerr
, you can find out more
information about return codes 12537, 12560, and 507. User input is shown in bold in
the following examples.
oerr tns 12537
12537, 00000, "TNS:connection closed"
// *Cause: "End of file" condition has been reached; partner has disconnected.
// *Action: None needed; this is an information message.
oerr tns 12560
12560, 00000, "TNS:protocol adapter error"
// *Cause: A generic protocol adapter error occurred.
// *Action: Check addresses used for proper protocol specification. Before
// reporting this error, look at the error stack and check for lower level
// transport errors. For further details, turn on tracing and reexecute the
// operation. Turn off tracing when the operation is complete.
oerr tns 507
00507, 00000, "Connection closed"
// *Cause: Normal "end of file" condition has been reached; partner has
// disconnected.
// *Action: None needed; this is an information message.
Chapter 16
Tracing Error Information for Oracle Net Services
16-52

16.7.5 Using the Trace Assistant to Examine Trace Files
Oracle Net Services provides a tool called the Trace Assistant to help understand the
information provided in trace files by converting existing lines of trace file text into a more
readable paragraph. The Trace Assistant works only with level 16 (support) Oracle Net
Services trace files.
Note:
The Trace Assistant can only be used when the DIAG_ADR_ENABLED parameter
is set to
off
. See "Understanding Automatic Diagnostic Repository".
• Trace Assistant Syntax
• Packet Examples
Trace Assistant enables you to view data packets from both the Oracle Net and TTC
communication layers.
• Two-Task Common (TTC) Packet Examples
• Connection Example
These are the sample outputs using the
trcasst
-la
and
-li
options.
• Statistics Example
16.7.5.1 Trace Assistant Syntax
To run the Trace Assistant, enter the following command at any command line prompt:
trcasst [
options
]
filename
The options are described in Table 16-23.
Table 16-23 Trace Assistant Syntax
Option Description
-elevel Displays error information. After the
-e
, use
0
,
1
, or
2
error decoding level may follow:
•
0
or nothing translates the NS error numbers dumped from the
nserror
function
plus lists all other errors
•
1
displays only the NS error translation from the
nserror
function
•
2
displays error numbers without translation
Chapter 16
Tracing Error Information for Oracle Net Services
16-53

Table 16-23 (Cont.) Trace Assistant Syntax
Option Description
-la If a connection ID exists in the NS connect packet, then the output displays the
connection IDs. Connection IDs are displayed as hexadecimal, eight-byte IDs. A
generated ID is created by Trace Assistant if the packet is not associated with any
connection, that is, the connect packet is overwritten in the trace file. This can occur with
cyclic trace files.
For each ID, the output lists the following:
• Socket ID, if the connection has one.
• Connect packet send or receive operation.
• Current setting of the
MULTIPLEX
attribute of the DISPATCHERS parameter in the
initialization parameter file. When
MULTIPLEX
is set to
ON
, session multiplexing is
enabled.
• Session ID, if
MULTIPLEX
is set to
ON
.
• Connect data information.
Notes:
• Do not use this option with other options.
• The IDs generated by the Trace Assistant do not correlate with client/server trace
files.
-li ID Displays the trace for a particular ID from the
-la
output
Note: Only use this option with output from the
-la
option.
-otype Displays the amount and type of information to be output. After the
-o
the following
options can be used:
•
c
to display summary connectivity information.
•
d
to display detailed connectivity information.
•
u
to display summary Two-Task Common (TTC) information.
•
t
to display detailed TTC information.
•
q
to display SQL commands enhancing summary TTC information. Use this option
with
u
, such as
-ouq
.
Note: As output for
d
contains the same information as displayed for
c
, do not submit
both
c
and
d
. If you submit both, then only output
d
is processed.
-s Displays the following statistical information:
• Total number of bytes sent and received.
• Maximum open cursors.
• Currently open cursors.
• Count and ratio of operations.
• Parsing and execution count for PL/SQL.
• Total calls sent and received.
• Total, average, and maximum number of bytes sent and received.
• Total number of transports and sessions present.
• Timestamp information, if any.
• Sequence numbers, if any.
If no options are provided, then the default is
-odt -e0 -s
, which provides detailed
connectivity and TTC events, error level zero (0), and statistics in the trace file.
The following example shows how the Trace Assistant converts the trace file
information into a more readable format using the
-e1
option.
Chapter 16
Tracing Error Information for Oracle Net Services
16-54

Example 16-13 trcasst -e1 Output
*************************************************************************
* Trace Assistant *
*************************************************************************
ntus2err: exit
ntuscni: exit
ntusconn: exit
nserror: entry
-<ERROR>- nserror: nsres: id=0, op=65, ns=12541, ns2=12560; nt[0]=511, nt[1]=2,
nt[2]=0
///////////////////////////////////////////////////////////////
Error found. Error Stack follows:
id:0
Operation code:65
NS Error 1:12541
NS Error 2:12560
NT Generic Error:511
Protocol Error:2
OS Error:0
NS & NT Errors Translation
12541, 00000 "TNS:no listener"
// *Cause: The connection request could not be completed because the listener
// is not running.
// *Action: Ensure that the supplied destination address matches one of
// the addresses used by the listener - compare the TNSNAMES.ORA entry with
// the appropriate LISTENER.ORA file (or TNSNAV.ORA if the connection is to
// go by way of an Interchange). Start the listener on the remote machine.
/
12560, 00000 "TNS:protocol adapter error"
// *Cause: A generic protocol adapter error occurred.
// *Action: Check addresses used for proper protocol specification. Before
// reporting this error, look at the error stack and check for lower level
// transport errors.For further details, turn on tracing and reexecute the
// operation. Turn off tracing when the operation is complete.
/
00511, 00000 "No listener"
// *Cause: The connect request could not be completed because no application
// is listening on the address specified, or the application is unable to
// service the connect request in a sufficiently timely manner.
// *Action: Ensure that the supplied destination address matches one of
// the addresses used by the listener - compare the TNSNAMES.ORA entry with
// appropriate LISTENER.ORA file (or TNSNAV.ORA if the connection is to go
// by way of an Interchange. Start the listener on the remote machine.
/
///////////////////////////////////////////////////////////////
*************************************************************************
* Trace Assistant has completed *
*************************************************************************
However, other errors may also exist within the trace file that were not logged from the
nserror
function.
16.7.5.2 Packet Examples
Trace Assistant enables you to view data packets from both the Oracle Net and TTC
communication layers.
Chapter 16
Tracing Error Information for Oracle Net Services
16-55

You can view the packets using the following options:
• Summary connectivity (using option
-oc
)
• Detailed connectivity (using option
-od
)
Example 16-14 shows summary information from the
-oc
option.
Example 16-14 Summary Information from trcasst -oc Output
*************************************************************************
* Trace Assistant *
*************************************************************************
---> Send 198 bytes - Connect packet
Connect data length: 140
Connect Data:
(DESCRIPTION=(ADDRESS=(PROTOCOL=TCP)(HOST=sales-server)(PORT=1521))
(CONNECT_DATA=(SERVICE_NAME=sales.us.example.com)(CID=(PROGRAM=)
(HOST=sales-server)(USER=joe))))
<--- Received 76 bytes - Redirect packet
Redirect data length: 66
Redirect Data:
(ADDRESS=(PROTOCOL=tcp)(HOST=sales-server)(PORT=1521))
---> Send 198 bytes - Connect packet
Connect data length: 140
Connect Data:
(DESCRIPTION=(ADDRESS=(PROTOCOL=TCP)(HOST=sales-server)(PORT=1521))
(CONNECT_DATA=(SERVICE_NAME=sales.us.example.com)(CID=(PROGRAM=)
(HOST=sales-server)(USER=joe))))
<--- Received 32 bytes - Accept packet
Connect data length: 0
---> Send 153 bytes - Data packet
Native Services negotiation packet
<--- Received 127 bytes - Data packet
Native Services negotiation packet
---> Send 32 bytes - Data packet
<--- Received 140 bytes - Data packet
*************************************************************************
* Trace Assistant has completed *
*************************************************************************
The packets being sent or received have a prefix of
---> Send nnn bytes
or
<---
Received nnn bytes
showing that this node is sending or receiving a packet of a
certain type and with
nnn
number of bytes. This prefix enables you to determine if the
node is the client or the database server. The connection request is always sent by the
client, and received by the database server or listener.
Example 16-15 shows detailed information from the
-od
option. The output shows all
of the details sent along with the connect data in negotiating a connection.
Example 16-15 Detailed Information from trcasst -od Output
*************************************************************************
* Trace Assistant *
Chapter 16
Tracing Error Information for Oracle Net Services
16-56

*************************************************************************
---> Send 241 bytes - Connect packet
Current NS version number is: 311.
Lowest NS version number can accommodate is: 300.
Global options for the connection:
can receive attention
no attention processing
Don't care
Maximum SDU size:8192
Maximum TDU size:32767
NT protocol characteristics:
Test for more data
Test operation
Full duplex I/O
Urgent data support
Generate SIGURG signal
Generate SIGPIPE signal
Generate SIGIO signal
Handoff connection to another
Line turnaround value :0
Connect data length :183
Connect data offset :58
Connect data maximum size :512
Native Services wanted
NAU doing O3LOGON - DH key foldedin
Native Services wanted
NAU doing O3LOGON - DH key foldedin
Cross facility item 1: 0
Cross facility item 2: 0
Connection id : Ox000059F70000004C
(DESCRIPTION=(ADDRESS=(PROTOCOL=TCP)(HOST=sales-server)(PORT=1521))
(CONNECT_DATA=(SERVICE_NAME=sales.us.example.com)(SRVR=SHARED)(CID=(PROGRAM=)
(HOST=sales-server)(USER=joe))))
<--- Received 76 bytes - Redirect packet
Redirect data length: 66
(ADDRESS=(PROTOCOL=tcp)(HOST=sales-server)(PORT=1521))
---> Send 241 bytes - Connect packet
Current NS version number is: 311.
Lowest NS version number can accommodate is: 300.
Global options for the connection:
can receive attention
no attention processing
Don't care
Maximum SDU size:8192
Maximum TDU size:32767
NT protocol characteristics:
Test for more data
Test operation
Full duplex I/O
Urgent data support
Generate SIGURG signal
Generate SIGPIPE signal
Generate SIGIO signal
Handoff connection to another
Line turnaround value :0
Connect data length :183
Connect data offset :58
Connect data maximum size :512
Native Services wanted
Chapter 16
Tracing Error Information for Oracle Net Services
16-57

NAU doing O3LOGON - DH key foldedin
Native Services wanted
NAU doing O3LOGON - DH key foldedin
Cross facility item 1: 0
Cross facility item 2: 0
Connection id : Ox000059F70000007A
(DESCRIPTION=(ADDRESS=(PROTOCOL=TCP)(HOST=sales-server)(PORT=1521))
(CONNECT_DATA=(SERVICE_NAME=sales.us.example.com)(SRVR=SHARED)(CID=(PROGRAM=)
(HOST=sales-server)(USER=joe))))
<--- Received 32 bytes - Accept packet
Accepted NS version number is: 310.
Global options for the connection:
no attention processing
Don't care
Accepted maximum SDU size: 8192
Accepted maximum TDU size: 32767
Connect data length: 0
Native Services wanted
NAU doing O3LOGON - DH key foldedin
Native Services wanted
NAU doing O3LOGON - DH key foldedin
---> Send 153 bytes - Data packet
Native Services negotiation packet version#: 150999040
Service data packet #0 for Supervisor has 3 subpackets
Subpacket #0: Version #150999040
Subpacket #1: 0000000000000000
Subpacket #2: DAABBCEF0003000000040004000100010002
Service data packet #1 for Authentication has 3 subpackets
Subpacket #0: Version #150999040
Subpacket #1: UB2: 57569
Subpacket #2: FCFF
Service data packet #2 for Encryption has 2 subpackets
Subpacket #0: Version #150999040
Subpacket #1: 000000000000000000
Service data packet #3 for Data Integrity has 2 subpackets
Subpacket #0: Version #150999040
Subpacket #1: 000000
<--- Received 127 bytes - Data packet
Native Services negotiation packet version#: 135290880
Service data packet #0 for Supervisor has 3 subpackets
Subpacket #0: Version #135290880
Subpacket #1: 0000
Subpacket #2: DAABBCEF00030000000200040001
Service data packet #1 for Authentication has 2 subpackets
Subpacket #0: Version #135290880
Subpacket #1: FBFF
Service data packet #2 for Encryption has 2 subpackets
Subpacket #0: Version #135290880
Subpacket #1: UB1: 0
Service data packet #3 for Data Integrity has 2 subpackets
Subpacket #0: Version #135290880
Subpacket #1: UB1: 0
....
---> Send 11 bytes - Marker packet
One data byte.
Hex character sent over to the server: 2
<--- Received 11 bytes - Marker packet
Chapter 16
Tracing Error Information for Oracle Net Services
16-58

One data byte.
Hex character sent over to the server: 2
<--- Received 155 bytes - Data packet
---> Send 25 bytes - Data packet
<--- Received 11 bytes - Data packet
---> Send 13 bytes - Data packet
<--- Received 11 bytes - Data packet
---> Send 10 bytes - Data packet
Data Packet flags:
End of file
*************************************************************************
* Trace Assistant has completed *
*************************************************************************
16.7.5.3 Two-Task Common (TTC) Packet Examples
TTC handles requests such as open cursor, select rows, and update rows that are directed to
the database server. All requests are answered by the database server. If you request to log
on, then a response is returned from the database server that the request was completed.
Summary information for TTC from the
-ou
option is different from other displays in that it
shows two packets on each line, rather than one. This is done to mirror the request/response
pairings process by which TTC operates.
Output is displayed in the following format:
description
TTC_message
cursor_number
SQL_statement
bytes_sent
bytes_received
Example 16-16 shows all of the details sent along with the connect data in negotiating a
connection.
Example 16-16 trcasst -ou Output
*************************************************************************
* Trace Assistant *
*************************************************************************
Bytes Bytes
Sent Rcvd
Send operation(TTIPRO) 32 140
Send operation(TTIDTY) 33 22
Get the session key (OSESSKEY) 229 145
Generic authentication call (OAUTH) 368 1001
Send operation(TTIPFN) 44 144
Send operation(TTIPFN) 36 16
Parse a statement (OSQL) # 1 SELECT USER FROM ... 47 100
Fast upi calls to opial7 (OALL7) # 1 130 111
Fetch row (OFETCH) # 1 21 137
Close cursor (OCLOSE) # 1 17 11
New v8 bundled call (OALL8) # 0 !Keep Parse BEGI... 156 145
Send operation(TTIPFN) 51 16
Parse a statement (OSQL) # 1 SELECT ATTRIBUTE,... 186 100
Fast upi calls to opial7 (OALL7) # 1 246 111
Fetch row (OFETCH) # 1 21 126
Chapter 16
Tracing Error Information for Oracle Net Services
16-59

Close cursor (OCLOSE) # 1 17 11
Send operation(TTIPFN) 36 16
Parse a statement (OSQL) # 1 SELECT CHAR_VALUE... 208 100
Fast upi calls to opial7 (OALL7) # 1 130 111
Fetch row (OFETCH) # 1 21 126
Close cursor (OCLOSE) # 1 17 11
Send operation(TTIPFN) 36 16
Fast upi calls to opial7 (OALL7) # 1 !Keep Parse BEGI... 183 41
Send operation(TTIRXD) 20 111
Close cursor (OCLOSE) # 1 17 11
New v8 bundled call (OALL8) # 0 Parse Fetch SELE... 165 278
Send operation(TTIPFN) 51 16
Parse a statement (OSQL) # 1 commit 31 100
Execute statement (OEXEC) # 1 number of rows: 1 25 100
Close cursor (OCLOSE) # 1 17 11
Send operation(TTIPFN) 36 16
Fast upi calls to opial7 (OALL7) # 1 !Keep Parse BEGI... 183 41
Send operation(TTIRXD) 60 111
Close cursor (OCLOSE) # 1 17 11
Send operation(TTIPFN) 36 16
Fast upi calls to opial7 (OALL7) # 1 !Keep Parse BEGI... 183 41
Send operation(TTIRXD) 20 111
Close cursor (OCLOSE) # 1 17 11
New v8 bundled call (OALL8) # 0 Parse Fetch sele... 144 383
New v8 bundled call (OALL8) # 1 !Keep Fetch 121 315
Logoff off of Oracle (OLOGOFF) 13 11
*************************************************************************
* Trace Assistant has completed *
*************************************************************************
Example 16-17 shows detailed TTC information from the
-ot
option.
Example 16-17 Detailed TTC Information from trcasst -ot Output
*************************************************************************
* Trace Assistant
*
*************************************************************************
Set protocol (TTIPRO)
Operation 01 (con) Send protocol version=6
Originating platform: x86_64/Linux 2.4.xx
Set protocol (TTIPRO)
Operation 01 (con) Receive protocol version=6
Destination platform: x86_64/Linux 2.4.xx
Set datatypes (TTIDTY)
Set datatypes (TTIDTY)
Start of user function (TTIFUN)
Get the session key (OSESSKEY)
Return opi parameter (TTIRPA)
Start of user function (TTIFUN)
Generic authentication call (OAUTH)
Return opi parameter (TTIRPA)
Chapter 16
Tracing Error Information for Oracle Net Services
16-60

Piggyback function follows (TTIPFN)
Start of user function (TTIFUN)
V8 session switching piggyback (O80SES)
Start of user function (TTIFUN)
Get Oracle version/date (OVERSION)
Return opi parameter (TTIRPA)
Oracle Database 21c Enterprise Edition Release 21.1.0.0.0 - 64bit Production
Version 21.1.0.0.0
Start of user function (TTIFUN)
New v8 bundled call (OALL8) Cursor # 0
Parse Fetch
Describe information (TTIDCB)
Start of user function (TTIFUN)
Fetch row (OFETCH) Cursor # 3
ORACLE function complete (TTIOER)
ORA-01403: no data found
Piggyback function follows (TTIPFN)
Start of user function (TTIFUN)
Cursor Close All (OCCA)
Start of user function (TTIFUN)
New v8 bundled call (OALL8) Cursor # 0
Parse Fetch
Describe information (TTIDCB)
Piggyback function follows (TTIPFN)
Start of user function (TTIFUN)
Cursor Close All (OCCA)
Start of user function (TTIFUN)
New v8 bundled call (OALL8) Cursor # 0
Parse Fetch
Describe information (TTIDCB)
Piggyback function follows (TTIPFN)
Start of user function (TTIFUN)
Cursor Close All (OCCA)
Start of user function (TTIFUN)
New v8 bundled call (OALL8) Cursor # 0
!Keep Parse
Sending the I/O vector only for fast upi (TTIIOV)
Piggyback function follows (TTIPFN)
Start of user function (TTIFUN)
Cursor Close All (OCCA)
Chapter 16
Tracing Error Information for Oracle Net Services
16-61

Start of user function (TTIFUN)
New v8 bundled call (OALL8) Cursor # 0
Parse Fetch
Describe information (TTIDCB)
Piggyback function follows (TTIPFN)
Start of user function (TTIFUN)
Cursor Close All (OCCA)
Start of user function (TTIFUN)
Commit (OCOMMIT)
V6 Oracle func complete (TTISTA)
Start of user function (TTIFUN)
Commit (OCOMMIT)
V6 Oracle func complete (TTISTA)
Start of user function (TTIFUN)
Logoff off of Oracle (OLOGOFF)
MAXIMUM OPEN CURSORS: 0
CURSORS NOT CLOSED: 0
V6 Oracle func complete (TTISTA)
Succeeded
*************************************************************************
* Trace Assistant has completed *
*************************************************************************
Example 16-18 shows detailed SQL information from the
-ouq
option. On each line of
the output, the first item displayed is the actual request made. The second item shows
on what cursor that operation has been performed. The third item is either a listing of
the SQL command or flag that is being answered. The number of bytes sent and
received are displayed at the far right. A flag can be one of the following:
• !PL/SQL = Not a PL/SQL request
• COM = Commit
• IOV = Get I/O Vector
• DEFN = Define
• EXEC = Execute
• FETCH = Fetch
• CAN = Cancel
• DESCSEL = Describe select
• DESCBND = Describe Bind
• BND = Bind
• PARSE = Parse
Chapter 16
Tracing Error Information for Oracle Net Services
16-62

• EXACT = Exact
Example 16-18 Detailed SQL Information from trcasst -ouq Output
*************************************************************************
* Trace Assistant *
*************************************************************************
Bytes Bytes
Sent Rcvd
Send operation(TTIPRO) 32 140
Send operation(TTIDTY) 33 22
Get the session key (OSESSKEY) 229 145
Generic authentication call (OAUTH) 368 1001
Send operation(TTIPFN) 44 144
Send operation(TTIPFN) 36 16
Parse a statement (OSQL) # 1 47 100
SELECT USER FROM DUAL
Fast upi calls to opial7 (OALL7) # 1 130 111
Fetch row (OFETCH) # 1 21 137
Close cursor (OCLOSE) # 1 17 11
New v8 bundled call (OALL8) # 0 !Keep Parse 156 145
BEGIN DBMS_OUTPUT.DISABLE; END;
Send operation(TTIPFN) 51 16
Parse a statement (OSQL) # 1 186 100
SELECT ATTRIBUTE,SCOPE,NUMERIC_VALUE,CHAR_VALUE,DA
TE_VALUE FROM SYSTEM.PRODUCT_PRIVS WHERE (UPPER('S
QL*Plus') LIKE UPPER(PRODUCT)) AND (UPPER(USER) LI
KE USERID)
Fast upi calls to opial7 (OALL7) # 1 246 111
Fetch row (OFETCH) # 1 21 126
Close cursor (OCLOSE) # 1 17 11
Send operation(TTIPFN) 36 16
Parse a statement (OSQL) # 1 208 100
SELECT CHAR_VALUE FROM SYSTEM.PRODUCT_PRIVS WHERE
(UPPER('SQL*Plus') LIKE UPPER(PRODUCT)) AND ((UPPE
R(USER) LIKE USERID) OR (USERID = 'PUBLIC')) AND (
UPPER(ATTRIBUTE) = 'ROLES')
Fast upi calls to opial7 (OALL7) # 1 130 111
Fetch row (OFETCH) # 1 21 126
Close cursor (OCLOSE) # 1 17 11
Send operation(TTIPFN) 36 16
Fast upi calls to opial7 (OALL7) # 1 !Keep Parse 183 41
BEGIN DBMS_APPLICATION_INFO.SET_MODULE(:1,NULL); E
ND;
Send operation(TTIRXD) 20 111
Close cursor (OCLOSE) # 1 17 11
New v8 bundled call (OALL8) # 0 Parse Fetch 165 278
SELECT DECODE('A','A','1','2') FROM DUAL
Send operation(TTIPFN) 51 16
Parse a statement (OSQL) # 1 31 100
commit
Execute statement (OEXEC) # 1 number of rows: 1 25 100
Close cursor (OCLOSE) # 1 17 11
Send operation(TTIPFN) 36 16
Chapter 16
Tracing Error Information for Oracle Net Services
16-63

Fast upi calls to opial7 (OALL7) # 1 !Keep Parse 183 41
BEGIN DBMS_APPLICATION_INFO.SET_MODULE(:1,NULL); E
ND;
Send operation(TTIRXD) 60 111
Close cursor (OCLOSE) # 1 17 11
Send operation(TTIPFN) 36 16
Fast upi calls to opial7 (OALL7) # 1 !Keep Parse 183 41
BEGIN DBMS_APPLICATION_INFO.SET_MODULE(:1,NULL); E
ND;
Send operation(TTIRXD) 20 111
Close cursor (OCLOSE) # 1 17 11
New v8 bundled call (OALL8) # 0 Parse Fetch 144 383
select * from dept
New v8 bundled call (OALL8) # 1 !Keep Fetch 121 315
Logoff off of Oracle (OLOGOFF) 13 11
*************************************************************************
* Trace Assistant has completed *
*************************************************************************
16.7.5.4 Connection Example
These are the sample outputs using the
trcasst
-la
and
-li
options.
Example 16-19 shows output from the
-la
option. The output shows the following
information:
• Connect IDs received
• Socket ID for the connection
• Operation
–
Receive
identifies the trace as a database server trace. In this example,
Receive
is the operation.
–
Send
identifies the trace as a client trace.
•
MULTIPLEX
attribute of the
DISPATCHERS
parameter is set to
ON
• 32-bit session ID
• Connect data information received
Example 16-19 trcasst -la Output
*************************************************************************
* Trace Assistant *
*************************************************************************
Connection ID: 00000B270000000B
Socket Id: 15
Operation: Receive
Multiplex: ON
Session Id: 8362785DE4FC0B19E034080020F793E1
Connect Data:
(DESCRIPTION=(ADDRESS=(PROTOCOL=TCP)(HOST=sales-server)(PORT=1521))
(CONNECT_DATA=(SERVER=shared)
(SERVICE_NAME=sales.us.example.com)(CID=(PROGRAM=)(HOST=sales-server)
(USER=oracle))))
Chapter 16
Tracing Error Information for Oracle Net Services
16-64

Connection ID: 00000B240000000B
Socket Id: 15
Operation: Receive
Multiplex: ON
Session Id: 8362785DE4FB0B19E034080020F793E1
Connect Data:
(DESCRIPTION=(ADDRESS=(PROTOCOL=TCP)(HOST=sales-server)(PORT=1521))
(CONNECT_DATA=(SERVER=shared)
(SERVICE_NAME=sales.us.example.com)(CID=(PROGRAM=)(HOST=sales-server)
(USER=oracle))))
Connection ID: 00000B1F00000008
Socket Id: 15
Operation: Receive
Multiplex: ON
Session Id: 8362785DE4F90B19E034080020F793E1
Connect Data:
(DESCRIPTION=(ADDRESS=(PROTOCOL=TCP)(HOST=sales-server)(PORT=1521))
(CONNECT_DATA=(SERVER=shared)
(SERVICE_NAME=sales.us.example.com)(CID=(PROGRAM=)(HOST=sales-server)
(USER=oracle))))
*************************************************************************
* Trace Assistant has completed *
*************************************************************************
Example 16-20 shows output for connection ID
00000B1F00000008
from the
-li
00000B1F00000008
option.
Example 16-20 trcasst -li Output
*************************************************************************
* Trace Assistant *
*************************************************************************
<--- Received 246 bytes - Connect packet
Current NS version number is: 310.
Lowest NS version number can accommodate is: 300.
Global options for the connection:
Can receive attention
No attention processing
Don't care
Maximum SDU size: 8192
Maximum TDU size: 32767
NT protocol characteristics:
Test for more data
Test operation
Full duplex I/O
Urgent data support
Generate SIGURG signal
Generate SIGPIPE signal
Generate SIGIO signal
Handoff connection to another
Line turnaround value: 0
Connect data length: 188
Connect data offset: 58
Connect data maximum size: 512
Native Services wanted
NAU doing O3LOGON - DH key foldedin
Native Services wanted
NAU doing O3LOGON - DH key foldedin
Cross facility item 1: 0
Cross facility item 2: 0
Chapter 16
Tracing Error Information for Oracle Net Services
16-65

Connection id: Ox00000B1F00000008
(DESCRIPTION=(ADDRESS=(PROTOCOL=TCP)(HOST=sales-server)(PORT=1521))
(CONNECT_DATA=(SERVER=shared)(SERVICE_NAME=sales.us.example.com)
(CID=(PROGRAM=)(HOST=sales-server)(USER=oracle))))
---> Send 114 bytes - Accept packet
Accepted NS version number is: 310.
Global options for the connection:
No attention processing
Don't care
Accepted maximum SDU size: 8192
Accepted maximum TDU size: 32767
Connect data length: 0
Native Services wanted
NAU doing O3LOGON - DH key foldedin
Native Services wanted
NAU doing O3LOGON - DH key foldedin
Connection Time out: 1000
Tick Size: 100
Reconnect Data: (ADDRESS=(PROTOCOL=tcp)(HOST=sales-server)(PORT=34454))
Session Id: 8362785DE4F90B19E034080020F793E1
<--- Received 164 bytes - Data packet
Native Services negotiation packet version#: 135290880
Service data packet #0 for Supervisor has 3 subpackets
Subpacket #0: Version #135290880
Subpacket #1: 0000000000000000
Subpacket #2: DAABBCEF0003000000040004000100010002
Service data packet #1 for Authentication has 3 subpackets
Subpacket #0: Version #135290880
Subpacket #1: UB2: 57569
Subpacket #2: FCFF
Service data packet #2 for Encryption has 2 subpackets
Subpacket #0: Version #135290880
Subpacket #1: 0000000000
Service data packet #3 for Data Integrity has 2 subpackets
Subpacket #0: Version #135290880
Subpacket #1: 0000
---> Send 143 bytes - Data packet
Native Services negotiation packet version#: 135290880
Service data packet #0 for Supervisor has 3 subpackets
Subpacket #0: Version #135290880
Subpacket #1: 0000
Subpacket #2: DAABBCEF00030000000200040001
Service data packet #1 for Authentication has 2 subpackets
Subpacket #0: Version #135290880
Subpacket #1: FBFF
Service data packet #2 for Encryption has 2 subpackets
Subpacket #0: Version #135290880
Subpacket #1: UB1: 0
Service data packet #3 for Data Integrity has 2 subpackets
Subpacket #0: Version #135290880
Subpacket #1: UB1: 0
<--- Received 48 bytes - Data packet
Set protocol (TTIPRO)
Operation 01 (con) Receive protocol version=6
Destination platform: SVR4-be-8.1.0
---> Send 156 bytes - Data packet
Set protocol (TTIPRO)
Operation 01 (con) Send protocol version=6
Originating platform: SVR4-be-8.1.0
<--- Received 49 bytes - Data packet
Chapter 16
Tracing Error Information for Oracle Net Services
16-66

Set datatypes (TTIDTY)
---> Send 38 bytes - Data packet
Set datatypes (TTIDTY)
<--- Received 245 bytes - Data packet
Start of user function (TTIFUN)
Get the session key (OSESSKEY)
---> Send 161 bytes - Data packet
Return opi parameter (TTIRPA)
...
*************************************************************************
* Trace Assistant has completed *
*************************************************************************
16.7.5.5 Statistics Example
The type of statistics gathered is approximately the number of TTC calls, packets, and bytes
sent and received between the network partners. Example 16-21 shows typical trace file
statistics from the
-s
option.
Example 16-21 trcasst -s Output
*************************************************************************
* Trace Assistant *
*************************************************************************
----------------------
Trace File Statistics:
----------------------
Total number of Sessions: 3
DATABASE:
Operation Count: 0 OPENS, 21 PARSES, 21 EXECUTES, 9 FETCHES
Parse Counts:
9 PL/SQL, 9 SELECT, 0 INSERT, 0 UPDATE, 0 DELETE,
0 LOCK, 3 TRANSACT, 0 DEFINE, 0 SECURE, 0 OTHER
Execute counts with SQL data:
9 PL/SQL, 0 SELECT, 0 INSERT, 0 UPDATE, 0 DELETE,
0 LOCK, 0 TRANSACT, 0 DEFINE, 0 SECURE, 0 OTHER
Packet Ratio: 6.142857142857143 packets sent per operation
Currently opened Cursors: 0
Maximum opened Cursors : 0
ORACLE NET SERVICES:
Total Calls : 129 sent, 132 received, 83 oci
Total Bytes : 15796 sent, 13551 received
Average Bytes: 122 sent per packet, 102 received per packet
Maximum Bytes: 1018 sent, 384 received
Grand Total Packets: 129 sent, 132 received
*************************************************************************
* Trace Assistant has completed *
*************************************************************************
16.8 Contacting Oracle Support Services
Some messages recommend contacting Oracle Support Services to report a problem. When
you contact Oracle Support Services, have the following information available:
Chapter 16
Contacting Oracle Support Services
16-67

• The hardware, operating system, and release number of the operating system
running Oracle Database.
• The complete release number of Oracle Database, such as release 21.1.0.0.0.
• All Oracle programs (with release numbers) in use when the error occurred, such
as SQL*Plus release 21.1.0.0.0.
• If you encountered one or more error codes or messages, then the exact code
numbers and message text, in the order in which they appeared.
• The problem severity, according to the following codes:
– 1: Program not usable. Critical effect on operations.
– 2: Program usable. Operations severely restricted.
– 3: Program usable with limited functions. Not critical to overall operations.
– 4: Problem circumvented by customer. Minimal effect, if any, on operations.
You will also be expected to provide the following:
• Your name
• The name of your organization
• Your Oracle Support ID number
• Your telephone number
Chapter 16
Contacting Oracle Support Services
16-68
