
OWNER’S MANUAL
DASH PLUS 500W MID-DRIVE E-BIKE
www.serfas.com

Don’t Forget To Register Your Bike!
SERFAS DASH PLUS 500W MID-DRIVE
OWNER’S MANUAL
Thank you for purchasing a Serfas Dash Plus 500W e-bike! Before riding, please take a
moment to review these instructions.
Need service or support? Visit our website for quick answers, manuals, and/or give us
a call and we’ll find you a solution.
Serfas, Inc
2333 W Utopia Rd
Phoenix, AZ 85027
Phone: 1-(800) 424-0047
Email: [email protected]
Register at: www.serfas.com/warranty-form

CONTENTS
Display / Control Specifications
Getting Started
Normal Operation
What’s On The Display
Settings
Headlights / Backlighting
ECO / Sport Modes
Walk Assistance
Service
1
2
3
6
7
8
9
10
12
5
4
Switching System On/Off
Support Levels
Selection Mode
Display Setting
Units (km/Miles)
Service Tip
Display Brightness
Auto Off
Max Pas
Default Mode
Power View
SOC View
Trip Reset
AL Sensitivity
Password
Changing Password
Deactivating Password
Set Clock
Information
Wheel Size and Speed Limit
Battery Information
Controller Information
Display Information
Torque Information
Error Code
Battery and Charging
Maintenance and Service
Storing Your Bike
Safety
Error Codes and Troubleshooting
Additional Troubleshooting
Battery Troubleshooting
Frequently Asked Questions (FAQ)
Warranty and Registration
13
15
16
14
17
21
22
24
27
11

DISPLAY / CONTROL SPECIFICATIONS
• 48 Volt Power Supply (500W)
• Current Rated: 10mA
• Maximum Operating Current: 30mA
• Power O Leakage Current < 1uA
• Operating Current to Controller: 50mA
• Operating Temperature: -20º to 45ºC
• Storage Temperature: -20º to 50ºC
• Waterproof Rating: IP65
• Bearing Humidity: 30% - 70% RH
Figure 2
SERFAS E-BIKE
Figure 1
POWER SWITCH
____
Figure 3
CHARGING PORT
CONTROL & DISPLAY
Model: DP C18.CAN BUS
___
Up
Light On/O
OK/Enter
System
On/O
Down

GETTING STARTED
2
SERFAS E-BIKE OWNER’S MANUAL
The Dash Plus 500W is operated using the control pad on the
handlebars. The control pad is located near the left-hand brake lever.
Push the power button on the battery to turn on. The current charge
level will temporarily display on the LEDs (4=full, 1=near empty), then
one green LED to show the battery is turned on. Press and hold the
button, 2 seconds, on the handlebar controls to turn system on. Display
should light up. Now, your e-bike is ready to ride. To turn o, press and
hold for 2 seconds. The battery will automatically turn o. Automat-
ic system shutdown time is set to 5 minutes by default.
The Dash Plus 500W bike oers pedal assist. When using pedal assist,
an electric motor supplements the rider’s own eort. To use the pedal
assist, simply start pedaling, then push the button to increase
assist or button to decrease pedal assist. 0 = lowest, 5 = highest.
Pedal assist will engage at speeds up to 28 MPH.
The Dash Plus 500W e-bike is equipped with a throttle, which is
mounted near the rider’s left thumb, to propel the bike without
pedaling. To use the throttle, start pedaling (one pedal revolution)
then push down on the throttle while pedaling. Once the bike is
moving on throttle power, you can stop pedaling entirely and use
your thumb to control the speed of the bike. The throttle can propel
you at speeds up to 20 MPH.
THE MOTOR STOPS WHEN YOU:
1) Stop pedaling 2) Squeeze the brake levers 3) Release the throttle.
Simply begin pedaling again to re-engage the motor.

NORMAL OPERATION
3
SERFAS E-BIKE OWNER’S MANUAL
6
BF-DM-C-DP C18-EN November 2019
7.7 NORMAL OPERATION
7.7.1 Switching the System ON/OFF
Press and hold (>2S) on the display to turn on the system. Press and hold (>2S) again to turn
off the system.
If the "automatic shutdown time" is set to 5 minutes (it can be set with the "Auto Off" function, See
"Auto Off"), the display will automatically be turned off within the desired time when it is not in op-
eration. If the password function is enabled, you must enter the correct password to use the system.
7.7.2 Selection of Support Levels
When the display is turned on, press the or (<0.5S) button to switch to the support level, the
lowest level is 0, the highest level is 5. When the system is switched on, the support level starts in
level 1. There is no support at level 0.
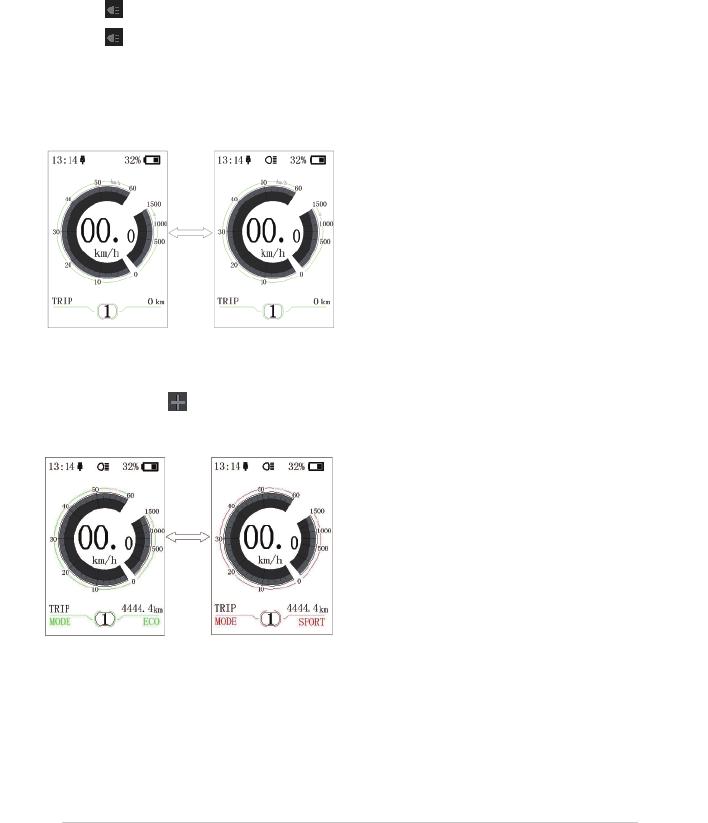
7.7.3 Selection Mode
Briefly press the (0.5s) button to see the different trip modes.
Trip: daily kilometers (TRIP) - total kilometers (ODO) - Maximum speed (MAX) - Average speed (AVG) -
Range (RANGE) - Energy consumption (CALORIES(only with torque sensor fitted)) - Travel time (TIME).
7
BF-DM-C-DP C18-EN November 2019
DEALER MANUAL FOR DISPLAY
7.7.4 Headlights / backlighting
Hold the (>2S) button to activate the headlight and taillights.
Hold the (>2S) button again to turn off the headlight. The brightness of the backlight can be set
in the display settings "Brightness". If the display /Pedelec is switched on in a dark environment,
the display backlight/headlight will automatically be switched on. If the display backlight/headlight
has been manually switched off, the automatic sensor function is deactivated. You can only turn on
the light manually. After switching on the system again.
7.7.5 ECO/SPORT Modus
Press and hold the (<2S) Button, to change from ECO mode to Sport mode.
(Depending on the version of the pedelec manufacturer)
The Dash Plus 500W is operated using the control pad on the
handlebars. The control pad is located near the left-hand brake lever.
First, push the power button on the battery to turn on (Fig.1) The
current charge level will be temporarily displayed on the LEDs (4=full,
1=near empty), then one green LED to show the battery is turned on.
Next, press and hold the button on the handlebar controls to turn
on the display (Fig. 2) Display should light up. Now, your e-bike is ready
to ride. To turn o, press and hold for 3 seconds. The battery will
automatically turn o.
The Dash Plus 500W bike oers pedal assist. When using pedal assist,
an electric motor supplements the rider’s own eort. To use the pedal
assist, simply start pedaling, then push the arrow to increase assist
or arrow to decrease pedal assist (Fig.2). 0 is the lowest 5 is the
maximum. Pedal assist will engage at speeds up to 28 MPH.
The Dash Plus 500W e-bike is equipped with a throttle, which is
mounted near the rider’s left thumb, to propel the bike without
pedaling. To use the throttle, start pedaling (one pedal revolution)
then push down on the throttle while pedaling. Once the bike is
moving on throttle power, you can stop pedaling entirely and use
your thumb to control the speed of the bike. The throttle can propel
you at speeds up to 20 MPH.
THE MOTOR STOPS WHEN YOU:
1) Stop pedaling 2) Squeeze the brake levers 3) Release the throttle.
Simply begin pedaling again to re-engage the motor.
7
BF-DM-C-DP C18-EN November 2019
DEALER MANUAL FOR DISPLAY
7.7.4 Headlights / backlighting
Hold the (>2S) button to activate the headlight and taillights.
Hold the
(>2S) button again to turn off the headlight. The brightness of the backlight can be set
in the display settings "Brightness". If the display /Pedelec is switched on in a dark environment,
the display backlight/headlight will automatically be switched on. If the display backlight/headlight
has been manually switched off, the automatic sensor function is deactivated. You can only turn on
the light manually. After switching on the system again.
7.7.5 ECO/SPORT Modus
Press and hold the (<2S) Button, to change from ECO mode to Sport mode.
(Depending on the version of the pedelec manufacturer)
8
BF-DM-C-DP C18-EN November 2019
7.7.6 Walk Assistance
The Walk assistance can only be activated with a standing pedelec.
Activation: Press the
button until this symbol appears. Next hold down the button whilst
the symbol is displayed. Now the Walk assistance will activate. The symbol will flashes and
the pedelec moves approx. 6 km/h. After releasing the button, the motor stops automatically and
switches back to level 0.
7.7.7 SERVICE
The display shows "Service" as soon as a certain number of kilometers or battery charges has been
reached. With a mileage of more than 5000 km (or 100 charge cycles), the “Service" function is
displayed on the display. Every 5000 km the display "SERVICE" is displayed every time. This function
can be set in the display settings.
4
SERFAS E-BIKE OWNER’S MANUAL

8
BF-DM-C-DP C18-EN November 2019
7.7.6 Walk Assistance
The Walk assistance can only be activated with a standing pedelec.
Activation: Press the
button until this symbol appears. Next hold down the
button whilst
the symbol is displayed. Now the Walk assistance will activate. The symbol
will flashes and
the pedelec moves approx. 6 km/h. After releasing the
button, the motor stops automatically and
switches back to level 0.
7.7.7 SERVICE
The display shows "Service" as soon as a certain number of kilometers or battery charges has been
reached. With a mileage of more than 5000 km (or 100 charge cycles), the “Service" function is
displayed on the display. Every 5000 km the display "SERVICE" is displayed every time. This function
can be set in the display settings.
5
SERFAS E-BIKE OWNER’S MANUAL

WHAT’S ON THE DISPLAY
IMPORTANT NOTICE
SERFAS E-BIKE
Time
1
USB charging indicator displays the icon
if an external USB device is connected to
the display.
2
3
4
The display shows this symbol, if the
light is on.
5
Speed Graphics
Trip: Daily Kilometers (TRIP) - Total Kilometers
(ODO) - Top Speed (MAX) - Avg. Speed
(AVG) - Range (RANGE) - Energy Cons-
umption (CALORIES(only w/ torque
sensor fitted)) - Travel Time (TIME)
Real time battery capacity.
Voltage indicator in Voltage or %
6
7
Digital Speed Display
8
Power indicator in Watts / Amperes
9
Support Level / Walking Assistance
10
Data: Display data, which corresponds
to the current mode.
11
Service: Please see the service section
12
If the error information from the display
cannot be corrected according to the
instructions, please contact your reseller.
Do not clean the display with a stream jet,
high-pressure cleaner, or water hose.
Do not use thinners or other solvents to clean
the display. Such substances can damage the
surfaces.
Warranty is not included due to wear and normal
use and aging.
The product is designed to be waterproof,
it is highly recommended to avoid submerging
the display under water.
6

SERFAS E-BIKE OWNER’S MANUAL
9
BF-DM-C-DP C18-EN November 2019
DEALER MANUAL FOR DISPLAY
7.8 SETTINGS
After the display is turned on, quickly
press the button twice, to access the
“SETTINGS” menu. By pressing the or
(<0.5S) button, you can select: Display
Settings, Information or EXIT. Then press the
(<0.5S) button to confirm your selected
option.
Or select "EXIT" and press the
(<0.5S)
button to return to the main menu, or select
"BACK" and press the (<0.5S) button to
return to the Settings interface.
If no button is pressed within 20 seconds,
the display will automatically return to the
main screen and no data will be saved.
You can quickly press the (<0.5S)
button twice at any time, to return to the
main screen.
7.8.1 “Display setting”
Press the or (<0.5S) button to select
Display Settings, and then briefly press the
(<0.5S) button to access the following
selections.
7.8.1.1 “Unit” Selections in km/Miles
Press the
or (<0.5S) button to high-
light “Unit” in the Display settings menu,
and then press the (<0.5S) button to
select. Then with the or button
choose between “Metric” (kilometer) or
“Imperial” (Miles). Once you have chosen
your desired selection, press the (<0.5S)
button to save and exit to the "Display
setting" interface.
7

8
SERFAS E-BIKE
10
BF-DM-C-DP C18-EN November 2019
7.8.1.2 “Service Tip” Switching the
notification on and off
Press the
or (<0.5S) button to
highlight “Service tip” in the Display settings
menu, and then press (<0.5S) to select.
Then with the or button choose
between “ON” or “OFF”. Once you have
chosen your desired selection, press the
(<0.5S) button to save and exit to the
"Display setting" interface.
7.8.1.3 “Brightness” Display brightness
Press the
or (<0.5S) button to high-
light “Brightness” in the Display settings
menu. Then press (<0.5S) to select. Then
with the or button choose between
"100%" / "75%" / "50%" /" 30%"/"10%" .
Once you have chosen your desired selec-
tion, press the (<0.5S) button to save and
exit to the "Display setting" interface.
7.8.1.4 “Auto Off” Set Automatic system
switch off time
Press the or (<0.5S) button to
highlight “Auto Off” in the Display settings
menu, and then press (<0.5S) to select.
Then with the or button choose
between “OFF”, "9"/"8"/"7"/"6"/"5"/"4"/"3"
/"2"/"1", (The numbers are measured in
minutes). Once you have chosen your de-
sired selection, press the (<0.5S) button
to save and exit to the "Display setting"
interface.
7.8.1.5 “MAX PAS” Support level
(Function not available with ECO/SPORT display)
Press the or (<0.5S) button to
highlight “Max Pass” in the Display settings
menu, and then press
(<0.5S) to select.
Then with the
or button choose
between “3/5/9” (the amount of support
levels). Once you have chosen your desired
selection, press the (<0.5S) button to
save and exit to the "Display setting"
7.8.1.6 “Default Mode” Set for ECO/Sport
mode
Press the
or (<0.5S) button to high-
light “Default Mode” in the Display settings
menu. Then press (<0.5S) to select. Then
with the or button choose between
“ECO” or “Sport”. Once you have chosen
your desired selection, press the (<0.5S)
button to save and exit to the "Display
setting" interface.
7.8.1.7 “Power View” Setting the power
indicator
Press the
or (<0.5S) button to high-
light “Power View” in the Display settings
menu, and then press (<0.5S) to select.
Then with the or button choose
between “Power” or “Current”. Once you
have chosen your desired selection, press
the (<0.5S) button to save and exit to the
"Display setting" interface.

9
SERFAS E-BIKE
11
BF-DM-C-DP C18-EN November 2019
DEALER MANUAL FOR DISPLAY
7.8.1.8 “SOC View” Battery view in volt
percent
Press the
or (<0.5S) button to
highlight “SOC View” in the Display settings
menu, and then press (<0.5S) to select.
Then with the or button choose
between “percent” or “voltage “. Once you
have chosen your desired selection, press
the (<0.5S) button to save and exit to the
"Display setting"
7.8.1.9 “TRIP Reset” Reset mileage
Press the
or (<0.5S) button to high-
light “TRIP Reset” in the Display settings
menu, and then press (<0.5S) to select.
Then with the or button choose
between “YES” or “NO”. Once you have
chosen your desired selection, press the
(<0.5S) button to save and exit to the
"Display setting"
7.8.1.10 “AL Sensitivity” Automatic
headlight sensitivity
Press the
or (<0.5S) button to high-
light “AL-Sensetivity” in the Display settings
menu, and then press (<0.5S) to select.
Then with the or button choose be-
tween "0" / " 1" / " 2"/ "3" / "4"/ "5"/ "OFF”.
Once you have chosen your desired selection
, press the (<0.5S) button to save and
exit to the "Display setting"
7.8.1.11 “Password”
Press the
or (<0.5S) button to choose
Password in the menu. Then by briefly
pressing (<0.5S) to enter the password
selection. Now again with the or
(<0.5S) buttons highlight “Start Password"
and press the (<0.5S) button to confirm.
Now again using the or (<0.5S)
Button choose between “ON” or “OFF” and
press the (<0.5S) button to confirm.
Now you can input your 4-digit pin code. By
using the
or (<0.5S) button choose
numbers between "0-9". By briefly pressing
the (<0.5S) button you can move on to
the next number.
After entering your desired 4-digit code,
you must re-enter the 4-digits you chose, to
ensure the code is correct.
After selecting a password, the next time
you turn on the system it will ask you to
input your password. Press the
or
(<0.5S) button to select the numbers, Then
press briefly (<0.5S) to confirm.
After entering the wrong number three
times, the system switches off. If you have
forgotten the password, please contact your
retailer.

10
SERFAS E-BIKE
12
BF-DM-C-DP C18-EN November 2019
Changing the password:
Press the
or (<0.5S) button to choose Password in the menu. Then by briefly pressing
(<0.5S) to enter the password section. Now again with the or (<0.5S) button highlight “Pass-
word set" and press the (<0.5S) button to confirm. Now with the or (<0.5S) buttons and
highlight “Reset Password” and with the (<0.5S) button to confirm.
By entering your old password once, followed by inputting the new password twice, then your
password will be changed.
Deactivating the password:
To deactivate the password, use the
or buttons to get to the menu point “Password” and
press the (<0.5S) button to highlight your selection. Press the or (<0.5S) button until is
shows “OFF”. Then press briefly (<0.5S) to select.
Now enter your password, to deactivate it.

11
SERFAS E-BIKE
13
BF-DM-C-DP C18-EN November 2019
DEALER MANUAL FOR DISPLAY
7.8.1.12 “Set Clock”
Press the
or (<0.5S) Button to access
the “Set Clock” menu. Then briefly press the
(<0.5S) button to confirm selection. Now
press the or (<0.5S) button and input
the correct number (time) and press the
(<0.5S) button to move to the next number.
After entering the correct time, press the
(<0.5S) button to confirm and save.
7.8.2 “Information”
Once the system is turned on, quickly Press the
(<0.5S) button twice to access the "SET-
TINGS" menu. Press or (<0.5S) button
to select "Information", and then press the
(<0.5S) button to confirm your selection.
Or select the point "Back" by confirming with the
(<0.5S) button to return to the main menu.
7.8.2.1 Wheel Size and Speed Limit
The "Wheel Size” and "Speed Limit” cannot
be changed, this information is here to be
viewed only.
7.8.2.2 Battery Information
Press the
or (<0.5S) button to access
the Battery Info menu, and then press the
(<0.5S) button to select confirm. Now
press the or
(<0.5S) button and select
"Back” or “Next Page". Then press the
(<0.5S) button to confirm, now you can read
the battery information.
Content Explanation
TEMP
Current temperature in
degrees (°C)
TotalVolt Voltage (V)
Current Discharge (A)
Res Cap
Remaining Capacity
(A/h)
Full Cap Total Capacity (A/h)
RelChargeState
Default Loader Status
(%)
AbsChargeState Instant charge (%)
Cycle Times
Charging cycles
(number)
Max Uncharge Time
Maximum time in
which no charge was
made (Hr)
Last Uncharge Time
Total Cell Number (individual)
Cell Voltage 1 Cell Voltage 1 (m/V)
Cell Voltage 2 Cell Voltage 2 (m/V)
Cell Voltage n Cell Voltage n (m/V)
HW Hardware Version
SW Software Version
NOTE: If no data is detected, "--" is displayed.

12
SERFAS E-BIKE
14
BF-DM-C-DP C18-EN November 2019
7.8.2.3 Controller Information
Press the
or (<0.5S) button and select
"CTRL Info", and then press the (<0.5S)
button to confirm. Now you can read the
controller information. To Exit press the
(<0.5S) button, once “EXIT” is highlighted to
return to the information settings.
7.8.2.4 Display Information
Press the
or (<0.5S) button and select
Display Info, then press the (<0.5S) but-
ton to read the software and hardware data
in the display. To Exit press the (<0.5S)
button, once “EXIT” is highlighted to return
to the information settings.
7.8.2.5 Torque Information
Press the
or (<0.5S) button and select
“Torque info”, then press the (<0.5S) but-
ton to read the software and hardware data
in the display. To Exit press the (<0.5S)
button, once “EXIT” is highlighted to return
to the information settings.
7.8.2.6 Error Code
Press the
or (<0.5S) button and select
“Error Code”, and then press the (<0.5S)
button to confirm. It shows error informa-
tion for the last ten errors of the pedelec.
Error code "00"means that there is no error.
To return to the menu press the (<0.5S)
button, once "BACK" is highlighted to return
to the information settings.

BATTERY AND CHARGING
13
SERFAS E-BIKE OWNER’S MANUAL
The Dash Plus 500W uses a Lithium-Ion battery which can be charged
on or o the bike. We recommend charging the battery o the bike
indoors, in moderate temperature conditions. To charge the battery,
plug the charger into the charging port and then connect the charger to
a wall outlet (Fig.3). The LED indicator light will be red when charging
and will turn green when charging is complete. When finished, unplug
the charger from the battery and from the wall outlet.
Take care of the battery to ensure a long service life.
To optimize the performance of the battery over time, try and use it
(discharging and charging) at least monthly. But if you won’t be riding
your Dash Plus 500W for an extended period of time, it’s best to store
the battery fully charged. EVERY 2 MONTHS: Put battery on the
charger to maintain optimum level.
After many charging and discharge cycles, runtime and range will be
reduced. Replacement batteries are available from Serfas to extend the
life of your e-bike. The lifespan of the battery is about 500 charge /
discharge cycles for properly maintained batteries.
When you install the baterry on the Dash Plus 500W, it locks into place
automatically. To unlock for removal, use the supplied key.
DO NOT ride the bicycle if the battery rattles or moves - it should be
firmly attached.
The Dash Plus 500W battery contains a USB port for transmitting
diagnostic data only, not for charging. It will not charge or power devices
via USB.
• Charge and store the battery indoors if possible. The battery
can be removed from the bicycle for this purpose.
• Avoid extreme hot and cold temperatures.
• DO NOT submerge your bike or any of the components in water.
This action will void the warranty.

14
MAINTENANCE AND SERVICE
SERFAS E-BIKE
• When cleaning your bike, use a damp cloth and gentle dish soap.
NOTE: DO NOT use a pressure washer or sprayer.
• Periodically apply a light lubricant to moving parts, including the
links of the chain, derailleur pivots, and shifter cable inner wire
where it enters the cable housing.
• If you ride in wet / humid environments, clean and dry electric
connections and apply an anti-corrosive.
• Keep tires inflated to their recommend pressure (30-50 PSI /
2.0-3.5 BAR / 200-350 KPA) and check weekly.
• Clean the drivetrain and lubricate the chain (monthly).
All bicycles will need a periodic tune-up or adjustments by a professional.
An annual “check-up” is beneficial. Your bike’s service schedule will
depend on the frequency of its use. In-between expert services at a bike
shop we suggest:

STORING YOUR BIKE
15
SERFAS E-BIKE OWNER’S MANUAL
From time to time, you may wish to store your bike for an extended
period without riding. Proper storage can help prolong the life of your
e-bike components and battery.
To ready your bike for storage, first fully charge the battery. Then
remove the battery from the bike and store it separately. Removing the
battery from the bike puts it into a low-voltage state designed for long
term storage.
Keep both the bike ad the battery in a cool, dry place. Avoid both very
hot and very cold temperatures. Generally if the environment is
comfortable for humans, then it’s a good place to store your bike.
Store your bike away from sources of heat, UV light, and ozone - all of
which can prematurely age rubber tires and tubes.
All bicycle tubes slowly lose air over time and need to be regularly
topped o to maintain proper pressure. This does not mean that your
bicycle has a flat tire. Avoid allowing the tires to deflate completely
during storage.

SAFETY
16
SERFAS E-BIKE
You should wear an approved e-bike bicycle helmet every time you
ride, regardless of legal requirement to do so. Additionally, some
jurisdictions require helmet use when riding Class II and Class III
e-bikes like the Dash Plus 500W.
Your Dash Plus 500W comes with reflectors and we encourage you to
use them. Reflectors are not a substitute for lights, which are not
included with your e-bike. You should purchase, install, and use front
and rear facing lights when riding in low light or dark conditions.
Some jurisdictions restrict where e-bikes can and cannot be ridden.
These limits may include specific speeds and motor wattages.
Your Dash Plus 500W is a Class III e-bike, 500 Watts with pedal assist
up to 28 MPH and throttle up to 20 MPH. You should only ride it where
legal and safe.
Some jurisdictions do not allow throttle controlled e-bikes. Your Dash
Plus 500W will still run without the throttle plugged in and removed
from the bicycle.

ERROR CODES AND TROUBLESHOOTING
17
SERFAS E-BIKE OWNER’S MANUAL
15
BF-DM-C-DP C18-EN November 2019
DEALER MANUAL FOR DISPLAY
7.9 ERROR CODE DEFINITION
The HMI can show the faults of Pedelec. When a fault is detected, the icon will be indicated and one of the
following error codes will be indicated too.
Note: Please read carefully the description of the error code. When the error code appears, please first restart the
system. If the problem is not eliminated, please contact your dealer or technical personnel.
Error Declaration Troubleshooting
04
The throttle is not back in its
correct position.
Check the connector from the throttle is correctly
connected. If this does not solve the problem, please
change the throttle.
05 The throttle has fault.
1. Check the connector and cable of the throttle are
not damaged and correctly connected.
2. Disconnect and reconnect the throttle, if still no
function please change the throttle.
07 Overvoltage protection
1. Remove and re-insert the battery to see if it
resolves the problem.
2. Using the BESST tool update the controller.
3. Change the battery to resolve the problem.
08
Error with the hall sensor signal
inside the motor
1. Check all connectors from the motor are correctly
connected.
2. If the problem still occurs, please change the
motor.
09 Error with the Engine phase’s Please change the motor.
10
The temperature inside the en-
gine has reached its maximum
protection value
1. Turn off the system and allow the Pedelec to cool
down.
2. If the problem still occurs, please change the
motor.
11
The temperature sensor inside
the motor has an error
Please change the motor.
12
Error with the current sensor in
the controller
Please change the controller or contact your supplier.

SERFAS E-BIKE
16
BF-DM-C-DP C18-EN November 2019
Error Declaration Troubleshooting
13
Error with the temperature
sensor inside of the battery
1. Check all connectors from the battery are correctly
connected to the motor.
2. If the problem still occurs, please change the
Battery.
14
The protection temperature
inside the controller has reached
its maximum protection value
1. Allow the pedelec to cool down and restart the
system.
2. If the problem still occurs, please change the
controller or contact your supplier.
15
Error with the temperature
sensor inside the controller
1. Allow the pedelec to cool down and restart the
system.
2. If the problem still occurs, Please change the con-
troller or contact your supplier.
21 Speed sensor Error
1. Restart the system
2. Check that the magnet attached to the spoke is
aligned with the speed sensor and that the distance
is between 10 mm and 20 mm.
3. Check that the speed sensor connector is connect-
ed correctly.
4. Connect the pedelec to BESST, to see if there is a
signal from the speed sensor.
5. Using the BESST Tool- update the controller to see
if it resolves the problem.
6. Change the speed sensor to see if this eliminates
the problem. If the problem still occurs, please
change the controller or contact your supplier.
25 Torque signal Error
1. Check that all connections are connected correctly.
2. Please connect the pedelec to the BESST system to
see if torque can be read by the BESST tool.
3. Using the BESST Tool update the controller to see
if it resolves the problem, if not please change the
torque sensor or contact your supplier.
18

19
SERFAS E-BIKE OWNER’S MANUAL
17
BF-DM-C-DP C18-EN November 2019
DEALER MANUAL FOR DISPLAY
Error Declaration Troubleshooting
26
Speed signal of the torque
sensor has an error
1. Check that all connections are connected correctly.
2. Please connect the pedelec to the BESST system to
see if speed signal can be read by the BESST tool.
3. Change the Display to see if the problem is solved.
4. Using the BESST Tool update the controller to see
if it resolves the problem, if not please change the
torque sensor or contact your supplier.
27 Overcurrent from controller
Using the BESST tool update the controller. If the
problem still occurs, please change the controller or
contact your supplier.
30 Communication problem
1. Check all connections on the pedelec are correctly
connected.
2. Using the BESST Tool run a diagnostics test, to see
if it can pinpoint the problem.
3. Change the display to see if the problem is solved.
4. Change the EB-BUS cable to see if it resolves the
problem.
5. Using the BESST tool, re-update the controller
software. If the problem still occurs please change
the controller or contact your supplier.
33
Brake signal has an error
(If brake sensors are fitted)
1. Check all connectors are correctly connected on
the brakes.
2. Change the brakes to see if the problem is solved.
If problem continues Please change the controller or
contact your supplier.
35
Detection circuit for 15V has
an error
Using the BESST tool update the controller to see if
this resolves the problem. If not, please change the
controller or contact your supplier.
36
Detection circuit on the keypad
has an error
Using the BESST tool update the controller to see if
this resolves the problem. If not, please change the
controller or contact your supplier.

20
SERFAS E-BIKE OWNER’S MANUAL
18
BF-DM-C-DP C18-EN November 2019
Error Declaration Troubleshooting
37 WDT circuit is faulty
Using the BESST tool update the controller to see if
this resolves the problem. If not, please change the
controller or contact your supplier.
41
Total voltage from the battery is
too high
Please change the battery.
42
Total voltage from the battery is
too low
Please Charge the battery. If the problem still occurs,
please change the battery.
43
Total power from the battery
cells is too high
Please change the battery.
44
Voltage of the single cell is too
high
Please change the battery.
45
Temperature from the battery is
too high
Please let the pedelec cool down.
If problem still occurs, please change the battery.
46
The temperature of the battery
is too low
Please bring the battery to room temperature. If the
problem still occurs, please change the battery.
47 SOC of the battery is too high Please change the battery.
48 SOC of the battery is too low Please change the battery.
61 Switching detection defect
1. Check the gear shifter is not jammed.
2. Please change the gear shifter.
62
Electronic derailleur cannot
release.
Please change the derailleur.
71 Electronic lock is jammed
1. Using the BESST tool update the Display to see if it
resolves the problem.
2. Change the display if the problem still occurs,
please change the electronic lock.
81 Bluetooth module has an error
Using the BESST tool, re-update the software onto
the display to see if it resolves the problem.
If not, Please change the display.

ADDITIONAL TROUBLESHOOTING
SERFAS E-BIKE
Having trouble with your Dash Plus 500W? Most problems are easy to
correct.
1. Start by making sure you have a charged battery.
2. If the motor of your bike will not engage, or only engages
intermittently, double check the cable connection where the
motor plugs into the rest of the system. This connector
must be firmly and fully plugged in to function correctly. If
necessary, loosen the clips holding the cable to the frame to
create additonal slack in the cable, then re-tighten the clips after
you have the motor cable firmly plugged in.
3. The throttle on the Dash Plus 500W will only engage after the
motor is turned on via pedal assist. This is a safety feature
designed to prevent you from accidentally engaging the throttle
while parking or walking the bike. If you are having diculty with
the throttle, remember to make one revolution of the pedals
first, then engage the throttle. You can stop pedaling after the
throttle function turns on.
4. If you bent the derailleur hanger on your Dash Plus 500W in a
fall, don’t worry. It’s actually designed to fail, sparing the more
expensive frame, and is inexpensively replaceable for this reason.
If you need another, they are available on www.serfas.com or at
partner bike shops.
5. If your bike powers up normally and shows no error messages,
but will not run when you turn the pedal assist on, check to
ensure the cadence sensor under the left crankarm is plugged in.
21

BATTERY TROUBLESHOOTING
SERFAS E-BIKE OWNER’S MANUAL
Your Dash Plus 500W e-bike battery uses several sophisticated
monitoring systems to prevent damage from overcharging, overheat-
ing, deep battery discharge, charging with the wrong voltage, and
other errors.
Please use the specific charger supplied with your e-bike. Other
chargers may not supply the correct voltage required for charging.
Those that do may not be programmed to initiate the charge cycle. To
resolve this:
If a situation occurs that could damage the battery, the battery can go
into a protective “sleep mode” - the battery cells inside are OK, but the
battery won’t turn on and won’t take a charge. To “wake up” the
battery, please follow this procedure:
continued on next page...
1. Remove battery from the bike.
2. Plug the charging tip into the battery.
3. Plug the charger into wall power.
4. Tap the power button on the battery once to turn it on.
5. Charge the battery overnight.
6. When charging is complete, put the battery back on the bike and
check for proper operation. Having trouble with your Dash Plus
500W? Most problems are easy to correct.
1. Put the battery on the bike.
2. Plug the chaging tip into the battery.
3. Plug the charger into wall power.
4. Tap the power button on the battery once to turn it on.
22

5. Press and hold “M” on the controls to turn on the display.
6. Allow the battery to charge overnight.
7. Once charged, remove from wall power and check for
proper operation.
Under specific circumstances you might see one single LED
flashing constantly on the battery. One blinking LED is a warning
of excessive strain on the battery for its charge level. To correct
this issue:
1. Reduce the strain on the battery and charge the battery. If
it will not take a charge, please take the previous steps to
resolve the issue.
SERFAS E-BIKE
23

FREQUENTLY ASKED QUESTIONS
Do components from the Dash 350/500W and Dash Plus 500W
interchange?
My Dash e-bike is too fast, or exceeds my local speed limit, or
only Class I e-bikes are allowed on my favorite bike path.
On the Dash line of e-bikes, I can’t use the throttle from a
dead stop, only once I’m pedaling. Why?
Some components interchange across the line of Dash e-bikes,
like saddles, seatposts, handlebars, and grips. The ebike
specific components, however, like batteries, controllers,
displays, and motor do not interchange. Dash 350W is a 36V
system vs 48V of the Dash Plus 500W and these parts are not
compatible.
Dash e-bikes can have the speed limit changed using the
settings in the control panel and can be set as low as 14 MPH
if desired to comply with local laws. Dash e-bikes can also have
the throtlle unplugged and removed (but will continute to run on
pedal assist) if desired in locations where throttle bikes are
not permitted.
This is a safety feature to prevent you from accidentally
engaging the throttle while parking or standing with the bike,
if you forget to turn it o and then hit the throttle accidentally.
You can engage the throttle at any time while you are pedaling.
If you are at a dead stop, you can push the throttle, start
pedaling (about one pedal revolution), then stop pedaling,
and the bike will stay in throttle mode.
•
•
•
SERFAS E-BIKE OWNER’S MANUAL
24

SERFAS E-BIKE
How many times can I recharge my e-bike battery?
Can I put a suspension fork on the Dash e-bike?
Do I have to wear a helmet when riding an e-bike?
Lithium-Ion e-bike batteries use a similar technology to your
laptop or smartphone. They can absorb about 500 charging
cycles before performance degrades. Afterwards, they
can continue to be recharged, however, their capacity will
decrease.
Yes, it is possible to put a suspension fork on the Dash line of
e-bikes. You would need a replacement fork with these specs:
1 1/8” to 1.5” tapered steerer tube, 51mm IS mount for disc
brakes (or a 74mm mount with an add-on adapter to 51mm),
27.5” / 650B wheel size, and the quick release / open type
dropout style. Selecting and installng a suspension fork is
probably a job for a bike shop.
We suggest you do. This depends on your age, and your state.
Please check your local laws.
•
•
•
What rear rack fits the Serfas Dash e-bikes?
We recommend to check with your local bike shop.
•
How should I care for my e-bike battery?
Please refer to the Battery and Charging section of
your Dash Plus 500W owner’s manual.
•
25

SERFAS E-BIKE OWNER’S MANUAL
How can I calculate the capacity of an e-bike battery?
E-bike battery capacity is measured in Watt-Hours, or Wh.
This is the size of the “fuel tank” on the e-bike. Like a car,
some motors guzzle fuel, others sip. To calculate capacity,
multiply the voltage (V) used on the bike by the Ampere-
Hour (Ah) rating.
For the Serfas Dash Plus 500W, for example, multiply 48V
by 11.6Ah = 556.8Wh. More Watt-Hours equals more range
for your e-bike.
•
Why does the remaining battery amount shown on the
LEDs on the battery not match the “Energy Bar” on the
display?
The LEDs on the battery itself shown the remaining
charge left in the battery, but this doesn’t account for how
you are using the bike. The Energy Bar function on the
display is designed to account for the charge on the battery
plus other factors, like speed, throttle usage, and riding
conditions like hills or wind. You’ll see it fall more quickly
under heavy usage, and more slowly when you are not
taxing the motor.
•
What are the weight limits for the Dash Plus 500W?
Max. Rider Weight: 250 lbs / 113.3 kg
Max. Cargo Weight: 50 lbs / 22.6 kg
•
26

WARRANTY POLICY
Register at: www.serfas.com/warranty-form
SERFAS E-BIKE
The specific warranty covering your Serfas bicycle is governed
by the law of the state or country in which it was purchased,
and applies only to bicycles purchaed from Authorized Serfas
Retailers.
FRAMES AND FORKS:
Serfas frames made from steel or aluminum (Dash e-bikes) are
warranted by Serfas Bikes, 2333 W. Utopia Rd., Phoenix, AZ
85027 against manufacturing defects in materials and/or
workmanship for the lifetime of the original owner.
COMPONENTS:
All other components, frame fixtures, and finishes (paint and
decals) are warranted against manufacturing defects in
materials and/or workmanship for a period of one year from the
date of original retail purchase. Forks (other than those made
by Serfas - for example, a Rockshox suspension fork) are not
covered by this limited warranty, but are separately covered by
the stated warranty of their manufacturer. Stripped threads due
to user error are not covered by this warranty.
7
BF-DM-C-DP C18-EN November 2019
DEALER MANUAL FOR DISPLAY
7.7.4 Headlights / backlighting
Hold the (>2S) button to activate the headlight and taillights.
Hold the
(>2S) button again to turn off the headlight. The brightness of the backlight can be set
in the display settings "Brightness". If the display /Pedelec is switched on in a dark environment,
the display backlight/headlight will automatically be switched on. If the display backlight/headlight
has been manually switched off, the automatic sensor function is deactivated. You can only turn on
the light manually. After switching on the system again.
7.7.5 ECO/SPORT Modus
Press and hold the (<2S) Button, to change from ECO mode to Sport mode.
(Depending on the version of the pedelec manufacturer)
27

www.serfas.com
7
BF-DM-C-DP C18-EN November 2019
DEALER MANUAL FOR DISPLAY
7.7.4 Headlights / backlighting
Hold the (>2S) button to activate the headlight and taillights.
Hold the
(>2S) button again to turn off the headlight. The brightness of the backlight can be set
in the display settings "Brightness". If the display /Pedelec is switched on in a dark environment,
the display backlight/headlight will automatically be switched on. If the display backlight/headlight
has been manually switched off, the automatic sensor function is deactivated. You can only turn on
the light manually. After switching on the system again.
7.7.5 ECO/SPORT Modus
Press and hold the (<2S) Button, to change from ECO mode to Sport mode.
(Depending on the version of the pedelec manufacturer)
8
BF-DM-C-DP C18-EN November 2019
7.7.6 Walk Assistance
The Walk assistance can only be activated with a standing pedelec.
Activation: Press the
button until this symbol appears. Next hold down the button whilst
the symbol is displayed. Now the Walk assistance will activate. The symbol will flashes and
the pedelec moves approx. 6 km/h. After releasing the button, the motor stops automatically and
switches back to level 0.
7.7.7 SERVICE
The display shows "Service" as soon as a certain number of kilometers or battery charges has been
reached. With a mileage of more than 5000 km (or 100 charge cycles), the “Service" function is
displayed on the display. Every 5000 km the display "SERVICE" is displayed every time. This function
can be set in the display settings.
