1
Publishing responsive web content in T4 Site Manager
Training guide
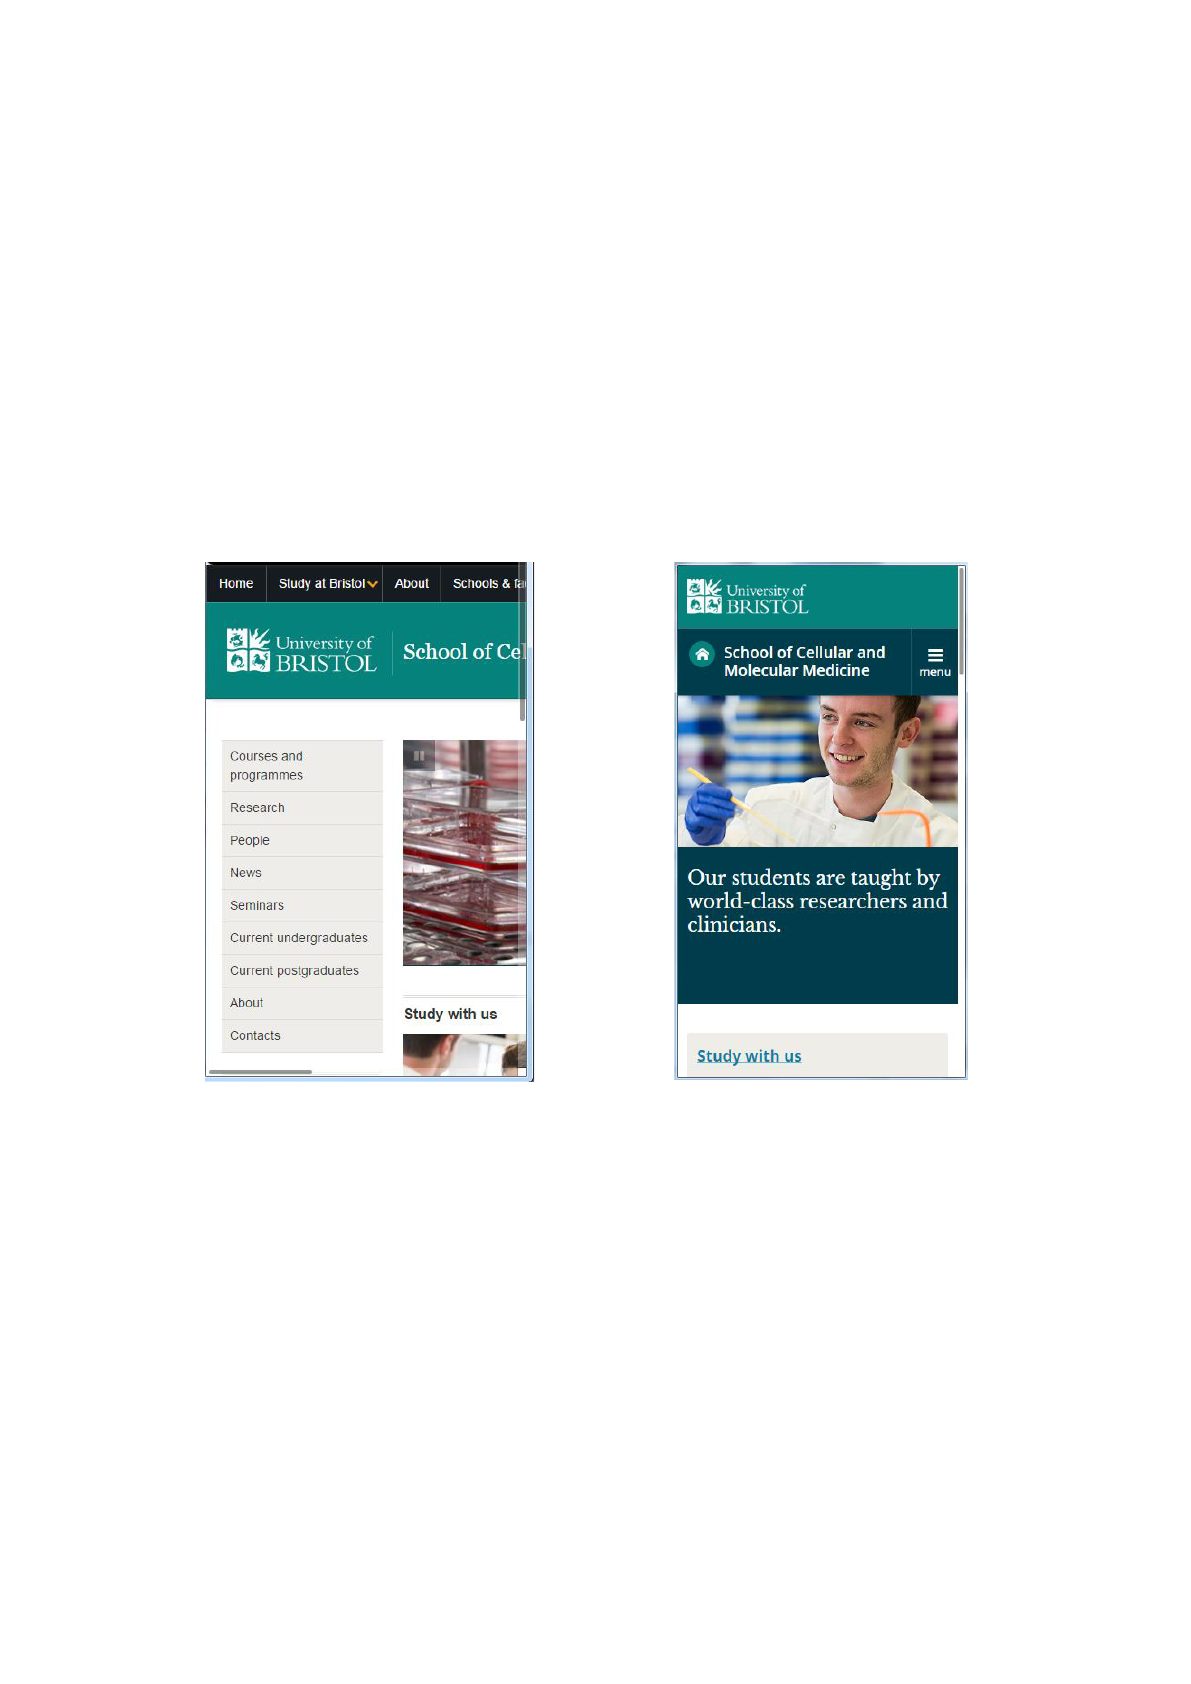
Example of a School website homepage, as it looks from a
mobile phone screen.
Before migration to
responsive web.
After migration
to responsive web.

2
Contents
1 Helpful links 3
2 Introducing the new responsive web content types 3
2.1 Responsive content types and descriptions 3
2.1.1 How to add a content type 4
2.2 Page layouts and calls to action 5
2.3 Naming convention for content types 5
2.4 Previewing content 6
2.4.1 How to preview content 6
2.5 Re-using content: mirroring and duplicating 7
2.5.1 How to mirror or duplicate content 7
2.6 Ordering content 7
2.6.1 How to re-order content 7
2.7 In pictures: responsive web content types 9
Example 1: A section/page with a title, some content and a call to action 9
Example 2: A section/page using more content types 10
3 Implementing content types for content publishing 11
3.1 Page title 11
3.2 Content block 13
3.3 Dropdowns 15
3.4 Image with caption 18
3.5 Lead in 20
3.6 Listing 22
3.7 Module 25
3.8 Quote 29
3.9 Slider 32
Once content is added: next steps 36
Colour schemes (for reference) 36

3
1 Helpful links
T4 Site Manager: https://t4cms.bris.ac.uk
Responsive web project site: http://www.bristol.ac.uk/responsive-web-project/
2 Introducing the new responsive web content types
From T4 Site Manager usage or training, you’ll already be familiar with the idea of a web page being
a section, and the content area in that section being made up of one or more content blocks, built
using different content types (e.g. a listing, dropdowns, a module) which have to be specified in
HTML. With responsive web, you enter content into a template in T4 instead of in HTML, and the
template ensures it renders appropriately on screen. There are templates for each of the different
content types (listed below). To build a section/page, you decide which content types you’re going
to need, and then enter the content in the appropriate content templates to build the page.
Using the templates means that you can be confident that the text will render correctly on screen
and display effectively on different devices (such as smartphones and tablets). Building content in
small chunks also means that you can make use of Site Manager functionality to mirror (clone) and
duplicate (re-use) content on your site, increasing efficiency and leading to a more consistent user
journey. And it means that the site features more highly in search rankings, leading to greater
visibility for content.
Once your site has been migrated to responsive, you will see the responsive content types in T4 Site
Manager. The most common page layouts on the University website can be achieved by using
combinations of these content types.
This section (Section 2) of this guide will cover:
● the different responsive content types
● content type naming conventions
● previewing content
● re-using content
● ordering content
● example pages, showing the content types.
The next section (Section 3) of this guide will cover:
● more details on the different content types, with examples of each one
● implementation details
● notes and best practice suggestions.
2.1 Responsive content types and descriptions
Responsive content types T4 Site Manager:
Content type
Used to display...
_Page title (responsive)
A page title to be added at the top of a page. There should only ever be one
page title per page.
Content block
(responsive)
Content (in HTML) made of text separated by headings. This may also include
headings, subheadings, images and bulleted lists.
Dropdowns (responsive)
Condensed, related, short blocks of content under clear headings. There can
be up to 7 different dropdowns.

4
Image with caption
(responsive)
An image followed by an optional caption and image credit.
Lead in (responsive)
An alternative landing page focal point: a single optional image followed by a
single paragraph of prominent text, followed by an underline to separate it
from what appears below.
Listing (responsive)
A list of up to 10 items, each with a heading, text and optional thumbnails.
Headings and images (if there are any) can link.
Module (responsive)
A box with various optional elements including heading, image, link and icons,
and a selection of pre-defined background colours. Modules can be positioned
in a right hand or main column.
Quote (responsive)
A box containing a quote and the quotee’s name and qualification, with
optional image of the quotee.
Slider (responsive)
A set of up to 3 slides, each with an image and optional associated heading.
Content types are combined in a section to build a page. The most basic section might be just a page
title and a single content block, displaying text separated by headings.
To build a more complicated layout e.g. with a dropdown or quote, a new dedicated content type is
required for each different element.
There are implementation details and examples for each content type in Section 3.
2.1.1 How to add a content type
When you are ready to add new content, navigate to the relevant section in T4, which will open in
the “Modify content, show section” page.
Go to the “Content” tab. Use the “add content” function on the right:
Figure 1: Using "add content" to add a new content type
Select the correct responsive content type from the list:

5
Figure 2: choosing a Content Type
Next, the template for the content type you chose will appear, and you can add your content. See
section 3 for content type details and recommendations.
2.2 Page layouts and calls to action
Throughout this document you will find references to “main column” and “right hand column”.
When viewed on a PC, web pages are laid out in a row of columns, with the navigation to the left,
and content in the main and/or right column.
Figure 4: Web page viewed from a PC, with columns outlined; web page viewed from a mobile showing how content rendering changes.
When viewed on a mobile or tablet (the image to the right in Figure 4), the row of columns becomes
vertical: the left navigation changes to a “burger” menu at the top of the screen, the main column
content is prioritised at the top of the screen, with the right column content dropping to the bottom
of the page. As such, calls to action should be near the top in the main column, so they are still
highly visible in mobile.
2.3 Naming convention for content types
As you will now have several content types used in a single section, it’s important to follow a naming
convention, so different types of content can be easily identified for efficient editing. The naming
convention is:
main column
right hand
column
left navigation
left navigation
“burger” menu
main column
right hand column

6
*first word of content type* – *short description*
e.g. “lead – welcome” [a “lead in” content type, with “welcome” content]
This should all be written in lowercase. The only exception is the page title, where the name is the
same as the name displayed on the page. Figure 5 shows some examples.
Content type in T4
Site Manager
Text on page
page title
About BrisSynBio
lead in
welcome intro
dropdowns
“about” text, in dropdowns
content block
“comments and feedback” text, appearing after
dropdowns
image with caption
image of Dek Woolfson with caption; this
appears in the right column on the page, which
is the default location for image with caption
Figure 5: Demonstrating the naming convention: this screenshot from T4 Site Manager shows the blocks of content for the section About
BrisSynBio. The table shows the content types, and we can work out the text on the page based on the naming convention.
Content types have standard positions on the page, and the templates have been created so that
content renders in the standard position (e.g. “modules” are mainly used in the right-hand column).
If you use as content type in a non-standard position, you should specify this in the name, so that it’s
clear when you’re looking at the list of content in the section. The naming convention changes to:
*first word of content type* – *position* - *short description*
e.g. “module - main - apply now” [a “module” content type, in the main column, with “apply
now” content]
There are details about how change the position of content types later in this guide.
2.4 Previewing content
Previewing content during page editing helps you to see what you’re working on, before you commit
to publishing it.
2.4.1 How to preview content
The easiest way to preview content once you have added or saved it as draft is to use the dropdown
arrow opposite the block or section and select Preview (Figure 6).
Figure 6: previewing a block of content
F
In Google Chrome, if nothing happens when you try to preview a page, look for the pop-up
blocker icon at the end of the location bar and select Always allow pop-ups from
https://t4cms.bris.ac.uk.

7
This opens a preview of the page in a new browser tab. Notice the URL is not the same as on the live
site, because you’re still inside T4 Site Manager.
2.5 Re-using content: mirroring and duplicating
One of the benefits of the responsive content types is that organising content in smaller increments
means it’s possible and easy to re-use content on different pages (e.g. a funding logo, details of an
application deadline, contact information). There are two ways to re-use content in T4:
Mirroring: the same content can be cloned and deployed in multiple sections. Any changes in one
will be reflected on all other versions of the content.
Duplicating: content is copied to another section, and both instances can be edited independently
without changes being reflected on other versions as they are not connected.
2.5.1 How to mirror or duplicate content
There are details of how to do this in the T4 Site Manager training.
2.6 Ordering content
The order of content in T4 Site Manager reflects the order that content appears on the page, with
main column content appearing first, followed by right-hand column content.
Blocks can be moved up and down (thus reordering content on the page) once they have been
created, it is not essential to add content in a specific order.
2.6.1 How to re-order content
In the Content tab, you can see all the blocks of content in the section,
Use the arrows to the right to move blocks of content up and down (see Figure 7). Once you are
happy with the order, “save changes” and “preview” the content, to take a look at it.

8
Figure 7: changing the order of content blocks

9
2.7 In pictures: responsive web content types
Here are some examples to help show how the content types are used to build a page, how the
naming convention is implemented, and order of content blocks in T4 Site Manager.
Example 1: A section/page with a title, some content and a call to action
Figure 8 is a common page layout:
● a title
● content in the main
column
● a call to action in the right
hand column.
Figure 8: common page layout
In responsive content types, this
is:
● a page title
● a content block
● a module (Figure 9).
The content block contains
paragraph text and another
heading, and the module contains
an image, a title and some text.
Figure 9: common page layout, with content types highlighted
Figure 10 shows the content in
this section in T4 Site Manager.
You can see how the naming
convention
“content type – description”
makes it easy to identify each
piece of content.
Figure 10: the section in T4 Site Manager, showing the Content Types in this section.
Page title (responsive) content type
Content block
(responsive) content type
Module
(responsive)
content
type

10
Example 2: A section/page using more content types
A more complex
page:
● title
● introduction
● dropdowns
● content
● image.
Figure 11: page using more detailed layout (showing one dropdown expanded)
In responsive
content types:
● page title
● lead in
● dropdowns (with
text)
● content block (the
paragraph after
the dropdowns)
● image with
caption
Figure 12: more detailed page layout, with content types highlighted
In T4 Site Manager,
it’s easy to identify
the different content
types.
The naming
convention becomes
even more vital on
pages with more
content types.
Figure 13: the section in T4 Site Manager, showing the different content types.
Lead in (responsive)
content type
Dropdown (responsive)
content type
Content block (responsive)
content type
Image with
caption
(responsive)
content type
Page title (responsive)
content type

11
3 Implementing content types for content publishing
This section covers the detail of implementing each of the different responsive content types, from
the point at which the content type has already been selected in T4 Site Manager (see Section 1 for
additional details prior to this point). For each content type, there is a description and example
screenshot, followed by the steps for adding it including the required fields, and any relevant notes.
3.1 Page title
Description
Use page title to add a title at the top of a page. There should only ever be one page title per
section/page, and it must be the first content type listed in the section, to ensure it appears at the
top of the page
Use sentence case house style for headings and subheadings, i.e. an initial capital followed by all
lower case (unless a proper noun appears in the heading). Capitalisation should be reserved for
proper nouns, and the official names of organisations.
The page title renders in the style “h1”. When you add headings in the page content, they should
follow in “h2”, with subheadings in “h3”.
Example of a page title
Figure 14: “Equipment and services” is a typical page title. The double line is included automatically in the style.
The screenshots to the right show the same content on a mobile phone screen.
An example of a page title on a webpage:
● http://wwwdev.bris.ac.uk/aa/mw/school-of-best-practice/research/
Adding a page title
Select the page title content type, you will then see the Add content, enter content details screen >
Content tab

12
Figure 15: Entering details into the page title content type.
Fields
Fields to complete in the template when adding this content type in T4 Site Manager:
● Name
Enter the desired page title in the name field, using sentence case i.e. an initial capital
followed by all lower case (unless using proper nouns)
Notes
Page titles were previously added using a separate field in a content block. Since pages are now
often made up of multiple blocks it is more practical to have a separate content type for the page
title.

13
3.2 Content block
Description
A content block is a content type for general, simple content. This is usually text separated by
headings, but may also include elements such as bulleted lists, tables and occasionally images.
The content block template includes a "what you see is what you get" (WYSIWYG) HTML editor to
allow flexibility with content layout.
Content blocks can only be used in the main column, and not in the right hand column.
If a page has a large amount of text and there is no content in the right column, the content block
can be customised to use the full width of the page (both the main and the right hand column). The
method for doing this is described below.
Example of a content block
Figure 16: The “Contacts” text is a typical content block (inside red outline). Content can include titles, text, bullets,
images, links, all in the same block. Content blocks normally appear in the main column. If necessary, content can use
the full width of the page as in “Funding”; the method for doing this (using a custom position) is specified below.
The screenshots to the right show the same content on a mobile phone screen; you can see how the Content block
resizes the text to appear without needing to scroll to the right.
An example of a content block on a webpage:
● http://wwwdev.bris.ac.uk/aa/mw/school-of-best-practice/research/cancer-biology/
14
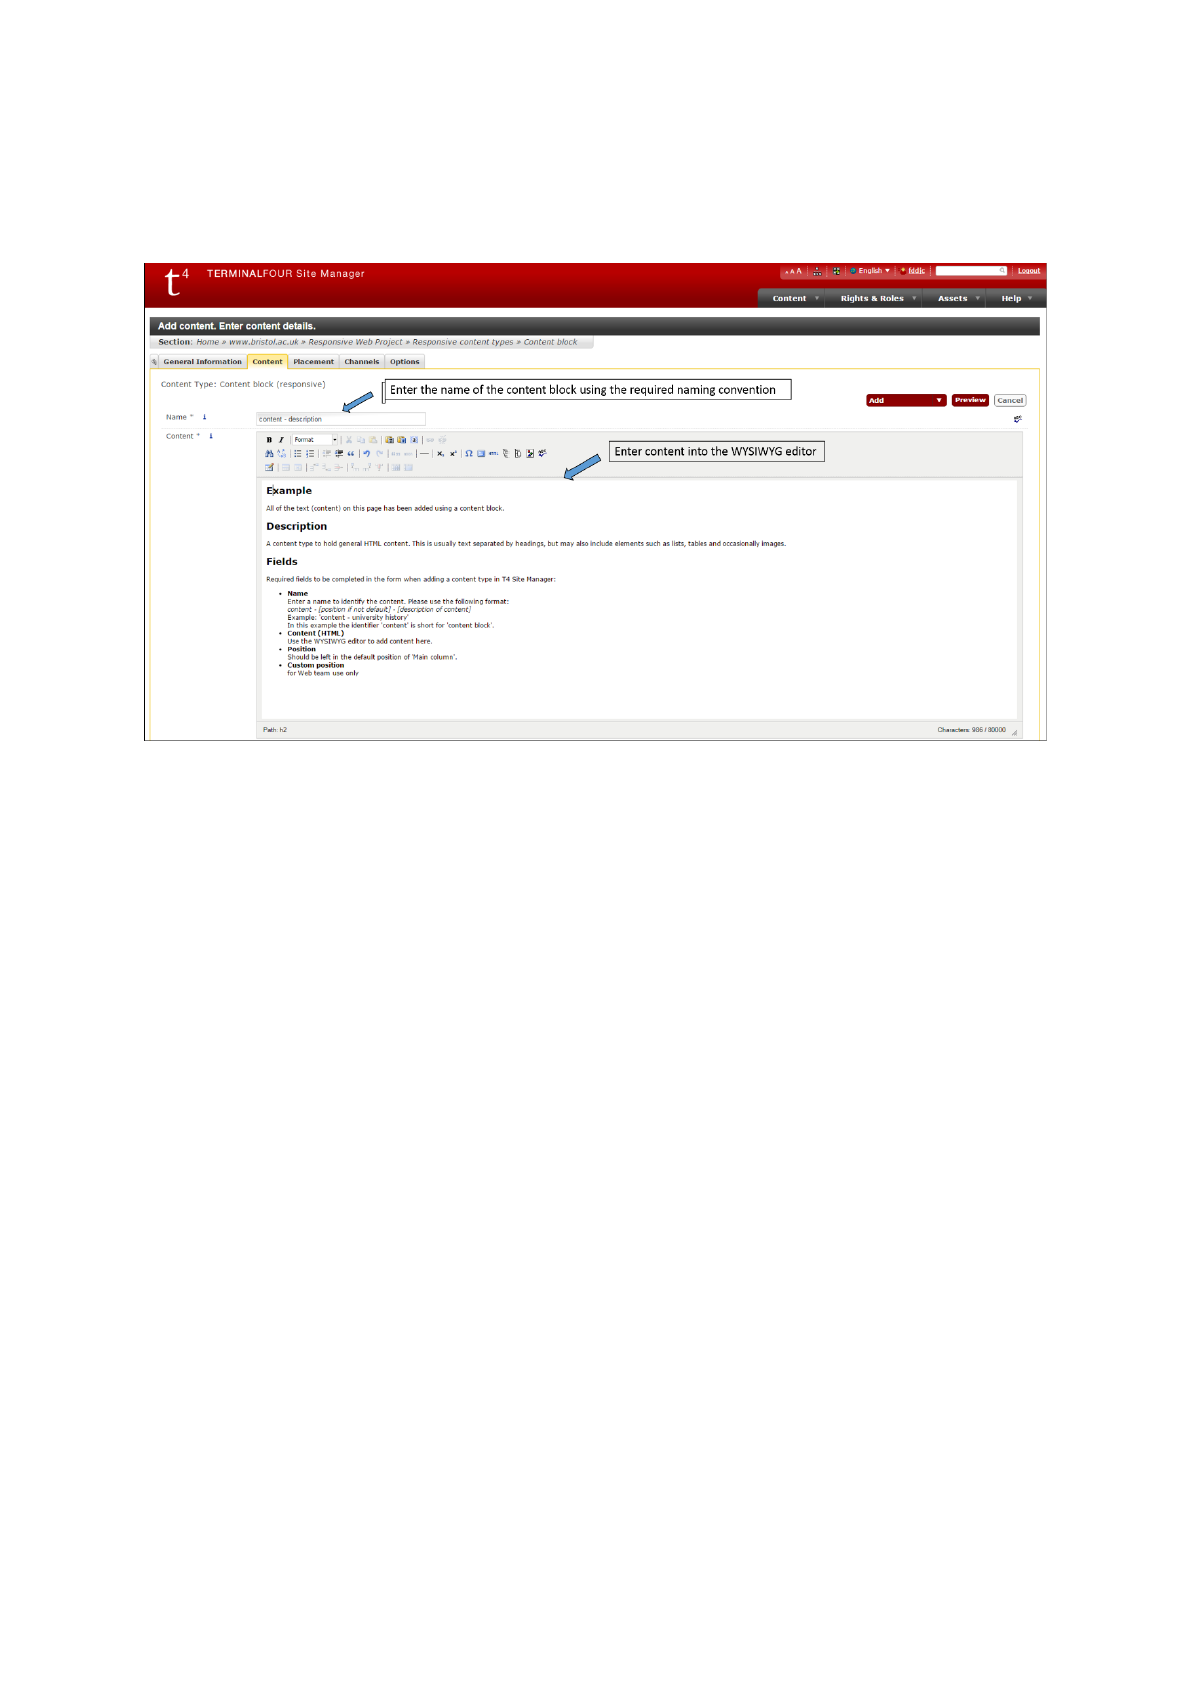
Adding a content block
Select the Content block (responsive) content type, you will then see the Add content, enter content
details screen > Content tab:
Figure 17: Entering details into the content block content type fields
Fields
Fields to complete in the template when adding this content type in T4 Site Manager:
● Name
Enter a name to identify the content. Please use the following format:
content - [description of content]
Example: 'content - university history'
In this example the identifier 'content' is short for 'content block'.
If using the full width of the page (both the main and the right column), then add “full” to
the name to show that it’s not using the default position, eg:
content - full - [description of content]
Example: 'content - full - university history'
● Content (HTML)
Use the WYSIWYG editor to add content here.
● Position
Should remain in the default position of ‘1 - Main column’.
If using the full width of the page (both the main and the right column), select ‘3 - custom’.
● Custom position
If using the full width of the page (both the main and the right column), enter ‘full-width’ in
this box. Otherwise, leave it blank.

15
3.3 Dropdowns
Description
Dropdowns are used to show/hide content beneath a set of headings. There can be up to seven
dropdown sections in this content type.
Generally, dropdowns are not recommended, because they hide content from users and in-browser
searches. The exception is for short blocks of content, each with a heading that clearly describes the
content, and where only a small number of these content blocks are likely to be relevant to the user.
Recommendations
1. If you want users to read most or all of the sections, do not use a dropdown menu.
2. The content type only allows for up to seven sections in a dropdown. If you have more than
7, this suggests that the content should be organised in a different way, perhaps even into
separate pages.
3. Only include up to two or three paragraphs per dropdown item. Any more than this suggests
that the content should be split into separate pages.
4. Conversely, if each section contains just one or two short sentences, don't use a dropdown
menu. It will be quicker for a user to scan the content without a dropdown menu in place.
5. Use dropdowns sparingly, because they require increased user interaction in clicking to open
and close menus; users do not want to have to navigate through page after page full of
dropdown menus searching for specific content.
If in doubt, know that a well structured page with clear headings is always preferable to hiding
content away behind a dropdown menu.
Example of a dropdown
Figure 18: The dropdowns are used here to split content into different sections, each with a title.
The screenshots to the right show the same content on a mobile phone screen.
An example of a dropdown on a webpage:

16
● http://wwwdev.bris.ac.uk/aa/mw/school-of-best-practice/about/facilities/
Adding a dropdown
Select the Dropdowns (responsive) content type, you will then see the Add content, enter content
details screen > Content tab:
Figure 19: Entering details into the dropdown content type fields
Fields
Fields to complete in the template when adding this content type in T4 Site Manager:

17
● Name
Enter a name to identify the content in the format:
drop - [position if not default] - [description of content]
Example: 'drop - ug study faq'
● Heading level
This will determine the heading level (size) used on each of the dropdown headings in the
list, i.e. 'Heading 2', 'Heading 3' etc. When selecting a heading size you should follow the
flow of the page. If you add a heading in the 'optional introduction' field using 'Heading 2',
then the dropdown headings should be 'Heading 3'.
● Optional introduction
This field can be used to add a heading for the dropdown, or to add introductory text.
● Drop 1 - Heading
Text to display on the first dropdown heading
● Drop1 - Content
The content of the dropdown; which will be revealed when the heading is clicked
● [Drop # - Heading] and [Drop # - Content] fields are repeated up to a total of 7 dropdowns
● Custom position
For Web team use only
Notes
The character limit imposed on dropdowns includes any HTML code, so the amount of allowed
visible characters may be shorter, particularly if there are many links in the text.

18
3.4 Image with caption
Description
Displays images with optional caption and image credit. This content type can be used to display
images in the central column, or in the right hand column.
Image guidelines and sizes
● Images should be high quality, sharp and not overly detailed or busy
● Photographic images should be saved as .jpg files. Images with blocks of flat colours or
graphics should be saved as .png files.
● Avoid over-compressing images, around 60-70% JPEG compression works well for most
photographs. Use Serif PhotoPlus, Photoshop or or an online tool like Pixlr Editor, PicResize
or Web Resizer for resizing and compressing images.
● Right hand column images can be 500 pixels wide and 250px high or 500px wide by 500px
high.
● Main column images must be 650px wide and no higher than 450px.
● Do not use portrait images in the main column as they will be too tall.
● The University is committed to ensuring our website is accessible. Images that contain text
or add meaning to the page content need to have alternative text. This appears when a user
hovers over the image, when the image is missing, or be read by a screen reader. The field
for entering the image’s alternate text is the description field in the Media Library. An
example of a meaningful alternative text is “Cross-section of the small intestine”.
Example of an image with caption
Figure 20: About BrisSynBio uses image with caption in the right hand column. The caption is below the image, not on
the image, and is a phrase or sentence. If you want text on the image, then use the slider content type (see below).
The screenshot to the right show the same content on a mobile phone screen. The image resizes automatically to be
appropriate for the different device screen size, and has moved to below the main column text.
An example of an image with a caption on a webpage:

19
● http://wwwdev.bris.ac.uk/aa/mw/school-of-best-practice/research/cancer-biology/ the
cancer cells in the right hand column.
Adding an image with caption
Select the Image with caption (responsive) content type, you will then see the Add content, enter
content details screen > Content tab:
Figure 21: Entering details into the image with caption content type fields
Fields
Fields to complete in the template when adding this content type in T4 Site Manager:
● Name
Enter a name to identify the content in the format:
image - [position if not default] - [description of content]
Examples: 'image - something clever', 'image - main - wills building'
● Image
Select an image from your image library.
● Caption
● Image credit
Enter the appropriate text.
● Position
Set to 'Main column' or 'Right hand column'.
● Custom position
For Web team use only.

20
3.5 Lead in
Description
A lead in provides a short and compelling summary of the page content; it is in a slightly larger font,
and is followed by a centred line. A lead in can optionally contain an image.
Example of a lead in
Figure 22: The Diploma in Dental Hygiene uses a lead in with an image; About BrisSynBio uses image a lead in without
an image. The text is in a larger font, and is followed by a centred double line.
The screenshots to the right show the same content on a mobile phone screen. The image and text resize automatically
for the different display dimensions.
Examples of a lead in on a webpage:
● http://wwwdev.bris.ac.uk/aa/mw/school-of-best-practice/research/

21
● http://wwwdev.bris.ac.uk/aa/mw/school-of-best-practice/research/cancer-biology/
Adding a lead in
Select the Lead in (responsive) content type, you will then see the Add content, enter content
details screen > Content tab:
Figure 23: Entering details into the lead in content type fields
Fields
Fields to complete in the template when adding this content type in T4 Site Manager:
● Name
Enter a name to identify the content in the format:
lead - [description of content]
Example: 'lead - wills img and introduction'
● Image
Select an image from your media library. Image must be 650px wide x 265px high.
● Image focal point
At smaller screen sizes (mobile phones) the whole image is not shown, instead it is zoomed
in on showing either the left, centre or right hand portion of the image. Choose from left,
right or centre depending on where the main focus of attention is in the image.
● Text
Text content should be added here. We recommend avoiding links in this text, however if
you really need to add them then use inline HTML, e.g.:
<a href="http://www.bristol.ac.uk/"> University of Bristol</a>
to link to the site homepage.
● Custom position
For Web team use only.
Notes
Only use one lead in per page. It should always be the block after the page title.

22
3.6 List item
Description
Use list items to display groups of related items, in a list. Listings are useful on homepages and
landing pages as section indexes, for example for a list of subsections, research groups, projects or
people.
List items can optionally include thumbnail images, and can be a single column or multicolumn.
Examples of a listing
Figure 24: BrisSynBio Research: the main column content uses a listing.
Graduate School of Biomedical Sciences: the main column content uses a multi-column listing. Neither include images (which are optional).
Wolfson Bioimaging Facility: listing with images in the main column.
Faculty of Science/ Research: multi-column listing with images in the main column, good for simple indexes with very little descriptive text.
The screenshots to the right show the same content on a mobile phone screen., focusing on the listing content.
Examples of a listing on a webpage:
● http://wwwdev.bris.ac.uk/aa/mw/school-of-best-practice/research/
○ the “research groupings” section uses a single column listing with thumbnail images
○ the “impact” section uses a multi-column column listing without images

23
Creating a listing
You need to add each list item separately – repeat these steps for each item in your listing:
In the Content tab of your section, select Add content.
Select the List item (responsive) content type, you will then see the Add content, enter content
details screen.
Figure 25: Entering details into the list item content type fields
Fields
Fields to complete in the template when adding this content type in T4 Site Manager:
• Name. Use the format:
list item - [description of content], for example:
'list item - research group - econometrics'
• Multi-column list. Check the box to display your list in two columns. You only need to check
this on the first item in the list.
• Heading. The main title of the list item. If you add an internal or external link, your heading
text will link to it.
● Description. A brief description of the list item
● Internal Link. Select a section in T4 to link to.
● External Link. Insert a URL to link to on an external website.
● Image. Select an optional image from the Media Library. This will appear as a thumbnail
image to the left of the heading. Make sure the images in each list item are the same size as
each other, using one of the following formats:

24
Square: 150px wide x 150px high
Portrait: 150px wide x 200px high
Landscape: 150px wide x 100px high
● Custom position. For Web team use only.
Once you have added items to your list, you can easily change the order they appear. By default,
they will appear in the order you created each item.
In the Content tab of your section, use the up and down arrows under the Move column to move
items up or down. Then select the small Save Changes button at the top of the Move column.

25
3.7 Module
Description
Use modules to signpost to subpages or other content, or highlight calls to action. Modules are
styled containers which can include icons, an image, heading, text (20-30 words) or list, and there
are a range of background colours to choose from a predefined list.
Modules are more commonly used in the right hand column, but can be used in the main column of
a page to really call attention to content, e.g. a change to opening hours. Use modules to:
● highlight and link to single pages of related content
● create a list menu linking to several related pages
● highlight facts or profiles
● highlight important messages or alerts
● link to social media accounts
Where possible, the heading should be made into a link to the relevant page.
Examples of modules
Figure 26: School of Oral and Dental Sciences/Research: these two modules are in the standard right-hand column position. "REF2014
success" has a heading which links, and some text. "Research in partnership" has an image, heading and unordered list.
School of Oral and Dental Sciences/Undergraduate: the first module has a heading and an unordered list, the second has a video and
includes a video “play” icon.
Library: the module “Printing, photocopying and scanning” uses the “custom” position “main column”. The modules on the right display
other icons, the “information” “i”, the “search” magnifying glass, and the video “play”.
CRIC: the CRIC logo is in a module, making it efficient to mirror (clone) it across the site.
The screenshots to the right show the same content on a mobile phone screen, focusing on the area displaying the module.
Examples of a module on a webpage:

26
● http://wwwdev.bris.ac.uk/aa/mw/school-of-best-practice/about/
○ “The school on film” uses a “play” icon to show it links to video content.
○ “Did you know” is a module with just heading and bulleted list.
● http://wwwdev.bris.ac.uk/aa/mw/school-of-best-practice/study/undergraduate/
○ “Applying to Bristol” uses a bulleted list with the bullets removed
○ “Get in touch” (main column) shows a module in the main column.
● http://wwwdev.bris.ac.uk/aa/mw/school-of-best-practice/contacts/
○ How to find us” includes an image as well as text.
Adding a module
Select the Module (responsive) content type, you will then see the Add content, enter content
details screen > Content tab:
Figure 27: Entering details into the module content type fields

27
Fields
Fields to complete in the template when adding this content type in T4 Site Manager:
● Name
Enter a name to identify the content in the format:
module - [position if not default] - [description of content]
Examples: 'module - explore bristol research', 'module - main - accommodation guarantee'
● Box colour
Choose a box colour from the dropdown list, which includes the colours in the University’s
colour pallet. Use the coloured module boxes sparingly - the more colour and styling you
apply to the page, the more distracting it is for your reader. Stick to the colours within your
website’s colour scheme in accordance with the University visual identity guidelines (e.g. if
your site has a bright blue banner, then please use a range of bright blue, dark blue and blue
tint for your module boxes).
You may also choose ‘stone’ as a neutral background, or choose to have no background
which may work better with images.
● Icon
If appropriate, select an icon from the dropdown list. The list includes info, warning, search,
download, social media icons, podcast and play. Any text in your module will align with the
icon automatically.
● Heading text
Enter optional heading text.
● Heading level
This determines the heading level of the 'Heading text'. Heading level should follow the flow
of the page. In general module boxes added to the right hand column should be at Heading
2. The heading level of modules added to the main column may need to be adjusted
depending on headings already on the page.
● Internal heading link (T4 section)
Links the heading to another section inside T4 (use “select” and navigate to the desired
section in T4). Both the heading and image (if there is one) will act as a link.
Where a link is included, a heading must be added to describe the target of the link.
● External heading link
Enter an optional external URL. Both the heading and image (if there is one) will act as a link.
Where a link is included, a heading must be added to describe the target of the link.
● Image
Use ‘select’ to navigate to an image in the media library. Images in modules can be either:
o 500px wide x 175px high
o 500px wide x 250px high.
● Show image at mobile view
By default, module images are not loaded or displayed at smaller screen sizes. Tick this box

28
if an image must always be displayed on mobile view, eg when you a module needs to be
particularly prominent on mobile view.
● Text content
The text content of the module. This should be kept short
and may include HTML content such as links or short lists.
To create the effect of a list (e.g. for a set of links as in
“Looking to join us?”), add the text as a bulleted list, and
then add the following class to the “ul” list tag:
<ul class="list-no-style list-links">
Using the class removes the bullets, and instead adds the
lines between each list item and a stone background. Ensure that the module box has a
matching background colour.
● Position
Default: 'right hand column’, but may also be added to the 'main column' by selecting this
option from the dropdown.
● Custom position
For Web team use only.
Notes
If the primary content is a quote or image use the appropriate content type and not a module box.

29
3.8 Quote
Description
Use quotes and quote boxes to reinforce or exemplify a key message that you are trying to
communicate on the page. You can use quote boxes with or without images, in the main or right
hand column.
Examples of a quote
Figure 28: Outreach in Biomedical Sciences: a quote with an image in the right hand column.
About the Faculty: a quote with no image in the main column.
The screenshots to the right show the quote content on a mobile phone screen, showing how it resizes for the smaller
format.
An example of a quote on a webpage:
● http://wwwdev.bris.ac.uk/aa/mw/school-of-best-practice/research/ in the right hand
column.
Adding a quote
Select the Quote (responsive) content type, you will then see the Add content, enter content
details screen > Content tab:

30
Figure 29: Entering details into the quote content type fields
Fields
Fields to complete in the template when adding this content type in T4 Site Manager:
● Name
Enter a name to identify the content in the format:
quote - [position if not default] - [description of content]
Examples: 'quote - prof basker', 'quote - right - erendira'
● Optional image
Insert an image, from the media library, of the person being quoted. Images must be a
square crop, 150px x 150px.
● Quote text
The quote itself.
● Quotee name
The name of the person or organisation being quoted.
● Internal link (T4 section)
Links the heading to another section inside T4 (use “select” and navigate to the desired
section in T4).
● External link
Insert a URL to the desired target page, on an external website.

31
● Bristol degree - award and year
If the person quoted is a current student or alumni, indicate their award following the house
style. Note that brackets are added automatically.
● Job title or other information
Additional information about the person being quoted. Keep this brief and relevant.
● Position
Default: 'main column', but may also be added to the 'right hand column' by selecting this
option from the dropdown.
● Custom position
For Web team use only.
Notes
The background colour defaults to 'stone', which cannot be changed.

32
3.9 Slider
Description
In the new responsive templates, sliders can hold up to three images, with optional headings, and
optionally link. Sliders can be in the main column, or can be full-width across the main and right
hand column on homepages or landing pages.
Note that the space for text on the responsive slider is much smaller than on the previous (non-
responsive) slider.
Do not add critical content to the second or third slide; users will often have left the page before the
rotation moves from the first image, and in some mobile browsers only the first slide will ever be
shown.
Slider images
● images should be high quality, sharp and not overly detailed or busy
● Photographic images should be saved as .jpg files. Images with blocks of flat colours or
graphics should be saved as .png
● Avoid over-compressing images, around 60-70% JPEG compression works well for most
photographs. Use Serif PhotoPlus, Photoshop or or an online tool like Pixlr Editor, PicResize
or Web Resizer for resizing and compressing images.
Example of a slider

33
Figure 30: Accommodation landing page: a full-width slider with only 1 image.
Wolfson Bioimaging Facility: a main-column slider with 3 images (note the 3 dots centre top and the “pause” icon top
left). Note the text length is quite short on slider text.
The screenshots to the right show the same content on a mobile phone screen.
See an example of a slider on a webpage:
● http://wwwdev.bris.ac.uk/aa/mw/school-of-best-practice/
Adding a slider
Select the Slider (responsive) content type, you will then see the Add content, enter content details
screen > Content tab:

34
Figure 31: Entering details into the slider content type
Fields
Fields to complete in the template when adding this content type in T4 Site Manager:
● Name
Enter a name to identify the content in the format:
slider - [position if not default] - [description of content]
Examples: 'slider - spiky', 'slider - main - wills'
● Background colour
Select an appropriate colour which compliments your site's colour scheme. If you add
heading text, then you will need to specify a background colour. If you don’t specify a
background colour but you have added a heading, the background will be black.
Use the colour sparingly - the more colour and styling you apply to the page, the more

35
distracting it is for your reader. Stick to the colours within your website’s colour scheme in
accordance with the University visual identity guidelines.
● Slide 1 - Heading
The heading to display on the first slide. Remember, if you add heading text then you need
to specify a background colour.
● Slide 1 - Link URL
Make the heading a link by adding a target URL here
● Slide 1 - Image
Select an image from the media library. Full-width images are 996px wide x 337px high.
Main column images are 650px wide x 265px high.
● Slide 1 - Image focal point
At smaller screen sizes the image is zoomed in. This option determines which portion of the
image will remain visible
● [Slide # - ...] fields are repeated up to a total of 3 slides.
Note, users often leave the page before the second or third slide is displayed, so do not add
critical content to these slides.
● Position
Default: 'Full-width' stretches the full width of the page. These are mainly used on
homepages. Change to 'Main column' for a smaller slider, and use on pages with content in
the right hand column.
● Custom position
For Web team use only.
Notes
For an example of how this looks on the webpage and for more information about the application of
this content type see: To be added.

36
4. Once content is added: next steps
Once content is added (Figure 32):
● Click on Preview to preview what the page will look like when published; this opens in a
separate browser tab
Point to the down arrow next to the Add button
● Select Save as Draft to save the content.
● Click on Add and Approve to save the content; it will then be published to the live site in the
next publishing cycle.
Figure 32: Preview, Save as Draft, Add and Approve.
5. Colour schemes (for reference)
