
REDUNDEAD | VERSION 3.0 (BETA)
RED.COM
REDUNDEAD
OPERATION GUIDE

Table of Contents 2
Disclaimer 3
Copyright Notice 3
Trademark Disclaimer 3
CHAPTER 1: REDUNDEAD Overview 4
Introduction 4
CHAPTER 2: Download and Install
REDUNDEAD 5
Download REDUNDEAD 5
Install REDUNDEAD on Windows 5
Install REDUNDEAD on MAC OSX 9
CHAPTER 3: Recover Media with
REDUNDEAD 16
Recover Media on Windows 16
Recover Media on MAC OS X 19
C OPYR IGHT © 2019 RED.C O M , LLC 955 - 0076, REV- M | 2
REDUNDEAD OPERATION GUIDE
TABLE OF CONTENTS

DISCLAIMER
RED
®
has made every effort to provide clear and accurate
information in this document, which is provided solely for the user’s
information. While thought to be accurate, the information in this
document is provided strictly “as is” and RED will not be held
responsible for issues arising from typographical errors or user’s
interpretation of the language used herein that is different from that
intended by RED. All safety and general information is subject to
change as a result of changes in local, federal or other applicable
laws.
RED reserves the right to revise this document and make changes
from time to time in the content hereof without obligation to notify any
person of such revisions or changes. In no event shall RED, its
employees or authorized agents be liable to you for any damages or
losses, direct or indirect, arising from the use of any technical or
operational information contained in this document.
This document was generated on 1/22/2019. To see earlier versions
of this document, submit a Support ticket at https://support.red.com.
For comments or questions about content in this document, send a
detailed email to OpsGuides@red.com.
COPYRIGHT NOTICE
COPYRIGHT© 2019 RED.COM, LLC.
All trademarks, trade names, logos, icons, images, written material,
code, and product names used in association with the accompanying
product are the copyrights, trademarks, or other intellectual property
owned and controlled exclusively by RED.COM, LLC. For a
comprehensive list, see www.red.com/trademarks.
TRADEMARK DISCLAIMER
All other company, brand, and product names are trademarks or
registered trademarks of their respective holders. RED has no
affiliation to, is not associated or sponsored with, and has no express
rights in third-party trademarks. Mac, Macintosh, Mac OS, and OS X
are registered trademarks of Apple Inc., registered in the U.S. and
other countries.
RESPONSIBLE PARTY
RED Digital Cinema
34 Parker
Irvine, CA 92618
USA
C OPYR I GHT © 2019 RED.C O M , LLC 955- 0076, REV- M | 3
REDUNDEAD OPERATION GUIDE

C OPYR I GHT © 2019 RED.C O M , LLC 955 - 0076, REV- M | 4
REDUNDEAD OPERATION GUIDE
CHAPTER 1:
REDUNDEAD OVERVIEW
INTRODUCTION
REDUNDEAD
®
is a lightweight media retrieval tool provided by RED
®
for the emergency recovery of footage.
REDUNDEAD is designed to repair and restore .R3D files from media that may have been formatted or experienced
errors while critical information was still present. It can also recover media that may have been lost due to improper
media ejecting and unmounting practices.
REDUNDEAD is compatible with the following RED media devices:
REDMAG™
RED MINI-MAG
®
REDFLASH
®
RED-RAM
®
RED-DRIVE
®
WARNING: Use REDUNDEAD at your own risk. RED DOES NOT guarantee that REDUNDEAD will be able to recover
any media files that will be useable.
IMPORTANT: DO NOT use REDUNDEAD to recover media that you do not own rights to.
WHEN REDUNDEAD CAN RECOVER MEDIA
Use REDUNDEAD to recover damaged or lost .R3D files in the following situations:
After media is formatted with .R3D files still present.
After improperly unmounting media from a computer resulting in lost .R3D files.
After improperly ejecting media from a DSMC resulting in lost .R3D files.
WHEN REDUNDEAD MAY NOT BE ABLE TO RECOVER MEDIA
REDUNDEAD may not be able to recover damaged or lost .R3D files in the following situations:
When media is physically damaged.
When media is reformatted AND used to record new footage, overwriting the previous footage.
NOTE: If there are existing .R3D files that have NOT been recorded over, they may still be recovered.
WHEN REDUNDEAD CANNOT RECOVER MEDIA
REDUNDEAD cannot recover data if the media cannot be recognized by the computer.

C OPYR I GHT © 2019 RED.C O M , LLC 955 - 0076, REV- M | 5
REDUNDEAD OPERATION GUIDE
CHAPTER 2:
DOWNLOAD AND INSTALL
REDUNDEAD
DOWNLOAD REDUNDEAD
REDUNDEAD
®
can be downloaded from the RED
®
website at www.red.com/downloads under the BETA tab.
1. Go to www.red.com/downloads.
2. Click Software.
3. Click Beta.
4. Navigate to the REDUNDEAD (BETA) download.
5. Click Release History.
6. Navigate to the box that contains the symbol in the bottom right corner for your operating system.
NOTE: REDUNDEAD is available for Mac
®
OS X
®
and Windows
®
.
7. Select the check box to agree to RED’s Terms and Conditions.
Figure: REDUNDEAD Terms and Conditions
8. Click DOWNLOAD.
9. Select a desired download location.
10. Click Save.
INSTALL REDUNDEAD ON WINDOWS
To install REDUNDEADon a Windows operating system, follow the instructions below:
1. Navigate to the REDUNDEAD download.
2. Double-click the compressed REDUndead_v#_Win download to extract the files.
3. Open the extracted folder.
4. Double-click the REDUndead_v#.msi file and select Run.

5. Click Next.
Figure: Click Next
6. Select the check box to agree to RED’s License Agreement.
7. Click Next.
Figure: Click Next
C OPYR I GHT © 2019 RED.C O M , LLC 955- 0076, REV- M | 6
REDUNDEAD OPERATION GUIDE

8. Click Next.
Figure: Click Next
9. Click Install.
Figure: Click Install
C OPYR I GHT © 2019 RED.C O M , LLC 955- 0076, REV- M | 7
REDUNDEAD OPERATION GUIDE

10. Click Finish.
Figure: Click Finish
11. Click the Windows Start button in the taskbar.
12. Type cmd.
13. Under Programs or Best Match, right-click cmd or Command Prompt and select Run as administrator.
14. Type REDundead into the command prompt line and press Enter.
C OPYR I GHT © 2019 RED.C O M , LLC 955- 0076, REV- M | 8
REDUNDEAD OPERATION GUIDE

INSTALL REDUNDEAD ON MAC OSX
To install REDUNDEAD on a Mac OS X operating system, follow the instructions below:
1. Navigate to the REDUNDEAD download.
2. Double-click the compressed REDUndead_v# download to extract the files.
3. Open the extracted folder.
4. Right-click the REDUndead_v#.pkg file and select Open from the drop-down menu.
5. Click Continue.
Figure: Click Continue
C OPYR I GHT © 2019 RED.C O M , LLC 955- 0076, REV- M | 9
REDUNDEAD OPERATION GUIDE

6. Click Continue.
Figure: Click Continue
C OPYR I GHT © 2019 RED.C O M , LLC 955 - 0076, REV- M | 10
REDUNDEAD OPERATION GUIDE

7. Click Agree.
Figure: Click Agree
C OPYR I GHT © 2019 RED.C O M , LLC 955 - 0076, REV- M | 11
REDUNDEAD OPERATION GUIDE

8. Click Continue.
Figure: Click Continue
C OPYR I GHT © 2019 RED.C O M , LLC 955 - 0076, REV- M | 12
REDUNDEAD OPERATION GUIDE

9. Click Install.
Figure: Click Install
C OPYR I GHT © 2019 RED.C O M , LLC 955 - 0076, REV- M | 13
REDUNDEAD OPERATION GUIDE

10. Click Close when the installation is complete.
Figure: Click Close
11. Go to Applications > Utilities and open Terminal.
12. Enter sudoREDundead into the command prompt line.
C OPYR I GHT © 2019 RED.C O M , LLC 955 - 0076, REV- M | 14
REDUNDEAD OPERATION GUIDE
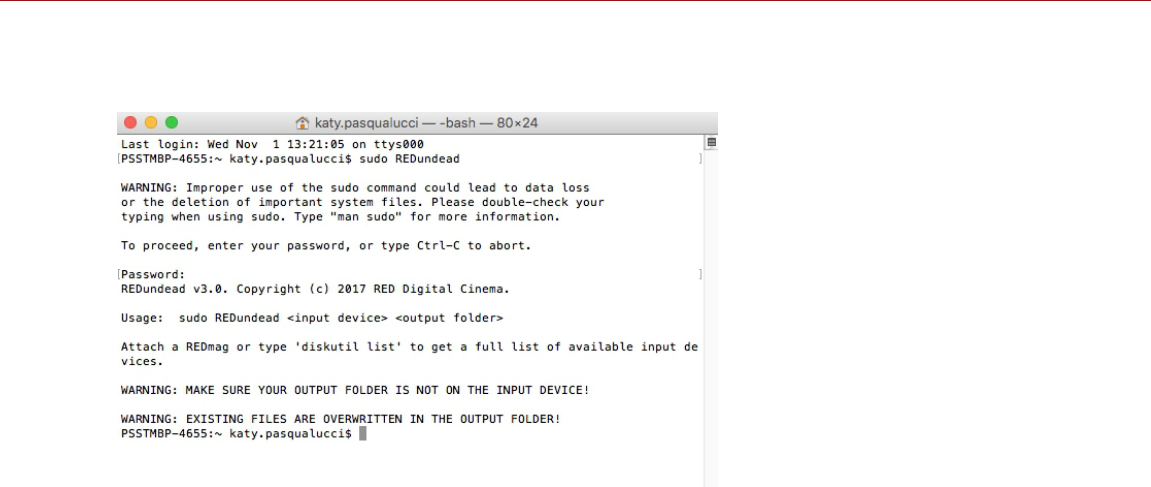
13. Enter your computer password if prompted.
If the installation is successful, REDUNDEAD outputs the text displayed in the image below.
Figure: Confirm REDUNDEAD
C OPYR I GHT © 2019 RED.C O M , LLC 955 - 0076, REV- M | 15
REDUNDEAD OPERATION GUIDE

C OPYR I GHT © 2019 RED.C O M , LLC 955 - 0076, REV- M | 16
REDUNDEAD OPERATION GUIDE
CHAPTER 3:
RECOVER MEDIA WITH
REDUNDEAD
RECOVER MEDIA ON WINDOWS
To recover media on a Windows
®
operating system, follow the instructions below:
1. Create a folder on your computer where you want to save recovered .R3D files.
WARNING: Available hard disk space on your computer must be at least the size of the total storage space on the
RED
®
media being recovered.
NOTE: In this example, we create a folder on the D drive labeled “RecoveryFolder” for the recovered files. The
path for this folder location on your hard drive is “D:/RecoveryFolder”.
2. Use the appropriate docking station to connect the RED media to your computer.
3. Click the Windows Start button in the taskbar.
4. Type cmd.
5. Under Programs or Best Match, right-click cmd or Command Prompt and select Run as administrator.

6. Type REDundead into the command prompt line and press Enter.
NOTE: Recognized media device(s) appear and are numbered as “disk1”, “disk2”, “disk3”, etc.
Figure: Type REDundead
7. Determine the source path and disk number for the disk that you want to recover.
If a list of disks does not appear, type echo list disk | diskpart and press Enter.
8. After identifying the correct REDMAG™ disk and source path, type the following to match the REDundead disk5
D:/RecoveryFolder format, where:
disk5: Is the correct number for the REDMAG disk identified earlier.
D:/RecoveryFolder: Is the output destination where the recovered file will be written.
WARNING: Do not select the REDMAG as the output destination for the recovered files as it will cause all data
to be lost.
9. Press Enter.
10. Enter your computer password if prompted.
REDUNDEAD
®
begins to recover files from the media device. This operation may take awhile. Files display in the
terminal window as they are found and rewritten.
NOTE: To stop the recovery process, press CTRL +Z. Files that have already recovered remain. Any files currently
processing stop at the current location.
C OPYR I GHT © 2019 RED.C O M , LLC 955 - 0076, REV- M | 17
REDUNDEAD OPERATION GUIDE

11. Wait for the terminal window to display Recovered # files. indicating REDUNDEAD is complete.
Figure: Recovery Folder Command Prompt
12. Open the destination folder to verify files that were successfully recovered.
NOTE: RED recommends that you unmount the drive from Disk Utility before physically removing it from the
computer. This helps to prevent unintended corruption of the drive and/or files.
C OPYR I GHT © 2019 RED.C O M , LLC 955 - 0076, REV- M | 18
REDUNDEAD OPERATION GUIDE

C OPYR I GHT © 2019 RED.C O M , LLC 955 - 0076, REV- M | 19
REDUNDEAD OPERATION GUIDE
RECOVER MEDIA ON MAC OS X
To recover media on a Mac
®
OSX
®
operating system, follow the instructions below:
1. Create a folder on your computer where you want to save recovered .R3D files.
WARNING: Available hard disk space on your computer must be at least the size of the total storage space on the
RED
®
media being recovered.
NOTE: In this example, we create a folder on the desktop labeled “RECOVER” for the recovered files. The path for
this folder location on your hard drive is “/Users/yourusername/Desktop/RECOVER”.
2. Use the appropriate docking station to connect the RED media to your computer.
3. Open Terminal.
4. Enter diskutil list into the Terminal command prompt line.
5. Press Enter.
NOTE: Recognized media device(s) appear and are numbered as “disk1”, “disk2”, “disk3”, etc.
6. Determine the source path and disk number for the disk that you want to recover.
7. Open Disk Utility and select Info on the drive to view the disk information.
NOTE: In this example, the RED media device that we attempt to recover is “disk1”, with a source path of
“/dev/disk1”, and thus the disk number is one (1).
Figure: REDUNDEAD Media Sources
8. Enter sudo redundead /dev/rdisk# /destination/path, where:
# is the number of the source disk determined in Step 6, which is one (1) in the example /dev/rdisk1
/destination/path is the location created in Step 1, such as /User/johnsmith/Desktop/RECOVER
NOTE: Drag and drop the recovery location folder into the Terminal window instead of manually entering the
destination path. The path automatically generates.
WARNING: Improper use of the sudo command could lead to data loss or the deletion of important system files.
Double-check your typing when using sudo. Enter man sudo for more information.
IMPORTANT: Ensure there is a space after “sudo”, “redundead”, and the source path. The space is required for
REDUNDEAD to run properly.
IMPORTANT: Note the “r” in front of the media source disk. It is required for REDUNDEAD to run properly.
9. Ensure that the command, source path, and destination path are entered correctly.

10. Press Enter.
Figure: Run REDUNDEAD
11. Enter your computer password if prompted.
REDUNDEAD begins to recover files from the media device. This operation may take a while. Files display in the
terminal window as they are found and rewritten.
NOTE: To stop the recovery process, press CTRL+Z. Files that have already been recovered remain. Any files
currently processing stop at the current location.
12. Wait for terminal window to display Done! indicating REDUNDEAD is complete.
Figure: REDUNDEAD Complete
13. Open the destination folder to verify files that were successfully recovered.
NOTE: RED recommends that you unmount the drive from Disk Utility before physically removing it from the
computer. This helps to prevent unintended corruption of the drive and/or files.
Figure: Verify Recovered Files
C OPYR I GHT © 2019 RED.C O M , LLC 955 - 0076, REV- M | 20
REDUNDEAD OPERATION GUIDE
