
© 2017 Bethany A Dailey gettinitpegged.com LOOM KNIT GARDEN TOTE
LOOM KNIT GARDEN TOTE
I imagine this floral motif as the window that
looks out onto a rose garden, which would
be a perfect place to sit and knit in the
shades of the trellises, surrounded by the
lovely scents of nature. This design features
both double and single knit, making it a
wonderful introduction to the Rotating
Double Knit Loom by Authentic Knitting
Board...Enjoy!
SKILL LEVEL: Intermediate
ABBREVIATIONS
Approx=approximately
CO=cast on
BO=bind off
WY=working yarn
PATTERN NOTES
(*please read through before beginning project)
This project is designed in such a way that a
multitude of items can be created from it. If a
bag is not preferred, a pillow can be made by
simply stuffing and closing the top, rather than
adding handles. An unlined bag can be created
by simply adding premade or knit handles to the
top of the bag. The stranded colorwork patch
can be inserted directly into another knitted
project, such as a blanket, etc. The options for
this design are only limited to your imagination!
To make it easier to add a simple canvas tote to
the inside of your bag for a quick liner with
handles, add another 4 rows on each of the 2
color blocks of the main double knit bag to
increase the height to 14”. Then simply insert
the tote into your knitted bag and hand stitch
them together along the top opening!
METHOD USED FOR FINISHING SAMPLE:
The sample used a basic tote bag for a liner, but
2” were cut off the top of the tote below the
thick seam and handles. The 2 handles were
removed, then stitched together to make one
LOOM: Rotating Double Knit Loom by KB
YARN: approx. 420 yards #4 worsted weight
yarn. Sample used Patons Classic Wool, 210
yards per skein, 100% wool, in colors orchid
and lemongrass
NOTIONS: loom tool, yarn needle, lengths of
waste yarn, row counter. Optional for lining
bag: approx. 1 yard decorator fabric, 1 basic
canvas tote, 10”x10” soft plastic canvas or
stiff felt, sewing machine, sewing thread,
sewing needle, straight pins.
GAUGE: Double Knit Ribbing: approx. 5 sts x
9 rows = 2 inches
Single Knit U-stitch: approx. 10 sts x 11.25
rows = 2 inches
SIZE: Sample is 12” h x 14” w.

© 2017 Bethany A Dailey gettinitpegged.com LOOM KNIT GARDEN TOTE
longer handle. The removed thick top piece was
trimmed to the very edge and cut through once
to make the 2
nd
longer handle. These were
covered with decorator fabric by folding over
and hand stitching. Pressing the sections of
newly made handles and liner with an iron as
you proceed is helpful and provides a
professional finish.
Two pieces of decorator fabric were cut approx.
1” larger than the trimmed tote and the pieces
seamed with right sides together across the
sides and bottom. The fabric was then inserted
into the tote with the right side of the fabric
showing through the opening of the bag. (*Note:
the part of the tote at the bottom where it opens
to make wider was simply kept closed for a basic
straight bottom.)
The top of the fabric was folded down over the
tote and stitched in place. The handles were
then securely re-affixed to the outside of the
tote. The entire tote with covered liner and
handles was then inserted into the knitted piece
and handstitched around the entire top edge.
COLORWORK PATCH
The stranded colorwork patch was made into a
pocket on the sample. If a pocket is not desired,
then simply stitch the patch around all sides
directly onto the main knitted bag.
The sample created a lined pocket with firm
support by first stitching the colorwork patch to
the front of the bag across the 2 sides and the
bottom. Make sure to center the patch so that
its color blocks are opposite from the bag’s color
blocks (sample was pink on green and green on
pink) and aligning the dividing line of the color
blocks on both pieces. A piece of soft, small
squared plastic canvas (stiff felt could also be
used) cut to approx. 10” x 9” was inserted to fit
at the back of the colorwork patch for support.
The liner was then created by cutting a piece of
decorator fabric into approx. 10.5”x 19”. This
piece of fabric was placed onto the front of the
patch with right sides together and stitched
across the top edges of the patch and the fabric.
The fabric was then folded up onto itself so that
the 2 shorter ends were aligned (the one just
seamed & the one now folded up). The sides of
the fabric were then stitched together to form a
pocket. This pocket was then tucked into the
knitted patch, folding the stitched top edge so
that none of the fabric showed at the front of
the patch. The other side of the top edge of the
fabric pocket liner was folded down to match
the height of the stitched front edge. Pin in
place and hand stitch the liner to the knitted
pocket and bag across the entire top opening.
Pressing the pocket and liner with an iron is
helpful and provides a professional finish…just
be careful about the temperature being applied
to any synthetic yarns. The sample used 100%
wool, so ironing at high heat was acceptable.

© 2017 Bethany A Dailey gettinitpegged.com LOOM KNIT GARDEN TOTE
KNITTING INSTRUCTIONS
DOUBLE KNIT BAG
Set up the Rotating Double Knit Loom to use
both looms on the base to work a double knit
panel. Using the color of yarn desired for the
bottom color block (COLOR A), CO to 35 peg
pairs using the Ribbing Stitch method of
wrapping.
*See last page of pattern for photos of the
Ribbing Stitch method.
Insert an anchor yarn across all the stitches and
tuck the ends down into the loom.
Rows 1-28: Wrap the loom with the Ribbing
Stitch method and knit off.
Rows 29-55: Trim the bottom yarn color to 4”
and pick up the top yarn color (COLOR B) to
continue wrapping and knitting with the Ribbing
Stitch.
BO all stitches using the Crochet BO for double
knitting. Also BO at the anchor yarn end.
Find helpful instructions for binding off and the
finishing method for the anchor yarn at this link:
http://www.knittingboard.com/bind-offs-page/
Repeat Rows 1-55 instructions to make a 2
nd
identical panel.
Stitch the 2 panels neatly together at the sides
and bottom.
COLORWORK PATCH
Set up the Rotating Double Knit Loom to use
only the outside loom on its base to work a
single knit panel. Using COLOR B, the yarn
desired for the bottom main color of patch, CO
to all 52 pegs from left to right (Sample used
Chain CO).
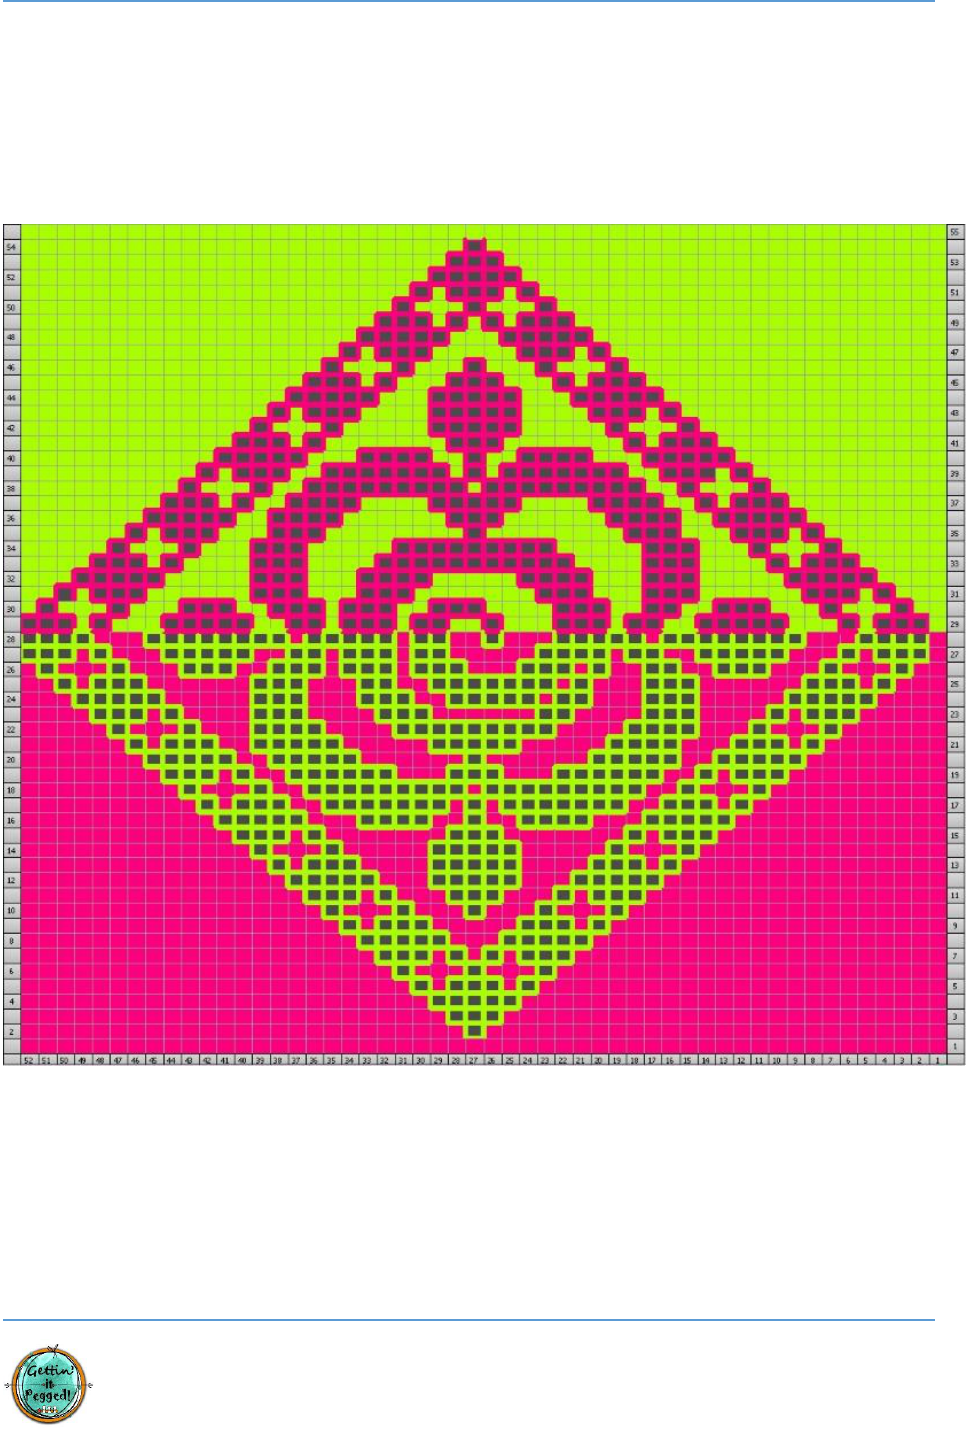
Rows 1-55: All stitches use the U-stitch. Follow
Chart below for color placement.
This panel uses stranded colorwork to create its
alternating color pattern. Do not cut yarns
when they are not being used. Instead, carry
them along the back of the work together with
the current color. To keep the travelling lines, or
floats, from getting too long, every 3 stitches
that a yarn isn’t being used, wrap the WY
around and over the carried yarn to pin it in
place to the back of the work. To switch colors,
simply bring the yarn to be used over the top of
the now resting yarn and knit the peg(s) called
for in the chart.
FOR EXAMPLE:
Begin reading the chart from right to left, and
working from the bottom row to the top, work
each stitch in the color indicated by the chart.
Row 1 calls for COLOR B to be used on all the
pegs. Row 2 calls for COLOR B to be used on
pegs 52-28. Drop COLOR B and begin using
COLOR A on peg 27. Drop COLOR A and bring
COLOR B around the top of COLOR A and begin
knitting pegs 26-1.
(**Note: You will only need to carry the yarns
during the actual multi-colored motif. The
outside of the diamond motif will be knitted with
just one color, so there is no need to travel the
unused color during these sections.)
BO all stitches using Basic BO and block panel to
a 10.5”w x 9.5”h measurement.
© 2017 Bethany A Dailey gettinitpegged.com LOOM KNIT GARDEN TOTE
FINISHING
Refer to PATTERN NOTES and METHOD USED
FOR FINISHING SAMPLE instructions at the
beginning of pattern for specific details and
ideas on lining and finishing the bag.
(*Note: For the sample, the colorwork patch was knit in exactly the color scheme as is shown in
the chart above and simply flipped around for seaming onto the bag. Feel free to knit the two
colors of the patch in whatever direction works best for your design. The pattern directions on
the previous page reflect the actual way the colors are laid out in the final design of the bag.)

© 2017 Bethany A Dailey gettinitpegged.com LOOM KNIT GARDEN TOTE
DOUBLE KNIT RIBBING CAST ON
(*Note: these photos are an example and not the
number of pegs called for in the pattern.)
CO from left to right as seen above. The slip knot
for temporarily holding the yarn is at far left.
Place anchor yarn across CO row & tuck ends
down through loom.
Start Row 1 in pattern from right to left. The
turning peg in each row will only have one loop
and will not be knit off (KO).
The row is completely wrapped the exact same
way as before. The last peg is wrapped for the
first time.
The row’s pegs are KO with anchor yarn in place.
Start Row 2 in pattern from left to right. The
turning peg will have only one loop. Continue
wrapping in the same exact way for all rows.
Bethany A. Dailey has loved the art of loom knitting since 2005. She discovered that even
with hand and wrist limitations, she was still able to successfully create lots of fibery
goodies on her knitting looms. She soon began teaching locally, and online through her
website, GettinItPegged.com. As well as participating in various loom knitting publications
over the years, Bethany has authored her own book, Loom Knitting for Little People. She
has also had the privilege of writing the Stitchology Column for Authentic Knitting Board
since 2014, as well as being a regular design contributor. Feel free to reach her at
Bethany@GettinItPegged.com.
