http://www.loomahat.com/wp-content/uploads/2014/09/Knifty.Knitter.Instructions.round_.loom_.pdf
Hat Instructions
Note: The blue loom is small (for babies), the red loom is medium (for young children), the green loom is large,
and the yellow loom is extra large.
*It is usually best to knit with two strands of knitting worsted yarnheld together (treating them like one strand) or
to use one strand of bulky yarn.
Let’s Begin!
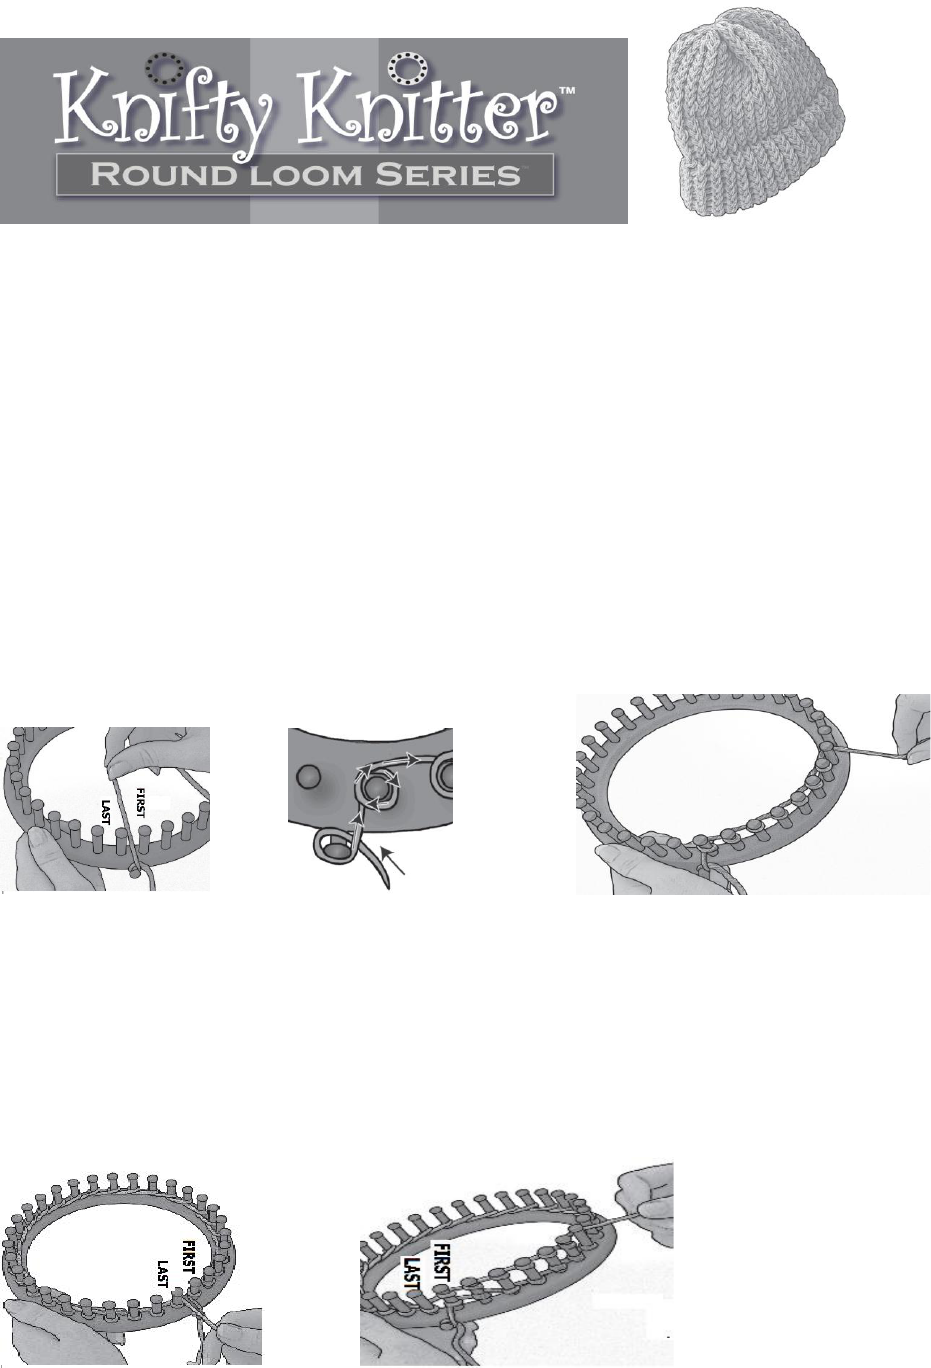
Step 1:
Wrap the end of your yarn around the outer peg on the edge of the loom. Pull the long end of yarn up
between the first and last pegs.
Step 2:
Keeping the yarn moderately loose, wrap the yarn completely around the first peg and cross it in the back
(follow arrows on illustration). Repeat with second peg. Continue wrapping pegs until you have wrapped
the last peg.
Step 1 Step 2 closeup Step 2
Step 3:
Slide the yarn loops on each peg toward the bottom of the pegs.
Step 4:
For the second time, wrap yarn around all the pegs, starting with the first peg and ending with the last
peg.
Step 3 Step 4

Step 5:
Secure the loose end of your yarn around the outer peg so the yarn won’t come unraveled. You may do
this by forming a half hitch, as follows: form a loop in the yarn (a). Place the loop on the outer peg and pull
the end to tighten (b).
Step 5 a Step 5 b
Step 6:
Using the enclosed hook, lift the bottom row of yarn loops over the top row and over the pegs. When you
are finished, you will have one row of loops on your pegs. You have now finished your first row of knitting.
Step 6
Step 7:
Push the row of loops to the bottom of the pegs again. Undo the half hitch you formed in Step 5, and
repeat Steps 4 through 7. You have now completed your second row of knitting.
Step 7 Step 8
Step 8:
Continue in this manner until your knitting is the length you desire (see measurements below). Your
finished knitting will emerge from inside the loom. After knitting several rows, you may unwrap the original
loop you made in Step 1 (on the outer peg). Just let the yarn hang.
If you do not want to add a brim to your hat, knit until you have reached 6½-7½" (small hat), 7-8" (medium
hat), or 8-9" (large/extra large hat). Then proceed to the “Finishing the Top of Your Hat” section. If you
don’t add a brim, the bottom of your hat will curl.
If you do want to add a brim to your hat, stop after knitting 3" (small hat), 4" (medium hat), or 5"
(large/extra large hat), and proceed to the “Adding a Brim to Your Hat” section.

Adding a Brim to Your Hat
Step 1:
Make sure you have only one row of loops on all of your pegs. Push the row of loops to the bottom of
the pegs. Reach inside the loom and pull the loops from your first row of knitting over the
corresponding pegs, as follows: pull up the long, loose yarn at the beginning of your knitting and
place it between the first and last pegs. This will help you align the loops with the pegs. The “loop” is
actually the long bar of yarn that runs between two stitches (see illustration). Starting with the peg to
the right of your original loose yarn, pull the loops up until all of the pegs are covered. You now have
two rows of yarn loops on your pegs.
Step 1 Step 2 Step 3
Step 2:
Use the hook to pull the bottom row of loops over the top row and the pegs, just as in Step 6 under
“Let’s Begin.”
Step 3:
Continue wrapping the yarn around the pegs and pulling the bottom row over the top and the pegs,
just like you were doing before you started your brim. Continue until you reach the finished length for
your hat: 6½-7½" (small hat), 7-8" (medium hat), or 8-9" (large/extra large hat). Proceed to the
“Finishing the Top of Your Hat” section.
Finishing the Top of Your Hat
Step 1:
Start with only one row of yarn loops on the pegs. Cut the end of your wrapping yarn, leaving a 3-4"
tail.
Step 2:
Cut a 24" piece of yarn from your skein and thread it onto the enclosed yarn needle.
Step 3:
Starting with the first peg, use the needle to sew through the yarn loop on each peg, moving from the
bottom of the peg to the top of the peg. After you thread through a loop, pull the loop up and over the
peg. Continue this until you have sewn through all the loops and pulled them all off their pegs. (Make
sure the end of the yarn is still sticking out of the first loop you pulled off.)

Step 1 Step 2 Step 3
Step 4:
Turn your hat inside out. Pull the two ends of your sewing yarn together to gather the material for the
top of the hat.
Step 4 Step 5 Step 6
Step 5:
Tie the two ends of your sewing yarn together in a tight square knot. Then tie the end of your
wrapping yarn to one of the sewing yarns. Cut the ends of all the yarn, leaving 3-4" tails. There will
also be a yarn end hanging near the brim of your hat. This is the original yarn from when you began
your hat. Weave the end of this yarn into the middle of the brim with a crochet hook or with the
enclosed yarn needle.
Step 6:
Turn your hat right side out. You have finished!
Tip: If you are using two strands of yarn to knit, you can make them each a different color to create a
unique, multicolored effect.
Tip: If you want to change colors during your knitting, you can do so at any time while you have only
one row of yarn on your pegs. Simply wrap the end of your new color around the outer peg and begin
wrapping the pegs like normal. Then pull the bottom row of yarn (the original color) up over the top
row of yarn (the new color) and over the peg. Continue knitting with your new color. After knitting a
couple of rows, go back and tie the end of your original color of yarn to the
half-hitched end (undo the half hitch first) of your second color.
Tip: When making a baby’s hat, use only one strand of yarn to prevent too much bulkiness.
Visit www.provocraft.com for additional patterns and projects using different methods of knitting.
