
© 2019 Furuno USA & Sirius XM Radio Inc.
3-2019Date:
English (en-US)
Installation instructions
Furuno BBWX4 SiriusXM
Marine Weather & Audio Receiver

2
Furuno BBWX4 SiriusXM Receiver Installation Guide
Thank you for purchasing the Furuno BBWX4 Receiver
Tracking of weather is easier than ever with the Furuno
®
BBWX4 SiriusXM Receiver for Furuno MFD’s. Furuno
and SiriusXM have teamed up to bring you live, up-to-date weather information and forecasting to give
you peace of mind, no matter when or how you are using your boat. The weather information is obtained
from the weather industry’s leading experts and is delivered via a digital receiver through SiriusXM’s Marine
Weather services.
You have the ability to receive high-quality and comprehensive weather information and forecasting that you
can overlay onto your raster and vector charts. You will be provided with premium weather content, such as
current weather reports, NOWRad® nationwide high-resolution weather radar imagery, and high-resolution
Sea Surface Temperature images that can help fishermen locate fishing hot spots. Hardware and the SiriusXM
weather service subscription are sold separately.
The Furuno BBWX4 SiriusXM Receiver also provides access to over 150* channels of SiriusXM satellite radio
service which can be added at a discounted rate to the Marine subscription.
For more information about SiriusXM Marine service features and pricing in the US visit siriusxm.com/marine
and in Canada visit siriusxm.ca/marine.
*Canadian SiriusXM satellite radio subscribers will have access to over 130 channels at a discounted rate with the marine subscription.
Fair Use Statement
You may print no more than three copies of this manual for your own use. You may not make any further
copies or distribute or use the manual in any other way including without limitation exploiting the manual
commercially or giving or selling copies to third parties.
Software Updates
Important: Check the Furuno website for the latest software releases for your product,
www.FurunoUSA.com.
Product Handbooks
The latest versions of manuals are available to download in PDF format from the website
www.FurunoUSA.com. Please check the website to ensure you have the latest manuals.
Copyright ©2019 Furuno USA. All rights reserved.

3
Furuno BBWX4 SiriusXM Receiver Installation Guide
Safety Notices
Warning: Product installation and
operation
This product must be installed and operated in
accordance with the instructions provided. Failure to
do so could result in personal injury, damage to your
vessel and/or poor product performance.
Warning:
Maintain a permanent watch
Always maintain a permanent watch, this will allow
you to respond to situations as they develop. Failure
to maintain a permanent watch puts yourself, your
vessel and others at serious risk of harm.
Warning: Potential ignition source
This product is NOT approved for use in hazardous/
flammable atmospheres. Do NOT install in a
hazardous/flammable atmosphere (such as in an
engine room or near fuel tanks).
Warning: Switch off power supply
Ensure the vessel’s power supply is switched OFF
before starting to install this product. Do NOT
connect or disconnect equipment with the power
switched on, unless instructed in this document.
Warning: Product grounding
Before applying power to this product, ensure it has
been correctly grounded, in accordance with the
instructions in this guide.
Warning: Positive ground systems
Do not connect this unit to a system which has
positive grounding.
Caution: Power supply protection
When installing this product ensure the power source
is adequately protected by means of a suitably-rated
fuse or automatic circuit breaker.
Caution: Service and maintenance
This product contains no user serviceable
components. Please refer all maintenance and repair
to authorized Furuno dealers. Unauthorized repair
may affect your warranty.

4
Furuno BBWX4 SiriusXM Receiver Installation Guide
General Information
EMC Installation Guidelines
Furuno equipment and accessories conform to
the appropriate Electromagnetic Compatibility
(EMC) regulations, to minimize electromagnetic
interference between equipment and minimize
the effect such interference could have on the
performance of your system. Correct installation
is required to ensure that EMC performance is not
compromised.
For optimum EMC performance we recommend that
wherever possible:
• Furuno equipment and cables connected to it
are:
- At least 1 m (3 ft) from any equipment
transmitting or cables carrying radio signals
e.g. VHF radios, cables and antennas. In the
case of SSB radios, the distance should be
increased to 7 ft (2 m).
- More than 2 m (7 ft) from the path of a
radar beam. A radar beam can normally be
assumed to spread 20 degrees above and
below the radiating element.
• The product is supplied from a separate
battery from that used for engine start. This is
important to prevent erratic behavior and data
loss which can occur if the engine start does
not have a separate battery.
• Furuno specified cables are used.
• Cables are not cut or extended, unless doing
so is detailed in the installation manual.
Note: Where constraints on the installation prevent
any of the above recommendations, always ensure
the maximum possible separation between different
items of electrical equipment, to provide the best
conditions for EMC performance throughout the
installation.
Water Ingress
Water ingress disclaimer:
Although the waterproof rating capacity of this
product meets the IPX6 & IPX7 standard, water
intrusion and subsequent equipment failure may
occur if the product is subjected to commercial
high-pressure washing. Furuno will not warrant
products subjected to high-pressure washing.
Suppression Ferrites
Furuno cables may be fitted with suppression
ferrites. These are important for correct EMC
performance. If a ferrite has to be removed for any
purpose (e.g. installation or maintenance), it must be
replaced in the original position before the product
is used.
Use only ferrites of the correct type, supplied by
Furuno authorized dealers.

5
Furuno BBWX4 SiriusXM Receiver Installation Guide
Connections to Other Equipment
Requirement for ferrites on non-Furuno cables. If
your Furuno equipment is to be connected to other
equipment using a cable not supplied by Furuno, a
suppression ferrite MUST always be attached to the
cable near the Furuno unit.
Product disposal
Dispose of this product in accordance with the
WEEE Directive.
The Waste Electrical and Electronic Equipment
(WEEE) Directive requires the recycling of waste
electrical and electronic equipment. Whilst the
WEEE Directive does not apply to some Furuno
products, we support its policy and ask you to be
aware of how to dispose of this product.
Warranty registration
To register your Furuno product ownership, please
visit www.FurunoUSA.com and register online.
It is important that you register your product to
receive full warranty benefits. Your unit package
includes a bar code label indicating the serial
number of the unit. You will need this serial number
when registering your product online. You should
retain the label for future reference.
IMO and SOLAS
The equipment described within this document
is intended for use on leisure marine boats and
workboats not covered by International Maritime
Organization (IMO) and Safety of Life at Sea
(SOLAS) Carriage Regulations.
Technical accuracy
To the best of our knowledge, the information in this
document was correct at the time it was produced.
However, Furuno cannot accept liability for any
inaccuracies or omissions it may contain. In addition,
our policy of continuous product improvement may
change specifications without notice. As a result,
Furuno cannot accept liability for any differences
between the product and this document. Please
check the Furuno website (www.FurunoUSA.com)
to ensure you have the most up-to-date version(s)
of the documentation for your product.

6
Furuno BBWX4 SiriusXM Receiver Installation Guide
Parts Supplied
Furuno BBWX4 SiriusXM Receiver
Shakespeare
®
SRA-50 Antenna
(Includes 25’ Cable & Mounting Accessories)
SMA to SMB Adapter Mounting Screws (2)
Furuno BBWX4 Network Cable
Furuno BBWX4 Stereo Audio Cable
Furuno BBWX4 Power Cable
ANTENNA AUDIO
MARINE
NETWORK
R ECEIVER
POWER
InfoLINK

7
Furuno BBWX4 SiriusXM Receiver Installation Guide
Multifunction display hardware and software compatibility
For compatibility information visit www.FurunoUSA.com.
Installation Overview
Shown at right is a typical installation
overview for the BBWX4 Receiver in
a Furuno system.
The BBWX4 Receiver can be
connected directly to a Furuno
Multifunction Display, or to an
Ethernet Hub or Network Switch.
The audio connection is optional and
is used if you subscribe to a SiriusXM
music and entertainment package
in addition to the SiriusXM Marine
subscription package.
ANTENNA AUDIO
MARINE
NETWORK
RECEIVER
POWER
InfoLINK
ANTENNA
SMA
to SMB
ADAPTER
Switched
Circuit
RF Ground Point
(If none then connect
to chassis/battery
ground)
RedWhite
AUDIO
CABLE
ANTENNA
CABLE
POWER
CABLE
NETWORK CABLE
NETWORK SWITCH
Black
BBWX4
RECEIVER
MULTIFUNCTION DISPLAY
AUX
Input
BATTERY
STEREO

8
Furuno BBWX4 SiriusXM Receiver Installation Guide
Required Additional Components
Component / Service
Required for
SiriusXM Satellite Radio
Required for
SiriusXM Marine Weather
Sirius SRA-50 type-approved antenna
Compatible Furuno multifunction
display
GPS receiver — provides position
information for your vessel in the
weather, chart and radar applications.
Some multifunction displays have an
internal GPS receiver. If your display
does not have an internal GPS, an
external GPS receiver will be required.
Third-party external audio system
— required if you want to listen to
SiriusXM satellite radio.
SiriusXM marine weather subscription
SiriusXM satellite radio subscription

9
Furuno BBWX4 SiriusXM Receiver Installation Guide
Cable Identification
The following is the pin identification for the Network Cable provided with the BBWX4 Receiver.
SiriusXM Receiver Furuno MFD
SiriusXM
Connector
Pin Description
Furuno
Connector
Pin Description
5
6
7
1
2
3
4
1 Ethernet RX+ (White/Green)
18
1 Ethernet TX+
2 Ethernet RX– (Green) 2 Ethernet TX–
3 Ethernet TX+(White/Orange) 3 Ethernet RX+
4 Ethernet TX– (Orange) 4 Not Used
5 HW ID-A 5 Not Used
6 HW ID-B 6 Ethernet RX–
7 Shield/Ground 7 Not Used
8 Not Used
Note: if a longer network connection is needed, visit www.FurunoUSA.com for additional extension solutions.

10
Furuno BBWX4 SiriusXM Receiver Installation Guide
The following is the pin and wire identification for the Power Cable provided with the BBWX4 Receiver.
Power
Connector
Pin Description
Wire
Color
Description
1
2
3
1 Battery + (Switched) Red Battery + (Switched)
2 Ground - Black Ground -
3 RF Shield Ground White RF Shield Ground
The following is the pin and connector identification for the Audio Cable provided with the BBWX4 Receiver.
Audio
Connector
Pin Description
Connector
Color
Description
14
2
3
1
Left Audio +
Red Right Stereo Audio
2
Left Audio –
3
Right Audio –
White Left Stereo Audio
4
Right Audio +

11
Furuno BBWX4 SiriusXM Receiver Installation Guide
BBWX4 Receiver Installation
Select a mounting location for the BBWX4 Receiver
that is sheltered from the elements. While the
receiver is water resistant, it should be mounted
where there will be no direct contact with water, or
water spray, if possible.
Also consider the proximity for the several cables
which will be need to be connected, antenna, power,
data, and optionally audio, so that the cables reach.
Before mounting the unit, make a note of the
Electronic Serial Number on the underside of the
unit.
Once you have determined a suitable location,
attach the receiver using the two provided screws.
ANTENNAAUDIO
MARINE
NETWORK
RECEIVER
POWER
InfoLINK
Connect the Power Cable
The BBWX4 Receiver should be connected to a 12 or
24 volt power source, negative ground.
Caution: Some vessels may have a positive ground
system. DO NOT connect to positive ground system.
Be sure the vessels’ power is off before making the
power connection, or the fuse or circuit breaker
which will be powering the BBWX4 Receiver is off.
Power Wire Connection (See diagram on page 7)
Red 12v or 24v positive power (switched
on/off with vessel’s main power)
Black Ground (negative)
White The RF shield wire. Ground this wire
to the vessel’s dedicated grounding
system. For vessels without a
dedicated grounding system, do not
connect this wire.
Power Cable Extension
The product is supplied with a power cable, which
can be extended if required.
The following restrictions apply to any extension to
the power cable:
• Cable must be of a suitable gauge for the
circuit load.

12
Furuno BBWX4 SiriusXM Receiver Installation Guide
ANTENNAAUDIO
MARINE
NETWORK
RECEIVER
POWER
POWER
InfoLINK
• Each unit should have its own dedicated
power cable wired back to the distribution
panel.
Total Length
(max)
Supply
Voltage
Cable Gauge
(AWG)
0–5 m
(0–16.4 ft)
12 V 18
24V 20
5–10 m
(16.4–32.8 ft)
12 V 14
24V 18
10–15 m
(32.8–49.2 ft)
12 V 12
24V 16
15–20 m
(49.2–65.5 ft)
12 V 12
24V 14
Note: These distances are for a 2–wire power cable
run from the battery to the product (approximate
distance). To calculate the round trip length, double
the figure stated here.
Breakers, Fuses and Circuit Protection
It is recommended that you fit a thermal breaker or
fuse at the distribution panel.
• Thermal breaker rating: 5 A (if only connecting
one device)
Note: The suitable fuse rating for the thermal
breaker is dependent on the number of devices you
are connecting. If in doubt consult an authorized
Furuno dealer.
Connect the Power Cable to the POWER connection
of the receiver.
13
Furuno BBWX4 SiriusXM Receiver Installation Guide
Connect the Network Cable
The Network Cable should be connected to your
Furuno system. This cable has two different
connectors - one end connects to the Furuno
system and the other to the BBWX4 Receiver. The
cable is marked near each end to distinguish the
connectors.
If your Furuno system does not utilize a Network
Switch, connect the RJ45 end of the cable to the
Furuno MFD’s Ethernet port.
If your Furuno system utilizes a an HUB101 or
equivalent Network Switch, connect the RJ45 end
of the cable to the Network Switch. If there are
no available connections on the existing Network
Switch, you will need to purchase another Network
Switch to accommodate the BBWX4 Receiver.
Connect the 7-pin end of the cable to the
NETWORK connection of the BBWX4 Receiver.
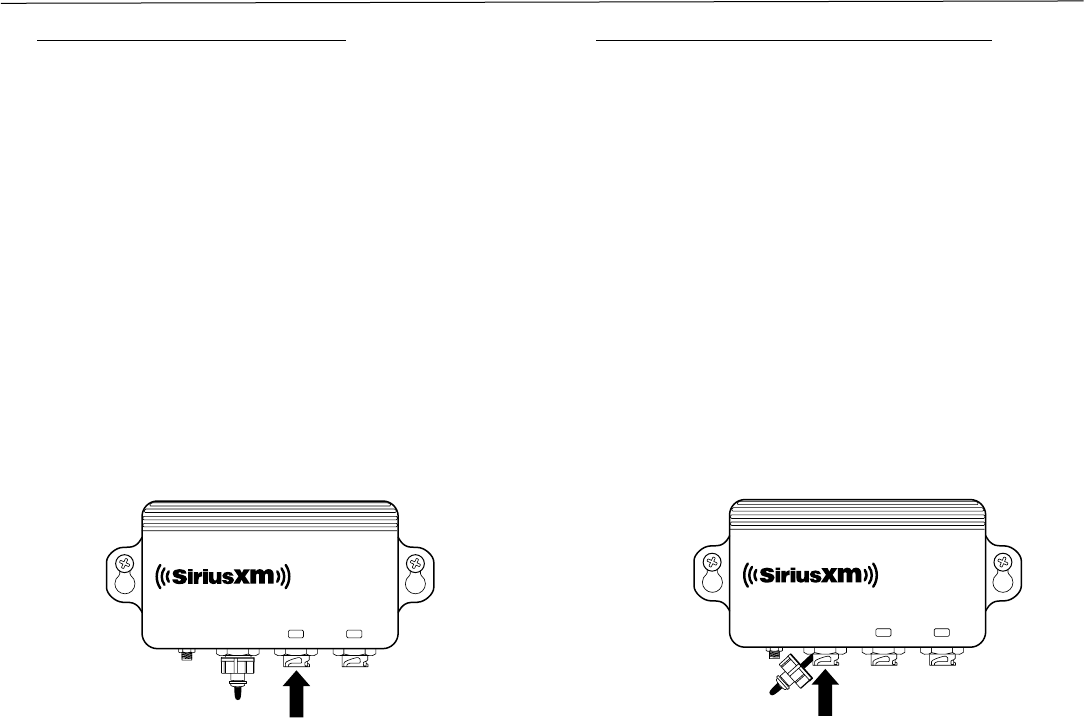
Connect the Audio Cable (optional)
The audio connection is optional and is used if you
subscribe to a SiriusXM music and entertainment
package in addition to the SiriusXM Marine
subscription package.
If you are not installing an audio connection, do not
remove the water resistant cap that is installed on
the BBWX4 Receiver’s AUDIO connector.
The Audio Cable provides an RCA-style Left and
Right audio connection. Connect these to the
auxiliary (AUX) input on your audio device.
If your audio system does not have RCA connectors
they will need an adapter cable, available from the
local dealer or an electronics retailer.
Remove the water resistant cap that is installed
on the BBWX4 Receiver’s AUDIO connector, and
connect the Audio Cable.
ANTENNAAUDIO
MARINE
NETWORK
RECEIVER
POWER
InfoLINK
AUDIO
ANTENNAAUDIO
MARINE
NETWORK
RECEIVER
POWER
InfoLINK
NETWORK

14
Furuno BBWX4 SiriusXM Receiver Installation Guide
Antenna Installation
Caution: When installing the antenna, do not cut or alter the antenna cable, or remove the cable connectors.
Two considerations are necessary before installing the antenna. First, finding a suitable mounting location,
and second determine how the antenna will be mounted. There are several in-box mounting options for the
antenna, or accessories can be purchased from marine stores for additional mounting options.
In choosing where to mount the antenna, consider whether you will be securing the antenna from the
underside of the mounting surface, or attaching the antenna to the mounting surface. Also, determine if the
antenna wire will be passed through the mounting surface, or if it will be routed along the surface.
If the distance between the antenna and the BBWX4
Receiver is more than 25 feet, special Shakespeare cable kits
are available. Plan and purchase the appropriate kit before
proceeding (page 16).
Choose a Location
The antenna must be mounted horizontally, and in a location
that is open and has a clear view of the sky.
The antenna must also be mounted away from any metal
objects or other structures that could block the line-of-sight
reception of the satellite signal. The height of the antenna is
not as important as having a clear view of the sky.
The antenna should be mounted a minimum of 1 m
(3 ft.) away from other radio transmitting antennas (such as
VHF or Sideband antennas), and a minimum of 2 m (27 ft.)
from a radar antenna.
Once you have selected a possible mounting location, sight
a full 360
º
circle around the antenna at an elevation angle
of 25º to make sure no obstacles block the antenna’s view
of the sky.
Clear 360
º
view of the sky in this area
25
º
from
horizon
25
º
from
horizon
*
1
2
2
2
Radar Beam
*Keep antenna at least 1 m (3 ft. away from engine to avoid interference.

15
Furuno BBWX4 SiriusXM Receiver Installation Guide
Choose a Mounting Option
In-Box Mounting Options
Surface Mount
Antenna secured from the underside of the mounting surface.
For mounting surfaces between 1/4” and 1” thick, use the supplied
extension shaft. Route antenna cable through the mounting
surface. Secure from below mounting surface using the mounting
lock washer & retaining nut.
Low Profile Surface Mount
Antenna secured topside to the mounting surface, and also
used when the antenna cable cannot be routed through the
mounting surface to the underside. Secure to the surface using
4 screws.
Pedestal Mount
Antenna secured topside above the mounting surface. Route
antenna cable either through or above the mounting surface.
Secure to the surface using 3 screws.
Optional Mounting Options (purchased separately)
Extension Mast Mount
Extension masts can be purchased in varying lengths to extend
the antenna up a greater distance above the mounting surface.
Antenna secured topside to the mounting surface. Route
antenna cable either through or above the mounting surface.
Secure to the surface using 3 screws.
Rail Mount
(Shakespeare model 4720 Rail
Mount)
Use to attach the antenna to an existing 7/8”, 1”, or 1-1/4”rail on
the vessel.

16
Furuno BBWX4 SiriusXM Receiver Installation Guide
Installing the Antenna
In-box antenna mounting options are surface mount,
low-profile surface mount, or pedestal mount.
Optional mounting options require an extension
mast, or a Shakespeare Style 4720 Rail Mount (each
sold separately).
Always mount the antenna so that it does not
interfere with safe operation of the vessel.
Important: When mounting to a surface using the
low-profile, pedestal, or extension mast mounting
method where the antenna cable will exit above
the mounting surface, orient the base or pedestal
bottom so that the antenna cable exits towards the
rear of the vessel, away from oncoming wind from
normal vessel motion.
The following accessories are available from
Shakespeare:
• SRS-3-KIT - Marine SiriusXM Splitter. Kit to
connect two SiriusXM satellite receivers to
one antenna. Includes three 25’ cables which
permit up to a 50’ cable run from the antenna
to each receiver.
• SRC-35 - 35’ Marine SiriusXM Replacement
Cable
• SRC-50 - 50’ Marine SiriusXM Replacement
Cable
• SRC-90 - 90’ Marine SiriusXM Replacement
Cable
Follow the instructions in the next sections for the
mounting method you’ve selected. Do not cut the
6” antenna lead or remove the connectors from
any of the cables under any circumstances.
Surface Mount
1. Drill a 9/16” mounting hole. When drilling
fiberglass surfaces, use a small backup block
of scrap wood underneath to control push-
through splintering. Use caution to avoid
drilling through or near fuel lines, fuel tanks,
hydraulic lines, or electrical wiring.
2. For mounting surfaces greater than 1/4”
thick (up to 1” thick), use the extension shaft
(provided), otherwise continue with step 3.
a. Route the 6” antenna lead with TNC female
connector through the center of the
extension shaft.
b. Thread the extension shaft onto the
existing antenna shaft and tighten.
3. Pass the 6” antenna lead connector and cable,
and extension shaft (if used), through the hole
Mounting
Surface
6” Antenna
Lead
Extension
Shaft
Antenna
Retaining
Nut
Lock
Washer
Antenna
Cable

17
Furuno BBWX4 SiriusXM Receiver Installation Guide
that was drilled.
4. Apply a small bead of marine sealant around
the outer edge of the antenna base to insure a
watertight seal.
5. Secure the antenna to the mounting surface
with the supplied retaining nut and lock
washer.
6. Connect the antenna cable to the 6” antenna
lead.
7. Route the antenna cable to the BBXW4
Receiver and connect the antenna cable to the
SMA to SMB Adapter. Connect the adapter
to the Antenna connection of the BBWX4
Receiver.
Low Profile Surface Mount
1. If you are going to route the antenna cable
through the mounting surface, drill a 9/16”
center hole for the antenna cable. When
drilling fiberglass surfaces, use a small backup
block of scrap wood to control push-through
splintering. Use caution to avoid drilling
through or near fuel lines, fuel tanks, hydraulic
lines, or electrical wiring.
2. Attach the antenna onto the base by using the
lock washer and retaining nut.
3. Orient the antenna as desired. Place on the
mounting surface and take off the antenna
and base leaving the base gasket in the same
position. Use the base gasket as a template to
mark the locations for screws.
4. The provided mounting screws will
accommodate most surfaces. If you find them
too long, too short, or otherwise unsuitable
for your application, substitute wood screws,
machine screws/washers/nuts, or other
hardware (not provided). Be sure to use only
stainless steel hardware. If you find it too
difficult to start the mounting screws, drill
7/64” pilot holes.
Mounting
Surface
6” Antenna
Lead
Base Gasket
Screws (4)
Cable Opening
Base
Antenna
Retaining
Nut
Lock Washer
Antenna
Cable
ANTENNAAUDIO
MARINE
NETWORK
RECEIVER
POWER
InfoLINK
ANTENNA

18
Furuno BBWX4 SiriusXM Receiver Installation Guide
5. Either pass the 6” antenna lead along with the
connector through the center hole, or, lay the
6” antenna lead into the cable opening in the
base gasket. Place the antenna, base, and base
gasket on the mounting surface aligning it to
the marks made in step 3.
6. Use the provided mounting screws (or other
stainless steel hardware, not provided) to
mount the antenna to the surface. Do not over-
tighten the screws.
7. Connect the antenna cable to the 6” antenna
lead.
8. Route the antenna cable to the BBWX4
Receiver and connect the antenna cable to the
SMA to SMB Adapter. Connect the adapter
to the Antenna connection of the BBWX4
Receiver.
Pedestal Mount
1. If you are going to route the antenna cable
through the mounting surface, drill a 9/16”
mounting hole. When drilling fiberglass
surfaces, use a small backup block of scrap
wood to control push-through splintering. Use
caution to avoid drilling through or near fuel
lines, fuel tanks, hydraulic lines, or electrical
wiring.
2. Assemble the antenna as shown:
a. Attach the antenna to the base with the
lock washer and retaining nut.
Mounting Holes
for Low Profile
Surface Mount &
Pedestal Mount
Antenna
Base
Base Gasket
Lock Washer
Retaining Nut
Pedestal Top
Rubber O-Ring
Pedestal Bottom
Cable Knockout
(3 available
use only one)
Cable Groove
Pedestal Gasket
6”
Antenna Lead
Cable Opening

19
Furuno BBWX4 SiriusXM Receiver Installation Guide
b. Align the base with the antenna, the base
gasket, and the pedestal top so that the
openings for the 4 screws are aligned, and
use the provided screws to screw them
together.
c. Place the rubber o-ring between the
pedestal top and the pedestal bottom,
and screw the pedestal bottom into the
pedestal top.
d. Place the pedestal gasket into the pedestal
bottom, aligning the screw holes.
3. Orient the antenna as desired and mark a
pencil line on the pedestal bottom and on the
mounting surface to serve as an alignment
index later.
4. While holding the pedestal gasket to the
mounting surface, lift off the remainder of the
antenna assembly and use the pedestal gasket
as a template to mark the locations for the
screws.
5. The provided mounting screws will
accommodate most surfaces. If you find them
too long, too short, or otherwise unsuitable
for your application, substitute wood screws,
machine screws/washers/nuts, or other
hardware (not provided). Be sure to use only
stainless steel hardware. If you find it too
difficult to start the screws, drill 7/64” pilot
holes.
6. Unscrew the pedestal bottom from the rest
of the antenna assembly, keeping the rubber
o-ring in place.
7. If you are not routing the 6” antenna lead
out through the side of the pedestal bottom,
continue with step 9.
Use a needle nose pliers to break off one of the
three cable knockouts in the pedestal bottom
to align with the cable groove in the pedestal
gasket. Refer to the alignment mark made in
step 3 to ensure the antenna cable exits the
pedestal in the correct direction.
8. Place the 6” antenna lead into the cable groove
in the pedestal gasket and align with the cable
knockout in the pedestal bottom.
9. Attach the pedestal bottom and pedestal
gasket to the mounting surface, orienting
them according to the alignment mark made in
step 3. Use the provided mounting screws (or
other stainless steel hardware, not provided)
to mount the pedestal to the surface. If you
are routing the 6” antenna lead out through
the side of the pedestal bottom, do not fully
tighten the screws yet -- the 6” antenna lead
must be free to turn. If the 6” antenna lead is
routing through the mounting surface, route it
through the mounting surface and tighten the
screws. Do not over-tighten.
10. Verify that the rubber o-ring is in place and
attach the rest of the antenna assembly to the
mounted pedestal bottom by screwing it onto
the pedestal bottom until tight.
Note: If you are routing the 6” antenna lead

20
Furuno BBWX4 SiriusXM Receiver Installation Guide
out through the side of the pedestal bottom,
make sure the antenna lead can turn freely so
that it does not get twisted as you screw the
antenna assembly onto the pedestal bottom.
When complete, finish tightening the 3 screws
that hold the pedestal base to the mounting
surface. Do not over tighten.
11. Connect the antenna cable to the 6” antenna
lead.
12. Route the antenna cable to the BBWX4
Receiver and connect the antenna cable to the
SMA to SMB Adapter. Connect the adapter
to the Antenna connection of the BBWX4
Receiver.
Extension Mast Mount
1. Follow the installation steps 2a and 2b in the
Pedestal Mount section, Place the rubber o-ring
over the threads of the extension mast.
2. You will need to feed the 25’ antenna cable
through the pedestal gasket and pedestal
bottom, and through the extension mast, and
connect it to the 6” antenna lead. Screw down
the assembled antenna into the extension mast.
3. Route the antenna cable to the BBWX4
Receiver and connect the antenna cable to the
SMA to SMB Adapter. Connect the adapter
to the Antenna connection of the BBWX4
Receiver.
Rail Mount
The center hole in ratchet-type antenna mounts
will not accommodate the SRA-50’s connector. You
must use a rail mount which will allow the cable and
its connector to pass through (Shakespeare model
4720 Rail Mount).
Do not cut the antenna cable and do not remove the
connector in an attempt to accommodate a ratchet-
type antenna mount.
1. Follow installation steps 2a and 2b for the
Pedestal Mount.
2. Place the rubber o-ring over the threads of
the rail mount and route the 6” antenna lead
through the rail mount.
3. Attach the antenna assembly to the rail mount
by screwing it onto the rail mount until tight.
4. Follow the instructions included with the rail
mount for attaching the rail mount to a rail.
5. Connect the antenna cable to the 6” antenna
lead.
6. Route the antenna cable to the BBWX4
Receiver and connect the antenna cable to the
SMA to SMB Adapter. Connect the adapter
to the Antenna connection of the BBWX4
Receiver.

21
Furuno BBWX4 SiriusXM Receiver Installation Guide
Verify Operation
Power on the Furuno system, and the BBWX4
Receiver. Verify that the Power LED light is on
(blue), and that the Network LED light is randomly
flashing violet, which indicates normal network
traffic.
Consult “Troubleshooting” on page 22 if the
indicator LED lights are not on, or if the Network
LED light is showing a blinking pattern.
Subscribe to SiriusXM Services
You can subscribe to the SiriusXM Marine service
and add satellite Radio at a discount by following
these steps:
1. Make sure the Furuno system is turned on.
Verify that you are receiving the SiriusXM signal
by entering the SiriusXM menu in your MFD.
2. Make a note of the Radio ID. You can find it on
a label on the BBWX4 Receiver packaging and
on the label on the underside of the BBWX4
Receiver.
NOTE! The Radio ID does not use the letters I, O, S, or F.
3. Activate your service:
In the USA:
First see our Customer Agreement for
complete terms at www.siriusxm.com/marine
and then:
• Online: Go to www.siriusxm.com/activate
OR
• By phone: 1-855-SXM-WTHR (1-855-796-9847)
In Canada:
First see our Customer Agreement for
complete terms at www.siriusxm.ca/marine and
then:
• Online: Go to www.siriusxm.ca/activate
OR
• By phone: 1-844-823-0843
4. Activation usually takes 10 to 15 minutes, but
may take up to an hour. We recommend that
your MFD remain on until subscribed.
5. Activation signals can be sent again at any time
by visiting www.siriusxm.com/refresh (in USA)
or www.siriusxm.ca/refresh (in Canada).
Note: SiriusXM Marine Weather subscriptions will be
available in Canada starting April 2018.

22
Furuno BBWX4 SiriusXM Receiver Installation Guide
Troubleshooting
The troubleshooting information in this section is for general reference. Consult the documentation that
accompanied your Furuno system for specific operating instructions and advisory messages that may be
displayed.
LED Indicator Lights
The BBWX4 Receiver has two LED indicator lights which show the current state of the receiver.
Power LED
(Blue)
Network LED
(Red/Violet/Blink)
Status
Off Off No Power. Turn power on or check power source/cable connection.
On Violet, random
blinking pattern
Normal network communication is established between the MFD and the
BBWX4 Receiver. Blinking violet indicates network traffic.
On Red, 1-blink fast
pattern
Network Cable is not connected, or not secured. Make sure the cable is
connected and secured to the BBWX4 Receiver.
On Red, 1-blink slow
pattern
Network cable connected is damaged or out of spec. Contact Furuno for a
replacement cable.
On Violet, 2-blink pattern
for 18 seconds
BBWX4 receiver has lost the link connection to the MFD or network switch.
Please check the network components.
On Red, 2-blink pattern Network Cable is not connected to the MFD or network switch. Confirm that
the cable is connected to an MFD or network switch. If the cable is properly
connected to the MFD or network switch, the cable may be damaged.
On Red, 4-blink pattern MFD is not communicating with the BBWX4 Receiver. Check the MFD to determine
the reason why the MFD is not communicating with the BBWX4 Receiver.

23
Furuno BBWX4 SiriusXM Receiver Installation Guide
MFD Message Reason
No Signal
(NoSignal)
Make sure that the vessel is
outdoors with a clear view of the
southern sky.
Make sure the Antenna is mounted
according to the instructions in this
manual.
Move your vessel away from any
area which obstructs the antenna.
Check Antenna
(Chek Antenna,
CHK Antena, Chek
Ant)
Make sure that the antenna cable
is firmly and securely plugged into
the BBWX4 Receiver.
Make sure the antenna cable is not
bent or broken.
Turn the MFD off, then on, to
reset this message. If the message
persists, most likely the antenna
cable has been damaged. Replace
the antenna.
Antenna
Disconnected
Check the antenna connection to
make sure it is fully plugged into
the BBWX4 Receiver.
Antenna Cable
Shorted
Replace the antenna and antenna
cable.
Check Tuner
(Chek Tuner, Chk
Tunr)
Network Cable is not connected
to the MFD or network switch.
Confirm that the cable is connected
to an MFD or network switch.
Channel Not
Available (Chan
Unavailable, Ch
Unavailable, Ch
Unavail, Ch Unavl)
The channel you have selected is
not available.
MFD Message Reason
Channel Not
Subscribed (CH
Unsubscribed,
Chan Unsub, Ch
Unsub)
The channel you have selected
is not part of your current
subscription plan. First see our
Customer Agreement for complete
terms in the US at:
www.siriusxm.com/marine and then
call 1-855-796-9847 to subscribe,
and in Canada at
www.siriusxm.ca/marine and then
call 1-888-539-7474 to subscribe.
Waiting To
Establish
Connection
(Waiting to
Connect)
The BBWX4 receiver is connected
to the MFD network, but the
MFD has not yet established a
connection.
Furuno customer support
For support, please obtain the following information
using the product menus:
• Product name, Product identity, Serial number
• Software application version and System
diagrams.
Visit the Web customer support area at:
www.FurunoUSA.com for FAQs, servicing
information, and support.
Telephone support In the USA:
• Tel: 360-834-9300 West Coast
• Tel: 410-479-4420 East Coast

24
Furuno BBWX4 SiriusXM Receiver Installation Guide
FCC Statement
The user is cautioned that changes or modifications not expressly
approved by Furuno Inc. or Sirius XM Radio Inc. can void the user’s
authority to operate this device. This device complies with Part 15 of the
FCC Rules. Operation is subject to the following two conditions:
1. This device may not cause harmful interference.
2. This device must accept any interference received, including interference
that may cause undesired operation.
This equipment has been tested and found to comply with the limits for a Class
B digital device, pursuant to Part 15 of the FCC Rules. These limits are designed
to provide reasonable protection against harmful interference in a residential
installation. This equipment generates, uses, and can radiate radio frequency
energy and, if not installed and used in accordance with the installation
instructions, may cause harmful interference to radio communications. However,
there is no guarantee that interference will not occur in a particular installation.
If this equipment does cause harmful interference to radio or television
reception, which can be determined by turning the equipment off and on, the
user is encouraged to try to correct the interference by one or more of the
following measures:
• Reorient or relocate the receiving antenna of the affected receiver.
• Increase the separation between the Furuno or SiriusXM equipment
and the affected receiver.
• Connect the Furuno or SiriusXM equipment into an outlet on a
circuit different from that to which the affected receiver is connected.
• Consult the dealer or an experienced radio/TV technician for help.
IC Information
Warning: Changes or modifications not expressly approved by the
manufacturer could void the user’s authority to operate the equipment.
Canadian Compliance: This Class B digital apparatus complies with Canadian
ICES-003.
IC STATEMENT
Operation is subject to the following two conditions: (1) this device may not
cause interference, and (2) this device must accept any interference, including
interference that may cause undesired operation of the device. For product
available in the Canada market, only channel 1~11 can be operated. Selection
of other channels is not possible. This device and its antenna(s) must not be
co-located or operation in conjunction with any other antenna or transmitter.
To reduce potential radio interference to other users, the antenna type and
its gain should be so chosen that the equivalent isotopically radiated power
(e.i.r.p) is not more than that permitted for successful communication. IC
Radiation Exposure Statement: This equipment complies with IC RSS-102
radiation exposure limits set forth for an uncontrolled environment. This
equipment should be installed and operated with minimum distance 20cm
between the radiator & your body.
Specifications
BBWX4 Receiver
Dimensions ...................7 in (W) x 3.1 in (H) x 1.7 in (D)
180 mm (W) x 80 mm (H) x 42 mm (D)
Weight .......................
9.63
oz (273 g)
Nominal Supply Voltage ........12v or 24v DC
Operating Voltage Range ........10.8v to 31.2v DC
Power Consumption ............<3.0W
Operating Temperature .........-4°F to +158°F (-20°C to +70°C)
Waterproof Rating .............IPX 6/7
Antenna Connection ............SMA (SMA to SMB adapter included
Network Connection ............TCP/IP over Ethernet (10/100-Base-TX)
Static IP: 172.31.200.21
Audio Connection ..............Stereo Analog Audio Out, 2v RMS
Power Connection ..............2-Wire Switched B+ and Ground, plus
RF Ground
Antenna
Type .........................Shakespeare SRA-50
Pigtail Cable ...................6 in (152 mm), TNC Female
Antenna Cable .................25 ft (7.6 m), TNC male to SMB
Cables
Network Cable Length ..........8 ft (2.5 m) 7-pin to RJ45
Waterproof Rating ............Cable Connectors IPX 6/7
Power Cable Length ............6.5 ft (2 m), Fuse 5.0 A, AGC
Waterproof Ratings Cable Connector IPX 6/7, Fuse Holder
IPX 5
Audio Cable Length ............6.5 ft (2 m)
Waterproof Rating ............IPX 6/7
Network Operation ...............XM Network
Specifications are subject to change without notice.

25
Furuno BBWX4 SiriusXM Receiver Installation Guide
Environmental Information
Follow local guidelines for waste disposal when discarding packaging and electronic appliances. This product
is packaged with cardboard, polyethylene, etc., and does not contain any unnecessary materials.
WARNING: This product contains chemicals known to the State of California to cause cancer and birth
defects or other reproductive harm.
Copyrights and Trademarks
Furuno Legal Information
Furuno and related marks are property of Furuno Inc. All Rights Reserved.
Shakespeare Legal Information
Shakespeare and related marks are property of Shakespeare Company, LLC. All Rights Reserved.
SiriusXM Legal Information
© 2019 Sirius XM Radio Inc. Sirius, SiriusXM, XM and all related marks and logos are trademarks of Sirius XM
Radio Inc. All other trademarks, tradenames, or company names referenced herein used for identification
only and are the property of their respective owners.
This product is protected by patents, design patents, patents pending, or design patents pending.
SiriusXM Patent Information
It is prohibited to, and you agree that you will not, copy, decompile, disassemble, reverse engineer, hack, manipulate, or otherwise access and/or make available
any technology incorporated in this product. Furthermore, the AMBE
®
voice compression software included in this product is protected by intellectual property
rights including patent rights, copyrights, and trade secrets of Digital Voice Systems, Inc. The software is licensed solely for use within this product. The music,
talk, news, entertainment, data, and other content on the Services are protected by copyright and other intellectual property laws and all ownership rights
remain with the respective content and data service providers. You are prohibited from any export of the content and/or data (or derivative thereof ) except in
compliance with applicable export laws, rules and regulations. The user of this or any other software contained in a SiriusXM radio is explicitly prohibited from
attempting to copy, decompile, reverse engineer, hack, manipulate or disassemble the object code, or in any other way convert the object code into human-
readable form.

26
Furuno BBWX4 SiriusXM Receiver Installation Guide
Important Legal Notice About Your SiriusXM Subscription
Hardware and subscription sold separately. The subscription plan you choose will automatically renew and you will
be charged according to your chosen payment method at then-current rates. Please see our Customer Agreement
at www.siriusxm.com (U.S.A.) or www.siriusxm.ca (Canada) for complete terms and how to cancel, which includes
calling us at 1-800-985-9200 (U.S.A.) or 1-888-539-7474 (Canada). Fees and taxes apply. All fees and programming
are subject to change. Our satellite service is available only to those at least 18 and older in the 48 contiguous USA, DC
and Canada. Our Sirius satellite service is also available in PR (with coverage limitations) but this BBWX4 Receiver is
not operational in PR. Our streaming service is available throughout our satellite service area and in AK and HI.
Important Legal Notice About Installation
Installation instructions are provided for your convenience. You must determine if you have the knowledge,
skills, and ability required to properly perform installation. Professional installation is recommended. Furuno nor
SiriusXM shall have no liability for damage/injury resulting from the installation/use of any Furuno or SiriusXM
or other products. You must ensure that all products are installed in adherence with local laws and regulations
and in such a manner as to allow a vehicle to be operated safely and without distraction. Furuno nor SiriusXM
product warranties do not cover the installation, removal, or reinstallation of any product.
Registration
To register your Furuno product ownership, please visit www.FurunoUSA.com and register online. It is
important that you register your product to receive full warranty benefits. Your unit package includes a bar
code label indicating the serial number of the unit. You will need this serial number when registering your
product online. You should retain the label for future reference.

27
Furuno BBWX4 SiriusXM Receiver Installation Guide
LIMITED WARRANTY CERTIFICATE
The FURUNO U.S.A., Inc., Limited Warranty provides a twenty four (24) month LABOR and twenty four (24)
month PARTS warranty on products from the date of installation or purchase by the original owner. Products
or components that are represented as being waterproof are guaranteed to be waterproof only for, and
within the limits, of the warranty period stated above. The warranty start date may not exceed eighteen (18)
months from the original date of purchase by a dealer from Furuno U.S.A., Inc. and applies to new equipment
installed and operated in accordance with Furuno U.S.A.’s published instructions.
Furuno U.S.A., Inc. warrants each new product to be of sound material and workmanship, and through its
authorized dealer, will exchange any parts proven to be defective in material or workmanship, under normal
use, at no charge for a period of 24 months from the date of installation or purchase.
Furuno U.S.A., Inc., through an authorized Furuno dealer, will provide labor at no cost, to replace defective
parts, exclusive of routine maintenance or normal adjustments, for a period of 24 months from installation
date, provided the work is done by Furuno U.S.A., Inc. or an AUTHORIZED Furuno dealer during normal shop
hours and within a radius of 50 miles of the shop location.
An installation certification or suitable proof of purchase showing date of purchase, must be provided to
Furuno U.S.A., Inc., or its authorized dealer at the time of request for warranty service.
WARRANTY LIMITATIONS
The Furuno U.S.A., Inc. warranty policy does not apply to equipment which has been damaged due to
improper installation or operation, or that has been subjected to accident, abuse, misuse, water damage,
shipping damage, alterations, corrosion, incorrect and/or non-authorized service.
Warranty service can only be carried out by an authorized Furuno dealer (which is encouraged for speed of
repair), or by Furuno U.S.A., Inc.
Travel costs, mileage and time, in excess of the Furuno U.S.A., Inc. authorized dealer allowance, must have
prior approval by Furuno U.S.A., Inc. and shall not, in any case, exceed the contract price for the product
claimed to be defective.
This warranty specifically excludes, and Furuno U.S.A., Inc. and its dealers shall have no liability for, any
consequential damages, including, but not limited to the loss or damage to any vessel, structure, person or
persons or any delay suffered in connection with the use of the equipment.

28
Furuno BBWX4 SiriusXM Receiver Installation Guide
This Limited Warranty is the sole and entire warranty. There is no other warranty, either expressed or
implied (including any warranty of merchantability or fitness for a particular purpose). Furuno U.S.A.,
Inc. has no other liability to the purchaser for direct or consequential damage under any theory including
absolute liability, tort, or contract. This limited warranty cannot be altered or modified in any way and shall
be interpreted in accordance with the laws of the State of Washington.
HOW TO OBTAIN WARRANTY SERVICE
In order to expedite repairs, warranty service on Furuno equipment is provided through its authorized dealer
network. If this is not possible or practical, please contact Furuno U.S.A., Inc. to arrange warranty service.
FURUNO U.S.A., INC.
Attention: Service Coordinator
4400 N.W. Pacific Rim Boulevard
Camas, WA 98607-9408
Telephone: (360) 834-9300
FAX: (360) 834-9400
Internet: www.furunousa.com
Furuno U.S.A., Inc. is proud to supply you with the highest quality in Marine Electronics. We know you had
several choices when making your selection of equipment, and from everyone at Furuno, we thank you.
Furuno takes great pride in customer satisfaction.
For your warranty record, please complete the following information and retain for 24 months.
Vessel Name:
Model(s):
Serial Number(s):
Purchased From:
Date Installed:
Installed By:

29
Furuno BBWX4 SiriusXM Receiver Installation Guide
Notes:

30
Furuno BBWX4 SiriusXM Receiver Installation Guide
Notes:

31
Furuno BBWX4 SiriusXM Receiver Installation Guide
Notes:

Furuno USA Inc.
4400 NW Pacific Rim Blvd
Camas, WA 98607
Tel: (+1) 360-834-9300
www.FurunoUSA.com
ww
w.furunousa.co
m
