
Ace Pro User Manual
User Manual

Ace Pro User Manual
Content
Product Introduction 1
Ace Pro Introduction 1
Standard Accessories 2
First Use 4
Insert the Battery 4
Insert the MicroSD Card 5
External Devices 5
Charging 6
Activation 7
Basic Use 8
Button Instructions: 8
Using the Screen 10
Shooting Mode 13
Indicator Lights 20
File Storage 22
Exclusive Features 23
Gesture Control 23
Clarity Zoom 23
Cancel Recording 23
Pause Recording 24
Photo Grab 24

Ace Pro User Manual
Auto Dash 25
AI Warp 25
AI Selfie Stick Eraser 25
AI Highlights Assistant 26
app Background Downloading 26
GPS Preview Remote 27
File Transfer 33
Insta360 App 错误!未定义书签。
Connect to the Insta360 App 36
Android Mode 36
app Interface 36
Maintenance 37
Firmware Update 37
Waterproofing 38
Cleaning 39
Battery Precautions 39

Ace Pro User Manual
1
Product Introduction
Ace Pro Introduction
1. Indicator Light
2. Front Screen
3. Shutter Button
4. Microphone
5. Lens
6. Power Button
7. USB Port Cover
8. USB Type-C Port
9. MicroSD Card Slot
10. Battery Cover
11. Battery
12. Release Switch
13. Indicator Light
14. Flip Touchscreen
15. Mounting Latch
16. Speaker

Ace Pro User Manual
2
Standard Accessories
Ace Pro includes two in-the-box accessories for flexible shooting wherever you go.
Accessories
Description
Figure
Standard Mount:
Secure your camera
to any accessory for
ultra-stable shots
with the universal 2-
prong mount.
Magnetic design for
quick assembly and
disassembly.
How to Use:
1. Align the camera lens with
the icon on the Standard
Mount and attach the
mount.
2. Press the Standard Mount
against the camera until
you hear a click. Then,
gently pull away from the
camera to ensure it is
attached and properly
installed.
3. Press and hold the buttons
on both sides of the
Standard Mount at the
same time to remove the
camera.
Expanded use:
Standard Mount can realize the
connection between the camera
and the three-jaw interface
accessories, and can be
externally connected to the
Flexible Adhesive Mount and
other accessories.

Ace Pro User Manual
3
Flexible Adhesive
Mount:
Flexible design with a
strong 3M adhesive
base that can be used
on flat, curved
surfaces and in
complex
environments. Heat
and humidity
resistant.
How to Use:
1. Peel off the red sticker on the
bottom of the Flexible Adhesive
Mount and clean the base with
a cleaning wipe before use.
Stick to the surface and press
and hold for 30 seconds.
2. Attach the Standard Mount.
Tighten the screw to ensure it is
stable.
3. Attach the camera to the
Standard Mount.
Notes:
∙ The adhesive base is a
one-time use only. If it detaches
from the surface, it cannot be
reused.
∙ The product should be
mounted to a smooth, clean
surface, such as glass, ceramic,
plastic, painted surfaces, metal,
etc.
∙ The mount can be directly
connected to a camera or used
with a carbon fiber extension
rod on a helmet. It cannot be
used with any selfie sticks.

Ace Pro User Manual
4
First Use
Insert the Battery
1. Press and hold the latch of the Battery Cover and slide it downwards.
2. When you see the yellow indication mark, open the cover outward.
3. Insert the battery in the direction indicated on the battery.
4. Close the cover and ensure the yellow indication mark is completely covered to ensure
waterproofing is not affected.

Ace Pro User Manual
5
Insert the MicroSD Card
1. Press and hold the latch of the USB Port Cover and slide it downwards.
2. Insert the MicroSD Card in the direction indicated on the card.
Note:
Please use exFAT format microSD cards of speed classes UHS-I and V30 or above to ensure
normal recording. The maximum supported storage space is 1TB.
External Devices
1. Hold the protective cover of the camera's MicroSD card slot against the protruding part of the
cover in the direction shown in the illustration, and pull out the cover completely in the direction
indicated by the arrow;
2. Open the cover outward and pull it out firmly ;
3. After pulling out the cover, you can insert the flash companion and audio adapter;
4. After use, align the inner notch on the top of the protective cover with the silver metal snap
above the slot compartment.

Ace Pro User Manual
6
Charging
Open the camera's USB Port Cover. Use the Type-C to Type-C charging cable included in the box
to connect the Type-C port of Ace Pro to a Type-C charger.
Rapid PD Fast Charging gets your camera to 80% battery in just 22 minutes and fully charges in 46
minutes.
Ace Pro Charging Time:
∙ PD Fast Charging: 46 minutes - 100%
∙ Normal Charging: 63 minutes - 100%
*The Indicator Lights will be solid red when charging and will turn off once the battery is fully
charged.

Ace Pro User Manual
7
Activation
You need to activate Ace Pro in the Insta360 App before using it for the first time.
Steps:
1. Download the Insta360 App. Alternatively, search "Insta360" in any major app store or scan the
QR code on the box.
2. Press the Power Button to turn on Ace Pro.
3. Enable Wi-Fi and Bluetooth on your smartphone.
4. Open the Insta360 App and click the camera at the bottom of the page. Select the device you
want to connect to in the pop-up window, then follow the on-screen instructions to complete the
connection. The name of your camera is "Ace Pro ******" by default, where ****** is the last six
digits of the serial number on the box your Ace Pro came in. The first time you connect to Ace Pro,
you will need to confirm the connection on the touchscreen.
5. After successfully connecting the camera, follow the on-screen instructions to activate your
camera. The app will prompt you to update the firmware if a new version is available. Please follow
the on-screen prompts to update the firmware of Ace Pro.

Ace Pro User Manual
8
Basic Use
Button Instructions:
Power Button
Camera Status
Operation
Descriptions
Powered off
Press once
• Power on camera.
Powered on
Press once
• Switch between different shooting modes or presets.
• When recording, press to mark clips as important. You
can find then find marked clips quicker when you are
editing.
Long press
• 1 second: Power off.
• 5 seconds: Force shutdown.

Ace Pro User Manual
9
Shutter Button
Camera Status
Operation
Descriptions
Powered off
Press once
• Start shooting with QuickCapture*.
*This function must be enabled in the camera first.
Powered on
Press once
• During Preview:
○ Take a photo or start recording a video.
○ Stop recording.
• In other pages:
○
Return to the preview page.
Long press
• During recording:
○ Quickly cancel recording.
Release Switch
Operation
Descriptions
Press the buttons on each side of the flip
screen at the same time.
• Change the angle of the touchscreen.

Ace Pro User Manual
10
Using the Screen
Front Screen
Once the camera is turned on, the front screen will display the following information:
Camera
Status
Descriptions
Previewing
Battery, storage capacity, shooting specifications, current
shooting mode.
Shooting
Shooting status i.e., paused, pre-recording, countdown, etc.
Other
Footage saving, connecting to app, firmware upgrade, etc.

Ace Pro User Manual
11
Flip Touchscreen
The touchscreen's main display shows the current camera shooting mode. The menu bar shows
battery level, storage capacity, and current shooting parameters. By swiping or tapping the screen,
you can achieve the following:
Tap the screen
Hide/show information on the
touchscreen.
Swipe down from the top
Enter the camera settings.
Swipe left and right in the
center
Switch shooting mode.
Swipe from the left
Enter the album page.
Swipe from the right
Enter the shooting parameter
settings.
Swipe up from the bottom
More shooting parameter
settings.

Ace Pro User Manual
12
Shortcut Menu
1. Storage: Shows the remaining number of photos or the length of video footage that can be
stored on the microSD card.
2. Battery Status: Current battery level of Ace Pro.
3. Shooting Mode: Click the icon and swipe to select a different shooting mode.
4. Shooting Specifications: See the current shooting mode settings.
5. Clarity Zoom: Click the icon or double-tap the screen to zoom in or out without compromising
image quality.
6. Field of View: Change the Field of View.

Ace Pro User Manual
13
Shooting Mode
Click the icon and swipe or swipe left and right in the center of the screen to select a different
shooting mode.
Shooting Mode
Description
Video
Record a video with FlowState Stabilization automatically
applied.
FreeFrame
Video
apply FlowState Stabilization and Horizon Lock with
adjustable aspect ratio in post via the app or Studio.
PureVideo
PureVideo improves image quality in low light environments.
TimeShift
TimeShift video can be used while moving to create a
hyperlapse effect.
Timelapse
Suitable for shooting static timelapse videos.
Loop Recording
Record continuously and save only the last fixed-length
segment.
Slow Motion
Shoot Slow Motion video with a high frame rate.
Starlapse
Shoot and store multiple photos and automatically combine
Starlapse effects.
Burst Photos
Take multiple photos in a short space of time.
Interval
The camera automatically takes continuous photos at a
specific time interval.

Ace Pro User Manual
14
HDR Photo
For high dynamic range photos. Please keep the camera still
while shooting.
Photo
Take a single photo.

Ace Pro User Manual
15
Camera Settings
Swipe down on the touchscreen to view the camera settings.
1. Prompt Sound: Set the camera speaker volume. There are four options: High, Medium, Low,
and Mute.
2. Indicator Light: Turn on/off.
3. Grid: Turn on/off.
4. Audio: Switch audio mode. Choose between Stereo, Wind Reduction or Direction Focus.
5. Timed Capture: Use the Timed Capture function.
6. Bluetooth Remote: Search for and connect a Bluetooth remote.
7. AirPods: Search for and connect AirPods.
8. Settings: See camera settings.
9. QuickCapture: Turn on/off. Once enabled, press the Shutter Button when the camera is
powered off to turn it on and start recording.
10. Rotation Lock: Turn on/off.
11. Gesture Control: Turn on/off.
12. Voice Control: Turn on/off.
13. Pre-recording: Turn on/off. Save 15 or 30 seconds of footage before you start recording.
14. AI Highlights Assistant: Turn on/off. The camera finds the best moments from a single video
and shows you the highlights to review. Merge them into one video or save each of them as
new files. View them on the Album page.
15. Adjust Brightness: Slide the bar to adjust the screen brightness.
16. Lock Screen: Tap to lock screen. Swipe up on the touchscreen to unlock.

Ace Pro User Manual
16
Shooting Specification Settings
Swipe up from the bottom of the touchscreen to view shooting specification settings.
Shooting Mode
Parameters
Video
Stabilization, Ratio, Duration, Resolution, Frame Rate
FreeFrame Video
Ratio, Duration, Resolution, Frame Rate
PureVideo
Ratio, Duration, Resolution, Frame Rate
TimeShift
Stabilization, Ratio, Duration
Timelapse
Stabilization, Ratio, Duration, Interval
Loop Recording
Stabilization, Ratio, Loop Duration, Resolution, Frame Rate
Slow Motion
Stabilization, Ratio, Duration, Resolution, Frame Rate
Starlapse
Type, Ratio, Duration, Resolution, Timer
Burst
Burst, Ratio, Cache, Resolution, Timer
Interval
Interval, Type, Ratio, Duration, Resolution, Timer
HDR Photo
Format, Ratio, Resolution, Timer
Photo
Format, Ratio, Resolution, Timer

Ace Pro User Manual
17
Shooting Parameter Settings
Swipe left from the right edge of the touchscreen to see the shooting parameter settings.
Parameters
Descriptions
Shutter Speed
The time it takes for light to enter the camera. The faster the shutter
speed, the clearer the image.
Sensitivity
(ISO)
Reflects how sensitive the sensor is to light. A higher sensitivity means
the camera can capture more light for a brighter image.
Exposure
Compensation
Value (EV)
In Auto Mode, you can adjust the EV to help with overexposure or
underexposure.
White Balance
(WB)
Removes unrealistic colors and tones so colors are accurately captured
in the image.
Low Light
Stabilization
Improves motion blur and stabilization in low light environments. In
extreme environments, the image will be darker and may have some
flickering.
Filter
Add different color tones and effects.
Face Priority
Prioritizes the face for brightness.

Ace Pro User Manual
18
Shooting Mode
Parameters
Auto
Manual
Video
Filters, EV, Face Priority, Low Light Stabilization, WB
Filters, Shutter, ISO, EV, WB
FreeFrame
Video
Filters, EV, Face Priority, Low Light Stabilization, WB
Filters, Shutter, ISO, EV, WB
PureVideo
EV, Low Light Stabilization, WB
Shutter, ISO, EV, WB
TimeShift
Filters, EV, WB
Filters, Shutter, ISO, EV, WB
Timelapse
Filters, EV, WB
Filters, Shutter, ISO, EV, WB
Loop
Recording
Filters, EV, Face Priority, Low Light Stabilization, WB
Filters, Shutter, ISO, EV, WB
Slow Motion
Filters, EV, WB
Filters, Shutter, ISO, EV, WB
Starlapse
Filters, Shutter, ISO, WB, EV
Shutter, ISO, EV, WB
Burst Photo
Filters, EV, WB
Filters, Shutter, ISO, EV, WB
Interval
Filters, EV, WB
Filters, Shutter, ISO, EV, WB
HDR Photo
Face Priority, WB
Face Priority, WB
Photo
Filters, EV, Face Priority, WB
Filters, Shutter, ISO, EV, WB

Ace Pro User Manual
19
Album Page
Swipe right from the left of the touchscreen to enter the Album page.

Ace Pro User Manual
20
Indicator Lights
Ace Pro has two LED Indicator Lights, one on the front of the camera and one on the back. Both
display the same information. You can turn the Indicator Lights on/off in Settings > General.
Camera Status
Indicator Light Status
Powered on
Solid cyan
Start shooting with
QuickCapture
Flashing cyan three times
Standby/standby
(charging)/standby (fully
charged)
Solid cyan
Stop shooting with Quick
Capture
Flashing cyan five times
Charging (powered off)
Solid red (turns off when fully charged)
Recording a video
Flashing red
Countdown >1s
Flashing cyan
Countdown≤1s
Flashing cyan five times
U-Disk Mode
Solid cyan
Updating firmware
Slowly flashing blue

Ace Pro User Manual
21
Insufficient storage/file
error/USB error/no SD card
Solid yellow
Temperature is too high
Flashing yellow three times
Low battery/temperature is
too high and camera will
start auto shutdown
countdown
Continuously flashing yellow
Camera Status
Indicator Light Status
Powered on
Solid cyan

Ace Pro User Manual
22
File Storage
Please use exFAT format microSD cards of speed classes UHS-I and V30 or above to ensure
normal recording. The maximum supported storage space is 1TB.
We recommend using the official memory card available on the Insta360 Store. If you wish to use
another memory card, the following have also been tested to be compatible with Ace Pro:

Ace Pro User Manual
23
Exclusive Features
Gesture Control
You can control the camera with gestures, perfect for group selfies or noisy environments. Enable
Gesture Control on your camera, then give the sign to start/stop recording or take a photo. Swipe down
on the touchscreen and turn on Gesture Control.
Gesture
Trigger Control
Peace Sign
Take photo with countdown timer.
Palm
Start/stop video recording.
Clarity Zoom
During recording and preview, double-tap the screen or tap the zoom button on the right of the
screen to zoom in or out without compromising image quality.
*Supports 4K60fps and below in Video Mode, and 30fps and below in PureVideo.
Cancel Recording
In camera settings, turn on Cancel Recording. You can then long press the Shutter Button to
instantly cancel the current recording and start again.

Ace Pro User Manual
24
Pause Recording
Pause and resume recording in the same file. There are three ways to use this feature:
Camera Status
Operations
Recording
Tap the red button at the bottom center of the screen to pause the
recording for the first time.
To resume or pause your recording again, tap the button or press the
Shutter Button once.
Click the red button at the bottom right of the screen to save your
footage to the camera's album.
Turning off (while
video recording is
paused)
You can continue to record in the same file the next time you turn on the
camera.
Tap the red button at the bottom of the screen and turn off your camera.
Turn the camera back on and continue to record/pause recording in the
same way as normal.
Click the red button at the bottom right corner to save your clip to an
album.
On Album Page
Click the red button in the lower right corner of the album to continue
recording in that file.
Photo Grab
Take a high quality photo even when you're recording a video in 4K60fps or below in Video and
FreeFrame Video mode. All parameters are supported.
Tap the circle button in the bottom left corner to take a HD photo whilst recording.
After recording, the video and photo will both be saved.

Ace Pro User Manual
25
Auto Dash
In camera settings, tap "Power Off Charging Settings" and choose"Charge and Record". You can
adjust the shooting settings and mode here. When the camera is connected to an external power
source, it will automatically power on and start shooting in the set shooting mode and parameters.
This function is ideal for cars or motorcycles as it acts as a dashcam.
Once the camera is disconnected from the power source, the camera will automatically stop
recording, save the file and start counting down to power off.
AI Warp
Add a dynamic twist to your videos with AI Warp. Search for a filter in the app and apply premium
AI effects to the whole clip or specific parts.
AI Selfie Stick Eraser
Choose the AI Selfie Stick Eraser effect in Shot Lab for epic third-person perspectives. If you have
used the selfie stick in your video, AI will automatically detect and remove it from your clips.
Motion ND
By adding Motion ND directly to the image in the app, you can create visual blockbusters with a
cinematic sense of speed even without an ND filter. Ideal for shots in the forward direction while
riding or driving.

Ace Pro User Manual
26
AI Highlights Assistant
You can use this feature on the camera or in the app.
In-Camera:
Swipe down from the top of the touchscreen and enable AI Highlights Assistant.
Go to the Album Page to view the footage after recording.
AI will automatically analyze a single video and show you the highlights to review.
Choose the highlight clips and save them separately or merge them into one video.
You can then delete the rest to quickly free up storage space.
In the app:
Once the camera is connected to the app, go to the album page and open your clip. Pause the
video and you can see your highlights in the 'Highlights' section.
You can edit the clip duration and choose the highlights you want to export, or make more clips.
In addition, AI will automatically create and edit a highlight reel for you.
You can also view them in the new Memories section of the app.
app Background Downloading
You can now download your clips to the app as it runs in the background.
As they download, you can exit the app and keep using your phone until they're ready.
The app will notify you once the download is complete.
Ace Pro User Manual
27
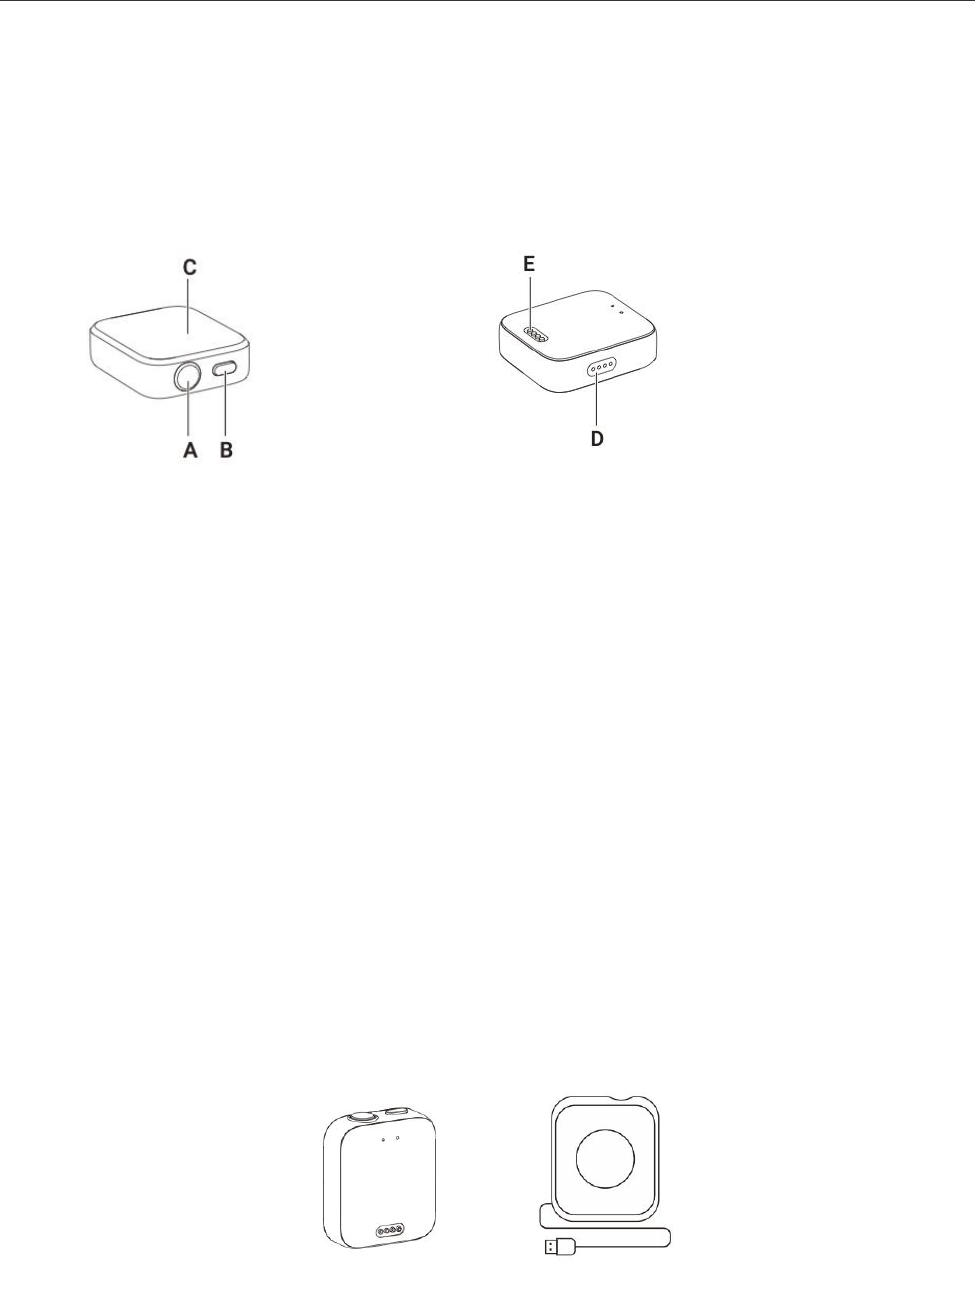
GPS Preview Remote
Preview your footage in real-time and adjust camera settings with the GPS Preview Remote.
Record precise GPS information and other data to add to your footage in post.
Overview
A.Shutter Button
B.Power Button
C.Touch Screen
D.Speaker
E.Charging Points
Charging
1. Put the remote on the charging base, ensuring that the charging points are in full contact.
2. Then, connect the charging base to the charger and the power supply. An indicator will
appear on the touch screen to confirm the remote is charging.
Note:
• Please use a 5V/1.5A power adapter to charge the Remote.
• Keep the remote and the charging base clean and dry.

Ace Pro User Manual
28
Install
You can attach the GPS Preview Remote in three ways. It has two straps for flexible mounting.
Position
Description
Figure
On wrist
Use the Wrist Strap to wear the GPS
Preview Remote on your wrist. Ensure the
buttons are aligned correctly.
On selfie stick
Use the Universal Strap to attach the
remote to a selfie stick. Ensure the
buttons are aligned correctly.
On bike/motorcycle
Use the Universal Strap to attach the
remote to the handlebars. Ensure the
buttons are aligned correctly.

Ace Pro User Manual
29
How to Use
Power on/off
Remote Status
Operation
Descriptions
Powered off
Long press Power
Button
• Power on the remote.
Powered on (camera
disconnected)
Long press Power
Button
• Power off the remote.
Powered on (camera
connected)
Long press Power
Button
• Power the remote/the camera/both (you
can select this function).
Connecting the Camera
1. Long press the Power Button to turn on the remote.
2. Power on the camera.
3. Click "Insta360 GPS Preview Remote" on the camera's Bluetooth Remote interface. When the
camera's screen displays Connected, it has been paired successfully.
Notes:
• For the best experience, update your camera's firmware to the latest official version.
• The optimal range for live preview is up to 26.2ft (8m) and 65.6ft (20m) for remote control,
measured in an open environment without interference.
• Please pay attention to the Insta360 official website for future camera compatibility and
firmware updates.
• After connecting to the remote for the first time, the device can wake up the camera within
range without pairing.

Ace Pro User Manual
30
Connecting Multiple Cameras
Swipe down from the top of the remote's watch dial to enter the connecting interface and tap the
camera button.The remote will be ready to pair. Enter the Bluetooth Remote feature on your
camera and connect to the remote. Repeat the process as needed.
Notes:
• The remote can control up to four cameras at a time. Each camera only recognizes one
remote at a time.
• The remote will only show the number of connected cameras and no other camera
information.
Wake up a Camera
You can use the remote to wake up your camera. After connecting to the camera for the first time,
swipe down on the remote touchscreen to enter the connection interface, and choose one of the
following two ways to wake up the camera:
• Connect: Wake up the last connected camera. The camera will automatically connect to the
remote once powered on.
• QuickCapture: Wake up the last connected camera. The camera will automatically connect to
the remote and enter QuickCapture.
Notes:
• Enable "Bluetooth Wakeup" on the camera to use this feature.
• The feature must be set on the camera before waking up, even if the remote is connected.
• To use QuickCapture, make sure it is enabled on your camera.
• Press the remote's Shutter Button once to enter QuickCapture. Long press the Shutter Button
to connect to the camera.

Ace Pro User Manual
31
Control the Camera
When the camera is connected, use the remote's touchscreen or press its buttons to control the
camera.
Preview Page
When the camera is connected, the remote will display the following camera information on the
preview page:
1. Camera Storage
2. GPS Signal
3. Camera Battery Status
4. Preview Page
5. Shooting Mode
6. Shooting Specifications
Switch Shooting Modes
• Touchscreen: Swipe left or right on preview page to switch shooting mode.
• Power Button: Press repeatedly to switch shooting modes.
Shooting Specifications
On the preview page, tap the shooting specifications button or swipe from the bottom upwards to
enter and adjust shooting specifications.
Shooting Parameters
On the preview page, swipe right to left to enter and adjust shooting parameters.

Ace Pro User Manual
32
Take Photos or Videos
Remote Status
Operation
Descriptions
On the preview page
Press the Shutter
Button
• Take a photo/start recording a video.
Recording
Press the Shutter
Button
• Stop recording.
application Center
Dashboard and Compass
Swipe left or right on the remote's watch dial screen to enter Dashboard, Compass or Settings.
Settings
You will find the following in Settings: Display and Brightness, Direction of Display, Sound, Time,
Language, About and Factory Data Reset.
Firmware Update
Open the Insta360 App > Settings > Update GPS Remote Control. Search and connect to the
remote.
Once connected, the app will prompt you to update if there is a new firmware version.
Please follow the on-screen instructions to update the remote's firmware.

Ace Pro User Manual
33
File Transfer
Connect Ace Pro to a mobile phone or computer with the included Type-C cable for file transfer.
You can download Ace Pro's files to your phone or PC, then use the Insta360 App or Insta360
Studio to edit and export.
Connect Ace Pro to a mobile phone or computer with the included Type-C cable for file transfer.
You can download Ace Pro's files to your phone or PC, then use the Insta360 App or Insta360
Studio to edit and export.
Download files from Ace Pro to the Insta360 App
1. Connect Ace Pro to your phone via the Insta360 App.
2. Enter the Album page, then select Camera.
3. Tap the multi-select icon in the upper right corner of the page and select the files you want to
download. Tap the download icon in the bottom right corner to download. You can use other apps
or lock your phone as you wait for footage to download to the app.
Download files from Ace Pro to your computer
1. Connect Ace Pro to your PC via the official cable.
2. Open the DCIM > Camera01 folder, then copy the photos/videos you want to your PC.

Ace Pro User Manual
34
Transfer files between the Insta360 App and your Windows computer
iPhone
1. Install iTunes on your PC. Connect your iPhone to your PC, open iTunes, then complete the
authorization process according to the instructions.
2. After successful authorization, click the iPhone icon in the top left corner, and the iPhone's
files will appear.
3. Click "File Sharing" and choose "Insta360" from the list. Then do one of the following:
○ Transfer from iPhone to Windows PC: Find the DCIM folder, then click Save. Choose your
desired path and click Save.
○ Transfer from Windows PC to iPhone: Create a new folder and name it IMPORT, then
copy the photos/videos to the IMPORT folder. Replace the IMPORT folder in the Insta360 App.
Android
1. Connect your Android phone to your PC, then choose "Manage Files" under "USB Connected"
on the phone.
2. Click "My Computer/This Computer", find your phone model, and click "Internal Storage".
3. Find "/Android/data/com.arashivision.insta360akiko > files > Insta360OneR > galleryOriginal",
then do one of the following:
○
Transfer from Android to Windows PC: Copy the folder or files to your PC.
○ Transfer from Windows PC to Android: Copy files to this folder from your PC.

Ace Pro User Manual
35
Transfer files between the Insta360 App and your Mac
iPhone
1. Connect iPhone to your Mac.
2. In the Finder window on your Mac, select your iPhone.
3. At the top of the Finder window, click Files, then do one of the following:
○ Transfer from Mac to iPhone: Drag a file or a selection of files from your Mac onto the
Insta360 App in the list.
○ Transfer from iPhone to Mac: Click the small triangle beside the Insta360 App to see its
files on your iPhone, then drag the desired files to a folder on your Mac.
Android
1. Install Android File Transfer on your Mac.
2. Connect your Android phone to Mac.
3. Open Android File Transfer.
4. Browse the files and folders on your Android device, then copy and paste them to a folder on
your Mac.

Ace Pro User Manual
36
Insta360 App
Connect to the Insta360 App
1. Download the Insta360 App . Alternatively, search "Insta360" in any major app store or scan
the QR code on the box.
2. Press the Power Button to turn on Ace Pro.
3. Enable Wi-Fi and Bluetooth on your smartphone.
4. Open the Insta360 App and click the camera icon at the bottom of the page. Follow the on-
screen instructions to activate your camera.
5. If you connect to the Insta360 App for the first time, you need to authorize the connection on
the touchscreen.
If you are unable to connect to the app, go to your smartphone's Wi-Fi settings, find your Ace Pro,
enter the password and return to the app.
Note: You can change the camera's Wi-Fi password on the app settings page.
Still can't connect to the Insta360 App?
1. Check if the Insta360 App has permission to access the following: network permission,
Bluetooth permission, or local network permission.
2. Check if the Wi-Fi option is enabled and turned on on your camera.
3. Make sure Ace Pro is close enough to the phone.
Android Mode
1. Connect Ace Pro to your Android phone with the USB-C cable.
2. A notification for Android Mode will pop up.
3. Open the Insta360 App to control the camera and access the camera's footage.
app Interface
Enter the shooting interface of the app and you will see the following icon functions. Some of the
icon functions are only available in some shooting modes.

Ace Pro User Manual
37
Maintenance
Firmware Update
Firmware updates will be regularly available for Ace Pro to ensure it runs efficiently. Please update
to the latest version for optimal results.
Before updating, ensure Ace Pro has at least 20% battery remaining.
Update via Insta360 App:
Connect Ace Pro to the Insta360 App. The app will notify you if there is a new firmware update
available. Follow the on-screen instructions to update the firmware.
If the camera firmware update fails, check the following and try the update again:
1. Ensure the camera is close to your phone.
2. Keep the Insta360 App running and do not exit or minimize it.
3. Ensure your phone has a strong and stable network connection.
Update via Computer
1. Make sure Ace Pro is powered on.
2. Connect the camera to the computer using the USB Type-C cable and select USB Mode.
3. Download the latest firmware version from the official Insta360 website on your computer.
4. Once the computer has recognized Ace Pro, copy the "Insta360AceProFW.bin" file to Ace Pro's
root directory.
Note: Do not change the file name.
5. Disconnect Ace Pro from the computer. Ace Pro will automatically power off. The Indicator
Lights will slowly flash blue.
6. Ace Pro will automatically restart once the update is complete.

Ace Pro User Manual
38
Waterproofing
1. Insta360 Ace Pro camera is waterproof up to 33ft (10m) without a Dive Case. For extended
underwater use, use the Dive Case. The Dive Case is waterproof to 96ft (60m).
2. Check that the battery compartment is free from dirt or foreign objects. Once the battery is
inserted, close the Battery Cover and ensure the yellow indication mark is completely covered to
ensure waterproofing is not affected.
3. Ensure the USB Port Cover is free from dirt or foreign objects. Ensure it is completely closed
before using the camera underwater.
4. After every use in seawater, soak the camera in fresh water for 15 minutes, gently rinse it with
the flip screen open, and then dry it thoroughly with a soft cloth. Wait until it is completely dry
before using it again.
To maintain the waterproofing of Ace Pro:
• Do not use a hair dryer to dry the camera, as it may affect the microphone and speaker and
damage the internal waterproofing ability.
• Avoid operating the camera for extended periods (>1 hour) outside the recommended
temperature range (-4°F to 104°F/-20℃ to 40℃) or in humid environments.
• Do not store the camera in high-temperature or high-humidity environments.
• Do not disassemble the camera.
• Avoid entering water at high speeds. Excessive water impact may damage the device.
• Ensure the camera's Battery Cover, USB Port Cover and Lens Cover are installed and securely
closed, or the camera will not be waterproof.

Ace Pro User Manual
39
Cleaning
1. If there are foreign objects, such as dirt or hair, on the Lens Cover, clean it with clean water or
use a lens pen, air blower or cloth.
2. If there are foreign objects, such as dirt or hair, on the lens, use a lens pen, air blower or cloth
to clean it.
3. Ensure the Battery and Battery Cover is free of dirt and foreign objects like sand or hair. Clean
it with a soft, dry cloth or paper if necessary.
4. Ensure the MicroSD Card Slot is free of dust, dirt and sand to ensure the camera works
properly.
Battery Precautions
• Only use batteries provided by Insta360 designed for Ace Pro. Insta360 is not responsible for
any accidents or failures that occur by using unofficial batteries. If you need to replace the battery,
please purchase it from the Insta360 official store.
• Avoid using the battery outside the recommended temperature range (-4°F to 104°F/-20℃ to
40℃). Temperatures outside of this may cause the battery to expand, catch fire or even explode.
Before using the camera in a low-temperature environment, fully charge the battery in a regular-
temperature environment first to extend the battery life.
• If the battery is not used for a long time, its performance will be affected.
• Recharge and discharge the battery every three months to maintain optimal working
conditions.

Ace Pro User Manual
40
Arashi Vision Inc.
ADD: 11th Floor, Building 2, Jinlitong Financial Center, Bao'an District, Shenzhen, Guangdong,
China
WEB: www.insta360.com
TEL: 400-833-4360 +1 800 6920 360
EMAIL: servic[email protected]m
V1.0
