
ENGLISH
DR750S-2CH
Manual

2
BLACKVUE
Table of Contents
Introduction .................................................................5
Important safety information
....................................6
Overview
......................................................................9
In the box ..................................................................................................................... 9
At a glance
.................................................................................................................10
Front camera ................................................................................................................................... 10
Removing and inserting the front camera
................................................................................12
Rear camera.....................................................................................................................................13
Removing and inserting the rear camera
..................................................................................13
Installation .................................................................14
Installing the BlackVue dashcam ..........................................................................14
Playing and Managing Videos ..................................18
Playing and managing video les using your smartphone
(Android/iOS) .......................................................................... 18
Opening video les ..................................................................................................18
BLACKVUE WI-FI screen composition
...................................................................20
Playing video
............................................................................................................21
Playing back videos ....................................................................................................................... 21
Identify video les by recording type
........................................................................................21
Checking the displayed time & GPS data
..................................................................................23
Real-time streaming video (Live View) ................................................................24
Managing videos
.....................................................................................................25
Managing videos in BLACKVUE WI-FI ........................................................................................25
Copy to Internal Memory ............................................................................................................................................. 25
Managing videos in INTERNAL MEMORY .................................................................................. 26
Deleting videos .............................................................................................................................................................. 27
Creating a new folder
................................................................................................................................................... 27
Copying and pasting videos
....................................................................................................................................... 27
Moving videos
............................................................................................................................................................... 28
Renaming a video
......................................................................................................................................................... 28
Uploading, sharing or emailing a video
................................................................................................................... 28
Playing and managing video les using your computer
(Windows/Mac) ....................................................................... 29
Removing the microSD card ..................................................................................29
Opening video les in BlackVue Viewer
..............................................................30
Viewer screen composition
....................................................................................31
Windows Viewer .............................................................................................................................31
Mac Viewer
......................................................................................................................................32
Playing video ............................................................................................................33
Playing back videos ....................................................................................................................... 33
Identify video les by recording type
........................................................................................33
Checking the displayed time
.......................................................................................................35
Using BlackVue Viewer
..................................................................................................................35
Exploring the timeline and G-Sensor graph
.............................................................................36
Zoom options
.................................................................................................................................37
Checking the GPS data
..................................................................................................................38
Managing videos......................................................................................................39
Capturing or printing a still image from video .........................................................................39
Deleting videos
..............................................................................................................................39
For Windows users ......................................................................................................................................................... 39
For Mac users
.................................................................................................................................................................. 40
Exporting videos ............................................................................................................................ 41
For Windows users ......................................................................................................................................................... 41
Copying videos ............................................................................................................................... 42
For Windows users ......................................................................................................................................................... 42
For Mac users
.................................................................................................................................................................. 43
Tips for optimal performance ..................................44
Formatting the microSD card ................................................ 44
Formatting the card in the BlackVue ....................................................................44
Format using BlackVue Viewer (Windows)
..........................................................44
Format using BlackVue Viewer (macOS)
..............................................................45
Upgrading the rmware ......................................................... 47
Upgrading the rmware using an iOS or Android device
(Firmware Over The Air)
..........................................................................................47
DR750S-2CH
3
Upgrading the rmware using a computer (Windows or Mac) .......................50
Changing settings .....................................................52
Changing settings using your smartphone (Android/iOS) .. 52
Basic settings ............................................................................................................53
Time settings ...................................................................................................................................54
Video settings
................................................................................................................................. 56
Resolution ....................................................................................................................................................................... 56
Image quality
.................................................................................................................................................................. 56
Enhanced night vision................................................................................................................................................... 57
Brightness (Front)
.......................................................................................................................................................... 57
Brightness (Rear)
............................................................................................................................................................ 57
Recording settings ......................................................................................................................... 58
Recording type settings ................................................................................................................................................ 58
Voice recording............................................................................................................................................................... 58
Date & time display
........................................................................................................................................................ 59
Speed unit
...................................................................................................................................................................... 59
Video segment length
................................................................................................................................................... 59
Lock event les
............................................................................................................................................................... 59
Rear camera rotation
..................................................................................................................................................... 59
Sensitivity settings ..................................................................................................60
G-Sensor (Normal mode) / G-Sensor (Parking mode) ............................................................. 61
Motion detection (Parking mode)
..............................................................................................62
System settings ........................................................................................................63
LED .................................................................................................................................................... 63
Recording status ............................................................................................................................................................ 63
Front security (Normal mode)
..................................................................................................................................... 63
Front security (Parking mode)
..................................................................................................................................... 63
Rear security
................................................................................................................................................................... 64
Wi-Fi (Parking mode)
..................................................................................................................................................... 64
Proximity Sensor ............................................................................................................................64
Voice guidance
...............................................................................................................................64
Volume
............................................................................................................................................. 64
Scheduled Reboot..........................................................................................................................64
Speed alert
......................................................................................................................................65
User text overlay
............................................................................................................................65
Wi-Fi settings ............................................................................................................66
Login credentials ............................................................................................................................66
Wi-Fi auto turn o
.......................................................................................................................... 66
Cloud settings ...........................................................................................................67
Enable Cloud service ..................................................................................................................... 67
Cloud service hotspot settings
....................................................................................................68
Push notication settings
.............................................................................................................69
FW Language ............................................................................................................70
Changing settings using your computer (Windows/Mac) ... 71
BlackVue Viewer settings........................................................................................72
Select language .............................................................................................................................. 72
Speed unit on map.........................................................................................................................72
Select map service
.........................................................................................................................72
Firmware settings ....................................................................................................73
Basic settings ..................................................................................................................................74
Time settings ................................................................................................................................................................... 74
Video settings
................................................................................................................................................................. 75
Recording settings
......................................................................................................................................................... 76
Sensitivity settings ........................................................................................................................ 78
G-Sensor (Normal mode) / G-Sensor (Parking mode) ............................................................................................. 78
Motion detection (Parking mode)
.............................................................................................................................. 79
Advanced sensitivity settings for normal and parking mode
............................................................................... 79
System settings ..............................................................................................................................81
LED .................................................................................................................................................................................... 81
Proximity Sensor
............................................................................................................................................................ 82
Voice guidance
............................................................................................................................................................... 82
Volume
............................................................................................................................................................................. 82
Scheduled Reboot.......................................................................................................................................................... 82
Speed alert
...................................................................................................................................................................... 83
User text overlay
............................................................................................................................................................ 83
Wi-Fi settings ..................................................................................................................................84
Login credentials ............................................................................................................................................................ 84
Wi-Fi auto turn o
.......................................................................................................................................................... 84
Cloud settings .................................................................................................................................85
Enable Cloud service ..................................................................................................................................................... 85
Cloud service hotspot settings
.................................................................................................................................... 86
Push notication settings
............................................................................................................................................. 86
Applying the settings ....................................................................................................................86
About the Cloud Service ...........................................87
Connect to BLACKVUE CLOUD (Optional) ............................ 87
Optional accessories .................................................92
4
BLACKVUE
Parking mode hardwiring kit (Optional) .............................. 92
Parking mode battery pack (Optional)
................................. 93
Troubleshooting ........................................................94
Changing / resetting direct Wi-Fi SSID and password ......... 94
On-device Wi-Fi SSID and password reset ...........................................................94
Change Wi-Fi SSID and password over the Cloud
..............................................95
Change the Wi-Fi password using BlackVue Viewer (Windows or Mac)
........97
Product specications ...............................................98
Recording time
....................................................... 100
Disposal and recycling information
...................... 101

DR750S-2CH
5
Introduction
Thank you for purchasing this BlackVue dashcam made by Pittasoft Co., Ltd.
This instruction manual contains information on how to operate your dashcam.
Before using your dashcam, we recommend that you read through this manual to ensure correct usage.
To improve the performance of the product, the contents of this manual are subject to change without prior notice.
Note
y
A formatted microSD card is provided with the BlackVue dashcam when you purchase the product. Insert the microSD card in the
dashcam and power it up. The microSD card will be initialized.

6
BLACKVUE
Important safety information
For user safety and to avoid property damage, read through this manual and follow these safety instructions to use the product correctly.
Failure to observe the following directions could result in death or property damage:
DANGER
y
Do not disassemble, repair, or modify the product yourself.
Doing so may cause re, electric shock, or malfunction. For internal inspection and repair, contact the service center.
y
If any foreign matter gets inside the product, detach the power cord immediately.
Contact the service center for repair.
y
Do not adjust the product while driving.
Doing so may cause an accident. Stop or park your car in a safe place before installing and setting up the product.
y
Do not install the product in a location where the product can interfere with the driver's eld of vision.
Doing so may cause an accident.
y
Do not use a damaged or modied power cord. Only use the cords provided by the manufacturer.
Damaged or modied power cords may cause an explosion, re, or malfunction.
y
Do not operate the product with wet hands.
Doing so may cause electric shock.
y
Do not install the product in an environment with high humidity, or combustible gases or liquids.
Doing so may cause an explosion and/or re.

DR750S-2CH
7
Failure to observe the following directions could result in death or serious injury:
WARNING
y
Do not leave the product near infants, children, or pets.
There is a risk of them swallowing small components, and/or their saliva may get into the product, causing an explosion due to a short
circuit.
y
Do not spray water or wax directly onto the product while cleaning the inside of the car.
Doing so may cause re, electric shock, or malfunction.
y
If smoke or an unusual smell is emitted from the power cord, detach the power cord immediately.
Contact the service center or your distributor.
y
Keep the terminals of the power cord clean.
Failure to do so may cause excessive heat and re.
y
Use the correct input voltage.
Failure to do so may cause explosion, re, or malfunction.
y
Plug in the power cord rmly so that it cannot easily be disconnected.
Failure to do so may cause re.
y
Do not cover the product with any material.
Doing so may cause external deformation of the product or re. Use the product and peripherals in a well-ventilated location.

8
BLACKVUE
Failure to observe the following directions could result in injury or property damage:
CAUTION
y
Do not spray cleaning products directly onto the product.
Doing so may cause discoloration, cracks, or malfunction.
y
If the product is used outside the optimal temperature range (-20°C – 60°C / -4°F – 140°F), performance can decline or
malfunctions may occur.
y
Make sure that the product is installed properly.
If installed incorrectly, vibrations may cause the product to fall, and may cause physical injury.
y
When entering or exiting a tunnel, when directly facing into bright sunlight, or when recording at night without lighting the
quality of recorded video may deteriorate.
y
If the product is damaged or the power supply is cut due to an accident, video may not be recorded.
y
Excessively tinted windshield glass can distort the recorded video or cause recorded video to be indistinct.
y
Prolonged use of the product can increase the interior temperature and cause burns.
y
microSD cards are consumables, so replace microSD cards after prolonged use.
microSD cards may not record video correctly after extended use, so check the microSD card's recording capability periodically and
replace as necessary.
y
Clean the lens regularly.
Foreign material attached to the lens can aect the recording quality.
y
Do not remove the microSD card while the microSD card is saving or reading data.
The data can be damaged or malfunctions may occur.
y
It is recommended that you install the software and rmware from the BlackVue downloads page (www.blackvue.com).
y
It is recommended that you remove the power cord if the product (BlackVue dashcam/Parking Mode Hardwiring Kit) is not used
for an extended period of time.

DR750S-2CH
9
Overview
In the box
Check the box for each of the following items before installing the BlackVue dashcam.
Front camera
Rear camera
connection cable
Rear camera
Power cord Quick start guide Pry tool
Double-sided tape
for the Mounting
Brackets
Cable clips (8 EA)
microSD card reader microSD Card
Note
y
The illustrations in this manual may dier from the product.
y
To improve the performance of the product, the contents of this manual are subject to change without prior notice.
y
For more information about the package components and accessories, visit the BlackVue website (www.blackvue.com).

10
BLACKVUE
At a glance
The following diagrams explain each part of the BlackVue dashcam.
Front camera
36 mm
Camera lens
Mounting bracket Front security LED
: Blinks slowly during normal mode and parking mode motion detection standby.
: Blinks quickly when (i) an event is being recorded (impact detected), (ii) manual
recording has started, or (iii) motion is detected in parking mode.
Lock button
55 mm
118.5 mm
GPS LED
: GPS is on
Recording LED
: Blinks orange in normal mode.
: Blinks red when (i) an event is being recorded (impact detected), or (ii) manual recording has started.
: Blinks green in parking mode when motion is detected.
Speaker

DR750S-2CH
11
Proximity Sensor:
Touch or wave a nger within 20mm of the sensor to turn
on/o audio recording.
Alternatively, it can be set as a manual recording trigger in
the rmware settings.
Wi-Fi/Internet LED
: Direct Wi-Fi is on.
: Blinks when connected to the internet (Cloud connected).
Wi-Fi / Format button:
– Press once to turn on/o Wi-Fi.
– Press and hold for 5 seconds and once voice instructions
start, release the button. Then press once again to reset the
Wi-Fi SSID and password or press and hold for 5seconds to
format the microSD card.
Cover
DC in
(power connector)
microSD card slot
Rear camer
a connection port

12
BLACKVUE
Removing and inserting the front camera
Serial number label
Connectivity details label:
– Default Wi-Fi SSID
– Default Wi-Fi password
– Cloud code
– QR code
y
To remove the dashcam from its bracket, press the LOCK button and pull the dashcam out of the mounting bracket.
y
To insert the dashcam into its bracket, push the dashcam into the mounting bracket until it "clicks" in.

DR750S-2CH
13
Rear camera
Rear security LED
: Stays on in all recordings
modes but can be turned o
from rmware settings.
V out
(Front camera
connection port)
Mounting bracket Camera lens
31 mm
67.4 mm
25 mm
Removing and inserting the rear camera
y
To remove the rear camera from its bracket, hold the mounting bracket and pull the rear camera out.
y
To insert the rear camera into its bracket, push the rear camera into the mounting bracket until it "clicks" in.

14
BLACKVUE
Installation
Installing the BlackVue dashcam
Install the front camera behind the rear view mirror. Install the rear camera at the top of the back windshield. Remove any foreign matter
and clean and dry the windshield before installation.
Warning
y
Do not install the product in a location where it can obstruct the driver's eld of vision.
1
Turn o the engine. Open the cover of the microSD card slot, gently push the card into the slot until it locks into place and close the
cover.

DR750S-2CH
15
2
Peel o the protective lm from the double-sided tape and attach the front camera to the windshield behind the rear-view mirror.
3
Adjust the angle of the lens by rotating the body of the front camera. We recommend pointing the lens slightly downwards (≈10°
below horizontal), so as to record video with a 6:4 road to background ratio.
4
Peel o the protective lm from the double-sided tape and attach the rear camera to the rear windshield. Adjust the angle of the
lens by rotating the body of the rear camera.

16
BLACKVUE
5
Connect the front camera ('Rear' port) and the rear camera ('V out') using the rear camera connection cable.
6
Use the pry tool to lift the edges of the rubber window sealing and molding and tuck in the rear camera connection cable.
Rear camera connection cable
7
Plug the power cord into the cigarette lighter socket and the front camera.
8
Use the pry tool to lift the edges of the windshield trim/molding and tuck in the power cord.
Power cord
Rear camera connection cable

DR750S-2CH
17
9
Turn on the engine. The BlackVue dashcam will power up and start recording. Video les are stored on the microSD card. When the
microSD card lls up, the newest video les will start to replace the oldest video les (called loop recording) – so you will always have
the most recent video les.
10
Turn o the engine. The dashcam will automatically stop recording and power down. To record in parking mode while the engine is
o please install a Power Magic Battery Pack (sold separately) or a Power Magic Pro (sold separately). A Power Magic Pro powers
your dashcam when the engine is o by hardwiring it to the automotive battery. A low voltage power cut-o function and a parking
mode timer protect the automotive battery from discharge.
Note
y
Up to 50 event recordings (impact, manual) can be locked from being overwritten. By default, this feature is disabled. You can
enable it from rmware settings and choose to either overwrite them with new event les when the event le storage is full
or lock the 50event les and save the new event les in loop recording storage. Please note that formatting the microSD card
deletes all the recordings including the locked event les.
y
The recording LED blinks while recording (default setting) and the GPS LED is on when a GPS signal is received. There are
4recording modes: Normal, Event, Parking and Manual. The dashcam starts recording in normal mode, switches to event mode
when an impact is detected, and switches to parking mode if the vehicle is stationary for 5minutes. Touching the proximity
sensor turns on/o audio recording or triggers manual recording depending on the rmware settings.
y
When you run the dashcam for the rst time the rmware is automatically loaded onto the microSD card. After the rmware has
been loaded onto the microSD card you can customize settings using BlackVue Viewer on a computer.

18
BLACKVUE
Playing and Managing Videos
Playing and managing video les using your smartphone (Android/iOS)
Opening video les
1
Search for the BlackVue app in the Google Play Store or Apple App Store and install it on your smartphone.
2
“Pair” your smartphone with the BlackVue dashcam via direct Wi-Fi:
a. Go to your smartphone's Settings then select Wi-Fi, and make sure Wi-Fi is turned on.

DR750S-2CH
19
b. Choose your BlackVue dashcam from the network list. The dashcam’s default SSID begins with its model number (e.g.
BlackVue750S-******).
c. Enter the password and tap join.
* The default Wi-Fi SSID and password is labeled on the dashcam. To nd them, unplug the cables and remove the front camera from
its mount.
d. Open the BlackVue app and select BLACKVUE WI-FI.
Note
y
Direct Wi-Fi lets you directly connect your smartphone to your dashcam via Wi-Fi within a range of 10m.
y
The BlackVue app is available for devices running Android 4.2 and higher, or iOS 8.0 and higher.
y
You can change Wi-Fi SSID and password as described on page 95 and 97.

20
BLACKVUE
BLACKVUE WI-FI screen composition
Firmware settings
Live View
BlackVue SSID
File type lter buttons
Refresh video list
Copy to Internal Memory
Video le pop-up menu
Video list

DR750S-2CH
21
Playing video
Playing back videos
Select the video le you want to play from the video list.
Press the refresh button
to refresh the video list.
Identify video les by recording type
Normal The dashcam records in normal mode by default.
Event
When the dashcam detects an impact while in normal or parking mode, it switches to event mode and
saves an event recording beginning 5 seconds before the event trigger. Exceeding the set speed limit
will also trigger an event recording.
Parking
In parking mode the dashcam continuously buers video. When motion is detected in the dashcam's
eld of view, it saves a parking recording beginning 5 seconds before the motion detection.
Manual
If proximity sensor is set as a manual recording trigger in the rmware settings, touching or waving a
nger within 20 mm of the sensor will turn on manual recording.
Tap the car icon to load the thumbnail of a recording.
The car icon with an arrow pointing to the right indicates a front dashcam recording.
The car icon with an arrow pointing to the left indicates a rear dashcam recording.

22
BLACKVUE
Recording le names include the date, time, recording type and camera direction.
y
Recording type: N: Normal
E: Event
P: Parking mode motion detection
M: Manual
y
Camera direction: F: Front camera
R: Rear camera
y
Example le name: 20170104_150838_NF.mp4
Date & time: 4th January 2017, 03:08:38 PM
Recording type: Normal
Camera direction: Front camera
Note
y
Use the
, , , buttons to lter the video list by recording type (Normal, Event, Parking and Manual). The
lter button displays both E (Event) and I (Impact event while parked) recordings.
y
The dashcam requires a constant power source to record in parking mode. See "Optional accessories" on page 92 for more
information.

DR750S-2CH
23
Checking the displayed time & GPS data
The time the video was recorded is displayed in the lower left corner of the video in the playback screen. If the displayed time in the
recorded videos is incorrect please see "Time settings" on page 54 or 74.
Copy to Internal Memory
Portrait and landscape
display
Video le
Date, Time & Speed
Rear camera
Model name
The vehicle's speed is displayed in the lower-left corner of the video.
Rotate your smartphone or press the rotate button to switch between portrait and landscape display modes.
Press the rear button to switch to the rear dashcam view.

24
BLACKVUE
Real-time streaming video (Live View)
You can view in real-time the video currently being recorded by connecting your smartphone to the dashcam via direct Wi-Fi.
1
Go to your smartphone's Settings > Wi-Fi and connect to your dashcam.
2
Open the BlackVue app. Select BLACKVUE WI-FI and tap the button.
3
Rotate your smartphone or press the rotate button to switch between portrait and landscape display modes.
4
Press the rear button to switch to the rear dashcam view.
Note
y
When watching Live View via direct Wi-Fi, map data isn’t displayed because your smartphone can’t access internet as long as it is
connected to dashcam’s Wi-Fi.
DR750S-2CH
25
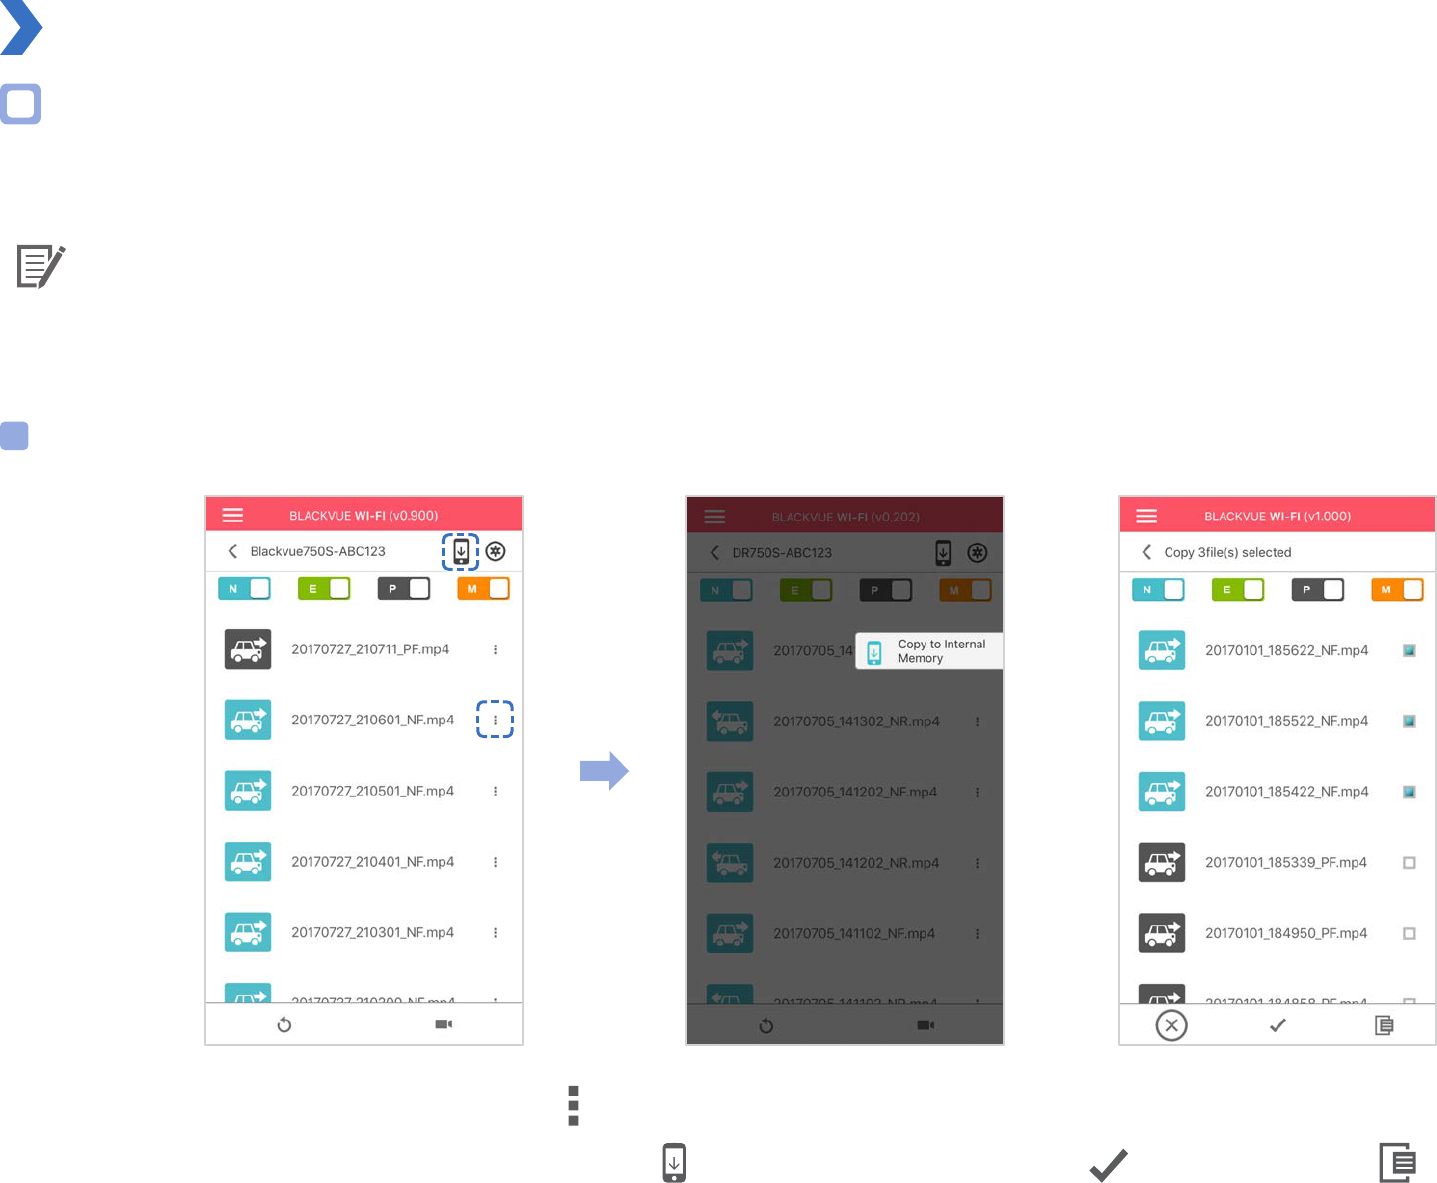
Managing videos
Managing videos in BLACKVUE WI-FI
You can manage the recorded videos using the BlackVue app.
Note
y
When the microSD card lls up, the newest video les will start to replace the oldest video les (called loop recording) – so you
will always have the most recent video les.
Copy to Internal Memory
To copy individual les to your smartphone, tap next to the video you want to copy. Select Copy to Internal Memory.
To copy multiple les to your smartphone in one go tap
. Select which les to copy, or tap to select all les. Tap to begin copying.

26
BLACKVUE
Managing videos in INTERNAL MEMORY
Open the BlackVue app and select INTERNAL MEMORY.
Tap to see le options. You can delete, copy or move les, change the name of les and share les.

DR750S-2CH
27
Deleting videos
To delete multiple les from your smartphone in one go, tap at the top of the screen and select Delete. Select which les to delete,
or tap
to select all les. Tap to delete the selected les.
To delete individual les, tap next to the video you want to delete. Select Delete.
Creating a new folder
To create a new folder tap at the top of the screen and select New folder. Enter a new folder name and press OK.
Copying and pasting videos
To copy multiple les in one go, tap at the top of the screen and select Copy. Select which les to copy, or tap to select all les.
Tap
to copy the selected les. Go to another folder and tap to paste the selected les there.
To copy individual les, tap
next to the video you want to copy. Select Copy. Go to another folder and tap to paste the le there.

28
BLACKVUE
Moving videos
To move multiple les in one go, tap at the top of the screen and select Move. Select which les to move, or tap to select all les.
Tap
and go to another folder and tap to move the selected les there.
To move individual les, tap next to the video you want to move. Select Move. Go to another folder and tap to move the le there.
Renaming a video
To rename a video, tap next to the video you want to rename. Select Change name. Enter a new name and tap OK.
Uploading, sharing or emailing a video
Tap next to the video you want to share. Select Share le. Choose the app you want to share with. The available options will depend on
what apps you have installed on your smartphone.

DR750S-2CH
29
Playing and managing video les using your computer (Windows/Mac)
Removing the microSD card
1
Unplug the power cord to turn o the dashcam.
2
Open the cover of the microSD card slot.
3
To remove the microSD card, gently press on the card to release the lock then carefully pull the card out.
To insert the microSD card, gently push the card into the slot until it locks into place and close the cover.
Open side cover To remove To insert

30
BLACKVUE
Opening video les in BlackVue Viewer
1
Remove the microSD card from the dashcam.
2
Insert the card into the microSD card reader and connect it to a computer.
3
Download BlackVue Viewer from www.blackvue.com > Support > Downloads and install it on your computer.
4
Run BlackVue Viewer. To play, select a video and click on the play button or double click the selected video.

DR750S-2CH
31
Viewer screen composition
Windows Viewer
When you launch the program, you will see the SD card Viewer window. To open Cloud Viewer, click the button.
Filter les by direction and
recording mode
Click
to change the folder
Recorded le list
GPS data
Map screen
Select le(s) to copy, delete or
verify it
Settings
Format
View full screen Switch front/rear view
Flip upside down Front/rear screen mode
Flip horizontally Print
Fit to playback screen Capture
Playback screen
Program info.
Playback speed control
Previous frame
Play/pause
Next frame
Stop
Timeline for hour/min/sec
selection
G-Sensor information
Switch between SD card Viewer and Cloud ViewerSelect card

32
BLACKVUE
Mac Viewer
When you launch the program, you will see the SD card Viewer window. To open Cloud Viewer, click the button.
G-Sensor Information
Settings
Print
GPS Data
Recorded File List
Timeline for sec selection
Capture
Playback Screen
(rear camera)
Playback Scr
een
(front camera)
Full Screen view
P
revious frame
Timeline for min selection
Playback speed control
Playback/Pause
Volume control
Next frame
Playback time
Play next le
View upside-down
Flip horizontally
Front/Rear screen mode
Front/Rear reverse view
Normal screen size
Play previous le
Switch between SD card Viewer
and Cloud Viewer
Format
MyWay Viewer

DR750S-2CH
33
Playing video
Playing back videos
In BlackVue Viewer double click a video le to play.
BlackVue Viewer shows by default the les in the microSD card. To see les in another folder click the
button and browse to the folder.
Identify video les by recording type
Parking mode, Front camera
Parking mode, Rear camera
y
Recording type: N: Normal
E: Event
P: Parking mode motion detection
M: Manual
y
Camera direction: F: Front camera
R: Rear camera
y
Example le name: 20170104_150838_NF.mp4
Date & time: 4th January 2017, 03:08:38 PM
Recording type: Normal
Camera direction: Front camera

34
BLACKVUE
Use the buttons to lter the video list by recording type. The lter button displays both E (Event) and I (Impact
event while parked) recordings.
Normal The dashcam records in normal mode by default.
Event
When the dashcam detects an impact while in normal or parking mode, it switches to event mode and
saves an event recording beginning 5 seconds before the event trigger. Exceeding the set speed limit
will also trigger an event recording.
Parking
In parking mode the dashcam continuously buers video. When motion is detected in the dashcam's
eld of view, it saves a parking recording beginning 5 seconds before the motion detection.
Manual
If proximity sensor is set as a manual recording trigger in the rmware settings, touching or waving a
nger within 20mm of the sensor will turn on manual recording.
The car icon with an arrow pointing to the right indicates a front dashcam recording.
The car icon with an arrow pointing to the left indicates a rear dashcam recording.
Note
y
The dashcam requires a constant power source to record in parking mode. See "Optional accessories" on page 92 for more
information.
y
Depending on the specications of your computer, the dashcam videos that are recorded at 60fps, may not play smoothly or at
higher speeds (2x, 4x, etc.).

DR750S-2CH
35
Checking the displayed time
The time the video was recorded is displayed in the lower left corner of the video in the playback screen. If the displayed time in the
recorded videos is incorrect please see "Time settings" on page 54 or 74.
Using BlackVue Viewer
View full screen
Switch between the front and rear view (2CH)
Flip upside down
Front/rear screen mode (2CH)
Flip horizontally
Print image (paused)
Fit to playback screen
Capture image (paused)
Playback speed control
Previous frame
Play/pause
Next frame
Stop
Playback time

36
BLACKVUE
Exploring the timeline and G-Sensor graph
You can explore the timeline for the playback of the recorded videos by date, hour, minute and second using the timeline.
You can check the impact sensitivity (G-Sensor) information in the line graph.
Select month
Timeline for hour/min/
sec selection
G-Sensor information
Select date
• Dates with recordings are black
• Click a date to lter recordings (date changes to red and circled)

DR750S-2CH
37
Zoom options
y
Use the mouse scroll wheel zoom. Right clicking will restore the video to the default size.
y
You can resize the playback frame or the BlackVue Viewer window by dragging the borders.
y
Full-screen view: Double click on the video image to enter full-screen view. Double click again or tap ESC to return to the default view.
MacWindows

38
BLACKVUE
Checking the GPS data
You can check the GPS data of the recorded video in BlackVue Viewer while video is playing back. The driving speed and coordinates are
displayed above the map frame.
Note
y
GPS data is not recorded during parking mode. Map data cannot be displayed for parking mode recordings.

DR750S-2CH
39
Managing videos
You can manage the recorded videos through the BlackVue Viewer program. You can also format the microSD card.
Note
y
If the microSD card is full, by default the dashcam will record over the oldest videos rst.
Capturing or printing a still image from video
1
Double click a le in the le list to play.
2
Click the pause button to pause the video.
3
Select the capture button to capture the image or the print button to print directly.
Deleting videos
For Windows users
1
Select the video, or videos using the checkboxes, from the recorded video list.
2
Click Delete.
y
You can also delete individual les by clicking
next to a video in the recorded video list and selecting Delete.

40
BLACKVUE
For Mac users
1
Go to \BlackVue\Record\.
2
Select the video from the recorded video list.
3
Click Move to Trash.

DR750S-2CH
41
Exporting videos
For Windows users
1
Click next to a video in the recorded video list.
2
Click Export.
3
If you want to extract a segment of a le select Save segment and edit the start and end second points. To export without audio
select Sound O.
4
Click the OK button.

42
BLACKVUE
5
Select the folder in which to save the le and enter the le name.
6
Click the Save button.
Copying videos
For Windows users
1
Click next to a video in the recorded video list.
2
Click Copy to.
3
Select the folder in which to copy the le and enter the le name.
4
Click the Select folder button.
y
To copy multiple les at once check the boxes next to the le names and press the Copy to button
y
When copying les the segment adjustment and sound o tools are not available.

DR750S-2CH
43
For Mac users
1
Go to \BlackVue\Record\.
2
Select the video from the recorded video list.
3
Click Copy "le name".

44
BLACKVUE
Tips for optimal performance
Formatting the microSD card
Caution
y
Back up necessary video les before formatting the microSD card. If you format the microSD card, all the video les stored in the
microSD card will be deleted including the locked event les. Your saved settings will not be aected.
Formatting the card in the BlackVue
Press and hold the Wi-Fi button for 5seconds and once voice instructions start, release the button. Then press and hold again for 5 seconds
to format the SD card.
Format using BlackVue Viewer (Windows)
1
Insert the microSD card into the microSD card reader and connect the reader to your computer.
2
Download BlackVue Viewer (Windows) from www.blackvue.com > Support >Downloads and install it on your computer.
3
Launch the BlackVue Viewer that is installed on your computer.
4
Click the Format button, select the card drive and click OK.

DR750S-2CH
45
Format using BlackVue Viewer (macOS)
1
Insert the microSD card into the microSD card reader and connect the reader to your computer.
2
Download BlackVue Viewer (Mac) from www.blackvue.com > Support > Downloads and install it on your computer.
3
Launch the BlackVue Viewer that is installed on your computer.
4
Click the Format button and select the microSD card from the list of drives in the left frame.

46
BLACKVUE
5
After selecting your microSD card select the Erase tab in the main window.
6
Select “MS-DOS (FAT)” from the Volume Format drop-down menu and click Erase.
Note
y
Formatting the microSD card once a month is recommended.
y
Format the microSD card if the recorded video quality appears to be poor.
y
Only use ocial BlackVue microSD cards. Other cards may have compatibility issues. PittaSoft Co., Ltd. will not be held responsible
for any problems caused by using another manufacturer's microSD card.
y
For Windows users: To format the microSD card directly from “My Computer”, right-click the microSD card drive and select Format.
Select File system as FAT32 and Allocation unit size as 64KB then click Start. If FAT32 is not available or can’t be selected, please
format the microSD card using BlackVue Viewer.

DR750S-2CH
47
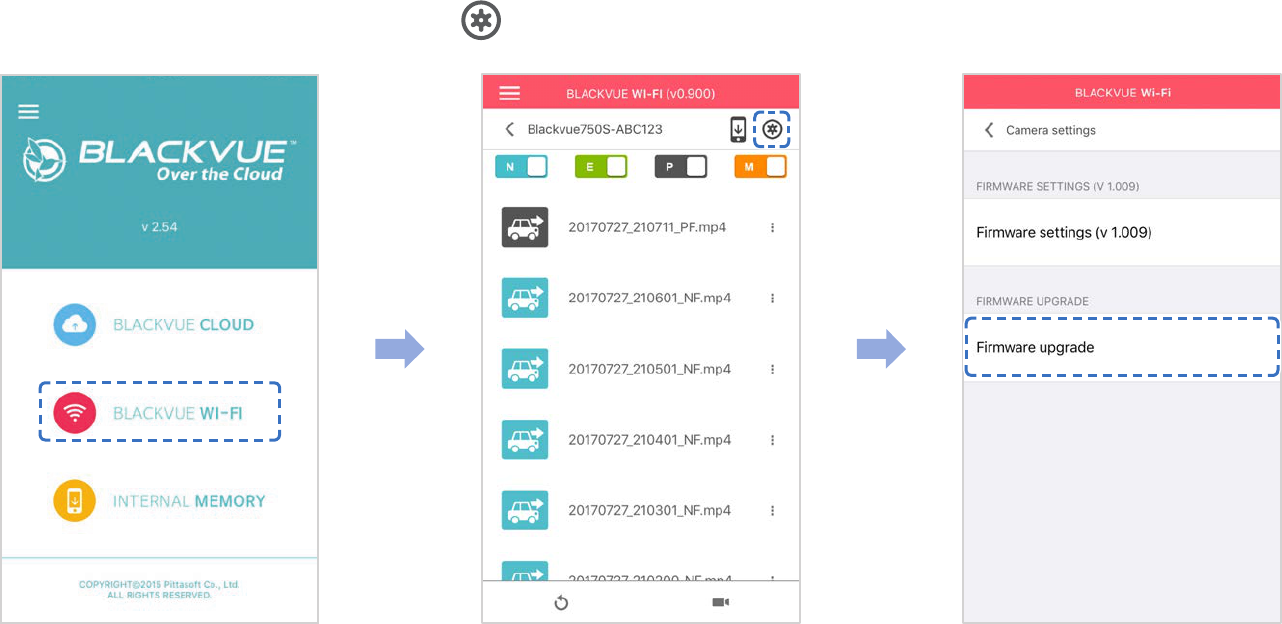
Upgrading the rmware
Regularly upgrade the rmware for performance improvements and updated features. Firmware updates will be made available for
download at www.blackvue.com > Support > Downloads.
Your saved settings are not aected by rmware upgrade.
Upgrading the rmware using an iOS or Android device (Firmware Over The Air)
Click here for a step-by-step video tutorial, or go to the main menu and select Help > Video tutorials.
Makes sure your smartphone has a stable internet connection.
1
Open the BlackVue app
2
Tap and select Firmware download.
3
Select your dashcam model and the rmware language and tap OK.
Note
y
Please select the rmware language currently installed in your dashcam. Once upgrade is completed, you can change the
rmware language from dashcam settings as described on page 70 or 73.
4
Check the rmware version and release notes and tap OK to start downloading.
5
After the download completes tap OK to be taken back to the home screen.
Make sure your BlackVue dashcam is on and nearby.

48
BLACKVUE
6
Go to your smartphone's Settings then select Wi-Fi, and make sure Wi-Fi is turned on.
7
Choose your BlackVue dashcam from the network list. The dashcam’s default SSID begins with its model number
(e.g.BlackVue750S-******).
8
Enter the password and tap join.
* The default Wi-Fi SSID and password is labeled on the dashcam. To nd them, unplug the cables and remove the front camera from
its mount.
DR750S-2CH
49
9
Open the BlackVue app. Select BLACKVUE WI-FI > > Firmware upgrade.
10
Tap OK to apply the rmware upgrade.
11
The dashcam's rmware will be upgraded – this may take a few minutes. The dashcam needs to reboot to complete the rmware
upgrade.

50
BLACKVUE
Upgrading the rmware using a computer (Windows or Mac)
Keep your BlackVue dashcam updated by upgrading the rmware to the latest version. Visit the BlackVue website (www.blackvue.com) to
check for any new rmware releases for your BlackVue dashcam model.
1
Insert the microSD card into the microSD card reader.
2
Connect the microSD card reader to a computer.
3
Launch BlackVue Viewer and click on the About button.
y
For Mac users, click
and select About BlackVue from the menu.
4
Check the current rmware version of your BlackVue dashcam and proceed only if your version is not the latest one.
MacWindows
5
Format the microSD card. See "Formatting the microSD card" on page 44.

DR750S-2CH
51
6
Go to the BlackVue website (www.blackvue.com > Support > Download) and download the latest rmware for your BlackVue
dashcam model in zip format.
7
Unzip the downloaded le and copy the BlackVue folder to the microSD card.
8
Insert the microSD card into the dashcam and connect the power to initiate the rmware upgrade. Make sure the power remains
on until the upgrade is completed. Any power interruption may prevent the rmware upgrade from completing, resulting in
malfunction.
Note
y
Do not insert or remove the microSD card when the dashcam is turned on. Doing so may damage the data and cause a
malfunction of the microSD card.
y
Your saved settings are not aected by rmware upgrade.
y
The rmware is upgraded to the previously saved language. If you want to change it, please refer to page 70 or 73.

52
BLACKVUE
Changing settings
Changing settings using your smartphone (Android/iOS)
“Pair” your smartphone with the BlackVue dashcam via direct Wi-Fi (for details see "Opening video les" on page 18).
1
Go to your smartphone's Settings > Wi-Fi and connect to your dashcam.
2
Open the BlackVue app. Select BLACKVUE WI-FI > to access the Firmware settings menu.
3
After making any changes, go back to the Firmware settings menu, tap and tap Save and close.
Caution
y
Please backup necessary recordings before changing time, video resolution, image quality or video segment length settings.
If any of the aforementioned settings are changed and saved, the dashcam will format the microSD card and delete all recordings
stored on the card including locked event les in order to ensure optimal performance.

DR750S-2CH
53
Basic settings

54
BLACKVUE
Time settings
Select your time zone to auto-sync with GPS time or you can set the time and date manually after enabling Manual time setting.

DR750S-2CH
55
Note
y
The factory setting is GMT -11.
Some examples of GMT time osets are:
- GMT-7: Los Angeles
- GMT-4: New York
- GMT+0: London
- GMT+1: Paris
- GMT+3: Moscow
- GMT+8: Singapore
- GMT+9: Seoul
- GMT+10: Sydney
If you are unsure of your GMT oset please look up your city on https://greenwichmeantime.com/
*Selecting Daylight saving time will advance the clock by one hour.
y
When setting the time manually, please set tothe expected time you willusethe BlackVue ( not the present time).

56
BLACKVUE
Video settings
Resolution
Select the resolution and frame rate. For example, "FHD@30 + FHD@30" means the front camera records Full HD video at 30 frames per
second, and the rear camera records Full HD video at 30 frames per second.
Note
y
At "FHD@60+FHD@30" resolution , the image quality is automatically set to Highest and Video segment length to 1 min. These
settings can not be changed.
Image quality
You can adjust the recording image quality (bit rate). Choose between:
y
Highest (Front: 12 Mbit/s, Rear: 10 Mbit/s)
y
High (Front: 10 Mbit/s, Rear: 8 Mbit/s)
y
Normal (Front: 8 Mbit/s, Rear: 6 Mbit/s)

DR750S-2CH
57
These are the maximum bit rates when the resolution is set to "FHD@30 + FHD@30". If you lower the resolution and frame rate setting, the
actual bit rates will be lower.
Increasing the image quality will increase the size of the video les. Loading and copying time will increase accordingly.
Enhanced night vision
The dashcam has intrinsic night vision feature. If you want to enhance it, enable Enhanced night vision.
Brightness (Front)
You can adjust the recording brightness level of the front camera.
Brightness (Rear)
You can adjust the recording brightness level of the rear camera.

58
BLACKVUE
Recording settings
Recording type settings
Normal recording
When turned o the dashcam does not record in normal mode.
Automatic parking mode
If enabled, the dashcam switches from normal mode to parking mode when the vehicle is stationary for 5 minutes.
Voice recording
When turned o the dashcam does not record audio.

DR750S-2CH
59
Date & time display
Turn on/o the date and time display on videos.
Speed unit
Select km/h, MPH, or turn o.
Video segment length
Choose between 1, 2 or 3 minute video segment lengths.
Lock event les
Turning on this option will lock the following recording types and stop them from being overwritten by newer recordings:
- Impact event recordings during normal and parking mode (E); and
- Manual recordings (M).
A maximum of 50 les can be locked. Once this limit is reached, to lock new recordings please review locked les on the microSD card and
free up space, or enable ‘Overwrite locked event les when full’ to allow the oldest locked les to be overwritten.
Rear camera rotation
If you installed the rear camera in a ipped position, use this setting to rotate the rear camera image 180°.

60
BLACKVUE
Sensitivity settings

DR750S-2CH
61
G-Sensor (Normal mode) / G-Sensor (Parking mode)
The G-sensor measures the movement of your vehicle through 3 axes – up and down, side to side, and front and back. When the G-sensor
detects signicant or sudden movement (such as an impact or collision) it will trigger an event recording. You can adjust the sensitivity so
minor incidents and bumps don't trigger an event recording. To turn o event recordings by impact detection set the G-sensor sensitivity
to o.

62
BLACKVUE
Motion detection (Parking mode)
In parking mode the dashcam continuously buers video and saves a parking recording when motion is detected in the dashcam's eld of
view.
You can adjust the sensitivity of the motion detection so minor motion caused by wind or rain doesn't trigger a recording. Please take into
account your vehicle's surroundings when adjusting the sensitivity.

DR750S-2CH
63
System settings
LED
Recording status
You can turn the recording status LED on/o.
Front security (Normal mode)
You can turn the front security LED on/o for normal mode.
Front security (Parking mode)
You can turn the front security LED on/o for parking mode.

64
BLACKVUE
Rear security
You can turn the rear security LED on/o.
Wi-Fi (Parking mode)
You can turn the Wi-Fi LED on/o for parking mode.
Proximity Sensor
You can choose the function of proximity sensor. It can be congured either for audio recording on/o feature or to trigger manual
recording.
Voice guidance
You can adjust the voice guidance (announcements) you want to hear.
Volume
You can adjust the volume of the voice guidance (announcements).
Scheduled Reboot
The dashcam reboots automatically once-a-day if in parking mode at the set time for improved stability. If the dashcam is recording at the
set time, the scheduled reboot is skipped.
You can enable/disable and change the time for scheduled rebooting. Default time is 03:00 am.

DR750S-2CH
65
Speed alert
Set a speed limit (up to 300 km/h or 200 MPH) for the speed alert. When the vehicle exceeds the specied speed limit, the dashcam beeps
and switches to event recording. After saving one event recording le the dashcam switches back to normal mode recording.
User text overlay
You can create a user text overlay of up to 20 characters using a combination of English letters (A – Z, a – z), numbers (0 – 9), and symbols
(:;‘/+-_()$#). The text is overlaid in the top-left corner of the recorded videos.

66
BLACKVUE
Wi-Fi settings
Login credentials
You can change the dashcam's SSID and Wi-Fi login password.
Wi-Fi auto turn o
When the Cloud service is enabled the Wi-Fi auto turn o setting cannot be adjusted. Wi-Fi will automatically switch on when you turn on
the dashcam and remain on.
If you disable the Cloud service, you will be able to adjust the Wi-Fi auto turn o setting.
ON OFF
Wi-Fi auto turn o Wi-Fi turns o if it is inactive for 10 minutes. Wi-Fi does not turn o automatically.

DR750S-2CH
67
Cloud settings
Enable Cloud service
If you don't use the Cloud service you can turn it o.

68
BLACKVUE
Cloud service hotspot settings
Up to 3 Wi-Fi hotspot SSIDs can be saved (e.g. home, portable hotspot and work). Choose your Wi-Fi hotspot from the list and enter the
password. Tap 2 and 3 to add settings for additional hotspots.
Your BlackVue will try to connect to hotspot 1 rst. If it cannot connect to hotspot 1, it will then try to connect to hotspot 2, and then
hotspot 3.
Note
y
The BlackVue DR750S-1CH, DR750S-2CH is not compatible with 5GHz wireless networks.

DR750S-2CH
69
Push notication settings
You can customize when you want to receive push notications.

70
BLACKVUE
FW Language
You can change the Firmware language of your dashcam.

DR750S-2CH
71
Changing settings using your computer (Windows/Mac)
Click on the Settings button (Windows) or the menu (mac OS) to open the BlackVue settings panel. You
will be able to change most of the BlackVue settings to customize its operation.

72
BLACKVUE
BlackVue Viewer settings
Select language
Select your preferred language for the BlackVue Viewer interface from the dropdown list.
Speed unit on map
Change the speed unit displayed on the map.
Select map service
Change the mapping service used.

DR750S-2CH
73
Firmware settings
Select your preferred language for the rmware from the FW language dropdown list. The audio announcements by the dashcam will be in
the selected language.
Caution
y
Please backup necessary recordings before changing time, video resolution, image quality or video segment length settings.
If any of the aforementioned settings are changed and saved, the dashcam will format the microSD card and delete all recordings
stored on the card including locked event les in order to ensure optimal performance.

74
BLACKVUE
Basic settings
Time settings
Select your time zone to auto-sync with GPS time or you can set the time and date manually after enabling Manual time setting.
Note
y
The factory setting is GMT -11.
Some examples of GMT time osets are:
- GMT-7: Los Angeles
- GMT-4: New York
- GMT+0: London
- GMT+1: Paris
- GMT+3: Moscow
- GMT+8: Singapore
- GMT+9: Seoul
- GMT+10: Sydney
If you are unsure of your GMT oset please look up your city on https://greenwichmeantime.com/
*Selecting Daylight saving time will advance the clock by one hour.
y
When setting the time manually, please set tothe expected time you willusethe BlackVue ( not the present time).

DR750S-2CH
75
Video settings
– Resolution
Select the resolution and frame rate. For example, "FHD@30 + FHD@30" means the front camera records Full HD video at 30 frames per
second, and the rear camera records Full HD video at 30 frames per second.
Note
y
At “FHD@60+FHD@30” resolution , the image quality is automatically set to Highest and Video segment length to 1 min. These
settings can not be changed.
y
Frame rate may vary during Wi-Fi streaming.
– Image quality
You can adjust the recording image quality (bit rate). Choose between:
y
Highest (Front: 12 Mbit/s, Rear: 10 Mbit/s)
y
High (Front: 10 Mbit/s, Rear: 8 Mbit/s)
y
Normal (Front: 8 Mbit/s, Rear: 6 Mbit/s)
These are the maximum bit rates when the resolution is set to "FHD@30 + FHD@30". If you lower the resolution and frame rate setting, the
actual bit rates will be lower.
Increasing the image quality will increase the size of the video les. Loading and copying time will increase accordingly.
– Enhanced night vision
The dashcam has intrinsic night vision feature. If you want to enhance it, enable Enhanced night vision.
– Brightness (Front)
You can adjust the recording brightness level of the front camera.
– Brightness (Rear)
You can adjust the recording brightness level of the rear camera.

76
BLACKVUE
Recording settings
– Normal recording
When turned o the dashcam does not record in normal mode.
– Automatic parking mode
If enabled, the dashcam switches from normal mode to parking mode when the vehicle is stationary for 5 minutes.
– Voice recording
When turned o the dashcam does not record audio.
– Date & time display
Turn on/o the date and time display on videos.
– Speed unit
Select km/h, MPH, or turn o.
– Video segment length
Choose between 1, 2 or 3 minute video segment lengths.
DR750S-2CH
77
– Lock event les
Turning on this option will lock the following recording types and stop them from being overwritten by newer recordings:
- Impact event recordings during normal and parking mode (E); and
- Manual recordings (M).
A maximum of 50 les can be locked. Once this limit is reached, to lock new recordings please review locked les on the microSD card and
free up space, or enable ‘Overwrite locked event les when full’ to allow the oldest locked les to be overwritten.
– Rear camera rotation
If you installed the rear camera in a ipped position, use this setting to rotate the rear camera image 180°.

78
BLACKVUE
Sensitivity settings
G-Sensor (Normal mode) / G-Sensor (Parking mode)
The G-sensor measures the movement of your vehicle through 3 axes – up and down, side to side, and front and back. When the G-sensor
detects signicant or sudden movement (such as an impact or collision) it will trigger an event recording. You can adjust the sensitivity so
minor incidents and bumps don't trigger an event recording. To turn o event recordings by impact detection set the G-sensor sensitivity
to o.

DR750S-2CH
79
Motion detection (Parking mode)
In parking mode the dashcam continuously buers video and saves a parking recording when motion is detected in the dashcam's eld of
view.
You can adjust the sensitivity of the motion detection so minor motion caused by wind or rain doesn't trigger a recording. Please take into
account your vehicle's surroundings when adjusting the sensitivity.
Advanced sensitivity settings for normal and parking mode
Advanced sensitivity settings allows you to ne-tune the event recording G-Sensor threshold, while watching pre-recorded G-Sensor data
and video as a reference.

80
BLACKVUE
1
Click the Advanced settings button.
2
Double click the video from the list that you want to use as a G-Sensor data reference.
3
Set the thresholds by adjusting the control bars next to each G-Sensor axis. Any G-Sensor data that crosses over the threshold on any
of the 3 axes will trigger an Event recording.
Event recording will occur No event recording will occur
4
Click Save and close.

DR750S-2CH
81
System settings
LED
– Recording status
You can turn the recording status LED on/o.
– Front security (Normal mode)
You can turn the front security LED on/o for normal mode.

82
BLACKVUE
– Front security (Parking mode)
You can turn the front security LED on/o for parking mode.
– Rear security
You can turn the rear security LED on/o.
– Wi-Fi (Parking mode)
You can turn the Wi-Fi LED on/o for parking mode.
Proximity Sensor
You can choose the function of proximity sensor. It can be congured either for audio recording on/o feature or to trigger manual
recording.
Voice guidance
You can adjust the voice guidance (announcements) you want to hear.
Volume
You can adjust the volume of the voice guidance (announcements).
Scheduled Reboot
The dashcam reboots automatically once-a-day if in parking mode at the set time for improved stability. If the dashcam is recording at the
set time, the scheduled reboot is skipped.
You can enable/disable and change the time for scheduled rebooting. Default time is 03:00 am.

DR750S-2CH
83
Speed alert
Set a speed limit (up to 300 km/h or 200 MPH) for the speed alert. When the vehicle exceeds the specied speed limit, the dashcam beeps
and switches to event recording. After saving one event recording le the dashcam switches back to normal mode recording.
User text overlay
You can create a user text overlay of up to 20 characters using a combination of English letters (A – Z, a – z), numbers (0 – 9), and symbols
(:;‘/+-_()$#). The text is overlaid in the top-left corner of the recorded videos.

84
BLACKVUE
Wi-Fi settings
Login credentials
You can change the dashcam's SSID and Wi-Fi login password.
Wi-Fi auto turn o
When the Cloud service is enabled the Wi-Fi auto turn o setting cannot be adjusted. Wi-Fi will automatically switch on when you turn on
the dashcam and remain on.
If you disable the Cloud service, you will be able to adjust the Wi-Fi auto turn o setting.
ON OFF
Wi-Fi auto turn o Wi-Fi turns o if it is inactive for 10 minutes. Wi-Fi does not turn o automatically.

DR750S-2CH
85
Cloud settings
Enable Cloud service
If you don't use the Cloud service you can turn it o.

86
BLACKVUE
Cloud service hotspot settings
Up to 3 Wi-Fi hotspot SSIDs can be saved (e.g. home, portable hotspot and work). Choose your Wi-Fi hotspot from the list and enter the
password. Tap 2 and 3 to add settings for additional hotspots.
Your BlackVue will try to connect to hotspot 1 rst. If it cannot connect to hotspot 1, it will then try to connect to hotspot 2, and then
hotspot 3.
Note
y
The DR750S-1CH, DR750S-2CH dashcam is not compatible with 5GHz wireless networks.
Push notication settings
You can customize when you want to receive push notications.
Applying the settings
You can automatically apply the conguration by inserting the microSD card into the BlackVue dashcam and turning it on. Congure the
settings before using the dashcam.
To reset all settings to their defaults press the Reset button at the bottom of the settings panel.

DR750S-2CH
87
About the Cloud Service
Using a mobile Wi-Fi hotspot or a car-embedded wireless internet connection you can connect your dashcam to the internet and take
advantage of the following features in the BlackVue app and BlackVue Cloud Viewer:
Live View – Watch your dashcam's live video feed.
Push notications – Be notied on your smartphone when something happens to your car.
GPS tracking – See in real-time where your car is and track your car's route and speed.
Two-way voice communication – Initiate voice chat from your smartphone to your dashcam.
Video backup – Backup video recordings to the Cloud or your smartphone's storage.
Video playback – Watch recorded videos stored on your dashcam or in the Cloud on your smartphone anywhere, anytime.
Connect to BLACKVUE CLOUD (Optional)
If you don't have a mobile Wi-Fi hotspot, or if you don't want to use the BLACKVUE CLOUD service, you can skip this step.
If you have a mobile Wi-Fi hotspot (also known as a portable Wi-Fi router), a car-embedded wireless internet network or a Wi-Fi network
near your car, you can use the BlackVue app to connect to BLACKVUE CLOUD and see in real-time where your car is and the dashcam's live
video feed.
For more information about using the BlackVue app, please download the BlackVue app Manual from www.blackvue.com > Support >
Downloads.
1
Create an account
(i) Open the BlackVue app.
(ii) Tap the button in the top-left corner and select Create account.
(iii) Enter your email address and choose a password. Re-enter your password and press Next.
(iv) After reading the Terms & Policies, check the boxes and press the Create account button to continue.
(v) You will receive an e-mail. Click the link in the email to nish creating your account.

88
BLACKVUE
2
Register your dashcam with your account
(i) In the BlackVue app select BLACKVUE CLOUD and login to your account.
(ii) Tap Yes to enable push notications (this setting can be adjusted at any time later).
(iii) Select Register new camera.
(iv) Register your camera using one of the following methods:
QR Code: Press Scan QR Code and line up the QR Code on your smartphone’s screen.
*The QR code can be found labeled on the front camera when you remove it from its mount.
or
Manual registration: Enter your camera’s Serial number and Cloud code and press Register.
(v) The app will ask for your permission to access your dashcam's GPS data. If you allow access the app will be able to show you
your dashcam's location and speed. If you don't allow access you won't be able to see your dashcam's location and speed (you
can allow access later in Privacy settings).

DR750S-2CH
89
3
Connect your BlackVue dashcam to a Wi-Fi hotspot for Cloud connectivity
Click here for a step-by-step video tutorial, or go to the main menu and select Help > Video tutorials.
(i) Make sure your BlackVue dashcam and mobile Wi-Fi hotspot are on.
(ii) “Pair” your smartphone with the BlackVue dashcam via direct Wi-Fi.
(iii) Open the BlackVue app. Select BLACKVUE WI-FI > > Cloud settings.
(iv) Ensure Enable Cloud service is on. Select Cloud service hotspot settings.

90
BLACKVUE
(v) Choose your Wi-Fi hotspot from the list and enter the password. Tap 2 and 3 to add settings for additional hotspots. Once done,
tap OK.
Note
y
Up to 3 Wi-Fi hotspot SSIDs can be saved (e.g. home, portable hotspot and work).
y
The DR750S-1CH, DR750S-2CH dashcam is not compatible with 5GHz wireless networks.

DR750S-2CH
91
(vi) Go back to the Firmware settings menu, tap and tap Save and close.
After rebooting, your dashcam will automatically connect to the Wi-Fi hotspot.
Select BLACKVUE CLOUD from the main screen to access all of the Cloud features.
Note
y
You can also change the dashcam settings through BLACKVUE CLOUD by going tapping next to your camera name and select
Camera settings.
y
For more information about using the BlackVue app, please refer to the manual by going to the main menu and selecting Help >
App manual.

92
BLACKVUE
Optional accessories
Parking mode hardwiring kit (Optional)
The BlackVue dashcam will turn o when the engine is turned o. To record video while the engine is turned o, a hardwiring kit (such as
the Power Magic Pro) is required. The Power Magic Pro powers your dashcam when the engine is o by hardwiring it to the automotive
battery. A low voltage power cut-o function and a parking mode timer protect your vehicle's battery from discharge.
Dashcam
Power Magirc Pro
Fuse Panel

DR750S-2CH
93
Parking mode battery pack (Optional)
To record video when the engine is turned o without using the vehicle's battery, you can install a parking mode battery pack. The Power
Magic Battery Pack B-112 powers a single dashcam for up to 12 hours after 1 hour of rapid charging. When the engine is o the battery
pack powers the dashcam. When the engine is on the dashcam is powered directly from the vehicle's battery and the battery pack charges.

94
BLACKVUE
Troubleshooting
Changing / resetting direct Wi-Fi SSID and password
The dashcam's Wi-Fi SSID and password can be changed/reset using on of the following methods.
On-device Wi-Fi SSID and password reset
Press and hold the Wi-Fi button on the dashcam, for 5 seconds and once voice instructions start, release the button. Then press once again
to reset the Wi-Fi SSID and password to default.
*The default Wi-Fi SSID and password can be found labeled on the front camera when you remove it from its mount.

DR750S-2CH
95
Change Wi-Fi SSID and password over the Cloud
1
Login to the BlackVue app.
2
Select BLACKVUE CLOUD.
Note
y
You can access FW settings Over the Cloud only when the dashcam is ON and connected to the internet (Cloud). A blue colored
icon means the dashcam is connected to the Cloud while a grey colored icon means that the dashcam is not connected to the
Cloud.
3
Tap next to your camera name and select Camera settings > Firmware settings > Wi-Fi > Login credentials.
You can change the camera's SSID and Wi-Fi login password.

96
BLACKVUE
4
Go back to the Firmware settings menu, tap and tap Save and close.

DR750S-2CH
97
Change the Wi-Fi password using BlackVue Viewer (Windows or Mac)
1
Remove the microSD card from the dashcam.
2
Insert the card into the microSD card reader and connect it to a computer.
3
Launch BlackVue viewer.
*You can download BlackVue Viewer from www.blackvue.com > Support > Downloads and install it on your computer.
4
In BlackVue Viewer click on the Settings button (Windows) or the menu (macOS) to open the
BlackVue settings panel.
5
Click the Firmware tab, then the Wi-Fi tab and under Login credentials change the password.
6
Click Save and close.

98
BLACKVUE
Product specications
Model Name DR750S-2CH
Color/Size/Weight
Front: Black / Width 118.5 mm x Height 36 mm / 90 g
Rear: Black / Width 67.4 mm x Height 25 mm / 25 g
Memory microSD Card (16 GB / 32 GB / 64 GB/ 128 GB)
Recording Modes
Normal recording, Event recording (when impact is detected in normal and parking mode), Manual
recording and Parking recording (when motion is detected)
* For Parking mode recording, a Parking Mode Battery Pack (Power Magic Battery Pack) or a Parking
Mode Hardwiring Kit (Power Magic Pro) is required.
Camera
Front: STARVIS™ CMOS Sensor (Approx. 2.1 M Pixel)
Rear: STARVIS™ CMOS Sensor (Approx. 2.1 M Pixel)
Viewing Angle
Front: Diagonal 139°, Horizontal 116°, Vertical 61°
Rear: Diagonal 139°, Horizontal 116°, Vertical 61°
Resolution/Frame Rate
<Front - Rear>
Full HD (1920x1080) @60fps - Full HD (1920x1080) @30fps (Sports)
Full HD (1920x1080) @30fps - Full HD (1920x1080) @30fps
Full HD (1920x1080) @30fps - HD (1280x720) @30fps
HD (1280x720) @30fps - HD (1280x720) @30fps
*Frame rate may vary during Wi-Fi streaming.
Image Quality Highest, High, Normal
Video Compression Mode MP4
Wi-Fi Built-in (802.11n (2.4 − 2.4835 GHz))
GPS Built-in
Microphone Built-in
Speaker (Voice Guidance) Built-in
LED Indicators
Front: Recording LED, GPS LED, Wi-Fi LED, Front Security LED
Rear: Rear Security LED

DR750S-2CH
99
Button
Wi-Fi / Format button:
Press once to turn on/o Wi-Fi.
Press and hold for 5seconds and once voice commands start, release the button. Then press once
again to reset the Wi-Fi SSID and password or press and hold for 5seconds to format the microSD card.
Proximity sensor:
Touching the proximity sensor turns on/o audio recording or triggers manual recording depending on
the rmware settings.
Sensor 3-Axis Acceleration Sensor
Backup Battery Built-in super capacitor
Input Power DC 12 V - 24 V (DC Plug:
(Ø3.5 x Ø1.35), MAX 1 A/12 V)
Power Consumption
Avg. 350 mA (4.2 W at 12 V, when GPS and Wi-Fi is On)
Avg. 300 mA (3.6 W at 12 V, when GPS and Wi-Fi is O)
Actual power consumption may vary depending on use conditions and environment.
Operation Temperature -20 °C − 70 °C (-4 °F − 158 °F)
Storage Temperature -20 °C − 70 °C (-4 °F − 158 °F )
High Temperature Cut-O Approx. 80 °C (176 °F)
Certications
Front: FCC, CE, RoHS, Telec, WEEE
Rear: FCC, CE, RoHS, WEEE
Software
BlackVue Viewer
Windows XP or higher and Mac Yosemite OS X (10.10) or higher
Application BlackVue Application (Android 4.4.2 or higher, iOS 9.0 or higher)
Others Adaptive Format Free File Management System
* STARVIS is a trademark of Sony Corporation.

100
BLACKVUE
Recording time
Your dashcam will automatically turn on and start recording when it is connected to a power source.
Resolution
Memory Capacity
FHD @ 60 + FHD @ 30 FHD @ 30 + FHD @ 30 FHD @ 30 + HD @ 30 HD @ 30 + HD @ 30
16GB
Highest 1 HR 25 MIN 1 HR 25 MIN 1 HR 35 MIN 2 HR
High x 1 HR 50 MIN 2 HR 2 HR 40 MIN
Normal x 2 HR 20 MIN 2 HR 40 MIN 4 HR
32GB
Highest 2 HR 50 MIN 2 HR 50 MIN 3 HR 10 MIN 4 HR
High x 3 HR 40 MIN 4 HR 5 HR 20 MIN
Normal x 4 HR 40 MIN 5 HR 20 MIN 8 HR
64GB
Highest 5 HR 40 MIN 5 HR 40 MIN 6 HR 20 MIN 8 HR
High x 7 HR 20 MIN 8 HR 10 HR 40 MIN
Normal x 9 HR 20 MIN 10 HR 40 MIN 16 HR
128GB
Highest 11 HR 20 MIN 11 HR 20 MIN 12 HR 40 MIN 16 HR
High x 15 HR 40 MIN 16 HR 21 HR 20 MIN
Normal x 18 HR 40 MIN 21 HR 20 MIN 32 HR
Bitrate
Front
Highest 12 Mbps 12 Mbps 12 Mbps 8 Mbps
High x 10 Mbps 10 Mbps 6 Mbps
Normal x 8 Mbps 8 Mbps 4 Mbps
Rear
Highest 10 Mbps 10 Mbps 8 Mbps 8 Mbps
High x 8 Mbps 6 Mbps 6 Mbps
Normal x 6 Mbps 4 Mbps 4 Mbps
Note
y
If the microSD card is full, older les are deleted rst to make space for newly-recorded videos.
y
Total recording time is dierent depending on the memory capacity of the microSD card and the resolution of the video.

DR750S-2CH
101
Disposal and recycling information
Disposal of your BlackVue dashcam
1. All electrical and electronic products should be disposed of separately from the municipal waste stream via
designated collection facilities appointed by the government or the local authorities. Contact local authorities to learn
about disposal and recycling options available in your area.
2. The correct disposal of your BlackVue dashcam will help prevent potential negative consequences for the environment
and human health.
3. For more detailed information about disposal of your BlackVue dashcam, please contact your city oce, waste
disposal service or the shop where you purchased the product.

102
BLACKVUE
Before Requesting Service
Please back up all important les and data before requesting service. In order to service the dashcam it may be necessary to delete all
les and data from the dashcam. All servicing is provided on the basis that the user has backed up all necessary les and data before
requesting service. Therefore Pittasoft Co., Ltd. will not be responsible for the loss of any les or data.
Customer Support
For customer support and rmware updates please visit www.blackvue.com
You can also email a Customer Support expert at cs@pittasoft.com
Copyright & Trademark
y
This instruction manual is protected by Copyright Law, and all rights to it are protected by law.
y
It is prohibited to reproduce, copy, modify, or translate this instruction manual without permission.
BlackVue is the registered trademark of Pittasoft Co., Ltd. Pittasoft Co., Ltd. reserves all rights regarding all works
related to the BlackVue brand such as product design, trademarks, and product-promotional videos. It is prohibited to reproduce,
copy, modify, or use related works without permission. Any violation may be penalized in accordance with the relevant regulations.
YCK-DR750S-2CH

YCK-DR750S-2CH
