©2022 Charles Hosmer Morse Foundation, Inc. 1 morsemuseum.org/create-explore
GRADES/LEVEL:
K–5th grade/Elementary
TIME REQUIRED:
30-40 minutes + drying time
LESSON PLAN:
Students will:
• learn about American painter Albert Bierstadt.
• learn about and apply the decalcomania technique to an original artwork.
• create a finished two-dimensional artwork inspired by Bierstadt.
MATERIALS:
• Printer
• Butterfly template (see end of lesson)
• White copy paper
• Water-based paint (acrylic, watercolor, tempera, etc.)
• Paintbrushes
• Cup for water
• Large popsicle sticks
• Sharpie® markers
• Tin foil (for activity extension)
VOCABULARY:
Asymmetry: the lack or absence of symmetry; an image that is not the same on both sides but
still maintains artistic balance.
Decalcomania: a technique developed in the 18th century and adopted by the Surrealists
where a wet medium (ink, paint, etc.) is spread onto a surface (paper, glass, etc.) and covered
with another material (paper, glass, tin foil, canvas, etc.). When the covering material is removed,
the medium stays on the new surface creating new, spontaneous art.
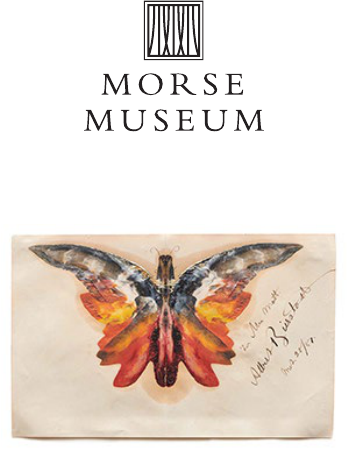
Butterfly, 1887. Oil on paper, Albert Bierstadt, American, 1830–1902;
4 7/8 x 7 3/4 in.; gift of Theodore E. and Susan Cragg Stebbins (2020-004:3).
Bierstadt’s butterflies

©2022 Charles Hosmer Morse Foundation, Inc. morsemuseum.org/create-explore2
Symmetry: something that is even in design and proportion; a well-proportioned,
well-balanced work of art that is the same on both sides.
ACTIVITY DESCRIPTION:
Decalcomania was a technique favored by Surrealist artists to create “impromptu” paintings.
These artists would apply paint (or another medium) to a surface and then press another surface
to the wet medium, transferring the image. The resulting print would often trigger the imagi-
nation as new shapes and images would appear. Artists could then embellish the new image to
reinforce these new images. The Lion-Bicycle (1936) by Óscar M. Domínguez (1906–57) is
an excellent example of decalcomania.
The Surrealist’s methods were not the only way to create spontaneous art. Albert Bierstadt
(1830–1902), best known for his large landscapes, employed a similar technique to create small
keepsakes for his dinner guests. The process was described by a reporter as such:
“Two or three daubs of pigment on the paper, a quick fold, and holding it still folded against a pane of
glass, he made two or three strokes of that wizard-like palette knife on the outside, and hey, presto!
a wonderful Brazilian butterfly or moth, even the veining on the wings complete! A pencil touch
added the antennae, that artist’s autograph was added to the corner, and now we each of us own a
painting by Bierstadt.”
—as quoted in Gordon Hendricks, Albert Bierstadt: Painter of the American West, 1974,
p. 302-303.
INSTRUCTIONS:
1) Ahead of project, cover tables with paper to protect from paint.
2) Give each student a piece of copy paper and the butterfly template. Have students fold both
papers in half. For the butterfly template, fold inward so only the light outline of the butter-
fly can be seen. Place the plain copy paper inside the butterfly template aligning the creases.
3) As a class, examine Albert Bierstadt’s Butterfly at
https://www.morsemuseum.org/collection-highlights/paintings/albert-bierstadt-
butterfly-painting. Point out the different paint strokes on the wings and how the arrows
on the butterfly template mimic these strokes.

©2022 Charles Hosmer Morse Foundation, Inc. morsemuseum.org/create-explore3
4) Keeping the template in place, have students carefully open both pages to reveal the outline
of the butterfly wing through the blank copy paper. Students will only paint on the right
side of the paper. Pass out paintbrushes and various colors of paint to students. Have students
select two paint colors. Instruct students to paint a generous, thick line of each color, one
next to the other, following the line of any arrow on the wing. Repeat with the remaining
four arrows using different paint pairings. NOTE: White paint makes a nice complement
when paired with vibrant colors.
5) Next, have students carefully fold the left side of the blank copy paper and template over the
right side; the sides should touch, but avoid spreading the paints.
6) Have students gently press the popsicle stick following the arrows of the butterfly template.
Students should go over their lines multiple times, rotating the popsicle stick at different
angles to create unique patterns and designs.
7) Once students are satisfied with the lines that have been created, have them carefully peel the
paper apart to reveal the butterfly.

©2022 Charles Hosmer Morse Foundation, Inc. morsemuseum.org/create-explore4
8) Have students use a Sharpie® marker to add antennae to their butterfly. Be sure to have
students sign their names just like Albert Bierstadt!
9) DECALCOMANIA ACTIVTY EXTENSION: Give each student a piece of 8 1/2" × 11"
in. tin foil. While paint from the butterfly artwork is still wet, have students align the foil
and artwork and gently press the two together with their fingertips. Make sure students do
not let the pages slide. Have students carefully peel the two apart to reveal a new impression.
Ask students if their print looks like their butterfly or do they see something new? Students
can use the Sharpie® marker to add details to the new image to reinforce what they see.
10) Allow artwork to dry and display.
ASSESSMENT:
Students should:
• be able to recognize symmetry and asymmetry in examples of artwork as well as in their
original artwork.
• be able to describe the purpose of the decalcomania technique.
• identify where different elements of art (line, shape, color, texture, space, form, and value)
appear in their original artwork.

©2022 Charles Hosmer Morse Foundation, Inc. morsemuseum.org/create-explore5
FoldFold
Fold Fold
butterfly template
