
The information provided here is solely for informational purposes. It is not an offer to buy or sell any of the securities,
insurance products, investments or other products named.
If you have any questions or need assistance, please contact us at 1-800-846-5200 or TTY: 1-800-788-6775.
Citi Personal Wealth Management is a business of Citigroup Inc., which offers investment products through Citigroup
Global Markets Inc. ("CGMI"), member SIPC. Insurance products are offered through Citigroup Life Agency LLC ("CLA"). In
California, CLA does business as Citigroup Life Insurance Agency, LLC (license number 0G56746). CGMI, CLA and
Citibank, N.A. are affiliated companies under the common control of Citigroup Inc.
© 2015 Citigroup Inc. Citi and Citi with Arc Design are registered service marks of Citigroup Inc. or its affiliates.
User Guide
Accessing your Citi investment accounts online
Citibankonline.com Investments tab
Investments.citi.com
NetXInvestor Mobile app
Revised 9/19/2014
INVESTMENT AND INSURANCE PRODUCTS: NOT FDIC INSURED • NOT A BANK DEPOSIT
• NOT INSURED BY ANY FEDERAL GOVERNMENT AGENCY • NO BANK GUARANTEE
• MAY LOSE VALUE

Table of Contents
1. Introduction .......................................................................................................................... 5
Audience ............................................................................................................................... 5
2. Overview ............................................................................................................................... 6
Navigation ............................................................................................................................. 6
Browser Requirements ....................................................................................................... 6
Other Information ................................................................................................................ 7
3. Access the Website ............................................................................................................ 8
First Time Login ................................................................................................................... 8
Subsequent Logins ............................................................................................................. 8
Logout ................................................................................................................................... 8
Identity Verification Code (IVC) ......................................................................................... 9
4. Manage Account Settings & Preferences ..................................................................... 11
Change Password ............................................................................................................. 11
Security-Protect masked data ......................................................................................... 11
Account Linking ................................................................................................................. 12
Account Nickname ............................................................................................................ 12
Account Groups ................................................................................................................. 13
Create a New Group ................................................................................................... 13
Edit a Group ................................................................................................................. 14
Delete a Group ............................................................................................................ 14
Brokerage Alerts ................................................................................................................ 14
Set Up Brokerage Alert .............................................................................................. 15
Subscribe Trade, Activity and Margin Call Alerts ................................................... 16
Subscribe Price Alerts ................................................................................................ 16
Create a Watchlist ............................................................................................................. 17
Subscribe Watchlist Alerts ............................................................................................... 17
Delivery Settings and Hold Alerts for Brokerage Alerts .............................................. 18
5. Electronic Delivery ............................................................................................................ 19
Add E-mail Addresses ...................................................................................................... 19
Set Up e-Delivery for an Individual Account ................................................................. 20
3
Set Up e-Delivery for Multiple Accounts using Quick Enroll ....................................... 20
View Statements & Reports ............................................................................................. 21
View Trade Confirmations................................................................................................ 21
View Tax Documents ........................................................................................................ 22
View Notifications .............................................................................................................. 22
6. Account Portfolio ............................................................................................................... 24
Overview ............................................................................................................................. 24
Portfolio Changes ........................................................................................................ 24
Quick Links ................................................................................................................... 25
Composition of Holdings ............................................................................................ 25
Quick Trade .................................................................................................................. 25
Open Orders & Executed Trades ............................................................................. 25
Strong & Weak Performers ........................................................................................ 26
Portfolio History ........................................................................................................... 26
News.............................................................................................................................. 27
Balances ............................................................................................................................. 28
Holdings .............................................................................................................................. 29
Non Dollar transactions on Non US exchanges valued at foreign currency of the
exchange ...................................................................................................................... 30
Realized Gain/Loss ........................................................................................................... 32
History ................................................................................................................................. 34
Projected Cash Flow ......................................................................................................... 35
7. Transact .............................................................................................................................. 36
Trade Equities .................................................................................................................... 36
Enter a Buy Equity Trade ........................................................................................... 36
Enter a Sell Equity Trade ........................................................................................... 37
Edit an Equity Trade ................................................................................................... 38
Order a Mutual Fund Prospectus ................................................................................... 39
Trade Mutual Funds .......................................................................................................... 40
Purchase a Mutual Fund ............................................................................................ 40
Exchange a Mutual Fund ........................................................................................... 41
Redeem a Mutual Fund .............................................................................................. 41
Trade Options .................................................................................................................... 42
4
Buy Call or Put Option Order ..................................................................................... 42
Close Call or Put Option Order ................................................................................. 43
Fixed Income Trading ....................................................................................................... 44
Ability to SSO to BondDesk from .............................................................................. 44
529 Plans ............................................................................................................................ 45
Viewing 529 plan allocations ..................................................................................... 45
View Order Status ............................................................................................................. 46
Cancel an Order ................................................................................................................ 47
8. Research ............................................................................................................................ 48
Markets ............................................................................................................................... 48
Quotes & News .................................................................................................................. 48
Investing Tools ................................................................................................................... 49
Rate board .......................................................................................................................... 50
9. Sort, Filter, Download and Print ...................................................................................... 51
Sort ...................................................................................................................................... 51
Filter ..................................................................................................................................... 51
Download ............................................................................................................................ 52
Generate Adobe PDF ....................................................................................................... 52
Print ..................................................................................................................................... 53
10. NetXInvestor Mobile App ................................................................................................. 54
5
1.
Introduction
This guide will familiarize you with the capabilities and functions of
the “Investments” tab of CitibankOnline.com
the standalone site, investments.citi.com
NetXInvestor Mobile App.
Audience
This guide is to be used by you, the investor, to learn how to:
Access the platform
Navigate through the platform
Manage your account preferences
View your account portfolio
Place trades

6
2.
Overview
The “investments.citi.com” site is an online platform enabling you to access account information,
place trades, view trade status, get quotes, and perform market research, read news and much
more. You can also view your account, tax statements and trade confirmations online.
Navigation
Enables You To:
Advisor Home
View the contact information of the financial professional for all accounts
linked to your user ID. The advisor information displayed is the same as
what appears on your account statement.
Portfolio
View the snapshot view of your account overview. Along with the snapshot
view, you can also view: balances, holdings, unrealized gain/loss, realized
gain/loss, history and projected cash flow.
Transact
Place a new equity, mutual fund, or option order. Apart from placing new
orders, you can also view the order status, commission schedule.
Research
View how the market is performing today. You can also view quotes of
recently visited stocks, news relating to the visited stocks, create watch
lists to monitor the required stocks and much more.
Tools
Create and view watch lists, view educational resources and helpful links.
Communications
View and download statements, reports, trade confirmations, tax
documents, and read through the frequently asked questions compiled by
the broker-dealer. You can create new account groups, nickname your
accounts, and change your password and security questions. You can
also set your e-delivery preferences.
*Note - Tax Documents - Citi does not provide tax or legal advice.”
Browser Requirements
The Investments site platform supports the following browsers:
Google Chrome Version 23.x and higher
Mozilla Firefox Version 17.x and higher
Microsoft Internet Explorer Version 8 and 9
Apple Safari Version 4.x and higher
7
Other Information
Data displayed in the screen shots represents sample data.
Shortcut keys are not supported for any of the functions.
Tab control on all screens is from top to bottom, left to right.
Screen names, buttons, links are provided in bold.
Text provided as part of the note, tip is for information.
8
3.
Access the Website
First Time Login
1. Go to the investments site, either through the Investments tab of CitibankOnline.com or
through direct login to investments.citi.com
2. If you are using the investments.citi.com site, in the User ID field, type your login ID for the
standalone site and click Continue. (If you are accessing the investment website through
the Investments tab of Citibankonline.com please use login credentials for
Citibankonline.com and disregard the login instructions below)
3. In the Enter Password field, type the temporary password and click Continue. The Change
Password section displays.
4. In the Old Password field, type the temporary password.
5. In the New Password and Confirm New Password fields, type the new password.
6. Click Continue. The Identity Verification Code (IVC) setup page displays.
7. Enter the Personal information details (Name, Phone Number, IVC preference) and click
on Continue.
8. Click Save. The Security Image page displays.
9. Select a personalized security image and click Continue. The Security Phrase page
displays.
10. Type your personalized security phrase and click Continue. The Security Review
page displays.
11. Review your selections and click Continue. The Home page displays.
12. Click the Update Preferences button to set up your e-delivery instructions.
After setting up the e-delivery instructions, the home page displays.
Subsequent Logins
1. Go to the site, investments.citi.com
2. In the User ID field, type your login ID and click Continue.
3. Confirm that your security picture and phrase are correct.
4. In the Enter Password field, type your password and click Continue. The home page
is displayed
Logout
On the home page, click Logout.

9
Identity Verification Code (IVC)
Identity Verification Code (IVC) is the latest way of protecting users’ online security.
Whenever the system recognizes that you are using a new device to log in to the Investment
website, the system will prompt you to generate an identity verification code, and to enter it to
validate the user’s identity.
The code is sent you via the preferred contact method (SMS or Voice) selected and set up by
you on your first login into the system. The IVC code will be valid for 5 minutes.
Once a valid identity verification code is entered, the system will direct you to the
password page.
After the password is validated, you are able to access the website.

10

11
4.
Manage Account Settings & Preferences
The site has options to manage your account settings and preferences, such as changing your
password, security questions, creating an account group, or adding a nickname.
Change Password
1.
On the home page, click the Settings icon [ ]. The Settings page displays.
2.
In the Security Settings section, click the Edit link in the Password row.
3.
In the Enter Password field, type your current password and click Continue.
4. In the New Password and Confirm New Password fields, type your new password and click
Continue. A message displays stating the password has been successfully changed.
5.
Click the OK button to continue.
Security-Protect masked data
Please note: When logging into the site and entering an incorrect password, the refreshed screen
will blank out the ‘Password’ field when it renders the incorrect password message.

12
Account Linking
Account linking enables you to link all accounts which have the same Social Security number as
yours. Through account linking, you can access all your account information from one place. You
can link account (s) only if you had created your user ID via online self-registration.
1. On the home page, click the Settings icon. The Settings page displays.
2. In the Account Linking section, select the account to link by clicking on the check box and
click Submit.
Account Nickname
A nickname enables you to quickly identify your accounts. The nickname is displayed to the left of
the account number.

13
1. On the home page, click the Settings icon. The Settings page displays.
2. In the Accounts area, click the (+) icon against the required account.
3. In the space provided, type a nickname for the account and click the Save Nickname button.
Account Groups
An account group is a collection of accounts. The investment portfolio of an account group can be
accessed from a single place. You can create, modify or delete a group.
Account group name can have up to 25 characters and contain
alphanumeric characters, spaces, hyphens and apostrophes.
Account group must contain a minimum of two accounts.
Duplicate account groups cannot be created.
Accounts can exist in more than one account group.
Create a New Group
1. On the home page, click the Settings icon. The Settings page displays.
2. In the Accounts & Groups section, click the Groups link.
3. Click the Add New Group link. The Add New Group window displays.
4. In the Group Name field, type a name for the group.
5. In the All Account list, select the required accounts and click the Add link. To remove an
account, select the required accounts in the right box and click the Remove link.
Tip: You can select multiple and continuous accounts by pressing Shift in the keyboard
and selecting the accounts. You can select multiple and random accounts by pressing Ctrl
in the keyboard and selecting the accounts.
6. Click the Save Groups button. The group is created and will be listed under Groups.

14
Edit a Group
1. On the home page, click the Settings icon. The Settings page displays.
2. In the Accounts & Groups section, click the Groups link.
3. Click the Edit icon. The Edit Group window displays.
4. You can edit the following:
o
Group Name—In the Group Name field, type a new name for the group.
o
Add or Remove Accounts—To add an account, select the account in the All Account
list and click the Add link. To remove an account, select the account in the right box and
click the Remove link.
Tip: You can select multiple and continuous accounts by pressing Shift in the
keyboard and selecting the accounts. You can select multiple and random accounts
by pressing Ctrl in the keyboard and selecting the accounts.
5. Click the Save Groups button. The group is edited and will be listed under Groups.
Delete a Group
1. On the home page, click the Settings icon. The Settings page displays.
2. In the Accounts & Groups section, click the Groups link.
3. Click the Delete icon. A warning window displays.
4. In the warning window, click Yes to delete the group, else click No.
Brokerage Alerts
The Brokerage Alerts service allows you to receive alerts about account activity or stock prices.
You can either retrieve the alerts online or have the alerts delivered to your e-mail address or cell
phone device. You can set up the following types of alerts:
Trade
Activity
Margin Call
Watchlist
Price Volume & News

15
Set Up Brokerage Alert
1. On the home page, click the Settings icon. The Settings page displays.
2. In the Alerts Setup section, click the Brokerage Alerts Set-up Guide link. A window
displays the terms and conditions.
3. Read through the terms & conditions and click I Agree.
4. Click the Add Device(s) link. The Device(s) window displays.
5. In the E-mail Address 1 and Re-Type E-mail Address 1 fields, type the primary e-mail
address to which you want the alert delivered, if desired.
6. Select the delivery format of the alert, Plain Text or HTML.
7. In the E-mail Address 2 and Re-Type E-mail Address 2 fields, type the secondary e-mail
address to which you want the alert delivered, if desired.
8. Select the delivery format of the alert, Plain Text or HTML.
9. To deliver the alert to your cell phone device, select the service provider from the Service
Provider list and type your phone number in the Phone Number field.
10. Click the Save button to save the changes.
Tip: To send a test message to your e-mail address and phone number, click the Test Device link.

16
Subscribe Trade, Activity and Margin Call Alerts
1. On the home page, click the Settings Icon. The Settings page displays.
2. In the Subscriptions section, click the Edit link. The Alert Subscriptions window displays.
3. For the Alert you wish to subscribe, click the (+) icon to view the devices.
4. Select the required device by selecting the appropriate check box and click the Save button.
The Subscription section displays the confirmation and the subscribed device.
Subscribe Price Alerts
1. On the home page, click Research. The Markets Today page displays.
2. Click Investing Tools. The Investing Tools page displays.
3. Click Market Alerts. A page displays the terms and conditions for the alerts.
4. Read through the terms and conditions and click the I Agree button to continue. The Market
Alerts page displays.
17
5. In the Set a New Alert field, type the stock name or symbol for which you would like to set
an alert.
6. From the list of matches, select the required option. The Manage Alerts window displays.
7. From the Select & Configure list, select the applicable option.
8. In the Notify me when section, select an option from the list and type the appropriate
information in the adjacent text field.
9. From the Select Delivery Location options, select where the alert should be delivered.
10. Click the Add to Subscription button.
11. The market alert is added to the Current Subscriptions section. Click Close.
Create a Watchlist
1. On the home page, click Research. The Markets Today page displays.
2. Click Investing Tools. The Investing Tools page displays.
3. Click My Watchlists and then click Create New Watchlist. The Create New Watchlist
window displays.
4. In the Enter Watchlist name field, type a name for the watchlist and select the check box
below to make this watchlist your default (if required).
5. Click Save. The My Watchlists page displays.
6. In the Enter Name or Symbol field, type a stock name of symbol and click Add.
Subscribe Watchlist Alerts
1. On the home page, click Research. The MarketsToday page displays.
2. Click Investing Tools. The Investing Tools page displays.
3. Click Watchlist Alerts.
4. From the Set a New Alert list, select the applicable watchlist and click Set. The Manage
Watchlist Alerts window displays.
5. From the Send me a summary list, select how often you like the alert to be delivered.
6. From the Select Delivery Location options, select where the alert should be delivered.
7. Click the Add to Subscription button.
8. The watchlist alert is added to the Current Subscriptions section. Click Close.

18
Delivery Settings and Hold Alerts for Brokerage Alerts
1. On the home page, click Research. The Markets Today page displays.
2. Click Investing Tools. The Investing Tools page displays.
3. Click Market Alerts. The Market Alerts page displays.
4. Click Delivery Settings & Hold/Resume Alerts.
5. In the Send To section, provide the following information:
o For Primary E-mail Address, type the primary e-mail address in the Primary E-mail
Address and Confirm primary e-mail address fields.
o Select the e-mail format, HTML or Plain Text.
o For Secondary E-mail Address, type the secondary e-mail address in the Secondary
E-mail Address and Confirm secondary e-mail address fields.
o Select the e-mail format, HTML or Plain Text.
o For Text Message Delivery, type the cell phone number in the Cell Phone Address and
Confirm cell phone address fields.
6. In the Hold/Resume Market Alerts section, select one of the following options and click Save.
o
Market Alerts are Active—This option is selected by default when the market alerts are
active. Select this option to resume alerts if you had placed a hold on receiving alerts.
o
Please hold my Market Alert—Select this option to temporarily stop the alerts from
being delivered. Select the Starting and Ending dates using the Calendar control.

19
5.
Electronic Delivery
You can enable electronic delivery of statements and documents to be delivered to your e-mail
address(es). You can also view the statements and documents online on the website.
You can setup the e-delivery preferences for an individual account or for all accounts using the
Quick Enroll option.
The retention time for account communications and documents vary based on the communication
type. To view the retention time, click the View Retention Times link.
The e-delivery Preferences section is available in the Settings page. You can access this
section by one of the following ways:
On the home page, click the Go paperless icon.
On the home page, click Communications > Settings.
On the home page, click the Settings icon.
Add E-mail Addresses
The e-delivery Preferences section displays all the e-mail address(es) you have added earlier to
your account. If you have not added any e-mail address(es), follow the instructions below to add.
1. On the home page, click the Settings icon. The Settings page displays.
2. In the E-mail Address(es) section, click the Add E-mail Address(es) link. The Add New E-
mail Address window displays.
3. In the E-mail Address 1 and Confirm E-mail Address 1 fields, type the primary e-
mail address.
4. In the E-mail Address 2 and Confirm E-mail Address 2 fields, type the secondary e-
mail address.
5. Click the Save button.

20
Set Up e-Delivery for an Individual Account
1. In the e-Delivery Preferences section, click the Edit link. The Document Delivery
Preferences window displays.
2. Select the box(es) next to the documents against the respective account you want to opt for
e-delivery.
Tip: To view the included documents under a category, click the Documents
Included link.
3. From the e-mail list, select the required e-mail address to which the documents should be
delivered electronically.
4. Click the Save button. A window displays the terms & conditions.
5. Read through the terms and conditions and click the I Agree button. A window displays
stating the e-delivery preferences have been saved.
6. Click the OK button to continue.
Set Up e-Delivery for Multiple Accounts using Quick Enroll
1. In the e-Delivery Preferences section, click the Quick Enroll (for all accounts) link. The
Document Delivery Preferences window displays.
2. Select the box(es) next to the documents you want to opt for e-delivery.
3. From the e-mail list, select the required e-mail address to which the documents should be
delivered electronically.
4. Click the Save button. A window displays the terms and conditions.

21
5. Read through the terms and conditions and click the I Agree button. A window displays
stating the e-delivery preferences have been saved.
6. Click the OK button to continue.
View Statements & Reports
The site allows you to view and download your account brokerage statements and reports and
deliver these statements and reports electronically.
Statements and reports are available in the All Communications page. You can access
statements and reports this way:
Click Communications > All Communications. In the All Communications page, click the
Statements and Reports link.
Click the My Documents link in the Quick Links section
The page, by default, displays the statements and reports for one year. To view a statement, click
the link in the Type column for the required date. You can also view any notices by clicking the
link in the Inserts column.
You can filter the information to display according to your requirements. Provide information in
one or all of the following filters and click the Apply Filters button.
Time Period
From Date
To Date
The information displayed can be exported to an Adobe PDF.
View Trade Confirmations
The site allows you to view and download your trade confirmations and electronically deliver
these confirmations.
Trade Confirmations are available in the All Communications page. You can navigate by
clicking Communications > All Communications. In the All Communications page, click the
Trade Confirmations link.
The page, by default, displays the trade confirmations for one year. To view a trade confirmation,
click the link in the Type column for the required date.
You can filter the information to display according to your requirements. Provide information in
one or all of the following filters and click the Apply Filters button.

22
Symbol
Transaction Type
Time Period
From Date and To Date (These fields will be enabled only if Custom Range is selected for
Time Period.)
The information displayed can be exported to an Adobe PDF.
View Tax Documents
The site allows you to view and download your tax information statement and electronically
deliver this statement.
Tax statements are available in the All Communications page. You can navigate by clicking
Communications > All Communications. In the All Communications page, click the Tax
Documents link.
To view a tax statement, click the link in the Type column for the required date.
The information displayed can be exported to an Adobe PDF.
View Notifications
The site offers you the option of viewing and downloading the notifications.

23
Notifications are available in the All Communications page. You can navigate by clicking
Communications > All Communications. In the All Communications page, click the
Notifications link.
To view a notification, click the link in the Type column for the required date.
The information displayed can be exported to an Adobe PDF.

24
6.
Account Portfolio
The site provides access to information relevant to, and regarding your portfolio. Such information
is divided into relevant sub-pages on the site under the Portfolio tab. These pages include:
Overview
Balances
Holdings
Unrealized Gain/Loss
Realized Gain/Loss
History
Projected Cash Flow
Overview
The Overview page provides a snapshot of your most recent events/activities such as, open
orders, recently completed trades, composition of investments in the portfolio, and more. The
home page also provides information on how your investments are performing in the market,
portfolio history and links to the most frequently accessed pages. You can view the portfolio of an
individual account, group of accounts or your linked accounts.
To access the portfolio overview page, click Portfolio on the Investments home page.
Portfolio Changes
This section displays the total market value of the available holdings. Unrealized gain/loss
information is displayed along with the increase and decrease in terms of percentage.

25
Quick Links
This section displays the shortcut links to the pages within the portfolio. You can access the page
by clicking the required link.
Composition of Holdings
This section displays the composition of holdings in your portfolio. The composition is displayed in
a pie chart along with the various asset classes available in your portfolio, their market value and
total percentage. Click on the required asset class to view the filtered Holdings page.
Quick Trade
This section enables you to place a quick trade. Type the security name in the field and click the
Quick Trade button to view the New Order page. The selected account will be the default
account in which the trade will be placed. You can directly proceed to providing the trade
instructions.
You can also click the Go to Trading link to navigate to the Transact > New Order page.
Open Orders & Executed Trades
This section displays the open orders and the recently executed trades within your portfolio. Click
on the stock symbol link in the Symbol/CUSIP column to view the Order Status page.

26
Strong & Weak Performers
This section displays the positive and negative performers in your portfolio. Click the Company
hyperlink to view the Quotes & News page. You can also click the Go to Holdings link to
navigate to the Holdings page directly.
Portfolio History
This section displays the five most recent activities in your account. Click the Go to History link

27
to navigate to the History page.
News
This section displays the news relating to the available holdings in your portfolio. Click the Go to
News link to navigate to the Quotes & News page directly. You can also click the stock or news
headline link to view the stock's information in the Quotes & News page.

28
Balances
The Balances page displays the total account value of your account. This page also displays the
information about the funds available for withdrawal, funds available to trade, and day trading
power as of previous day. You can view information for an individual account, groups or the
portfolio summary. The portfolio summary includes all the information of the linked accounts.
To view the balances page, click Portfolio on the site home page and then click Balances.
To view the balances for a single account, select the required account from the Viewing list.
To view the balances for a group, select the required group from the Viewing list.
You can download the information displayed in the page to a Microsoft
®
Excel file or print for
record keeping.

29
Holdings
The Holdings page displays all the holdings you hold in the portfolio. The page also displays the
total current value of holdings. From this page, you can view the quantity of stocks, current
market value, last traded price, yield, and more. You can also view more information about a
stock by clicking the (+) icon next to a stock. The transactions details chart, account type
information is displayed after expanding the view.
To view the holdings page, click Portfolio on the home page and then click Holdings.
To view the holdings for a single account, select the required account from the Viewing list.
To view the holdings for a group of accounts, select the required group from the Viewing list.
To view the holdings for all accounts, select All Accounts from the Viewing list
From this page, you can also buy, sell, and view the unrealized gain/loss information.
For information on trading equity, see Trade Equities.
For information on trading mutual funds, see Trade Mutual Funds. For information on trading
options, see Trade Options.
You can download the information displayed in the page to a Microsoft Excel file or print for
record keeping.

30
Non Dollar transactions on Non US exchanges valued at foreign
currency of the exchange
All Non USD orders placed on foreign exchanges will be values in the foreign currency of the
country the exchange is based in and the details can be viewed in a new tab “Traded Valuation”
link on the Holdings page.
Upon clicking the Traded Valuations screen, the holdings for Non Dollar trade will reflect
as below.

31
Unrealized Gain/Loss
The Unrealized Gain/Loss page displays the current performance of stocks in the market. The
page also displays the summary of short- and long-term gain and loss information, besides
displaying the total gain and loss information.
To view the Unrealized Gain/Loss page, click Portfolio on the Investments home page and
then click Unrealized Gain/Loss.
To view the Unrealized Gain/Loss for a single account, select the required account from the
Viewing list.
To view the Unrealized Gain/Loss for a group of accounts, select the required group from the
Viewing list.
To view the Unrealized Gain/Loss for all accounts, select All Accounts from the Viewing list.
You can filter and view the information displayed in the page according to your requirements. To
filter the information, type a stock's symbol, name, CUSIP, or ISIN in the Filter By field and click
the Apply Filters button.
You can download the information displayed in the page to a Microsoft
®
Excel file or print for
record keeping.

32
Realized Gain/Loss
The Realized Gain/Loss page displays the profit or loss information of your stocks arising out of
a sell. The page also displays the summary of short- and long-term gain and loss information,
besides displaying the total gain and loss information.
To view the Realized Gain/Loss page, click Portfolio on the Investments home page and
then click Realized Gain/Loss.
To view the Realized Gain/Loss for a single account, select the required account from the
Viewing list.
To view the Realized Gain/Loss for a group of accounts, select the required group from the
Viewing list.
To view the Realized Gain/Loss for all accounts, select All Accounts from the Viewing list.
You can filter and view the information displayed in the page according to your requirements. To
filter the information, provide information in one or all of the following filters and click the Apply
Filters button.
Time Period
From Date and To Date
Symbol, CUSIP

33
View By
You can download the information displayed in the page to a Microsoft
®
Excel file or print for
record keeping
Access to Citi generated information for pre-conversion accounts – Users can access pre-
conversion data (history, statements, RGL) from Smith Barney by selecting the View Pre-
Conversion Realized Gain Loss.

34
History
The History page displays all the activities that have taken place in the account. The activities
are available for a maximum of two years. By default, activities for one week are displayed.
To view the History page, click Portfolio on the Investments home page and then
click History.
To view the History for a single account, select the required account from the Viewing list.
To view the History for a group of accounts, select the required group from the Viewing list.
To view the History for all accounts, select All Accounts from the Viewing list.
You can filter and view the information displayed in the page according to your requirements. To
filter the information, provide information in one or all of the following filters and click the Apply
Filters button.
Symbol, CUSIP
Time Period
From Date and To Date
Transaction
The information displayed in the page can be downloaded as a Microsoft Excel file.
You can track the status or order from the Order Status page. To view the Order Status page,
click the Order Status link.

35
Projected Cash Flow
The Projected Cash Flow page displays the cash money flow into your account.
To view the Projected Cash Flow page, click Portfolio on the Investments home page and
then click Projected Cash Flow.
To view the projected cash flow for a single account, select the required account from the
Viewing list.
To view the projected cash flow for a group of accounts, select the required group from the
Viewing list.
To view the projected cash flow for all accounts, select All Accounts from the Viewing list.
The page is divided into the following sections:
Incoming Cash Flow—This section displays the announced and projected cash flow
information. To view the cash flow distribution, click the View Cash Flow Distribution link.
Fixed Income Cash Flow—This section displays the incoming cash flow from the fixed
income securities.
Maturity Schedule—This section displays the dates and amounts of redemption for an
issuance.
The information displayed in the page can be downloaded as a Microsoft Excel file.

36
7.
Transact
The Transact tab enables you to place:
Equity Trades
Mutual Fund Trades
Option Trades
Fixed Income Trades
529 Plan allocation
In addition to placing trades, the tab also enables you to view order status, view commission
schedule, and pay bills.
The Transact screens include a new donut chart that displays the following information:
Before selecting an account to trade, the donut chart displays the number of trade eligible
accounts linked to the user ID.
After selecting an account to trade, the donut chart displays the percentage of the account's
funds available to trade in relation to the total funds available to trade in all the trade eligible
accounts.
Trade Equities
Enter a Buy Equity Trade
1. On the home page, click Transact. The New Order page displays.
2. From the Trade list, select Equity.
3. In the Select an Asset to Trade section, type the name of the equity you wish to buy. You
can also click the Select From Current Holdings button to select an equity stock from
your holdings.

37
4. In the Select Account to Trade From section, select an account from the list.
5. In the Define Trade Instructions section, provide the following information.
Transaction—From this list, select Buy.
Order Type—From this list, select the required order type.
Duration—From this list, select the required duration.
Account Type—This field will populate the actual Account Type (Cash/Margin)
Quantity—In this field, type the quantity to be bought.
Limit Price—In this field, type the limit price. This field will be available only if the
Order Type is Stop--Limit.
Stop Price—In this field, type the stop price. Order Type is Stop-Limit.
6. Select the check box if the order was recommended by your financial advisor or
representative.
7. Click the Review Order button. The Review Order Ticket window displays.
8. Review the information and click the Submit button.
You can track the status of order from the Order Status page. To view the Order Status page,
click the Go to Order Status link.
Enter a Sell Equity Trade
1. On the home page, click Transact. . The New Order page displays.
2. From the Trade list, select Equity.
3. In the Select an Asset to Trade section, type the name of the equity you wish to sell. You

38
can also click the Select From Current Holdings button to select an equity stock from
your holdings.
4. In the Select Account to Trade From section, select an account from the list.
5. In the Define Trade Instructions section, provide the following information.
Transaction—From this list, select Sell from Portfolio.
Order Type—From this list, select the required order type.
Duration—From this list, select the required duration.
Account Type— This field will populate the actual Account Type (Cash/Margin)
Quantity—In this field, type the quantity to be sold.
Limit Price—In this field, type the limit price. This field will be available only if the
Order Type is Stop-Limit.
Stop Price—In this field, type the stop price. Order Type is Stop-Limit.
6. Select the check box if the order was recommended by your financial advisor or
representative.
7. Click the Review Order button. The Review Order Ticket window displays
8. Review the information and click the Submit button.
You can track the status of order from the Order Status page. To view the Order Status page,
click the Go to Order Status link.
Edit an Equity Trade
An equity trade can be edited only if the order is in the following statuses: Open, Part Executed,
and Part Mixed.
The order with tax lot selections will remove its original selection and revert to the default
disposition method.
To edit an equity trade:
1. On the home page, click Transact. The New Order page displays.
2. Click the Order Status tab.
3. From the Viewing list, select the account for which you wish to view the orders.
4. For the trade you wish to edit, click the Expand icon (+) to view the trade details. The
trade details expand to display the details.
5. Click Edit. The Trading—Order Entry window displays.
6. Edit the required information. You can only edit the following details:
Quantity
Order Type
Price (unavailable for edit if Order Type is Market.)
Duration (unavailable for edit if Order Type is Market.)
Stop Price and Limit Price (available for edit if Order Type is Stop-Limit.)
7. Select the check box if the order was recommended by your financial advisor
or representative.

39
8. Click the Review Order button. The Review Order Ticket window displays.
9. Review the information and click the Submit button.
You can track the status of order from the Order Status page. To view the Order Status page,
click the Go to Order Status link.
Order a Mutual Fund Prospectus
1. Click Transact. The Trading: Order Entry window displays.
2. From the Account list, select the account in which the order will be placed.
3. In the Symbol field, type the symbol of the mutual fund or double-click the required mutual
fund from the My Holdings section. The fund information displays.
4. Towards the end of the fund information, click the Order Prospectus link. The Order
Prospectus window displays.
5. In the screen, provide appropriate information in the following fields:
First Name
Last Name
Address
City
State
ZIP
Day Phone
Evening Phone
6. After providing the required information, click Request Prospectus. A window displays the
confirmation message that the prospectus will be mailed within three business days. In the
window, click Close.
Note: As you type the symbol, results, symbol or company name,
display matching the entered characters. Select the required security
from the list.

40
Trade Mutual Funds
Purchase a Mutual Fund
All purchase orders for load funds will attract applicable transaction fees. To purchase a
mutual fund:
1.
On the home page, click Transact. The New Order page displays.
2.
From the Trade list, select Mutual Fund.
3.
In the Select an Asset to Trade section, type the name of the fund you wish to buy.
You can also click the Select From Current Holdings button to select a fund from your
holdings.
4.
In the Select Account to Trade From section, select an account from the list.
5.
In the Define Trade Instructions section, provide the following information.
Transaction—From this list, select Buy.
Quantity to Buy—From this list, select USD ($) or # of Shares option and provide the
required information in the text field below.
Dividends, Income and Capital Gains—From this list, select how you want to reinvest
dividends, income and capital gains.
6.
Select the check box to confirm you have read, understand and accept the terms outlined in
the prospectus.
7.
Select the check box if the order was recommended by your financial advisor or
representative.
8.
Click Review Order. The Review Order Ticket window displays.
9.
Review the information and click Submit.
You can track the status of order from the Order Status page. To view the Order Status page,
click the Go to Order Status link.

41
Exchange a Mutual Fund
All exchange orders for load funds will attract applicable transaction fees. A Mutual Fund
Exchange order can be placed only if:
There are no other unexecuted orders for the fund.
If the daily cutoff time has passed, the next day's business price will be used.
To exchange a mutual fund:
1. On the home page, click Transact. The New Order page displays.
2. From the Trade list, select Mutual Fund.
3. In the Select an Asset to Trade section, type the name of the fund. You can also click the
Select From Current Holdings button to select a fund from your holdings.
4. In the Select Account to Trade From section, select an account from the list.
5. In the Define Trade Instructions section, provide the following information.
Transaction—From this list, select Exchange.
Exchange For—From this list, select the required fund.
Quantity to Exchange—From this list, select USD ($) or # of Shares option and provide
the required information in the text field below. To exchange the entire quantity, select the
Exchange All check box.
Exchange All—Select this check if you want to exchange the entire quantity.
Dividends, Income and Capital Gains—From this list, select how you want to reinvest
dividends, income and capital gains.
Select the check box to confirm you have read, understand and accept the terms outlined
in the prospectus.
6. Select the check box if the order was recommended by your financial advisor
or representative.
7. Click Review Order. The Review Order Ticket window displays.
8. Review the information and click Submit.
You can track the status of order from the Order Status page. To view the Order Status page,
click the Go to Order Status link.
Redeem a Mutual Fund
All redeem orders for load funds will attract applicable transaction fees. To redeem a mutual fund:
1. On the home page, click Transact. The New Order page displays.
2. From the Trade list, select Mutual Fund.
3. In the Select an Asset to Trade section, type the name of the fund. You can also click the
Select from Current Holdings button to select a fund from your holdings.
4. In the Select Account to Trade From section, select an account from the list.
5. In the Define Trade Instructions section, provide the following information.
Note: The dollar amount cannot exceed 80% of the market value; you can
opt to exchange "all" or type a lesser amount.
42
Transaction—from this list, select Redeem.
Quantity to Redeem—from this list, select USD ($) or # of Shares option and provide the
required information in the text field below. To redeem the entire quantity, select the
Redeem All check box.
Redeem All—Select this check if you want to redeem the entire quantity.
Dividends, Income and Capital Gains—from this list, select how you want to reinvest
dividends, income and capital gains.
6. Select the check box to confirm you have read, understand and accept the terms outlined in
the prospectus.
7. Select the check box if the order was recommended by your financial advisor or
representative.
8. Click Review Order. The Review Order Ticket window displays.
9. Review the information and click Submit.
You can track the status of order from the Order Status page. To view the Order Status page,
click the Go to Order Status link.
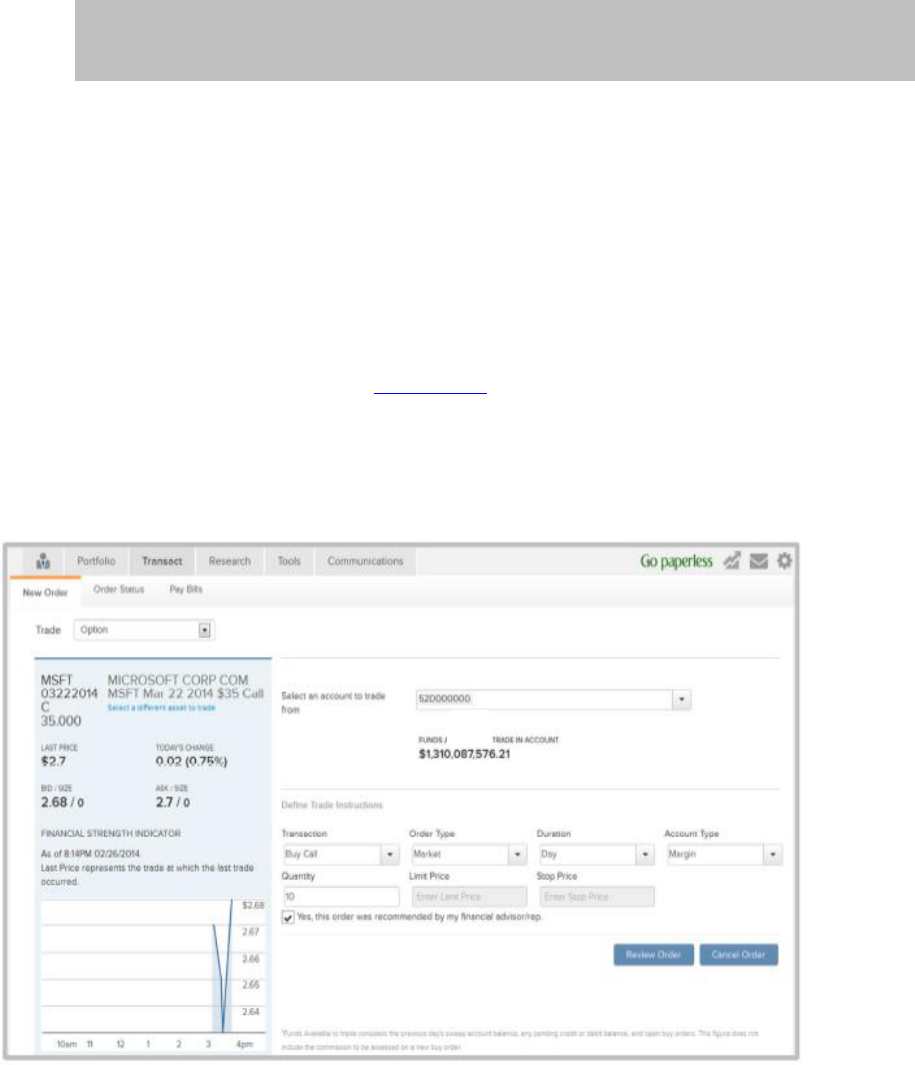
Trade Options
Buy Call or Put Option Order
1. On the home page, click Transact. The New Order page displays.
2. From the Trade list, select Option.
Note: The dollar amount cannot exceed 80% of the market value; you can opt to
redeem "all" or type a lesser amount.

43
3. In the Select an Asset to Trade section, type the symbol or name of the security. You can
also click the Select from Current Holdings button to select a security from your holdings.
The Select an Option to Trade window displays all option contracts and
associated quotes.
4. Select the required contract, from the Call and Puts section. To trade the contract, click
the link in the Symbol column or click Get Real-Time Quotes button to view the real-time
information for the contract.
5. In the Select Account to Trade From section, select an account from the list.
6. In the Define Trade Instructions section, provide the following information.
Transaction—from this list, select Buy Call or Buy Put.
Order Type—from this list, select the required order type.
Duration—from this list, select the required duration.
Account Type — This field will populate the actual Account Type (Cash/Margin)
Quantity—in this field, type the number of contract to buy. One option contract usually
has 100 shares of a stock, unless the option contract is Mini, which has 10 shares of a
stock.
7. Select the check box if the order was recommended by your financial advisor or
representative.
8. Click the Review Order button. The Review Order Ticket window displays.
9. Review the information and click the Submit button.
You can track the status of order from the Order Status page. To view the Order Status page,
click the Go to Order Status link.
Close Call or Put Option Order
1.
On the home page, click Transact. The New Order page displays.

44
2.
From the Trade list, select Option.
3.
In the Select an Asset to Trade section, type the symbol or name of the security. You can
also click the Select from Current Holdings button to select a security from your holdings.
The Select an Option to Trade window displays all option contracts and associated quotes.
4.
Select the required contract, from the Call and Puts section. To trade the contract, click the
link in the Symbol column or click Get Real-Time Quotes button to view the real-time
information for the contract.
5.
In the Select Account to Trade From section, select an account from the list.
6.
In the Define Trade Instructions section, provide the following information.
Transaction — from this list, select Close Call or Close Put.
Order Type — from this list, select the required order type.
Duration — from this list, select the required duration.
Account Type — This field will populate the actual Account Type (Cash/Margin)
Quantity — in this field, type the number of contract to close.
7.
Select the check box if the order was recommended by your financial advisor or
representative.
8.
Click the Review Order button. The Review Order Ticket window displays.
9.
Review the information and click the Submit button.
You can track the status of order from the Order Status page. To view the Order Status page,
click the Go to Order Status link.
Fixed Income Trading
Ability to SSO to BondDesk from
For Fixed Income research, users will be able to SSO to BondDesk platform by clicking the
Launch Fixed Income Inventory Search link. Users will be prompted with a disclaimer to access
the BondDesk search page, upon acceptance; users will be navigated to the Fixed Income
search page.

45
529 Plans
Viewing 529 plan allocations
Users can view their 529 plan allocations linked to their brokerage account on Investments site by
accessing the 529 Plan Allocation option under the Transact tab. Users will be able to view the
details of their 529 plans with the allocation breakup across different funds the investments are
made in.

46
View Order Status
The Order Status page displays the following:
Day duration order is shown until the end of the day.
Good Till Cancelled order is shown until the order is executed or cancelled manually. If the
order is not cancelled manually, the order will get cancelled automatically after 90 days.
From this page, you can view the details like, quantity, symbol, status etc. From this page, you
can also edit or cancel an order. You can view the order status information for an individual
account, groups or all linked accounts.
To view the orders page, click Transact on the Investments home page and then click
Order Status.
To view the orders for a single account, select the required account from the Viewing list.
To view the orders for a group, select the required group from the Viewing list.
To view the orders for all account, select All Accounts from the Viewing list.
You can filter the information to display according to your requirements.
Provide information in one or all of the following filters and click the Apply Filters button.
Symbol/Name/CUSIP or ISIN
Trade Status
To view the order details, click the Expand (+) button. To hide the order details, click the
Collapse (-) button.
You can download the information displayed in the page to a Microsoft Excel file or view the
history of all activities, click the History link.

47
Cancel an Order
An order can be cancelled if the trade has not been executed. The various scenarios during
which an order can be cancelled are provided in the table below. A confirmation message, after
submission, does not imply the order has been cancelled, but only a request to cancel an order
has been placed. The status of cancellation request can be viewed on the Order Status page.
Order Status
Stocks
Options
Mutual Funds
Open
X
X
X
Pending
X
X
X
Part Executed
X
X
Part Mixed
X
X
1.
On the home page, click Transact. The New Order page displays.
2.
Click the Order Status tab.
3.
From the Viewing list, select the account for which you wish to view the orders.
4.
For the trade you wish to edit, click the Expand icon (+) to view the trade details. The trade
details expand to display the details.
5.
Click Cancel Order. The Trading: Cancel Order window displays.
6.
Click Submit Order Cancellation. A confirmation message displays.

48
8.
Research
Markets
The Markets tab enables you to view stock market updates, market movers,
Advancers/decliners, access to real-time market news and events.
Quotes & News
The Quotes & News tab enables you to view full quote and perform research of a security. From
this tab, you can view the following:
Research from industry sources
Market headlines

49
Investing Tools
The Investing Tools tab enables you to view predefined stock, ETF and mutual fund screeners;
compare stocks and funds for profile, performance, risk, and much more. Upon clicking any of the
links, the user will be redirected to the websites. A warning message would be rendered each
time a user is being navigated to the 3
rd
party website.

50
Rate board
The Rate board tab enables you to view the prevailing rates for money market products,
currency, commodities and others.
51
9.
Sort, Filter, Download and Print
The information displayed in the pages within the platform can be sorted, filtered, exported to a
Microsoft Excel file or printed for record keeping. Some pages within the platform also offers the
ability to generate an Adobe
®
PDF file from multiple files.
Sort
The sorting feature enables you to reorder the information in ascending or descending order. A
sort can be applied to any page with a table-like structure. To sort the information, click on a
required column heading to sort in ascending order, and click the heading again to sort the
information in descending order.
An ascending sort order is identified by an upward triangle, whilst the descending sort order is
identified by a downward triangle. The indicator appears in the column used for sorting.
Filter
The filtering feature enables you to limit the information displayed in a page. The platform offers
many filter criteria that you can use to display the information according to your requirements.
The filter criteria differ from page to page. The most common filter criteria are:
Symbol, name, CUSIP
Time Period
View by
Transaction
Cash flow type—Appears only in the Projected Cash Flow page.
Trade Status—Appears only in the Order Status page.
To filter the information, provide information for the required filter and click the Apply
Filters button.

52
Download
The downloading feature enables you to download the information displayed in a page to a
Microsoft Excel file.
To download the information, click the Download link or the link name adjacent to the
Download label.
Generate Adobe PDF
The platform offers the ability to download these document types as PDFs.
Statements and Reports
Trade Confirmations
Tax Documents
Notifications
To generate a PDF:
1. In any of the above pages, click the Combine Documents button. The option to select
multiple documents becomes available for selection.

53
2. Select one or more documents by clicking the check box and click the Generate PDF button.
The documents appear in the generated PDF.
Print
The information displayed in the page can be printed for record keeping. To print the information,
click the Print link.

54
10.
NetXInvestor Mobile App
If you have user credentials for the investments standalone site (investments.citi.com) you can
access the Net X Investor Mobile app on either an iPad or iPhone.
The App will offer:
Balances
Holdings
History
Order Status
e-Documents
Quotes
News and Markets Data
Trading

55
Frequently Asked Questions:
1. Who is the Pershing NetXInvestor app intended for?
Any Citi client with an investment account who owns an iPad or iPhone.
2. Is there a charge for the app?
No, the app is free from the App store using either iPad or iPhone.
3. Can I use the app with an Android device?
No, at this time the app is only available for Apple devices- we plan to support Android
devices in the future.
4. How do I get the app?
The app is available from the App store using your normal Apple credentials
5. There is another Pershing app in the store, “NetX Client”; can I use that one?
Download the NetXInvestor app- it’s the latest version and is intended to be the companion
app to the NetXInvestor web site that launched in July 2014
6. Once downloaded, how do I sign into the app?
Log in with the usual user name and password for the investments site
(investments.citi.com), plus the Identity Verification Code (IVC). Users will also need to
populate the Financial Organization Code which is C01 or the first 3 digits of your account
number.
7. What can I do if I do not have login credentials for the investments site?
Visit www.investments.citi.com and click on the ‘Register’ button on the login page-anyone
who is not able to self-register online can call the support number listed for assistance.
8. Can I trade on the mobile app?
You may do any of the trading activities that you can normally do on the web, based on your
profile.
9. Can I customize my experience on the app such as create account nicknames, custom
account groups, etc.?
No, these types of personalization should be done through a PC login to
www.investments.citi.com. The customized names and groups will then appear on the mobile
app as well.
10. How do I get support for the mobile app?
Support is through calling the support numbers appearing on the website or app
11. Why does the app not contain Citi branding?
The app is currently released in an unbranded version without Citi customization we intend to
have a branded offering in the future.
56
12. How is this app different from the Citi Mobile app?
The app for investments is intended to support the needs of investment account holders and
has trading capabilities- the mobile app from Citi is bank account focused and shows only
high level investment account balances.
13. Why are there multiple apps- will there be a consolidated experience in the future?
Each app offers distinct features- we intend to offer an integrated mobile app experience for
both banking and investments in the future
14. Can I transfer funds on the Pershing NetXInvestor Mobile app?
No, this feature is not available on the mobile app at this time
15. Is the Pershing mobile app secure?
The app contains all of the same multi-factor authentication features as the web based
experience, including IVC (Identity Verification Code)

57
16. What does the app look like?
The screenshots below show the various pages of the app
App store search
Login page of app:

58
Identity Verification Code screen:
Accounts View—All Accounts, Groups, or individual account

59
Holdings View
History Page
