
IDEXX Cornerstone*
Enhanced Medical Notes
and Correspondence Documents
8.3
Participant Workbook
Information in this document is subject to change without notice. Companies, names and data used in examples
are ctitious unless otherwise noted. No part of this document may be reproduced or transmitted in any form or by
any means, electronic, mechanical or otherwise, for any purpose, without the express written permission of IDEXX
Laboratories. IDEXX Laboratories may have patents or pending patent applications, trademarks, copyrights or other
intellectual or industrial property rights covering this document or subject matter in this document. The furnishing of this
document does not give a license to these property rights except as expressly provided in any written license agreement
from IDEXX Laboratories.
© 2013 IDEXX Laboratories, Inc. All rights reserved. • 06-29928-00
*Cornerstone, Compliance Assessment Tool, Patient Clipboard, PetDetect and SmartLink are trademarks or registered
trademarks of IDEXX Laboratories, Inc. or its afliates in the United States and/or other countries.
LifeLearn is a registered trademarks of VetLearn, Inc. Microsoft is either a registered trademark or trademark of Microsoft
Corporation in the United States and/or other countries.
All other product and company names and logos are trademarks of their respective holders.
IDEXX Computer Systems
One IDEXX Drive
Westbrook, Maine 04092 USA
idexx.com/cornerstone

Enhanced Medical Notes and Correspondence Documents
Table of Contents
Introduction ...................................................................................................................................4
Course Description .........................................................................................................................................4
Prerequisites....................................................................................................................................................4
Getting Started ................................................................................................................................................4
Training Content ..............................................................................................................................................4
Enhanced Medical Notes and Correspondence Documents
Document Template Setup ............................................................................................................6
Document Template Overview .......................................................................................................................6
Windows and Features For Creating Document Templates ..........................................................................7
Template Properties and Save Options ..........................................................................................................9
Other Procedural Steps ..................................................................................................................................11
Document Default Settings .............................................................................................................................15
Document Security Settings ...........................................................................................................................17
Document Usage ...........................................................................................................................19
More Medical Note Features ...........................................................................................................................26
Managing Medical Notes and Correspondence ..........................................................................29
Daily Planner—Medical Notes and Correspondence .....................................................................................29
Medical Note and Document Reports ............................................................................................................29
Appendix
Medical Notes and Correspondence Bookmark List ....................................................................................32
IDEXX Cornerstone Chartless Setup Checklist ..............................................................................................35
Skill Assessment and Evaluation
Enhanced Medical Notes and Correspondence Documents Skill Assessment ............................................37
Enhanced Medical Notes and Correspondence Documents Evaluation ......................................................38
IDEXX Cornerstone • Enhanced Medical Notes and Correspondence Documents • Page 3 •

IDEXX Cornerstone • Enhanced Medical Notes and Correspondence Documents • Page 4 •
Introduction
During this course (2.5 hours), managers, receptionists, or technicians will learn to efciently set up and use document
templates—used for medical notes, release forms, and other purposes—and other important documents.
• The current version of the IDEXX Cornerstone* Practice Management System installed at the practice.
• Basic Cornerstone software navigation skills.
• Security access for setting up Cornerstone software features related to medical notes and correspondence.
Throughout this training, you will be working in your own practice's database.
This course is most effective if you work at a Cornerstone workstation while following along in the participant workbook
and completing the exercises.
Content of the course includes:
• Types of Documents and Uses • Cornerstone Editor
• Documents and Templates—Status, Properties, and Saving • Document Defaults and Security
• Document Templates and Document Content Elements • Daily Planner Window
• Start New Document Window • Reports
These icons are used throughout the training to provide additional information:
Important Information: Provides critical information about the topic or procedure.
Read this information carefully.
Note: Provides additional information about the topic or procedure.
Tip: Provides helpful information about the topic or procedure.
When you see this image placed below a lesson name, it indicates that
video snippets are available online at idexxlearningcenter.com for topics
related to this lesson.

Enhanced Medical Notes and Correspondence Documents
IDEXX Cornerstone • Enhanced Medical Notes and Correspondence Documents • Page 5 •

IDEXX Cornerstone • Enhanced Medical Notes and Correspondence Documents • Page 6 •
Document Template Setup
You’ll learn these important concepts in this chapter:
• Document Template Overview—Document template benets, types, and sample listings of correspondence and
medical notes you may want to create.
• Windows and Features for Creating Document Templates—Windows for selecting and modifying the document
templates, including the toolbars to add elements that make the document easy to use, such as text input fields,
check boxes, bookmarks, tables, and images.
• Template Properties and Save Properties—Options that control how a document is saved in history, managed,
and printed.
• Other Document Procedural Steps—Other procedural steps for creating documents and correspondence.
• Default Settings and Security—Default settings and security settings for documents and correspondence.
Document templates are reusable forms used to create medical notes and client correspondence type of documents.
Document templates are just like familiar word processing programs and are easy to use. The benets of setting up
templates include data entry efciencies and consistent content among staff.
Create a print-only, correspondence, or medical note document template type.
• Print Only documents are considered one-time use documents and are not saved to the patient’s history. Examples
of print-only documents might include PetDetect* collars, vaccination schedules, or cage cards.
• Correspondence documents are saved to a patient’s history either as the entire document or as the title only,
depending on how the template was set up. Examples of correspondence documents might include consent forms,
insurance forms, or health certicates.
• Medical Note documents accommodate routine procedures and create forms for a consistent look and content.
This makes searching easier and reduces missing information. Suggestions for medical note document templates
include Medical Exam, Surgery Notes, or Grooming Notes. These document templates are located on the Medical
Notes tab on the bottom of the Patient Clipboard* window. Information in a medical note can be edited until it is
nalized. After the document is nalized, it cannot be changed, but an addendum can be added
This chart shows the document types that are recorded in the patient’s medical history and the icon for each one.
Document Type Recorded in Medical History Source Icon
Print Only No None
Correspondence—Title Only Yes
Correspondence—Entire Document Yes
Medical Notes Yes

Document Template Setup
IDEXX Cornerstone • Enhanced Medical Notes and Correspondence Documents • Page 7 •
Document templates can be used to create a variety of documents. Here is a list of some document templates you may
want to use and create:
Client Education Breed sheets, medication information, wellness programs, and pet’s rst year
Labels Lab, cage, le, client, storage, and bar code
Certicates Health, surgical sterilization, vaccination, puppy/kitten class, and brushing teeth
Letters
New client, returning client, collections, lost pet, medication information, newsletter,
and special offers
Forms
Surgery authorization, health certicates, medication requests, discharge instructions,
feeding schedules, and check-in checklists
Medical Notes Exams, procedures, treatments, diagnostic results, health proles, and vital signs
The Document Template List window (Lists > Documents > Templates) includes options for nding, creating, and
converting templates.
Four sample “Quick Text" templates are included in the Samples category.

Document Template Setup
IDEXX Cornerstone • Enhanced Medical Notes and Correspondence Documents • Page 8 •
The following table summarizes the main features and functionality available with the two main styles of medical notes
offered in Cornerstone.
Feature/Functionality
Text Only
Templates
Enhanced
Templates
Use a designated Medical Note Quick Text document for immediate text
entry, bypassing the Start New Document window steps.
•
Click the Color All Text button to apply a single color to all text.
•
Apply multiple colors to select words or paragraphs throughout a document.
•
Apply text styles and formatting, such as font selection, bold, italics, indent
level, numbered/bulleted lists, etc.
•
Insert check boxes, tables, and other design elements.
•
Import graphic les, photos, and logos.
•
Add standard text-based bookmarks.
• •
Add image-based bookmarks (bookmarks that include signatures, images,
etc. or bookmarks that are inserted in a table format).
•
Insert a date/time stamp.
• •
Insert a problem description or diagnosis description.
• •
Insert a table of problem details, diagnosis details, or vital signs.
•
Lock a medical note to create a quick “tab-through” form using text input
elds.
• •
Use spell check.
• •
Use header/footer features.
•
Include attachments.
• •
Include invoice items.
• •
Use options for page setup and margins.
•
Email the client directly from the medical note
• •
Save a document with a Draft, Tentative, or Final status and continue to
add to or update the document.
• •
Void a document.
• •
Add an addendum to a document.
• •
Insert an entire medical note into a correspondence document.
• •
View full contents of the medical note on the Text tab and Medical Notes
tab on the Patient Clipboard* window.
•
View medical note in the Preview pane on the Patient Clipboard window.
• •

Document Template Setup
IDEXX Cornerstone • Enhanced Medical Notes and Correspondence Documents • Page 9 •
On the menu, select Lists > Documents > Templates and do one of the following:
• Click New and then select Text only template. Create the template and click Save.
• Select an existing template in the list and click Update. Make
changes to the template and click Save As to create a new
template and update the template properties.
• Select an existing template of the same type, click Copy, and
enter a name for the new template in the Description box.
Then select the copied template in the list and click Update
to make any changes. Click Save to save with the existing
template properties or Save As to change the template
properties.
Click Edit Properties to set properties, including the title,
category, and history description. You can also do this
when you save the template..
1. Create a new template or update an existing template and click Save As.
2. Create/update the top of the document (title or letterhead).
3. Create/update the body of the document.
• Develop content and layout rst.
• Identify work ow considerations: technician/doctor use and order of entries
• Use fonts, text alignment, bullets, numbering, and colored text (formatting options found in
programs like Microsoft
®
Word).
• Paste text from Word and some types of PDF les (may lose original formatting).
• Apply shading or colors to table cells to separate document sections.
4. Add elements:
• Bookmarks
• Text input elds
• Check boxes
• Links
• Medical illustrations and pictures
• Page breaks
5. Create/update the bottom of the document (footer or signature).
6. Set properties (description, type, practice favorite, auto nalize, default printer).
Bookmarks for Cornerstone data can be included in document templates. At the time of use, when a document
with bookmarks is printed, the bookmarks are replaced with the applicable data. For example, if the client
FullName bookmark is included in the template, the client’s name replaces the bookmark in the document at the
time of use.

Document Template Setup
IDEXX Cornerstone • Enhanced Medical Notes and Correspondence Documents • Page 10 •
Use the following information to change template properties and use the various save options.
1. Click the Edit Properties button to open the Template Properties window.
• Name—Type a name for this document template. The document template name will be included in the history
entry when this document template is used to create a patient document.
• Type—Select the type. Options are Medical Note, Correspondence, or Print Only.

Document Template Setup
IDEXX Cornerstone • Enhanced Medical Notes and Correspondence Documents • Page 11 •
• Save Correspondence as—When Correspondence is selected as the type, select how to save the document:
Title Only (only the title and no content will be recorded in medical history) or Document (the entire document
will be recorded in medical history). The Save option is not applicable to Medical Note or Print Only documents.
• History (Hx) description—(Optional) Type a default history description for this document template. This
provides you with an additional description for this document and will be recorded in medical history. When
recorded, the history line will be listed with the document name, followed by the status, and then followed by the
history description for the document.
History descriptions can be added or modied as needed.
Sample of history description in history entry.
• History (Hx) Alert—Select the Hx Alert check box to mark this document template as an alert in medical history.
Alerts help draw attention to the medical history entry.
• Autonalize in—Select the Autonalize in check box if you want the documents created from this document
template to autonalize. Indicate the number of days in which the document should autonalize.
• Printer—If this document template should print to a specic printer, select it from the list.
2. When the Template Properties window is complete, click OK.
3. Save the document template by clicking OK, Save, or Cancel.
• OK— Save and exit.
• Save—Save and continue.
• Cancel—Cancel changes and close.
4. The document template has been added to the list. Click Close to close the
Document Template List window.
On the Document Template List window, select a template in the list and then click Convert. The conversion options
available depend on the type of template you selected to convert.
Text Only conversion options include:
• Enhanced converted to Text Only—Converts the template and opens it for editing in the Cornerstone Editor (in
Text Only mode). The template retains only text from the enhanced template; tables, images, check boxes, etc. will
be removed.

Document Template Setup
IDEXX Cornerstone • Enhanced Medical Notes and Correspondence Documents • Page 12 •
• Text Only converted to Enhanced—Converts the template and opens it for editing in the Cornerstone Editor.
• Classic converted to Enhanced or Text Only—Converts the template and opens it for editing in the Cornerstone
Editor (in Text Only mode).
Conversion notes:
• When you convert a template, the original template is saved but inactivated.
• Bookmarks and invoice items are retained in the conversion, but note that when converting to Text Only, any
nontext bookmarks will be removed.
1. On the Template Update window, on the menu, select Insert > Header Footer > and then select Insert Header,
Insert Footer, Delete Header, Delete Footer, or Edit Header Footer (the options available depend on what the
template already contains).
2. Make any changes, such as inserting bookmarks, page numbers, etc.
3. Select Insert > Header Footer > Edit Header Footer to exit the header or footer.
1. Place your cursor in the location where you want to add a table, right-click, and select Insert > Table. The New
Table Parameters window opens.
2. Type the number of rows to include in the table.
3. Type the number of columns to include in the table.
4. Click OK.
1. Place your cursor in the location where you want to add a picture, right-click, and select Insert > Picture (or
Picture and Description). The Select Image File to Insert window opens.
2. Browse to the image (picture) you want to add to the document template and click Open. The image (picture) will
be added to the template.
3. To resize an image:
a. Left-click the image.
b. Rest your cursor on the handle in the corner of the image until your cursor becomes a
double-pointed arrow.
c. Left-click the handle and drag it to resize the image to the size you want.
Do not copy and paste images. Use only the Insert > Picture or Insert > Picture and Description method.
1. Place your cursor in the location where you want to add a page break and right-click.
2. Select Insert > Page break. The page break is added at the cursor’s location.

Document Template Setup
IDEXX Cornerstone • Enhanced Medical Notes and Correspondence Documents • Page 13 •
Bookmarks for Cornerstone data can be included in document templates. At the time of use, when a document with
bookmarks is printed, the bookmarks are replaced with the applicable data. For example, if the client FullName bookmark
is included in the template, the client’s name replaces the bookmark in the document at the time of use.
1. Place your cursor in the location where you want to add a bookmark and right-click.
If inserting a bookmark within a table cell, select Insert > Bookmark on the menu or click the
Bookmark button on the editor toolbar. Right-clicking in a table cell opens a table menu.
2. From the right-click menu, select Insert > Bookmark.
3. From the File Description list, select the appropriate type of le.
4. From the Field Description list, select the appropriate type of eld.
5. If applicable, update the name in the Bookmark box.
6. Click Add Bookmark.
Do not copy and paste bookmarks. This will “break” the bookmark and could create “protected text" errors in the
Cornerstone database.
See the Appendix for a list of all document bookmarks.
1. Place your cursor in the location where you want to add a check box and right-click.
2. From the right-click menu, select Insert > Check Box. You can type a corresponding name to appear next to the
check box.
1. Place your cursor in the location where you want to add a text input eld and right-click.
2. From the right-click menu, select Insert > Text Input.
3. In the Field Name box, type a name for the eld.
4. In the Initial Data box, type any initial data.
5. In the Maximum Field Length box, type the maximum number of characters for the eld.
Leave the Maximum Field Length box blank to allow unlimited text.
6. Click the Font button to customize the font, and then click OK.
7. Click OK.
You can add the following links: Problem Description, Problem Details, Diagnosis Description, Diagnosis Details, and Vital
Signs.
1. Place your cursor in the location where you want to add a link and right-click.
2. From the right-click menu, select Insert and then select the appropriate link.

Document Template Setup
IDEXX Cornerstone • Enhanced Medical Notes and Correspondence Documents • Page 14 •
Vaccination preferences allow vaccination information to be included on vaccination certicates, health certicates, and
other similar documents.
1. Select Controls > Defaults > Practice and Workstation > Vaccination Bookmarks.
2. Select the vaccinations to appear on vaccination certicates, health certicates, and other similar documents.
3. In the Vaccination line pattern area, select the buttons in the order in which the information should print on
documents.
4. Click OK.
5. You can now insert a bookmark (Reminder Info or Vaccinations–Use Preferences) into a document template.
The Reminder Info bookmark lists all items from the Vaccinations bookmark and also inserts dates based
on patient history. The Vaccinations bookmark lists only items and dates from the vaccination bookmark list
currently on the patient reminder le.
Check out all of the medical note templates available for download at community.idexx.com.
Import templates from the Cornerstone* Online Community using the Import Document Templates feature.
1. On the Tools menu, select Import Document Templates.
2. If you have not already downloaded the document template to import, click the Cornerstone Community link and
download the template le to the Downloads folder in your Cornerstone directory (for example: C:\Cstone
\Downloads).
3. On the Import Document Template window, click Browse and select the document template (.csz le) to import.
4. If a template with the same name already exists on your system, a message asks if you want to continue with the
import. If you click Yes, a number is appended to the new template name (“Eye Exam” will be changed to “Eye
Exam (1)”). If you click No, the currently selected template will not be imported. Click Browse to select a different
template or click Cancel to close the dialog box without importing a template.
5. Click Import Template. A message displays to inform you that the import was successful.
6. The next time you open the Document Template List window, the imported template will be available for selection in
the Samples category.
If the Document Template List window is open while you import the template, you will need to close the Document
Template List window and reopen it to see the new template in the list.
Once you have document templates set up, you can use them by accessing Correspondence or Medical Notes
through the menu bar, toolbar, and right-click menus.
To automate document templates, link them to:
• Reason for Visit as a check-in/out document.
• Invoice items with the Print Document special action.
• Diagnostic codes.

Document Template Setup
IDEXX Cornerstone • Enhanced Medical Notes and Correspondence Documents • Page 15 •
On the menu, go to Controls > Defaults > Practice & Workstation > Documents to set the default document settings
for your practice.
Controls > Defaults > Practice and Workstation
Menu Access Default Description
Documents
See gure V
Medical Note options
Display partial
medical note in
correspondence
(classic only)
Select the check box for Display partial medical notes in
Correspondence to be able to select which information from your
medical note templates to include in correspondence documents
where medical note bookmarks are being used.
Medical Note must
be nalized before
patient can be
checked out
Select the check box for Medical Note to be nalized before
patient can be checked out if you want medical notes to be
nalized prior to patient check out.
Auto nalize after
___ days
Select the number of days before the medical notes will be
automatically nalized.
Ask for weight if
last entry is older
than ___ days
Select the number of days for the computer to prompt for a weight
entry.
Default templates
For new templates
use
Select the Medical Note template you want to use as a default.
For Medical
Note Quick Text
documents use
Select the Quick Text Medical Note you want to use as a default.
Include invoice items when
printing Medical Notes
Select this check box to include invoice items when printing medical notes. Select the Also
include check box to add the following options: Declined item, Amount, and Staff ID.
Include invoice items when
printing Correspondence
Select this check box to include invoice items when printing correspondence documents.
Select the Also include check box to add the following options: Declined item, Amount,
and Staff ID.

Document Template Setup
IDEXX Cornerstone • Enhanced Medical Notes and Correspondence Documents • Page 16 •
Controls > Defaults > Practice and Workstation
Menu Access Default Description
Figure V
(Controls > Defaults > Practice and
Workstation > Documents)
Documents >
Favorite Documents
See gure W
Favorite document
templates
In the rst empty ID eld, enter the document ID of the medical note or correspondence
documents you would like to include on your Favorites list. (Lists > Documents >
Templates).
Figure W
(Controls > Defaults > Practice and
Workstation > Documents > Favorite
Documents)

Document Template Setup
IDEXX Cornerstone • Enhanced Medical Notes and Correspondence Documents • Page 17 •
After your practice has completed
the work of setting up your
document templates, the
management team should be aware
of the security options below that
affect the staff’s ability to access
document windows. Be mindful of
this to ensure the integrity of your
document templates and electronic
medical records. You should view
the correspondence and medical
note security options to ensure
the correct staff have the intended
access are listed below.
On the File menu, select Security Setup and view document security options.
Key: GEN: General Login; REC: Receptionists; TECH: Technicians; DR: Doctors; M/O: Managers/Owners
Cornerstone Dialog
Access Suggestions
Path to Locate
GEN REC DR TECH O/M
Correspondence
X X X X X
Activities > Correspondence OR
Correspondence button on toolbar
Correspondence—Finalize
X X X X X
Activities > Correspondence OR
Correspondence button on toolbar
Document Template Category List X X X X X Lists > Documents > Template Categories
Document Template Category Setup
X
Lists > Documents > Template > Categories >
New OR Update
Document Template List X X X X X Lists > Documents > Template
Document Template Setup
X
Lists > Documents > Template > New OR
Update
Documents—Void
X
From Patient Clipboard; double-click document
and click Void OR right-click the document and
select Void
Medical Notes
X X X X X
Activities > Medical Notes OR
Medical Note button on toolbar
Medical Notes—Finalize X X X X X Medical Note button on toolbar
Some practices may prefer to not give all staff the access/ability to nalize correspondence documents and/or
medical notes.

Document Template Setup
IDEXX Cornerstone • Enhanced Medical Notes and Correspondence Documents • Page 18 •
Chapter Summary
You learned these important concepts in this chapter:
• Document Template Overview—Document template benets, types, and sample listings of correspondence and
medical notes you may want to create.
• Windows and Features for Creating Document Templates—Windows for selecting and modifying the document
templates, including the toolbars to add elements that make the document easy to use, such as text input fields,
check boxes, bookmarks, tables, and images.
• Template Properties and Save Properties—Options that control how a document is saved in history, managed,
and printed.
• Other Document Procedural Steps—Other procedural steps for creating documents and correspondence.
• Default Settings and Security—Default settings and security settings for documents and correspondence.

IDEXX Cornerstone • Enhanced Medical Notes and Correspondence Documents • Page 19 •
Document Usage
You’ll learn these important concepts in this chapter:
• Document Editor—Medical Note Functionality—Develop skills and understand how to record medical notes and
use medical note features.
• More Medical Note Features—Additional medical note features.
You can dedicate some pages of the document for the internal medical record and other pages for client or external
purposes. This might be a procedure summary or discharge instructions, all in one document. You can also:
• Customize forms.
• Insert elements such as tables, check boxes, text input elds, and images.
• Enter invoice items in the template.
• Access and insert other Cornerstone features, such as problems, diagnosis, and vital signs.
1. With the client account displayed on the Patient Clipboard* window, right-click the patient’s name and select
Medical Note to open the Start New Document window.
You can also select Correspondence when appropriate—follow the same steps.
2. Enter the staff ID and press TAB.
The staff ID should be the doctor or “author” of the medical note, as it is recorded in history and places the
medical note on the Daily Planner window for that staff ID. The staff ID cannot be changed once it
is assigned.
3. Use one of the following options to select the medical note template:
• If you know the exact title of the template or if you know the document ID, type it in the Title or ID box.
• If you do not know the exact title but know one or more keywords included in the title, select the Search for
word check box and type all or part of
the word in the Title or ID box.
• If your template is saved as a favorite,
select it from the Favorites list.
• Select the template from the Categories
drop-down list.
4. Select the document from the list and click
OK.Continue to next activity.

Document Usage
IDEXX Cornerstone • Enhanced Medical Notes and Correspondence Documents • Page 20 •
Use the weight window to begin adding, editing, and graphing vital signs. Vital sign entry is based on the practice’s default
settings.
1. Enter the recording staff’s ID.
2. Enter the patient’s weight, verify the weight units, and select the value rating. If applicable, type a short note.
Leave the window open for the next activity.
1. In the Weight entry area, click add more Vital Signs.
If vital signs are entered by both the technician and the doctor,
the technician can enter through the weight entry window.
The doctor can use the vital sign link in the body of the note
to enter their vital signs and then merge the two entries into a
single set that will be automatically imported into the medical
note.
2. Enter the vital signs values, click OK to input the staff ID for this
vitals set, and select the recording staff.
If a vital signs link has been included in the medical note
template, you can record vital signs while working in a medical
note. The recorded vital signs will populate the Patient
Clipboard, and the values will be inserted into the medical
note as a table.
3. Click OK.
Vital signs on the Patient Clipboard window
Vital signs link in medical note
Leave the window open for the next activity.

Document Usage
IDEXX Cornerstone • Enhanced Medical Notes and Correspondence Documents • Page 21 •
The ability to edit vital signs is based on the original date/time of the vital sign set. Follow these guidelines for editing
existing vital signs sets:
• If the vital signs set was created within the last 24 hours, you can add values to blank vital signs and edit an
existing entry (cell) in the set.
• If the vital signs set is older than 24 hours but created within the last 10 days, you can add values only to blank
vital signs. Editing of existing entries is not allowed.
• If the vital signs set was created over 10 days ago, no entries or editing are allowed. The key time frames to
remember are 24 hours and 10 days.
• You can void a vital sign at any time; however, it will void the entire vital sign set—you cannot void a single vital
sign. Once the vital sign set is voided, you can add a new vital sign set and modify the entry date.
The period of time when editing is allowed is based on the server date/time when a vital signs set is created,
which is not necessarily the date/time entered by the staff member.
TASK
Within 24 hours of
initial vital signs
set creation
More than 24 hours
after initial vital signs
set creation
Within 10 days of
initial vital signs set
creation
More than 10 days
after initial vital
signs set creation
Add a new vital sign
entry (blank cell)
within an existing set
Yes Yes Yes Not Allowed
Edit a vital sign entry
(occupied cell) within
an existing set
Yes Not Allowed Not Allowed Not Allowed
For more information about vital signs rules and options, see “More About Vital Signs” in the Appendix.
1. Lock the medical note so that you can automatically advance through the input elds and
check boxes.
2. To record the technician in the Technician eld of the medical note, double-click in the rst
input eld, and then press TAB to advance to the next eld.
3. Ask and answer the questions in the History area.

Document Usage
IDEXX Cornerstone • Enhanced Medical Notes and Correspondence Documents • Page 22 •
4. Record the physical exam ndings. This example is from a sample gastrointestinal medical note.
Leave the window open for the next activity.
Keep the following information in mind when working with medical notes in the Cornerstone Editor:
• Click the Lock button to limit entries.
◦ First Entry—For locked documents, double-click the rst text input eld and enter the text.
During document setup, select the rst cursor position and lock the document. The rst entry position will
already be selected.
◦ TAB—Press the TAB key to advance to subsequent elds, making entries as you proceed.
◦ Unlock—To enter information in other locations, unlock the document .
◦ Spacebar—Press the spacebar to select a check box.
• Use the Cornerstone Editor toolbar, menu bar, or right-click menu to insert medical record features (pictured below).
◦ Table—When working in a table, only the menu bar and toolbar are available.
◦ Problem—Insert a problem link. This also populates the Problems tab on the Patient Clipboard*.
◦ Diagnosis—Insert a diagnosis link. You can also link documents to a specic diagnosis so the documents print
when you use that diagnosis. This also populates the Dx tab on the Patient Clipboard.
• To expand the editor pane, grab the Splitter Bar and move it up or down or click Full Size View (at the top right
corner of the editor pane).
• Double-click the client banner or patient banner to open the Client Information or Patient Information windows.

Document Usage
IDEXX Cornerstone • Enhanced Medical Notes and Correspondence Documents • Page 23 •
These features are available for correspondence and medical notes.
Text Input Fields Check Boxes Tables Images Email/Fax and PHN Share
Diagnosis and
Problem Links
Bookmarks Invoice Items Attachments
Client Signature
About Invoice Items on the Medical Note
You can use the following methods for entering invoice items while creating medical notes:
• Add default invoice items to the template so that when a template is opened during the exam, the normal protocol
and charges appear.
You’ll experience differences when the invoice items are set with a blank status rather than a recommended
status.
• Enter the invoice items when completing the medical note.
• Wait to enter the charges in the next step of the process, on the Patient Visit List.
Your key leaders will make a decision about entering invoice items on medical notes based on the following advantages
and potential gaps:
Advantages
• Invoice items and medical notes can be entered on one window.
• Staff can later review the medical note and related invoice items in history together.
If invoice items and pricing change outside the medical note, the changes won’t be reected in the medical note.

Document Usage
IDEXX Cornerstone • Enhanced Medical Notes and Correspondence Documents • Page 24 •
Potential Gaps
• Patient Visit List Changes Don’t Change Medical Note Entries—If changes or additions are made to the Patient
Visit List, they do not “sweep back“ and change the medical note entries. You must enter the change manually in
the medical note.
• Declined Recommendations—No Blue Line—If you decline a recommendation and then make a notation on the
blue line, the notation will not be available in the Cornerstone Editor window, as a declined recommendation is not
included.
• Estimates Don’t Flow to Medical Note—If your practice’s standard process is to create and nalize estimates,
be aware that nalized estimate charges don’t ow to medical notes. Your practice team must delete duplicate
charges created by having both a nalized estimate as well as medical note invoice items. You can also change
estimate default settings so that the nalized charges are not transferred to the Patient Visit List window (Controls
> Defaults > Practice and Workstation > Estimates).
The Invoice Items tab is located near the bottom of the Cornerstone Editor window.
Point to the gray bar between the document editor and the tab area
until you see a cursor with a double arrow. Click and drag up to increase the size of the pane.
To add an invoice item at the time of use and save the medical note:
Add invoice items and smart groups to the medical note template to automatically add those items to the medical
note.
1. In the rst blank row, double-click or press F2 in the Item ID column, and then select the invoice item.
2. To set the invoice item status, click the gray box to the left of the Item ID column. Options are Blank,
Recommended, Accepted, Performed, Declined, and Declined to history.
Click Travel Sheet to select multiple items from a specic list.
3. Optional: In the Hx description box, type a description for the patient’s history. The history description is part of the
in line history entry in the patient’s le.
4. Optional: Select the Alert check box to place a permanent red highlight in the patient history for this medical entry.
5. Select the status of the medical note. Options are Draft, Tentative, or Final. The default status is Tentative.
6. Click OK to save and close the medical note.
If any special actions appear, complete them and then click Continue; the medical note will close. If you
complete the special actions at this time, they will not be available on the Electronic Whiteboard, so you must
determine at which time you need to complete them. Some examples of special actions are lab request, image
request, prescription label, vaccine tag, update microchip ID, and print document.
To delete an item from the Invoice Items tab, highlight the quantity for that item and press CTRL + D.

Document Usage
IDEXX Cornerstone • Enhanced Medical Notes and Correspondence Documents • Page 25 •
In addition to using medical note templates, you can use the medical note quick text feature. This option offers a fast and
simple medical note for adding information to a patient’s medical record. Select the Medical Note Quick Text option,
enter your staff ID, and immediately start typing your notes in the Cornerstone Editor.
The quick text feature allows text entry ONLY. Links, images, tables, and some bookmarks are not available.
1. With the patient’s record open on the Patient Clipboard, right-click the patient’s name and select Medical Note
Quick Text.
2. Enter the staff ID and click OK.
3. If prompted for weight, complete the weight entry information and click OK.
4. In the white work area, type the medical notes into the template.
Set a default document for your Medical Note Quick Text template at Controls > Defaults > Practice and
Workstation > Documents. Customize your Quick Text templates at Lists > Templates.
5. After you enter the medical note text, select the document status. Options are Draft, Tentative, and Final.
Draft and tentative documents appear in the Daily Planner window until they are nalized.
6. Optional: In the Hx description box, type a history description.
7. Optional: Select the Alert check box to place a permanent red highlight on this entry in patient history (title line
only). Use text color to highlight the body of the note as needed for additional alert information. You can also
change the text color for the entire note to enhance it when viewing patient history.
8. Optional: Select the Autonalize in (#) days check box and enter the number of days.
9. Click OK to save and close the medical note.
Text only medical notes allow full in line viewing of text only document contents on the Patient Clipboard window. This
means that you can quickly view any text
only medical note directly on the Text tab
or Medical Notes tab in the patient history
area without having to open the document
in a separate preview or editor window. You
can also point to the quick text medical note
to view the note in the Summary tab.
Example of a quick text medical note using text input elds

Document Usage
IDEXX Cornerstone • Enhanced Medical Notes and Correspondence Documents • Page 26 •
When adding a medical note for a patient, if you insert a diagnosis code that has been precongured to link to a particular
document in Cornerstone (Lists > Diagnostic Codes > Diagnostic Code Setup), the Diagnosis Document window
opens.
If you click Yes to print the linked diagnosis document, the Staff Selection window opens.
After entering the staff ID, one of the following will happen:
• If the linked diagnosis document is a medical note or correspondence document, the document prints on the default
printer.
• If the linked diagnosis document is a LifeLearn
®
client handout, the document opens in Microsoft
®
Word. You can
then print the document directly from Microsoft Word.

Document Usage
IDEXX Cornerstone • Enhanced Medical Notes and Correspondence Documents • Page 27 •
To edit a picture or make annotations to a picture (available only at time of use):
Any edits or annotations you make to a picture within a document are associated only with that document
and will not be reected outside of the document (will not change the original picture saved in the patient
record).
1. Double-click the inserted image (not a pasted image) that you want to edit. The image opens in the Image Viewer
window.
2. Use the Image Viewer tools to make annotations and edit the image, and then close the Image Viewer window
3. Click Yes to save changes. The Image Viewer closes and the edited image is displayed.
Image Viewer
Annotation tool menu and annotated image
Annotated image in medical note

Document Usage
IDEXX Cornerstone • Enhanced Medical Notes and Correspondence Documents • Page 28 •
Chapter Summary
You learned these important concepts in this chapter:
• Document Editor—Medical Note Functionality—Develop skills and understand how to record medical notes and
use medical note features.
• More Medical Note Features—Additional medical note features.

IDEXX Cornerstone • Enhanced Medical Notes and Correspondence Documents • Page 29 •
Managing Medical Notes and Correspondence
You’ll learn these important concepts in this chapter:
• Daily Planner—How to use the Daily Planner window to view and act on medical notes and correspondence.
• Reports—How to view reports for medical notes and correspondence documents.
The Daily Planner window features nine tabs of information and is valuable for receptionists, technicians, and doctors to
view tentative or draft medical notes and correspondence.
1. Click the Daily Planner button on the toolbar.
2. In the Staff ID box, press TAB to accept the default staff ID, or enter a new staff ID and press TAB.
3. Click the Medical Note tab to view tentative or draft medical notes.
4. Right-click and select an option to completed the following actions for the selected patient:
• Update—Update or complete and nalize the medical note.
• Finalize—Finalize the medical note to the patient le. Finalized medical notes cannot be modied.
• Patient Clipboard*—Access the Patient Clipboard for selected patient.
While nalized medical notes cannot be modied, addendum are allowed.
You can complete these steps for tentative or draft correspondence documents on the Correspondence tab on
the Daily Planner window.
This report lists all patients with medical notes still marked as tentative.
Managing Medical Notes and Correspondence
IDEXX Cornerstone • Enhanced Medical Notes and Correspondence Documents • Page 30 •
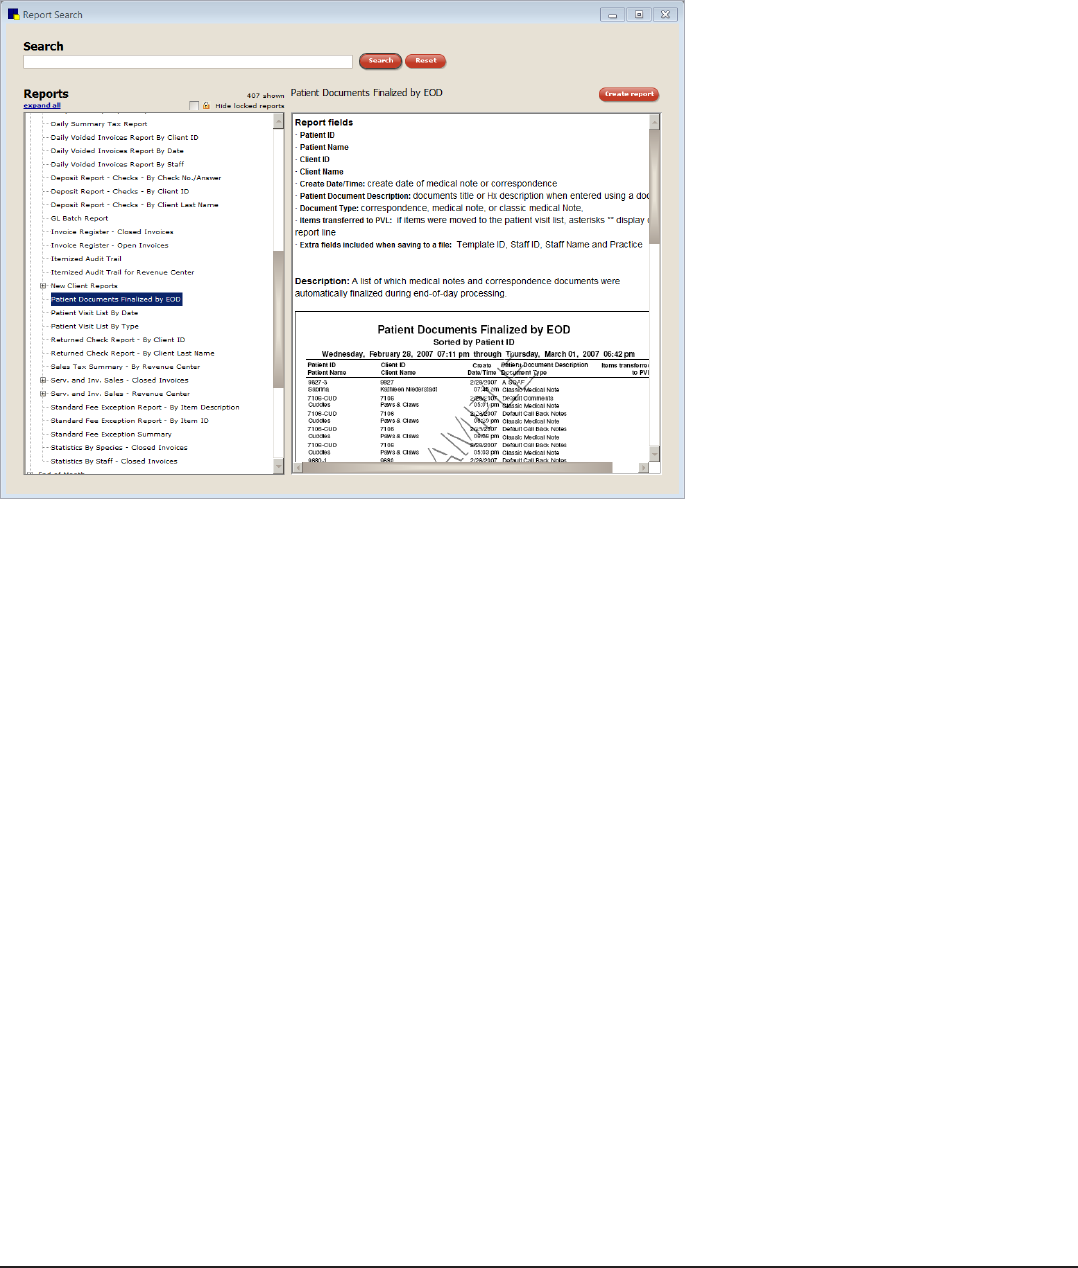
This report provides a list of medical notes and correspondence documents that were automatically nalized during end-
of-day processing.
Chapter Summary
You learned these important concepts in this chapter:
• Daily Planner—How to use the Daily Planner window to view and act on medical notes and correspondence.
• Reports—How to view reports for medical notes and correspondence documents.

Appendix
IDEXX Cornerstone • Enhanced Medical Notes and Correspondence Documents • Page 31 •

Appendix
IDEXX Cornerstone • Enhanced Medical Notes and Correspondence Documents • Page 32 •
Medical Notes and Correspondence Bookmark List
File descriptions and bookmarks are listed below.
Bar Codes
BC Client First Name
BC Client Full Name
BC Client ID
BC Client Last Name
BC Patient ID
BC Patient Name
BC Staff First Name
BC Staff Full Name
BC Staff ID
BC Staff Last Name
Boarding
Arrival Date
Arrival Time
Boarding Status
Cage Number
Cage Type
Departure Date
Departure Time
Patient Information
Choice
our/your us/you we/you
Client
Address 1
Address 2
All Phones
City
Classication
Client Signature
Credit Code
Current A/R
Date Client Entered
Email Address
Finance Charges A/R
First Name
Full Name
ID
Last Month A/R
Last Name
Last Payment Amount
Last Payment Date
LY Sales—Inventory
LY Sales—Services
LY Visits
Middle Initial
Ninety Days A/R
Note
Outstanding Balance
Overdue Balance
Phone Description
Phone Extension
Phone Number
Postal Code
Referred Address 1
Referred Address 2
Referred By Name
Referred City
Referred Postal Code
Referred State
Secondary Name
Sixty Days A/R
State
Status
Thirty Days A/R
Title
YTD Sales—Inventory
YTD Sales—Services
YTD Visits
Imaging
Image Patient Picture
Invoice Items
List
Lab
Lab Results

Appendix
IDEXX Cornerstone • Enhanced Medical Notes and Correspondence Documents • Page 33 •
Medical History
Abnormal Exam Observ.
Only
All Exam Observations
Departing Instructions
Patient Diagnosis
Medical Notes
A l l o r a n y s p e c i c m e d i c a l n o t e s Header and Footer
Header and Footer w/fonts
Merge
Invoice Item BC Invoice Item Desc (description) Invoice Item ID
Miscellaneous
Current Date Current Time
Patient
Age
Birth Date
Breed
Check In Date (Last)
Check In Time (Last)
Check Out Date (Last)
Check Out Time (Last)
Color
Current Weight
Current Weight Unit
Current Weight Unit Date
Date Current Weight
Date Patient Entered
Deceased Date
Manner Of Injection
Markings
Microchip ID
Name
Number of Years
Patient Classication
Patient ID
Patient Note
Patient Status
Rabies Expiration Date
Rabies Tag Date
Rabies Tag Number
Registration Number
Sex
Species
Vaccine Amount
Vaccine Expiration
Vaccine Lot Number
Vaccine Name
Vaccine Producer
Vaccine Type
Practice
All Phones
Clinic Address 1
Clinic Address 2
Clinic City
Clinic Name
Clinic Name 2
Clinic Phone
Clinic Postal Code
Clinic State
Prescription Inst (instructions)
List
Question
Displays a window for a question to be entered.

Appendix
IDEXX Cornerstone • Enhanced Medical Notes and Correspondence Documents • Page 34 •
Referral Doctor
All Phones
Ref. Doctor Address 1
Ref. Doctor Address 2
Ref. Doctor City
Ref. Doctor Email
Ref. Doctor Fax
Ref. Doctor First Name
Ref. Doctor Full Name
Ref. Doctor Last Name
Ref. Doctor License
Ref. Doctor Note
Ref. Doctor Phone Desc.
(description)
Ref. Doctor Phone Extension
Ref. Doctor Phone Number
Ref. Doctor Postal Code
Ref. Doctor State
Ref. Doctor Title
Referral Hospital
All Phones
Ref. Hospital Address 1
Ref. Hospital Address 2
Ref. Hospital City
Ref. Hospital Email
Ref. Hospital Fax
Ref. Hospital Name
Ref. Hospital Note
Ref. Hospital Phone Desc.
(description)
Ref. Hospital Phone Extension
Ref. Hospital Phone Number
Ref. Hospital Postal Code
Ref. Hospital State
Reminder Info
Varies by practice
Staff
All Phones
Signature
Signature w/Pwd.
(password
Staff Address 1
Staff Address 2
Staff City
Staff Classication
Staff Extension
Staff First Name
Staff Full Name
Staff ID
Staff Last Name
Staff License Number
Staff Middle Initial
Staff Note
Staff Phone Description
Staff Phone Number
Staff Postal Code
Staff State
Staff Status
Staff Title
User Def Client
Varies by practice (depending on what you set up as user-dened prompts
(Controls > User Dened Prompts > Client tab)
User Def Patient
Varies by practice (depending on what you set up as user dened prompts
(Controls > User Dened Prompts > Patient tab)
Vaccinations
Varies by practice

Appendix
IDEXX Cornerstone • Enhanced Medical Notes and Correspondence Documents • Page 35 •
IDEXX Cornerstone Chartless Setup Checklist
• User Dened Prompts: Consider creating user-dened prompts to create elds for information that does not
already exist in the client or patient record. User-dened prompts can also be set as alerts.
◦ Client Prompts: Preferred Doctor, Client Alert
◦ Patient Prompts: Medical Condition, Patient Alert, Temperament, Special Diet, Vaccine Reactor, Allergic To
• List Top 10 Reasons for Visit: Create a list of your top ten reasons for visit. Use this list to ensure that all
Cornerstone features are setup to support your protocols for the most common visits.
• Review/Modify Reasons for Visit: Review reasons for visit. Create reasons for visit for the top 10 reasons for
visit if not already listed. Attach alerts to remind staff of information they should collect from or provide to the client.
Documents can also be attached to print at check-in or checkout. (Controls > Reasons for Visit)
• Create Smart Groups: Create smart groups for your top 10 reasons for visit. Smart groups will establish your
protocol and ensure charges are not missed. Pick lists may also be used in smart groups. (Lists > Invoice Item)
• Create Document Templates: Create medical notes and documents (correspondence or print only) for each reason
for visit. (Lists > Documents > Templates)
Medical note templates will standardize the information recorded for each visit in the patient’s le. Ensure templates
include elds for SOAP or HEAP notations and links to enter vital signs, problems, and diagnoses.
Documents can be created for consent forms, discharge instructions, and client education, which can be
electronically signed and saved to the patient’s le.
• Review/Modify Problems: Review/modify the problem list. This will ensure the majority of common problems will
be on the list to be added to the patient’s le as needed. Reviewing now will eliminate time entering new problems
during exam time. (Controls > Problems > Problem List)
• Review/Modify Diagnoses: Review/modify the diagnostic code list. This will ensure the majority of common
diagnoses will be on the list to be added to the patient’s le as needed. Reviewing now will eliminate time entering
new diagnoses during exam time. (Lists > Diagnostic Codes)
• Review/Modify Callback Reminders: Review/modify callback reminders attached to invoice items for each reason
for visit to ensure callbacks are performed and documented in the patient’s le. (Lists > Invoice Item)
• Review/Modify and Attach Departing Instructions: Review/modify the departing instructions and attach to invoice
items to ensure consistent information is provided to clients regarding service and inventory items where appropriate.
(Lists > Departing Instructions)
• Review/Modify and Attach Prescription Instructions: Review/modify prescription instructions and attach to
invoice items where appropriate. This will create efciency when creating prescription labels for medications that
have standard dosing instruction. (Lists > Prescription Instructions)
• Review Diagnostic Integration Options: IDEXX SmartLink* technology can advance the standard of medical care
in your practice. It will help you provide better medicine and increase efciency which lead to better business and
increased client loyalty. Lab results and digital radiography can be directly downloaded to the patient’s le. Contact
your IDEXX Computer Systems Representative for more information on integration options for your practice.
• Create Compliance Protocols: Use the Compliance Assessment Tool* to create compliance protocols for your
top reasons for visit to measure compliance rates and review missed revenue-generating opportunities. Use the
compliance results to determine opportunities for staff education. (Reports > Compliance Assessment Tool >
Protocol Setup Wizard)

Skill Assessment and Evaluation
IDEXX Cornerstone • Enhanced Medical Notes and Correspondence Documents • Page 36 •

IDEXX Cornerstone • Enhanced Medical Notes and Correspondence Documents • Page 37 •
Enhanced Medical Notes and Correspondence Documents
Skill Assessment
Practice Name:
Your Name:
Completion Date:
Instructions: After completing your training, please read each of the following skill assessment statements and
evaluate your ability to perform each task. Mark only one X for each skill statement.
Can
Perform
Can
Perform
but NOT
Using
Cannot
Perform
Not
Applicable
Chapter Summary
1. I can create a document template.
2. I can insert a table into a document template
3. I can insert an invoice item into a document template.
4. I can set a document template to autonalize in a specic number of
days.
5. I can edit and/or delete a default header and/or footer in a document
template.
6. I can set the properties for a document template.
7. I can mark a document template as inactive.
8. I can select the template from a list of available document templates.
9. I can start a medical note document for a patient from the Patient
Clipboard
*
.
10. I can enter information into a medical note document.
11. I can select the document status.
12. I can save the document.
13. I can update a medical note from the Daily Planner or the Patient File.
14. I can update a correspondence document from the Daily Planner or the
Patient File.
15. I can void a document.
16. I can enter vital signs through a document.
Results of the Skill Assessment
_____ Can Perform
_____ Can Perform but not Using
_____ Cannot Perform
_____ Not Applicable
Please return this skill assessment using one of the following methods:
Return this information to:
Cornerstone Education Department at [email protected].
Mail this information to:
IDEXX Laboratories
Attn: Cornerstone Education Department/Gina Toman
One IDEXX Drive
Westbrook, Maine 04092

IDEXX Corn erstone
*
Practice Management System
Enhanced Medical Notes and Correspondence Documents
Evaluation
We value your opinion! Tell us what you think about the course.
Practice: Date:
Trainer:
Feedback received from you regarding the training is vital to our continued improvement.
Course Description
During this two and a half hour course, managers, receptionists or technicians will learn to efficiently set up and
use document templates, used for such purposes as medical notes, release forms or other important documents.
Topic include:
• Types of Documents and Uses • Cornerstone Editor
• Documents and Templates—Status, Properties, and Saving • Document Defaults and Security
• Document Templates and Document Content Elements • Daily Planner Window
• Start New Document Window • Reports
1. How likely would you be to recommend an IDEXX Cornerstone course to a friend or colleague?
1 Not Likely................................................. .........................................................................................Likely 10
1 2 3 4 5 6 7 8 9 10
2. For us to better understand the opinions of our participants, please explain why you selected the rating
above?
3. The prerequisites for this course are:
• The most current version of Cornerstone installed at practice.
• Basic Cornerstone navigation.
• Access to set up Cornerstone features, which means security for medical notes and correspondence setup.
Indicate which participants were ready for, and met the prerequisites for, this course.
Please select all that apply.
Our practice
All other practices
Some other practices
IDEXX Cornerstone • Enhanced Medical Notes and Correspondence Documents • Page 38 •

Enhanced Medical Notes and Correspondence Documents Evaluation
4. How was the length of the course?
Too short
Too long
Just right
Additional Comments:
5. Referring to the items listed below, did we meet
your expectations:
No Yes
1 2 3 4 5 6 7 8 9 10 N/A
The course content matched the course description.
The course materials were professional looking.
The course materials provided contained valuable
content.
The trainer arrived well prepared and used appropriate
examples.
The trainer used effective communication skills.
The trainer answered all of my questions effectively.
As a result of this course we can expand our use of
Cornerstone’s features.
This course provided a good value for the cost.
Additional Comments:
6. Did you follow along with the participant workbook during the course presentation?
Yes—I followed the participant workbook the majority of the time.
No—I didn’t use the participant workbook.
Sometimes—I used the participant workbook some, but not most, of the time.
If No or Sometimes, why not?
7. What was the most valuable aspect of this course?
IDEXX Cornerstone • Enhanced Medical Notes and Correspondence Documents • Page 39 •

Enhanced Medical Notes and Correspondence Documents Evaluation
Your Name:
Practice Name:
Practice City, State:
Practice Telephone #:
Testimonial Permission:
(Please check the box below)
Please have an IDEXX Computer
Systems Representative contact me
to discuss featuring my comments in
promotional materials.
Reminder: Please return this evaluation using one of the following methods:
Return this information to:
Cornerstone Education Department at [email protected].
Mail this information to:
IDEXX Laboratories
Attn: Cornerstone Education Department/Gina Toman
One IDEXX Drive
Westbrook, Maine 04092
Please Print:
8. What suggestions do you have for future revisions of this course?
9. Using the roles listed, count and record how many participants (from your practice) attended some, or all,
of this course. If someone holds more than one of these roles, record their primary role only.
Primary Roles
Number of participants with this primary
role that attended this course
Veterinarian
Technician or Nurse
Reception or Client Services
Office, Practice, or Business Manager
Practice Owner
Other (List role and record number)
Other (List role and record number)
Thank you! We appreciate your feedback.
IDEXX Cornerstone • Enhanced Medical Notes and Correspondence Documents • Page 40 •
