Bluebeam Revu 2016: Basics Guide
(YOGI v1.0)
PAGE 2 Revu Basics | Guide 2016
PAGE 3 Revu Basics | Guide 2016
Table of Contents
TABLE OF CONTENTS ............................................................................................................................................3
“REQUIRED,” “RECOMMENDED,” “AS NEEDED” ..................................................................................................................5
1.0 INTRODUCTIONS.............................................................................................................................................6
1.1 COURSE INTRODUCTION.............................................................................................................................................6
1.1.1 Welcome.......................................................................................................................................................6
1.1.3 Background...................................................................................................................................................6
1.2 INTRODUCTION TO REVU ............................................................................................................................................6
1.2.1 What is Bluebeam Revu? ..............................................................................................................................7
1.2.2 Who Uses Bluebeam Revu? ..........................................................................................................................7
1.2.3 Vector vs. Raster Data & What That Means with Respect to PDF ................................................................7
1.2.4 Revu’s Impact on Existing PDF Files ..............................................................................................................7
2.0 OVERVIEW: INTERFACE, NAVIGATION & PROFILES ..........................................................................................9
2.1 MODULE OVERVIEW .................................................................................................................................................9
2.2 COMMAND BAR, TOOLBARS & MENUS.........................................................................................................................9
2.3 SIDE PANELS & TAB ACCESS .....................................................................................................................................10
Activity – Lesson 2.3: Panels & Tab Access Review – Q&A ..................................................................................10
2.4 PROFILES & PROFILE MANAGEMENT ..........................................................................................................................10
2.5 OPENING A PDF.....................................................................................................................................................12
2.6 PDF NAVIGATION...................................................................................................................................................15
3.0 THE MARKUP TOOLS .....................................................................................................................................17
3.1 MODULE OVERVIEW ...............................................................................................................................................17
3.2 HOW TO ACCESS MARKUP TOOLS..............................................................................................................................17
3.3 TYPES OF MARKUP TOOLS ........................................................................................................................................18
3.4 CUSTOMIZING THE PROPERTIES OF MARKUP TOOLS ......................................................................................................21
3.5 USING THE SNAPSHOT TOOL .....................................................................................................................................22
4.0 STAMPS ........................................................................................................................................................23
4.1 MODULE OVERVIEW ...............................................................................................................................................23
4.2 & 4.3 APPLYING A STAMP (TO A SINGLE PAGE OR ALL PAGES) ..........................................................................................23
4.4 CREATING A STAMP.................................................................................................................................................25
5.0 THE TOOL CHEST ...........................................................................................................................................28
5.1 MODULE OVERVIEW ...............................................................................................................................................28
5.2 WHAT IS THE TOOL CHEST & WHY DOES IT SAVE SO MUCH TIME?..................................................................................28
5.3 RECENT TOOLS .......................................................................................................................................................30
5.4 PROPERTIES MODE VS. DRAWING MODE ....................................................................................................................30
5.5 MY TOOLS ............................................................................................................................................................31
5.6 TOOL SETS ............................................................................................................................................................33
Activity – Module 5 Review..................................................................................................................................35
6.0 THE MARKUPS LIST .......................................................................................................................................36
6.1 MODULE OVERVIEW ...............................................................................................................................................36
6.2 WHAT IS THE MARKUPS LIST?...................................................................................................................................36
6.3 ORGANIZING COLUMNS ...........................................................................................................................................37
6.4 SORTING DATA IN THE MARKUPS LIST.........................................................................................................................39
6.5 FILTERING DATA .....................................................................................................................................................40
6.6 STATUSES..............................................................................................................................................................40
PAGE 4 Revu Basics | Guide 2016
6.7 CUSTOM COLUMNS.................................................................................................................................................42
6.8 IMPORTING COMMENTS FROM OTHER PDFS ...............................................................................................................44
6.9 EXPORTING MARKUP DATA ......................................................................................................................................44
Activity – Lesson Review: Pop Quiz!.....................................................................................................................46
7.0 PDF CREATION ..............................................................................................................................................47
7.1 MODULE OVERVIEW ...............................................................................................................................................47
7.2 NEW PDF CREATION...............................................................................................................................................47
7.3 USING THE BLUEBEAM PDF PRINTER TO CREATE PDFS FROM VIRTUALLY ANY PROGRAM ....................................................48
7.4 PDF CREATION USING BLUEBEAM’S PLUGINS ..............................................................................................................49
8.0 DOCUMENT MANAGEMENT & SETUP ...........................................................................................................50
8.1 MODULE OVERVIEW ...............................................................................................................................................50
8.2 PDF MANIPULATION...............................................................................................................................................50
8.3 SEARCH: TEXT & VISUALSEARCH................................................................................................................................51
8.4 EMAILING & EXPORTING PDFS..................................................................................................................................52
Activity – Module 8 Review: “Pop Quiz!”.............................................................................................................53
9.0 INTRODUCTION TO STUDIO ..........................................................................................................................54
9.1 MODULE OVERVIEW ...............................................................................................................................................54
9.2 DIFFERENCES BETWEEN STUDIO SESSIONS & STUDIO PROJECTS .......................................................................................55
9.3 GETTING IN TO STUDIO ............................................................................................................................................55
Activity – Module 9 Review: “Pop Quiz!”.............................................................................................................57
10.0 STUDIO SESSIONS .......................................................................................................................................58
10.1 MODULE OVERVIEW .............................................................................................................................................58
10.2 SETTING UP A NEW SESSION...................................................................................................................................58
10.3 LIVE SESSION PARTICIPATION ..................................................................................................................................65
10.4 RECORD REPORTS .................................................................................................................................................66
10.5 CLOSING OUT A STUDIO SESSION.............................................................................................................................69
Activity – Module 10 Review: “Pop Quiz!”...........................................................................................................72
11.0 STUDIO PROJECTS .......................................................................................................................................73
11.1 MODULE OVERVIEW .............................................................................................................................................73
11.2 SETTING UP A NEW PROJECT ..................................................................................................................................74
11.3 SETTING PERMISSIONS ...........................................................................................................................................81
11.4 WORKING WITH DOCUMENTS IN STUDIO PROJECTS ....................................................................................................84
11.5 VIEWING REVISION HISTORY ...................................................................................................................................86
Activity – Module 11 Review: “Pop Quiz!”...........................................................................................................88
12.0 ADDITIONAL RESOURCES ............................................................................................................................89
12.1 MODULE OVERVIEW .............................................................................................................................................89

Revu 2016: Basics Guide
PAGE 5 Revu Basics | Guide 2016
“Required,” “Recommended,” “As Needed”
Depending on your requirements, you may decide to
skim over some of the topics recommended. Before
you do that, check out the chart below & compare it
with the table of contents. The highlighted modules
were covered during the training sessions most of you
attended. Together, they will help you know what
topics should be considered “required,”
“recommended” & “optional (As needed.”
Required
Module 1: Welcome & Introduction
Module 2: Interface, Navigation & Profiles
Module 3: The Markup Tools
Module 5: The Tool Chest
Module 6: The Markups List
Recommended
Module 8: Document Management & Setup
Module 9: Introduction to Studio
Module 10: Studio Sessions
Module 11: Studio Projects
As Needed
Module 4: Stamps
Module 7: PDF Creation

Revu 2016: Basics Guide
PAGE 6 Revu Basics |Guide 2016
1.0 Introductions
1.1 Course Introduction
1.1.1 Welcome
Welcome to the Revu 2016 Basics course.
In this course you will learn about the basic, core
features of Revu 2016.
1.1.3 Background
This course was created in response to the need for a
structured & consistently delivered drawing review
program for Georgia Tech projects.
Revu provides the digital collaborative process
for reviewing drawings to help:
o Condense the drawing review process
o Alleviate duplicate notes & time consuming
data entry
1.2 Introduction to Revu
Lesson objectives
By the end of this lesson, learners will be able to:
Use Bluebeam Revu as a powerful PDF creation,
editing, markup & collaboration tool.
Understand Revu is built primarily for technical
industries such as Architecture, Engineering,
Construction, Oil & Gas.
Use Revu to streamline workflows throughout the
construction process.
Understand how flexible Revu is as an
application that can be used by anyone who
works with PDFs.
Open & edit any PDF that meets the ISO
standard requirements in Revu.
Understand that any PDF created with Revu, can
be opened & edited in any other PDF software.
Understand the difference in working with a
vector or raster PDF. Vector is preferred.

Revu 2016: Basics Guide
PAGE 7 Revu Basics |Guide 2016
Use the PDF printer driver & PDF creation plugins
within Revu to create vector PDFs.
Understand that old PDFs still exist even though
they have a blue icon instead of a red one.
Change the PDF icon color from blue to red in
the Bluebeam Administrator.
1.2.1 What is Bluebeam Revu?
Revu is a powerful PDF creation, editing, markup &
collaboration tool.
1.2.2 Who Uses Bluebeam Revu?
The AEC industry specifically, Revu has tools to
streamline workflows throughout the construction
process, from design review to project closeout &
facilities management.
However, Revu is flexible enough for use by anyone
who works with PDFs, regardless of industry.
1.2.3 Vector vs. Raster Data & What That Means with Respect to PDF
The content within a PDF is encoded as one of two
types of data: vector or raster.
You can tell if a PDF is made with vector or raster
data by zooming in on it.
1.2.4 Revu’s Impact on Existing PDF Files
Most people recognize PDFs by the red icon they’re
used to seeing on their computer when using other
PDF programs.

Revu 2016: Basics Guide
PAGE 8 Revu Basics |Guide 2016
However, when Revu is set as the default PDF viewer,
the PDF icons will appear as blue colored icons,
similar to those on the left—though the file is still the
same.
If you would prefer your icons to show up in red, you
can change the color of the icons in the Bluebeam
Administrator.

Revu 2016: Basics Guide
PAGE 9 Revu Basics |Guide 2016
Menu Bar
2.0 Overview: Interface, Navigation & Profiles
2.1 Module Overview
Lesson objectives
By the end of this lesson, learners will be:
Familiar with the interface, navigation & profiles
2.2 Command Bar, Toolbars & Menus
Lesson objectives
By the end of this lesson, learners will be able to:
Describe the function of the menu bar,
Command bar & Toolbars.
By selecting these items from the Menu Bar, Different
Options will appear hear in the Command Bar
Panel
Knob

Revu 2016: Basics Guide
PAGE 10 Revu Basics |Guide 2016
2.3 Side Panels & Tab Access
Lesson objectives
By the end of this lesson, learners will be able to:
Hide each of the three panels (left, right &
bottom)
Recognize that Tabs are opened in the panels.
Use the Tab Access arrow to access tabs.
Activity – Lesson 2.3: Panels & Tab Access Review – Q&A
What’s the relationship between a panel & a
tab?
Answer: Panels contain tabs.
How many panels are there?
Answer: Three.
How do you open a panel?
Answer: Click the blue knob, click & drag the
panel edges, Tab Access.
2.4 Profiles & Profile Management
Lesson objectives
By the end of this lesson, learners will be able to:
Recognize why Profiles are helpful
Turn toolbars on & off.
Move toolbars to other locations in the
interface.
Turn tabs on & off in the side panels.
Move tabs to other locations in the interface,
including from one panel to another, another
location in the same panel (split panel), & as a
stand-alone window on another monitor.
Create a custom Profile.
Share their custom Profile with others.

Revu 2016: Basics Guide
PAGE 11 Revu Basics |Guide 2016
Click the arrow to the right of the Profiles button from either View >
Profiles or from the Navigation bar (use the keyboard shortcut F4 to show it
if it's hidden) to prompt a list of available Profiles. The Profile that is currently
active will be checked.
To change Profiles, simply select another one from the menu. Once
selected, the Revu interface will update based on the settings defined in
the new Profile.
Creating Custom Profiles
1.
Configure the Revu
interface as desired,
arranging toolbars,
tabs, panels and so
on as needed. This
configuration will be
the custom Profile.
2.
Click the Profiles
button. The Manage
Profiles dialog box
opens.
3.
Click Add. The Add
Profile dialog box
opens.
4.
Enter the name of the
custom Profile in the
Name field and click
OK. The Add Profile
dialog box closes and
the new Profile is
added to the Profiles
list and selected as
the active Profile.
5.
Click OK to close the
Manage Profiles
dialog box.

Revu 2016: Basics Guide
PAGE 12 Revu Basics |Guide 2016
2.5 Opening a PDF
Lesson objectives
By the end of this lesson, learners will be able to:
Open a PDF using the Open icon on the Command
bar.
Recognize that multiple opened files are organized
as document tabs in the interface.
Move document tabs to another location or to a
stand-alone window.
Use the document list arrow to identify the full
name of a file when many are open (thus
obscuring the name in the tab).
Open previously viewed PDFs under the Recents
section under File Access.
Pin recent PDFs to the pinned section, an existing
category, or a new category in File Access.
Unpin PDFs.
Open a PDF using
the Open icon on
the Command
bar.
Or Open a PDF
file from File
Explorer
Right-click on file
& Select to Open
With Bluebeam
Multiple opened
files are
organized as
document tabs in
the interface.

Revu 2016: Basics Guide
PAGE 13 Revu Basics |Guide 2016
Use the
document list
arrow to identify
the full name of a
file when many
are open (thus
obscuring the
name in the tab).
Open previously
viewed PDFs
under the
Recents section
under File
Access.

Revu 2016: Basics Guide
PAGE 14 Revu Basics |Guide 2016
Pin recent PDFs to
the Pinned
section, an
existing category,
or a new
category in File
Access.
Since this follows
the path to
where the
document is
saved pinning
does not work in
Studio unless you
are the Host
Unpin PDFs by
right clicking the
Pinned doc <
Select Pin < Unpin
File

Revu 2016: Basics Guide
PAGE 15 Revu Basics |Guide 2016
2.6 PDF Navigation
Lesson objectives
By the end of this lesson, learners will be able to:
Zoom in & out using the scroll wheel on their
mouse.
Move a document around in the main
workspace (panning) with the left mouse
button.
Move a document around in the main
workspace (panning) by pressing & holding the
center scroll wheel.
Use Single Page & Continuous modes.
Use the Ctrl key to modify the navigation
default.
Utilize MultiView to split Revu’s workspace up to
16 times.
Split Revu’s workspace & view two different
documents side by side.
Activate the sync function & demonstrate how
it enables side-by-side documents to move in
tandem.
Understand that Revu can be used across
multiple monitors.
Single Page &
Continuous modes


Revu 2016: Basics Guide
PAGE 17 Revu Basics |Guide 2016
3.0 The Markup Tools
3.1 Module Overview
Lesson objectives
By the end of this lesson, learners will be able to:
Understand what markup tools can do
Give an example of how they can use Revu’s
markup tools in their everyday workflows.
3.2 How to Access Markup Tools
Lesson objectives
By the end of this lesson, learners will be able to:
Access markup tools from the Markup menu.
Access markup tools from the Text & Shapes
toolbars.
Access markup tools using keyboard shortcuts.
Access markup tools from the Markup menu.
Access markup tools
via the View menu
from the Text &
Shapes toolbars.
Revu 2016: Basics Guide
PAGE 18 Revu Basics |Guide 2016
3.3 Types of Markup Tools
Lesson objectives
By the end of this lesson, learners will be able to:
Identify the five (5) types of Text markup tools:
Text Box, Callout, Typewriter, Note & Flag.
Employ right-click to open the context menu for
a markup tool.
Autosize a text box.
Add a leader line to a callout.
Identify the three (3) types of Pen markup tools:
Pen, Highlight & Eraser.
Identify the five (5) types of Line markup tools:
Line, Arrow, Arc, Polyline & Dimension.
Identify the five (5) types of Shapes markup
tools: Rectangle, Ellipse, Polygon, Cloud,
Cloud+.
Demonstrate the difference between picking
points & dragging a rectangle to place a
Shapes markup tool.
Convert any portion of a Polyline, Polygon, or
pick-point Cloud markup into an arc.
Edit the size & shape of Shape markups by
moving the blue & yellow control points.
Add or remove a control point to a shape by
right-clicking & selecting “add a control point”
or “subtract a control point.”
Place an image on the page using the Image
tool.
Understand that the Crop Image tool works on
image markups but not images that are part of
the PDF content.
Place an image on the page using the Camera
tool.

Revu 2016: Basics Guide
PAGE 19 Revu Basics |Guide 2016
Text markup tools:
Text Box, Callout,
Typewriter, Note &
Flag
Employ right-click to
open the context
menu for a markup
tool.
Autosize a text box.
Add a leader line to
a callout.

Revu 2016: Basics Guide
PAGE 20 Revu Basics |Guide 2016
Pen markup tools:
Pen, Highlight &
Eraser
Line markup tools:
Line, Arrow, Arc,
Polyline & Dimension
Shapes markup tools:
Rectangle, Ellipse,
Polygon, Cloud,
Cloud+
For more information on
PDF Markups click on the
hyperlink to the right
PDF Markup Training Video

Revu 2016: Basics Guide
PAGE 21 Revu Basics |Guide 2016
3.4 Customizing the Properties of Markup Tools
Lesson objectives
By the end of this lesson, learners will be able to:
Customize the visual properties of Text, Pen, Line
& Shape markup tools using the Properties tab.
Change the subject line in the Properties tab for
one or more markups.
Properties tab
Subject line
For more information on
Customizing PDF
Markups click on the
hyperlink to the right
Customizing Markups Training Video

Revu 2016: Basics Guide
PAGE 22 Revu Basics |Guide 2016
3.5 Using the Snapshot Tool
Lesson objectives
By the end of this lesson, learners will be able to:
Copy PDF content using the Snapshot tool &
paste it elsewhere on the page or paste it in a
new PDF.
Change the color of copied & pasted PDF
content.
Under the Edit Menu
select the Snapshot
icon.
Releasing the mouse
button will take the
snapshot. The area
that was copied will
be highlighted in
blue
To place the
snapshot, simply
right click on the
area where you
want to place the
image and click
Paste
With the Snapshot tool, click and drag a
rectangle to copy an area of a PDF with your
mouse. This content is then automatically saved
onto your Windows Clipboard and will maintain
the vector data and image quality of the
original.
Or Create a new
PDF & paste the
selected content
into the new doc

Revu 2016: Basics Guide
PAGE 23 Revu Basics |Guide 2016
Change the color of
copied & pasted
PDF content.
4.0 Stamps
4.1 Module Overview
Lesson objectives
By the end of this lesson, learners will be able to:
Describe, in general terms, the critical role that
Stamps play in AEC workflows.
In the submittal process, for example, stamps are
used by architects, engineers, & consultants to
communicate that a submittal was examined,
reviewed, rejected, approved, & so on, by various
stakeholders. Revu improves & simplifies the way
professionals determine the documentation or
procedural milestones using tools such as digital
stamps.
For more information
on Stamps click on the
hyperlink to the right
Stamps Training Video
4.2 & 4.3 Applying a Stamp (to a single page or all pages)
Lesson objectives
By the end of this lesson, learners will be able to:
Select a Stamp from the Command bar’s
Stamp icon & place it on the page.

Revu 2016: Basics Guide
PAGE 24 Revu Basics |Guide 2016
Right-click on a Stamp on a PDF & apply it to
all pages of the document in the exact same
spot.
Select a Stamp from
the Command bar’s
Stamp icon & place
it on the page.
Right-click on a
Stamp on a PDF &
apply it to all pages
of the document in
the exact same
spot.

Revu 2016: Basics Guide
PAGE 25 Revu Basics |Guide 2016
4.4 Creating a Stamp
Lesson objectives
By the end of this lesson, learners will be able to:
Understand that custom PDF stamps can be
created in Revu.
Right-click on the
stamp in the
Command Bar &
then select Create
Stamp…

Revu 2016: Basics Guide
PAGE 26 Revu Basics |Guide 2016
The Stamp
Properties dialog
box appears
Select the properties
you would like to
change, including
the template & click
OK
Once the desired
properties are
changed click OK

Revu 2016: Basics Guide
PAGE 27 Revu Basics |Guide 2016
A screen similar to
the right will appear
& you can fine tune
the stamp using the
properties in the
right panel & save
the stamp similar to
a document, but
the stamp will be
saved in the Stamp
dropdown list
The stamp is saved
here as the last
stamp used
It is saved below for
retrieval & later use

Revu 2016: Basics Guide
PAGE 28 Revu Basics |Guide 2016
5.0 The Tool Chest
5.1 Module Overview
Lesson objectives
By the end of this lesson, learners will be able to:
Describe, in general terms, the benefit of the
Tool Chest in AEC workflows.
Identify at least one way that the Tool Chest can
save time in their work.
5.2 What Is the Tool Chest & Why does It Save So Much
Time?
Lesson objectives
By the end of this lesson, learners will be able to:
Open the Tool Chest tab.
Describe the purpose of the Tool Chest.
Identify at least one way that the Tool Chest can
save time in their work.
Differentiate a tool set from the Tool Chest.
Explain the purpose of a tool set.
Open the Tool Chest
tab

Revu 2016: Basics Guide
PAGE 29 Revu Basics |Guide 2016
Tool sets

Revu 2016: Basics Guide
PAGE 30 Revu Basics |Guide 2016
5.3 Recent Tools
Lesson objectives
By the end of this lesson, learners will be able to
understand:
That Markups become part of the Recent Tools
section of the Tool Chest as they are used.
Items in the Recent Tools section are deleted
after every session, so any tools there need to be
saved to a tool set for future use.
That Markups can be moved from one tool set to
another.
5.4 Properties Mode vs. Drawing Mode
Lesson objectives
By the end of this lesson, learners will be able to:
There is a difference between the Properties &
Drawing modes within the Tool Chest.
Properties mode adds a new markup with the
same appearance properties of the saved
markup. In this mode the Properties (as shown on
the Properties tab) are retained but the exact
dimensions, text, & so on are not.
Drawing mode adds a new markup that is an
exact duplicate of the saved markup, as if you'd
copied & pasted the original markup rather than
made a new one of a similar type.
To change the mode of a tool in any of these tool
sets, double-click on the tool's icon or select it &
click / Toggle Mode (which icon is shown
depends on which mode is currently active) in the
Tool Chest toolbar. All information of the original
markup is always retained when switching modes.
Only the icon & the way that the markup is
added to the file changes when the mode is
changed. By default, most tools are saved in
Properties Mode, though there are some markups
that always remain in Drawing Mode.
If a tool has a defined Action, the action will
only be added to markups created with it
when in Drawing mode.

Revu 2016: Basics Guide
PAGE 31 Revu Basics |Guide 2016
The Recent Tools tool set can be configured to
default to either Properties Mode or Drawing
Mode. To set the mode, click the Properties
gear to the right of Recent Tools & either check or
uncheck Properties Mode, as desired.
5.5 My Tools
Lesson objectives
By the end of this lesson, learners will be able to:
Describe the purpose of the My Tools section of
the Tool Chest.
Save a custom markup to the My Tools section of
the Tool Chest.
Access a tool from My Tools using its shortcut
number.
Save a custom
markup to the My
Tools section of the
Tool Chest.
Right-Click the tool
Select Add to Tool
Chest & then Select
desired tool set
where tool should
be saved.

Revu 2016: Basics Guide
PAGE 32 Revu Basics |Guide 2016
Access a tool from
My Tools using its
shortcut number.
While holding the
Left mouse button
press the number
associated with the
desired tool. Then
drag & drop the tool
into the document.

Revu 2016: Basics Guide
PAGE 33 Revu Basics |Guide 2016
5.6 Tool Sets
Lesson objectives
By the end of this lesson, learners will be able to:
Show/hide the tool sets available in their current
Profile using the Manage Tool Sets arrow.
Switch between Symbol view & Detail view in a
tool set & describe the difference between the
two.
Change the order of tools in a tool set.
Create a custom tool set.
Direct Revu to save a new custom tool set in all
Profiles or just the current Profile.
Revu is preloaded with trade-specific tool sets.
Export a tool set for use by another user.
Show/hide the tool
sets available in their
current Profile using
the Manage Tool
Sets arrow.
Select the tool sets
you wish to display
or deselect the tool
sets you wish to
hide.


Revu 2016: Basics Guide
PAGE 35 Revu Basics |Guide 2016
Activity – Module 5 Review
Information
What is the Tool Chest? How can it help you
save time?
Answer: (Generally speaking…) The Tool Chest
is a feature in Revu that helps you annotate
PDFs faster by letting you store your frequently
used custom markups for one-click access.
What’s the difference between the Tool
Chest & a tool set?
Answer: The Tool Chest contains tool sets.
Further, tool sets contain frequently used
markup tools.
What is Recent Tools?
Answer: Recent Tools is a special tool set that
temporarily stores the most recent markup tool
used.
What is My Tools?
Answer: My Tools is a tool set that’s pre-
populated with commonly used markup tools
so they are always available to you.
Explain the difference between Properties
Mode & Drawing Mode.
Answer: Properties Mode lets you quickly draw
new markups that have identical properties—
but different shapes & sizes—as the markup
tool selected in a tool set. Meanwhile, Drawing
Mode allows you to quickly draw markups that
have identical properties & identical shape &
size as the markup tool selected in a tool set.
How would you change a markup from
Properties Mode to Drawing Mode?
Answer: Double-click the markup tool in the
Tool Chest.

Revu 2016: Basics Guide
PAGE 36 Revu Basics |Guide 2016
6.0 The Markups List
6.1 Module Overview
Lesson objectives
By the end of this lesson, learners will be able to:
Describe, in general terms, the benefit of the
Markups list features.
Found at the bottom panel of the workspace, by default, the Markups list
automatically tracks all of the markups placed on a PDF, as well as the
information associated with them.
For more information on
the Markups List click
the hyperlink to the right
Markups List Training Video
6.2 What Is the Markups List?
Lesson
objectives
By the end of this lesson, learners will be able to:
Open the Markups list tab.
Explain the purpose of the Markups list.
Give an example of a workflow in which the Markups list
is helpful.
The Markups list automatically tracks markups placed on
a PDF, including author, date, color & comments
associated with each markup.
The Markups list toolbar contains tools for organizing, processing, importing &
exporting data.
+ Expand All & Collapse All: Expands or collapses the entire list.
Previous & Next: Moves to the previous or next markup in the list.
Filter & Clear Filters: Toggles column filters on & off & clears previously
applied filters.
Hide Markups: 70Hides all markups in the current PDF file. Markups will not
display or print when this mode is enabled. This mode is temporary & will be
reset the next time Revu is started.
Search: Filters the Markups list based on the text entered in the field.

Revu 2016: Basics Guide
PAGE 37 Revu Basics |Guide 2016
Columns: Selects which columns to display in the Markups list.
Manage Columns: Launches the Manage Columns dialog box to change
the display order & add, remove & create Custom Columns. Columns can also
be reordered by dragging & dropping column headers.
Delete: Deletes a selected reply from the Markups list or a selected markup
from both the PDF & the list.
Reply: Replies to the selected markup. Replies appear on a new indented
row below the markup in question.
Status: Sets the status of the markups. The default statuses are Accepted,
Rejected, Completed, Cancelled & None, but custom statuses can also be
created.
Manage Status: Creates & manages custom statuses.
Checkmark: Checks or unchecks the checkbox associated with the
selected markup. Also provides a command to clear all checkboxes.
Import: Takes the markups from a PDF or an XML file & includes them in the
active PDF (this is useful for incorporating & reviewing markups or feedback
from multiple sources). FDF files containing annotations generated from other
PDF applications may also be imported.
Export: Exports all markups to an XML file. The XML file can be imported into
another PDF so that the markups will be displayed in the target PDF. The XML
file can also be imported into Excel for viewing in a tabular form. Markups may
also be exported to the FDF format for interoperability with other PDF
applications.
Summary: Publishes a report of all the markups in a PDF. A PDF Summary
can be saved as a separate PDF or appended to the end of the current PDF.
It is also possible to export a Summary as CSV or XML data for use in Excel or
other programs.
6.3 Organizing Columns
Lesson objectives
By the end of this lesson, learners will be
able to:
Explain the relationship of the active
Profile to the order & display of columns
in the Markups list.
Turn columns on & off.
Change the arrangement of columns in
the Markups list.

Revu 2016: Basics Guide
PAGE 38 Revu Basics |Guide 2016
The Markups list displays a table with each row representing a markup that
has been added to the active PDF. Each column displays information
about the markups.
As a row is selected, the view of the PDF in the workspace will jump to the
location of the associated annotation. This makes it easy to use the
Markups list to step through the annotations in PDF with the Previous & Next
buttons, or by using the keyboard shortcuts of the Up & Down arrow keys.
Horizontal section separators with disclosure triangles show & hide each
section of the Markups list. Click a disclosure triangle to show or hide that
section.

Revu 2016: Basics Guide
PAGE 39 Revu Basics |Guide 2016
To turn columns on & off,
Select the tool sets you wish
to display or deselect the
tool sets you wish to hide. The
Columns menu allows you to
toggle various columns on &
off. A column that is turned
on will appear in the top row
of the Markups list & will
display a check box next to
the name in the menu. Click
a column name to turn it on
or off. To sort by any column,
click the column's name on
the header. Click again to
reverse the sort order.
To change the arrangement
of columns in the Markups
list. Similar to other programs,
simply Left-Click, Drag & Drop
the column to the desired
location within the Markups
List.
For more information on the
Managing & Creating Columns
click the hyperlink to the right
Managing & Creating Columns in Markups
List Online Support
6.4 Sorting Data in the Markups List
Lesson objectives
By the end of this lesson, learners will be able to:
Sort data in the Markups list using any of the
visible columns.
Differentiate between the functions of sorting
categories & sorted column information.
Collapse & expand any sorting category in the
Markups list.

Revu 2016: Basics Guide
PAGE 40 Revu Basics |Guide 2016
6.5 Filtering Data
Lesson objectives
By the end of this lesson, learners will be able to:
Filter data in the Markups list using the filter
button & any of the visible columns.
Be able to distinguish filtered & unfiltered
markups on the PDF.
For more information on the
Filtering Data click the
hyperlink to the right
Filtering Data Online Support
6.6 Statuses
Lesson objectives
By the end of this lesson, learners will be able to:
Set status on a markup.
Understand that statuses stack on top of each
other or “cascade” when they are changed
with the author information & a time stamp &
date.
To apply a status to a markup:
1. Select the markup in the Markups list.
2. On the Markups list toolbar, go to Status > Model > Status.

Revu 2016: Basics Guide
PAGE 41 Revu Basics |Guide 2016
Alternatively, right-click the markup in the main workspace or in the Markups
list & go to Set Status > Model > Status.
On the Markups list
toolbar, click Manage
Status. The Manage Status
dialog box appears.
The Manage Status dialog
box appears. Select one
or both of the preloaded
models you’d like to use.
The procedure outlined above describes creating a custom status in general.
For a specific example, see Tutorial: Creating a Custom Status for the Markups
List.

Revu 2016: Basics Guide
PAGE 42 Revu Basics |Guide 2016
6.7 Custom Columns
Lesson objectives
By the end of this lesson, learners will be able to:
Add custom columns to the ones that are built-in.
Create a custom text column to assign
responsibility.
To control which
columns are displayed
in the Markups list & in
what order.
1. On the Markups list
toolbar, click
Manage Status. The
Manage Status
dialog box appears.
2. Click the Display
Order tab.
3. Check or uncheck
columns, as desired.
Checked columns
are shown,
unchecked columns
are hidden.
4. Select a column &
use the Up or
Down button to
move it into the
desired position.
Columns are shown
in the order found
here.

Revu 2016: Basics Guide
PAGE 43 Revu Basics |Guide 2016
Create a custom
text column to
assign responsibility.
1. On the Markups list
toolbar, click
Manage Status. The
Manage Status
dialog box appears.
2. Select the Custom
Columns tab. All
custom columns are
listed.
3. Click Add. The Add
Column dialog box
appears.
4. Enter a display
name for the
column in the Name
field.
5. Select Text from the
Type list.
6. To wrap text so that
it appears on
multiple lines if it is
longer than the
available space in
the Markups list,
check Multiline.
7. Enter default text to
be added with
every new markup
in the Default field.
8. Click OK.

Revu 2016: Basics Guide
PAGE 44 Revu Basics |Guide 2016
6.8 Importing Comments From Other PDFs
Lesson objectives
By the end of this lesson, learners will be able to:
Import comments from other PDFs into their PDF
using the Import button in the Markups list.
Import: Takes the markups from a PDF or an XML file & includes them in the
active PDF (this is useful for incorporating & reviewing markups or feedback
from multiple sources). FDF files containing annotations generated from other
PDF applications may also be imported.
6.9 Exporting Markup Data
Lesson objectives
By the end of this lesson, learners will be able to:
Export their markup data to a PDF Summary.
Exclude filtered markups & hidden columns in
their PDF Summary.
Append the PDF Summary to the current PDF &
create hyperlinks from the summary to the
location of the markup on the PDF.
Change the title, style, preview size, padding,
page size & page orientation of their PDF
Summary.
Export their markup data to a CSV Summary
that will open in Excel.
Exclude filtered markups & hidden columns in
their CSV Summary.
Include column headers in their CSV Summary.
Include markups & totals, or just markups or just
totals, in their CSV Summary.

Revu 2016: Basics Guide
PAGE 45 Revu Basics |Guide 2016
To export markup data
to a PDF Summary
1. On the Markups list
toolbar, click
Summary & select
the desired Summary
type.
2. Configure the desired
settings (see below
for details regarding
settings for each type
of summary) & click
OK.
For your
convenience, I
included the steps for
the configuration to
the right for ease of
creating a report.
Generate the PDF
Summary using the
settings to the right.
Information
The resulting PDF Summary will appear similar to the
report shown on the next page.

Revu 2016: Basics Guide
PAGE 46 Revu Basics |Guide 2016
Activity – Lesson Review: Pop Quiz!
What can you do with columns in the Markups
list?
Answer: Filter, sort, turn on & off, & move.
What happens to markups that are filtered out of
the Markups list on the PDF?
Answer: They turn gray on the PDF.
What happens to the status of a markup when
you update it?
Answer: It stacks on top of the previous status
with a time stamp & date.
How would you merge comments from multiple
PDFs onto one file?
Answer: Use Import Comments.
Which summary report of the Markups list
includes the option to append to the current
PDF?
Answer: PDF Summary.
Which summary would you create to access
your Markups list information in Excel?
Answer: CSV Summary.

Revu 2016: Basics Guide
PAGE 47 Revu Basics |Guide 2016
7.0 PDF Creation
7.1 Module Overview
Lesson objectives
By the end of this lesson, learners will be able to:
Create a new blank PDF using the New button.
Create a new PDF based on an existing
template using the New button.
Convert any file to PDF using the Bluebeam PDF
printer.
7.2 New PDF Creation
Lesson objectives
By the end of this lesson, learners will be able to:
Create a new blank PDF using the New button.
Create a new PDF based on an existing
template using the New button.
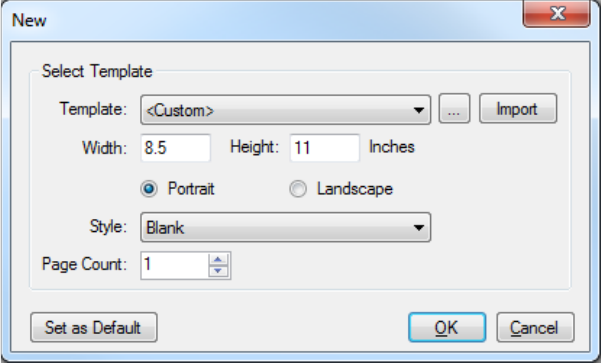
Create a new blank PDF
using the New button.
1. Go to File > New.
The New dialog box
appears.
2. To set the PDF to a
standardized size,
select it from the
Template menu.
Otherwise, select
<Custom>.
3. Define the size of the
pages in the PDF by
setting the Width &
Height.
4. If a standardized size
was selected in the
previous step, these
options are
unavailable as those
settings are inherent
to the selection.
Revu 2016: Basics Guide
PAGE 48 Revu Basics |Guide 2016
5. Determine the page
orientation by
selecting either
Portrait (vertical) or
Landscape
(horizontal).
6. Select the desired
style for the PDF from
the Style menu.
7. For a blank PDF,
select Blank.
8. Determine the
number of pages in
the PDF by entering
the desired value in
the Page Count field.
9. By default, a new,
empty PDF in Revu
has the settings shown
in the image above
(essentially, a single
sheet of blank, 8.5 x
11 paper with a
Portrait orientation). If
you would like to use
the current
configuration as the
default for new,
empty PDFs, click Set
as Default.
10.Click OK.
7.3 Using the Bluebeam PDF Printer to Create PDFs From
Virtually Any Program
Lesson objectives
By the end of this lesson, learners will be able to:
Convert any file to PDF using the Bluebeam
PDF printer.
The Bluebeam PDF printer can be accessed from
the File > Print menu of Microsoft Word.

Revu 2016: Basics Guide
PAGE 49 Revu Basics |Guide 2016
7.4 PDF Creation Using Bluebeam’s Plugins
Lesson objectives
By the end of this lesson, learners will be able to:
Create a PDF with a single click from Microsoft
Word, Excel or PowerPoint.
Bluebeam Revu has plugins for 2D PDF creation
from AutoCAD, Revit & SolidWorks.
Bluebeam Revu has plugins for 3D PDF creation
from Revit, Navisworks & SketchUp Pro.
Select plug-ins
similar to the one on
the right in Microsoft
Word, Excel or
PowerPoint.
For more information
on PDF Creation click
the hyperlink to the
right
PDF Creation Video Tutorial

Revu 2016: Basics Guide
PAGE 50 Revu Basics |Guide 2016
8.0 Document Management & Setup
8.1 Module Overview
Lesson objectives
By the end of this lesson, learners will be able to:
Describe, in general terms, the benefit of
document management & setup to AEC
workflows.
8.2 PDF Manipulation
Lesson objectives
By the end of this lesson, learners will be able to:
Locate & use the Thumbnails tab
Access & use functions in Thumbnails tab from the
Document Command bar.
Using the right-click functionality:
o Add a blank page to their PDF
o Add a page from another PDF
o Copy & paste multiple selected pages
o Delete one or more pages
o Rotate a single page or a range of pages
o Rearrange pages from one place to another.
o Relabel & typing new text
o Extract pages as separate PDFs
o Combine multiple PDFs.
Thumbnails tab
Right-Click Menu

Revu 2016: Basics Guide
PAGE 51 Revu Basics |Guide 2016
8.3 Search: Text & VisualSearch
Lesson objectives
By the end of this lesson, learners will be able to:
Search for text in a PDF with searchable text.
Use text search options in the Search panel.
Use Visual Search to find non-text content
Can search all open documents, their recent
documents, a folder, or their current Studio
Project for either text or a visual cue.
Select a number or all of their search results.
Highlight search results.
Search Tab
For more information
on Searching click the
hyperlink to the right
Search Video Tutorial

Revu 2016: Basics Guide
PAGE 52 Revu Basics |Guide 2016
8.4 Emailing & Exporting PDFs
Lesson objectives
By the end of this lesson, learners will be able to:
Attach the current PDF to an email & send it using
the Email button.
Export a full document to Microsoft Word.
Export a table in a PDF page region to Microsoft
Excel.
Email button is
always located
with the 6
permanent icons
located on the
Command Bar
Export full or
portions of a
documents to
Microsoft Word &
Excel
Revu 2016: Basics Guide
PAGE 53 Revu Basics |Guide 2016
Activity – Module 8 Review: “Pop Quiz!”
Which tab would you use to reorder pages in a
multi-page PDF?
Answer: The Thumbnails tab.
How would you identify that text on a PDF is
searchable?
Answer: If it can be selected by the Select
Text tool, then it’s searchable.
What can you search for within the Search tool
in Revu? (It’s okay to use Revu to answer!)
Answer: Textual & visual elements.
You can use Revu’s Search tool to search
through which items?
Answer:
1. Current Document
2. Current Page
3. All Open Documents
4. All Recent Document
5. A folder of documents
Can you email a PDF from Revu?
Answer: Yes.
If you wanted to edit a PDF in Microsoft Word,
how would you convert it to a Word document?
Answer: You would export the page to a
Word document.
Revu 2016: Basics Guide
PAGE 54 Revu Basics |Guide 2016
9.0 Introduction to Studio
9.1 Module Overview
Lesson objectives
By the end of this lesson, learners will be able to:
Use Studio to save time
Recognize the differences between Studio vs.
screen-sharing
o With screen-sharing, I might display my screen
with one or more of you over, say, a software
service like GoToMeeting or WebEx, to
collaborate on a document.
o If any—or all—of you have comments you
want placed on that document, then you
might audibly tell the host those comments, &
they would mark them on the document
manually for you.
o However, there’s an issue with doing this
among collaborators in the AEC industry—&
that has to do with the integrity of the
comments you gave for the host to markup
on the document.
o If the host fails to capture your comments
exactly as you intended, then that carries
potential liability for the host.
o Bluebeam captures comments exactly as
you intended them—especially if they are to
be associated with you on official
documents.
o In contrast to screen-sharing technology,
Studio Sessions empowers you & all other
collaborators to place the markups directly
on the document yourselves, rather than
relying on the host—or some other
facilitator—to place them for you.
o Further, Studio Sessions technology gives you
& other collaborators the flexibility to place
your individual comments on the document
synchronously—meaning, at the same time—
or asynchronously (at different times).

Revu 2016: Basics Guide
PAGE 55 Revu Basics |Guide 2016
9.2 Differences Between Studio Sessions & Studio Projects
In Studio Sessions, everyone can work on the
same documents together at the same time. By
contrast, Studio Projects, which is a document
management system, allows only one person to
work on a document at a time.
Only PDF type files can be used in Studio
Sessions, but any file type can be used in Studio
Projects.
Up to 500 people can collaborate in a Studio
Session, but the number of participants for a
Studio Project is unlimited.
9.3 Getting In to Studio
Lesson objectives
By the end of this lesson, learners will be able to:
Access the Studio tab & log in.
Create a Studio account.
Access the Studio
tab

Revu 2016: Basics Guide
PAGE 56 Revu Basics |Guide 2016
If you already have
an account, you will
only need to provide
your Password.
Don’t forget to
check the box so
Studio remembers
your password
If you don’t have an account, you’ll need to click on “Create Account”
The Create Studio Account dialog will display
Type your E-mail address
Type & confirm your Password
Type your Name. The default is your Windows login ID
Click OK
A screen similar to
the one on the right
will appear & select
the appropriate
Session to join.
Once you select a
Studio Session to join
& the desired
drawing to view a
screen similar to the
one to the right will
appear
Revu 2016: Basics Guide
PAGE 57 Revu Basics |Guide 2016
Activity – Module 9 Review: “Pop Quiz!”
Which is the collaboration tool that allows you to
markup documents in real time or on your own
time?
Answer: Studio Sessions.
Of the following file types, which ones does
Studio Sessions support?
o Excel
o DWG
o DOCX
Answer: (Trick question!) None of them. Studio
Sessions only supports PDF documents. (On the
other hand, Studio Projects is the feature that
supports any document type.)
Which of the Studio features supports all file
types?
Answer: Studio Projects.
How much free storage space do you get in
Studio Projects?
Answer: Unlimited.
What information is needed to set up a Studio
account?
Answer: Name & email address only.

Revu 2016: Basics Guide
PAGE 58 Revu Basics |Guide 2016
10.0 Studio Sessions
10.1 Module Overview
Benefits of using Studio Sessions for Digital Design
Review:
Don’t have to print, copy, deliver, mail, courier
or travel to another location
Can see all of the comments as they are
entered
Someone does NOT have to gather & transpose
the markups
Stakeholders can review & add markups from
their own PCs from anywhere & at anytime
Reduces/eliminates redundancies
Comments can easily be compiled
Single source of truth
All can work simultaneously
10.2 Setting Up a New Session
Lesson objectives
By the end of this lesson, learners will be able to:
Set up a new Studio Session.
Upload PDFs to a Studio Session during creation.
Turn the default permissions on & off & restrict
attendees by email during the creation of a
new Studio Session.
Describe the value of setting an expiration date
for a Studio Session.
Invite colleagues to join them in a Studio Session
by typing in the email address.
Describe how they can invite attendees to a
Studio Session using their email address book.
Create Studio
Account
Go to View > Tabs > Studio or press ALT+C to
access the Studio tab.


Revu 2016: Basics Guide
PAGE 60 Revu Basics |Guide 2016
Once the Create
New Server dialog
box appears, enter
the name of the
Studio sever in the
Server field
If this Studio server has been configured to use Active Directory & you
would like to use your Windows login, select Use Windows Authentication.
o The Domain / E-mail field will be automatically populated when this
option is selected.
If this Studio server has not been configured to use Active Directory or if you
would prefer to log in using your email address:
o Enter your email address in the Domain / E-mail field.
o Select Remember password.
o Enter a password for this Studio account in the Password field.
Click OK.
You will receive a verification email after you create the account. Follow the
instructions in this email in order to complete the validation process. You must
validate the email address or you will not be able to continue using the
account.

Revu 2016: Basics Guide
PAGE 61 Revu Basics |Guide 2016
Setting up a new
Studio Session
From the Studio tab, go to Start > New Session.
The Start Studio Session dialog box appears
The dialog box to the
right will appear
Enter a Session Name
Click Add to select
PDFs to include in the
Session, or click Add
Open Files to add the
files that are already
open in Revu. Files
can be added later,
as well.
Select the desired
options from the
Permission list. These
will apply universal
permissions to all
Attendees. Check
Save, Print, Markup,
Markup Alert, or Add
Documents to allow
Attendees those
permissions by
default or uncheck
them to remove
those permissions
from Attendees by
default
To restrict access to
the Session by email
address, select
Restrict Attendees by
E-mail Address. To
allow any user with
the Session ID to join
the Session, uncheck
this option

Revu 2016: Basics Guide
PAGE 62 Revu Basics |Guide 2016
To set an expiration
date for the Session,
select Session Expires
& enter the desired
expiration date &
time. Expiration dates
must be in the future;
Revu will not allow a
back-dated
expiration date.
Click OK to save the
settings & upload the
files. The Session
Invitation dialog box
will appear
Inviting somebody to
a Session
automatically adds
them as an Allowed
Attendee in the
Session Settings. In
addition, the invitee is
also sent an email
containing
information about
the Session, as well as
a link allowing them
to automatically
connect to the
Session. If you do not
wish to do this, click
Cancel to create the
Session without
invitees. You can
send an invitation
later.

Revu 2016: Basics Guide
PAGE 63 Revu Basics |Guide 2016
The Session
Information is shown
at the top of the
dialog box. To copy
this information to the
clipboard in order to
paste it into another
program, such as an
email message, IM or
other document,
click Copy Invitation.
To add invitees from
the address book of
your default email
program, click
Address Book.
The email program
must be MAPI
compliant for Revu to
access its address
book. The address
books from web-
based email like
Gmail, Hotmail or
Yahoo cannot be
accessed.

Revu 2016: Basics Guide
PAGE 64 Revu Basics |Guide 2016
To add invitees
manually, click .
When the Add E-Mail
Address dialog box
appears, enter the
invitee's email
address & click OK
To add all the
members of an
existing Group,
click . When the
Select Groups dialog
box appears, select
the desired Group &
click OK
To change the email
address of an invitee,
select the entry &
click . When the
Modify E-mail
Address dialog box
appears, enter the
new email address &
click OK
To remove an invitee,
select the entry &
click
Enter a Message to
add to the invitations,
if desired
Click OK. Email
invitations will be sent
to all the invitees
from the Studio server
Revu 2016: Basics Guide
PAGE 65 Revu Basics |Guide 2016
10.3 Live Session Participation
Lesson objectives
By the end of this lesson, learners will be able to:
Join a Session. (See 9.3 Getting In to Studio)
Place markups on a PDF in a Session. (See
3.0 The Markup Tools)
Correctly state that markups placed in a
Studio Session can only be edited by the
attendee who placed them.
Correctly state that custom columns need to
be set up on their documents before they
are uploaded to a Studio Session in order for
the custom column(s) to appear in a Studio
Session.
Explain what type of information the Record
pane tracks within a Studio Session.
Understand that attendees can access a
Studio Session using Bluebeam Vu.

Revu 2016: Basics Guide
PAGE 66 Revu Basics |Guide 2016
10.4 Record Reports
Lesson objectives
By the end of this lesson, learners will be able to:
Create a PDF Package Record Report.
Join the Session
Click Report in
the Record section
of the Studio tab.

Revu 2016: Basics Guide
PAGE 67 Revu Basics |Guide 2016
The Session Report
dialog box
appears
Click the Type of
report that you
would like to
create:
Record Summary
creates a PDF file
containing the
contents of the
Record section of
the Studio tab.
PDF Package
Report creates a
PDF package
containing the
Record Summary &
all of the
documents in the
session.
Combine Files
Report creates a
single PDF that
contains the
Record Summary &
all of the
documents in the
session.
Note: The PDF Package Report & Combine Files Report contain hyperlinks in
the Record Summary that link to the corresponding markup in the document –
just like you are still within the session. This lets you review the Record & then
jump to the markup in the document.

Revu 2016: Basics Guide
PAGE 68 Revu Basics |Guide 2016
Enter a Title for the
PDF file or package
that will be
created.
Enter a heading for
any Notes you wish
to include in the
report & add the
notes in the field
immediately
below.
Select the Page
Size & orientation
(Portrait or
Landscape).
Select any or all of
the following
options:
Include Attendees
List will include a list
of the Attendees in
the Report
Summary.
Include Documents
List will include a list
of the Documents
in the Report
Summary.
Include Filtered
Record Items will
include all Records
in the Summary,
even if they are not
currently displayed
because they have
been filtered.
Select Date, Time,
Document &/or
Page to include
these Records
columns in the
Report.
Click OK to create
the Report.

Revu 2016: Basics Guide
PAGE 69 Revu Basics |Guide 2016
10.5 Closing Out a Studio Session
Lesson objectives
By the end of this lesson, learners will be able to:
Describe the difference between leaving &
finishing a Session.
Finish a Studio Session & save the files locally to
their computer.
Create a Record Report when they are closing
out a Studio Session.
Join the Session &
ensure that nobody is
in the Session working
on any Session
documents.
Click Finish on the
Studio tab. The Finish
Session dialog box
appears

Revu 2016: Basics Guide
PAGE 70 Revu Basics |Guide 2016
To include the
markups of specific
Attendees in the
Session documents
that you choose to
save, select those
Attendees in the
Include Markups list.
Choose one of the
Save Options:
o Save (Overwrite
Existing) saves the
files back to the
locations from
which they were
originally
uploaded to the
Session &
overwrite any files
with the same
name that are
currently there.
This essentially
replaces the
original files with
the ones from the
Session. Do not
choose this option
if you need to
preserve the
original files &
have not made
backups already.
o Save In Folder
saves the Session
documents in a
specified folder.
To change the
default folder
location, click
& navigate to the
desired folder.

Revu 2016: Basics Guide
PAGE 71 Revu Basics |Guide 2016
Select Session Folder
to create a subfolder
with the Session
name in the specified
location.
Select Do not save
files discards the
Session documents
without saving them.
Select Close files
after finishing to
automatically close
any Session files that
are currently open in
Revu when the
Session is finished,
otherwise they will
stay open.
Select Generate
Report to generate a
Session Report before
finishing the Session.
To specify the Session
Report settings, click
Settings. The Session
Report dialog box
appears. See Session
Report for more
information about
Session Report
settings.
The Session Report is
saved in the folder
specified in the field
below. To change
the default folder
location, click &
navigate to the
desired folder.
Click OK to finish the
Session.

Revu 2016: Basics Guide
PAGE 72 Revu Basics |Guide 2016
The Session & all of its
files are permanently
removed from the
Studio server when
the Session is
finished. This cannot
be undone.
For more information
on hosting, starting,
configuring,
managing, creating
& finishing a Session
Click on the link to
the right.
Bluebeam Studio Training Video
Direct download link to webinar:
https://studio.bluebeam.com/share/ev45qg
Activity – Module 10 Review: “Pop Quiz!”
Which of the following is something you cannot
do when creating a new Studio Session?
o Restrict attendees by email.
o Turn default permissions on & off.
o Place markups on the page.
o Set a Session expiration date.
What Revu programs can you use to access a
Studio Session?
Answer:
1. Revu Standard
2. Revu CAD
3. Revu eXtreme
4. Revu iPad
5. Vu
6. Vu iPad
Revu 2016: Basics Guide
PAGE 73 Revu Basics |Guide 2016
Can you create custom columns directly in a
Studio Session?
Answer: No. You need to create your custom
columns in Revu before uploading the
document to the Studio Session.
Who can edit a markup placed on a document
in a Studio Session?
Answer: Only the person who placed the
markup can edit it in a Studio Session. (Even
the Session administrator cannot edit a
markup placed by any other attendee.)
What is the difference between finishing &
leaving a Studio Session?
Answer: Leaving a Studio Session allows other
attendees to continue working & gives you
the opportunity to re-enter at a later date.
Finishing a Studio Session kicks everyone out &
closes the Session for good; it cannot be
accessed again in the future.
11.0 Studio Projects
11.1 Module Overview
Lesson objectives
By the end of this lesson, learners will be able to:
Explain, in general terms, how Studio Projects
differs from Studio Sessions.
In an earlier module, you learned how the
popularity of digital collaboration afforded by
Studio Sessions increased the demand for access to
documents anytime & anywhere.
In this module, you’ll learn how to use Studio
Projects to increase your — & your team’s —
productivity by gaining access to shared
documents anytime/anywhere.
11.2 Setting Up a New Project
Lesson objectives
By the end of this lesson, learners will be able to:
Create a new Studio Project.

Revu 2016: Basics Guide
PAGE 74 Revu Basics |Guide 2016
Upload individual files of any file type to a Studio
Project by right-clicking on the Project name.
Create a new folder & then upload individual
files of any file type to a Studio Project by right-
clicking on the Project name.
Upload an existing folder of files to a Studio
Project by right-clicking on the Project name.
Invite colleagues to join them in a Studio Project
by typing in an email address.
Invite attendees to a Studio Project using their
email address book.
Restrict attendees by email address.
Before you can start a Studio Project you must
create a Studio account. (See Module 10.2
Setting Up a New Session)
To start a new Project:
1. Go to View > Tabs
> Studio or press
ALT+C to open the
Studio tab.
2. On the Studio tab, go
to Start > New
Project.
3. The New Project
dialog box appears.
4. Enter a name for the
Project & click OK.
The Studio tab
changes to show the
empty Project.
Revu 2016: Basics Guide
PAGE 75 Revu Basics |Guide 2016
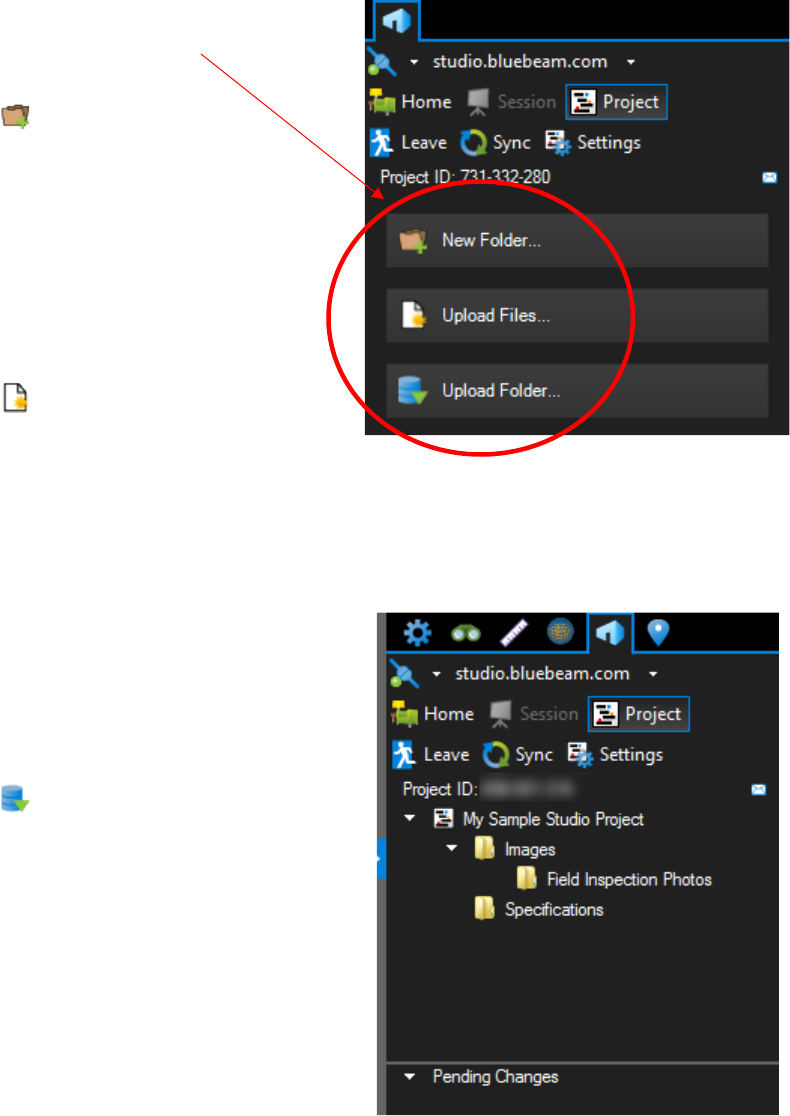
To add initial Project
files, select from the
three options:
New Folder:
Creates a new folder
in the root directory
of the Project. Once
selected, the New
Folder dialog box
appears. Enter a
name for the folder &
click OK to create it.
Upload Files:
Uploads individually
selected files to the
root directory of the
Project. Once
selected, the Open
dialog box appears.
Navigate to the
desired files (CTRL-
click or SHIFT-click to
select multiple files, if
desired) & click
Open.
Upload Folder:
Uploads the contents
of a folder to the root
directory of the
Project. Once
selected, the Select a
folder to upload
dialog box appears.
Navigate to & select
the desired folder &
click Select Folder.

Revu 2016: Basics Guide
PAGE 76 Revu Basics |Guide 2016
o This option
recreates the
selected folder in
the Project &
uploads the
contents into that
folder
automatically.
Additional files &
folders can be
added to the Project
later as well.
To invite a user to the
Project:
Inviting somebody to a Project automatically adds
them as an Allowed User in the Project Settings.In
addition, the invitee is also sent an email containing
information about the Project as well as a link
allowing them to automatically connect to the
Project.
1. When in the Project,
click Invite on the
Studio tab.

Revu 2016: Basics Guide
PAGE 77 Revu Basics |Guide 2016
The Project Invitation
dialog box appears.
2. The Project
Information is shown
at the top of the
dialog box. To copy
this information to the
clipboard in order to
paste it into another
program, such as an
email message, IM or
other document,
click Copy Invitation.
3. To add invitees from
the address book of
your default email
program, click
Address Book.
Note: The email
program must be MAPI
compliant for Revu to
access its address book.
The address books from
web-based email like
Gmail, Hotmail or Yahoo
cannot be accessed.
4. To add invitees
manually, click .
When the Add E-Mail
Address dialog box
appears, enter the
invitee's email
address & click OK.

Revu 2016: Basics Guide
PAGE 78 Revu Basics |Guide 2016
5. To add all the
members of an
existing Group, click
. When the Select
Groups dialog box
appears, select the
desired Group & click
OK.
6. To change the email
address of an invitee,
select the entry &
click . When the
Modify E-mail
Address dialog box
appears, enter the
new email address &
click OK.
7. To remove an invitee,
select the entry &
click .
8. Enter a Message to
add to the invitations,
if desired.
9. Click OK. Email
invitations will be sent
to all the invitees
from the Studio
server.
To add users & restrict
access:
1. When in a Project,
click Settings on
the Studio tab.

Revu 2016: Basics Guide
PAGE 79 Revu Basics |Guide 2016
The Project Settings
dialog box appears.
2. Click the User Access
tab. Previously invited
users will appear in
the list.
3. To add new,
individual users, click
. The Add E-mail
Address dialog box
opens. Enter the
user's email address &
click OK.
4. To add the users in a
Group, click . The
Select Groups dialog
box opens. Select the
desired group & click
OK. All the users in
that Group are
automatically
added.
5. By default, all users
added to the User
Access tab
automatically have
their Access set to
Allow. To deny
access to a specific
user select the
desired user & click
Deny.
6. To restrict access to
this Project to only
those users listed on
the User Access tab
whose Access is set
to Allow, select
Restrict Users.

Revu 2016: Basics Guide
PAGE 80 Revu Basics |Guide 2016
a. The relationship
between this
setting & a user's
Access status
(either Allow or
Deny) lets you set
up the equivalent
of a "white list" or a
"black list" & merits
some further
explanation:
b. When Restrict Users
is checked, only
users listed here on
the User Access
tab whose Access
is set to Allow will
be able to access
this Project. This is
the equivalent of a
"white list."
c. When Restrict Users
is not checked,
any user can
access the Project
except for those
listed here on the
User Access tab
whose Access is
set to Deny. This is
the equivalent of a
"black list."
7. Click OK.

Revu 2016: Basics Guide
PAGE 81 Revu Basics |Guide 2016
11.3 Setting Permissions
Lesson objectives
By the end of this lesson, learners will be able to:
Set admin-level permissions in a Studio Project
for everyone, a single user, or a group.
Set folder-level permissions in a Studio Project for
everyone, a single user, or a group.
1. When in a Project,
click Settings on
the Studio tab. The
Project Settings
dialog box appears.
2. Click the Permissions
tab.
The default group, Everyone, will be shown, as well as any other Groups that
have been previously added to this Project. The Everyone group applies to all
users in the Project & its initial permission settings are configured when the
Project is created. It cannot be deleted. Most permissions for the Everyone
group are set to Deny when the Project is created; a recommended best
practice is to give additional permissions to specific users & Groups rather than
allow greater access to the Everyone group.
3. To add individual
users or Groups:
a. Click . The Add
Users/Groups
dialog box opens.
b. Select the desired
user or group &
click OK. By
default, when
users & Groups
are added they
inherit the
permissions of the
Everyone group.

Revu 2016: Basics Guide
PAGE 82 Revu Basics |Guide 2016
Note: Individual users will not appear in the list until
after they have accessed the Project for the first
time.
4. To change the
permissions for a user
or Group:
a. Select the desired
user or Group in
the Users/Groups
list.
b. Select the desired
permission in the
Applied
Permissions list.
A dropdown list
arrow will appear
to the right of the
selected
permission.
c. Select a
permission setting
from the
dropdown list.
5. When defining
permissions for the
Everyone group, the
options are Deny or
Allow.
6. When defining
permission for all
other users & Groups,
then options are
blank, Deny or Allow.
Selecting blank will
cause the user or
Group to inherit the
permission defined
for the Everyone
group.
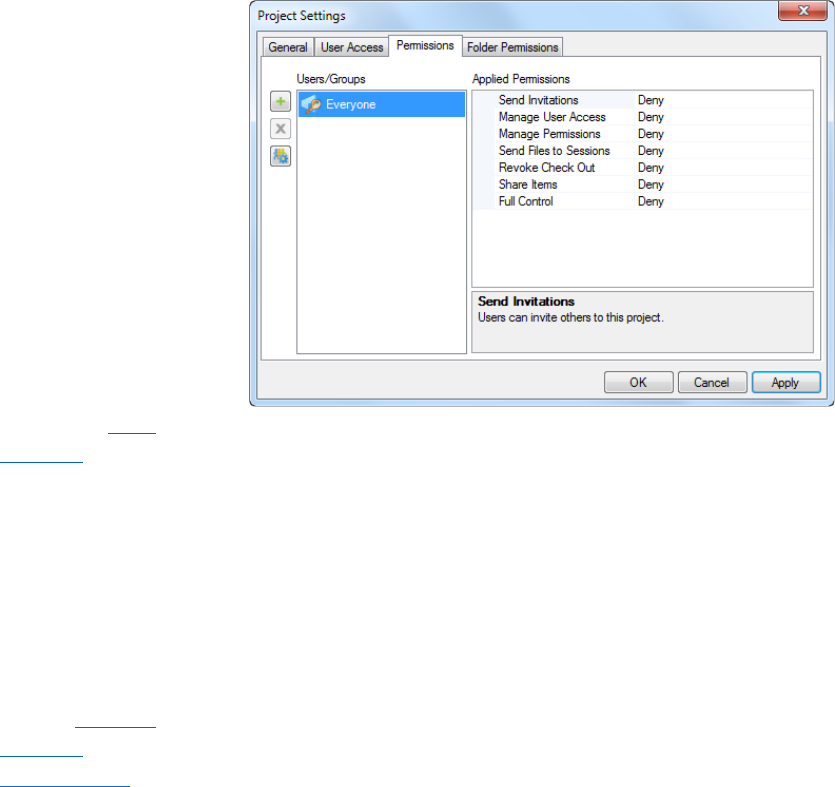
Revu 2016: Basics Guide
PAGE 83 Revu Basics |Guide 2016
a. The Full Control
permission is
powerful & setting
it to Allow gives
the user or Group
of users
administrator
powers. The
effects of this are:
b. All permissions for
administrators are
set to Allow.
c. Administrators can
rename the
Project.
d. Administrators can
delete the Project.
e. Administrators can
manage User
Access.
f. Administrators can
manage
Permissions for
other users.
g. Administrators
have full
permissions to any
folder, regardless
of the folder's
default
permissions.
7. There are some limits
on what
administrators can
do, however:
a. Administrators
cannot block the
Host.

Revu 2016: Basics Guide
PAGE 84 Revu Basics |Guide 2016
b. Administrators do
not have access
to the Host's (or
any other
administrator's)
Groups.
8. To remove a user or
Group, select them &
click .
9. Click OK.
11.4 Working With Documents in Studio Projects
Lesson objectives
By the end of this lesson, learners will be able to:
Open a document in read-only mode.
Identify when a document is open in read-
only mode.
Check out any document by right-clicking on
the document in the main section of the
Studio tab.
Check in any document by right-clicking on
the document in the main section of the
Studio tab.
Undo check out of a file by right-clicking on
the document in the main section of the
Studio tab.
Find out who checked out a document by
hovering over the document name in the
main section of the Studio tab.
Files not checked out by you
Right-click on a file in the Project file list & you have the following options
depending on the file type, the current status of the file, & your permissions:
Open: Opens the file for viewing. Files that are only opened (but not
checked out) cannot be edited.
Check Out: Opens the file (if it is not already) & checks it out to you. Only
files that have been checked out can be edited & only one user can check
out a file at a time.
Download Copy: Downloads a copy of the document to a local or network
drive.
Rename: Changes the name of the file.
Cut: Cuts the file from its current location so you can move it to another
folder in the Project.
Copy: Copies the file so you can paste another copy into another folder in

Revu 2016: Basics Guide
PAGE 85 Revu Basics |Guide 2016
the Project.
Paste: Pastes a cut or copied file into the selected folder.
Delete: Removes the file from the project.
Add to New Session: An the PDF file to a new Studio Session. Only valid for
PDF files.
Add to session name: Add the PDF file to this existing Studio Session. Only
valid for PDF files.
Share Link: Allows you to provide a link to the Project file that can be used
by somebody outside the Project to open & view the file.
Revision History: Shows the revision history of the file & allows you to open a
previous version of the file.
Properties: Shows the properties of the file, including its name, project path,
status, creation date, & size.
Files checked out by you
Open: Opens the file for viewing &/or editing.
Open Project Copy: Opens the server copy of the Project file in a new tab.
Download Copy: Downloads a copy of the document to a local or network
drive.
Check In: Saves the file to the Project & makes it available for another user
to check out.
Update Server Copy: Updates the Project file with changes you have made
but does not check it in.
Undo Check Out: Releases your Check Out (making it available for another
user to check out) & discards any changes you made to the file.
Replace File: Allows you to replace the server copy of a Project file with one
from a local or network drive.
Revert Changes: Reverses any changes you have made to the Project file that
you have not checked in, essentially opening the server copy again.
Copy: Copies the file so you can paste another copy into another folder in
the Project
Share Link: Allows you to provide a link to the Project file that can be used
by somebody outside the Project to open & view the file.
Revision History: Shows the revision history of the file & allows you to open a
previous version of the file.
Properties: Shows the properties of the file, including its name, project path,
status, creation date, & size.

Revu 2016: Basics Guide
PAGE 86 Revu Basics |Guide 2016
11.5 Viewing Revision History
Lesson objectives
By the end of this lesson, learners will be able to:
View the history of changes made to a
document by right-clicking on the document in
the main section of the Studio tab.
Restore a document from a previous version
To view a document's
previous versions:
Right-click the desired
document in the Project
list & select Revision
History. The Revision
History dialog box
appears with all
previous versions listed.
Each file listed in the Revision History dialog box is numbered, with Revision #1
being the file’s initial upload. The latest revision, representing the current state
of the document, will appear bolded at the top of the list.
Each revision, including
the latest, can be
opened & viewed in a
read-only state.
To open a previous
version of a document:
1. Right-click the
desired document in
the Project list &
select Revision
History. The Revision
History dialog box
appears with all
previous versions
listed.

Revu 2016: Basics Guide
PAGE 87 Revu Basics |Guide 2016
2. Select the desired
version & click Open
Revision. The revision
will open in its native
application with the
revision number
automatically
appended to its file
name.
To restore a document
to a previous version:
1. Right-click the
desired document in
the Project list &
select Revision
History. The Revision
History dialog box
appears with all
previous versions
listed.
2. Select the desired
version & click
Restore Revision. A
new revision of the
document is created
from the selected
version & added to
the Revision History
with a note regarding
its origin. None of the
previous versions are
overwritten or
deleted.
For more information on
Studio Projects Click on
the link to the right.
Studio Projects Video Tutorial
Revu 2016: Basics Guide
PAGE 88 Revu Basics |Guide 2016
Activity – Module 11 Review: “Pop Quiz!”
True or false? You can upload individual files
to a Studio Project.
Answer: True.
True or false? You can upload an entire
directory of files to a Studio Project.
Answer: True.
True or false? You can right-click a file in a
third-party account like Dropbox, & then add
the selected file to a Studio Project.
Answer: False.
How can you identify whether or not a
document is checked out—& by whom?
Answer: The file name will display a red
checkmark next to it; hovering your mouse
cursor over the file name will display a tooltip
with the email address of the person who has
it checked out.
True or false? Once a Project file is checked
back in, the old copy of the file is replaced
entirely.
Answer: False.

Revu 2016: Basics Guide
PAGE 89 Revu Basics |Guide 2016
12.0 Additional Resources
12.1 Module Overview
Lesson objectives
By the end of this lesson, learners will be able to:
Access the free training videos on Bluebeam’s
website.
Access the Ask Support articles on Bluebeam’s
website.
Identify where on Bluebeam.com to
download premade tool sets & Profiles.
Free training videos on
Bluebeam’s website
Revu Features & Tools
Ask Support articles
Bluebeam Knowledge Base
Download Bluebeam’s
premade Tool-sets
Tool-Sets
Download Bluebeam’s
premade Profiles
Profiles
Free training videos on
Lynda.com website
Sign into www.lynda.com & search for “Bluebeam
Training & Tutorials”
