
NP-32/NP-12
Owner’s Manual
Polski
Slovenščina
Русский
Български
Dansk
Română
Svenska
Latviski
Česky
Lietuvių k.
Slovenčina
eesti keel
Magyar
HrvatskiTürkçe
EnglishFrançaisEspañolDeutschPortuguêsItalianoNederlands
Manual Development Department
© 2015 Yamaha Corporation
Published 10/2015 AL##*.*-**A0
Printed in China
ZR87720
Yamaha Global Site
http://www.y amaha.com/
Yamaha Downloads
http://download.yamaha.com/
NP-32 NP-12
Owner’s Manual
Mode d'emploi
Manual de instrucciones
Bedienungsanleitung
Manual do Proprietário
Manuale di istruzioni
Gebruikershandleiding
Podręcznik użytkownika
Руководство пользователя
Brugervejledning
Bruksanvisning
Uživatelská příručka
Používateľská príručka
Használati útmutató
Navodila za uporabo
Ръководство на потребителя
Manualul proprietarului
Lietotāja rokasgrāmata
Vartotojo vadovas
Kasutusjuhend
Korisnički priručnik
Kullanıcı el kitabı
EN
FR
ES
DE
PT
IT
NL
PL
RU
DA
SV
CS
SK
HU
SL
BG
RO
LV
LT
ET
HR
TR

NP-32/NP-12 Owner’s Manual 3
OBSERVERA!
Apparaten kopplas inte ur växelströmskällan (nätet) så länge som den
ar ansluten till vägguttaget, även om själva apparaten har stängts av.
ADVARSEL: Netspændingen til dette apparat er IKKE afbrudt,
sålænge netledningen sidder i en stikkontakt, som er tændt — også
selvom der er slukket på apparatets afbryder.
VAROITUS: Laitteen toisiopiiriin kytketty käyttökytkin ei irroita koko
laitetta verkosta.
(standby)
Entsorgung leerer Batterien (nur innerhalb Deutschlands)
Leisten Sie einen Beitrag zum Umweltschutz. Verbrauchte Batterien
oder Akkumulatoren dürfen nicht in den Hausmüll. Sie können bei einer
Sammelstelle für Altbatterien bzw. Sondermüll abgegeben werden.
Informieren Sie sich bei Ihrer Kommune.
(battery)

4 NP-32/NP-12 Owner’s Manual
The model number, serial number, power requirements, etc., may be
found on or near the name plate, which is at the bottom of the unit.
You should note this serial number in the space provided below and
retain this manual as a permanent record of your purchase to aid
identification in the event of theft.
Model No.
Serial No.
(bottom_en_01)
Information for Users on Collection and Disposal of Old Equipment and used Batteries
These symbols on the products, packaging, and/or accompanying documents mean that used
electrical and electronic products and batteries should not be mixed with general household waste.
For proper treatment, recovery and recycling of old products and used batteries, please take them
to applicable collection points, in accordance with your national legislation and the Directives 2002/
96/EC and 2006/66/EC.
By disposing of these products and batteries correctly, you will help to save valuable resources and
prevent any potential negative effects on human health and the environment which could otherwise
arise from inappropriate waste handling.
For more information about collection and recycling of old products and batteries, please contact
your local municipality, your waste disposal service or the point of sale where you purchased the
items.
[For business users in the European Union]
If you wish to discard electrical and electronic equipment, please contact your dealer or supplier for
further information.
[Information on Disposal in other Countries outside the European Union]
These symbols are only valid in the European Union. If you wish to discard these items, please
contact your local authorities or dealer and ask for the correct method of disposal.
Note for the battery symbol (bottom two symbol examples):
This symbol might be used in combination with a chemical symbol. In this case it complies with the
requirement set by the Directive for the chemical involved.
(weee_battery_eu_en_01)

NP-32/NP-12 Owner’s Manual 5
PRECAUTIONS
PLEASE READ CAREFULLY BEFORE PROCEEDING
Please keep this manual in a safe and handy place for future reference.
For AC adaptor
For NP-32/NP-12
• Do not place the power cord near heat sources such as heaters or radiators. Also, do not excessively
bend or otherwise damage the cord, or place heavy objects on it.
• Only use the voltage specified as correct for the instrument. The required voltage is printed on the name
plate of the instrument.
• Use the specified adaptor (page 23) only. Using the wrong adaptor can result in damage to the
instrument or overheating.
• Check the electric plug periodically and remove any dirt or dust which may have accumulated on it.
• This instrument contains no user-serviceable parts. Do not open the instrument or attempt to
disassemble or modify the internal components in any way. If it should appear to be malfunctioning,
discontinue use immediately and have it inspected by qualified Yamaha service personnel.
• Do not expose the instrument to rain, use it near water or in damp or wet conditions, or place on it any
containers (such as vases, bottles or glasses) containing liquids which might spill into any openings.
If any liquid such as water seeps into the instrument, turn off the power immediately and unplug the
power cord from the AC outlet. Then have the instrument inspected by qualified Yamaha service
personnel.
• Never insert or remove an electric plug with wet hands.
• Do not put burning items, such as candles, on the unit. A burning item may fall over and cause a fire.
WARNING CAUTION
• This AC adaptor is designed for use with only Yamaha electronic instruments. Do not use for any other
purpose.
• Indoor use only. Do not use in any wet environments.
• When setting up, make sure that the AC outlet is easily accessible. If some trouble or malfunction
occurs, immediately turn off the power switch of the instrument and disconnect the AC adaptor from the
outlet. When the AC adaptor is connected to the AC outlet, keep in mind that electricity is flowing at the
minimum level, even if the power switch is turned off. When you are not using the instrument for a long
time, make sure to unplug the power cord from the wall AC outlet.
WARNING
Always follow the basic precautions listed below to avoid the possibility of serious injury or even death from electrical shock, short-circuiting, damages, fire or other
hazards. These precautions include, but are not limited to, the following:
Power supply/AC adaptor
Do not open
Water warning
Fire warning
DMI-5 1/3

6 NP-32/NP-12 Owner’s Manual
• Follow the precautions below. Failure to do so might result in explosion, fire, overheating or battery
fluid leakage.
- Do not tamper with or disassemble batteries.
- Do not dispose of batteries in fire.
- Do not attempt to recharge batteries that are not designed to be charged.
- Keep the batteries separate from metallic objects such as necklaces, hairpins, coins, and keys.
- Use the specified battery type (page 12) only.
- Use new batteries, all of which are the same type, same model, and made by the same manufacturer.
- Always make sure all batteries are inserted in conformity with the +/- polarity markings.
- When the batteries run out, or if the instrument is not to be used for a long time, remove the batteries
from the instrument.
- When using Ni-MH batteries, follow the instructions that came with the batteries. Use only the
specified charger device when charging.
• Keep batteries away from small children who might accidentally swallow them.
• If the batteries do leak, avoid contact with the leaked fluid. If the battery fluid should come in contact
with your eyes, mouth, or skin, wash immediately with water and consult a doctor. Battery fluid is
corrosive and may possibly cause loss of sight or chemical burns.
• When one of the following problems occur, immediately turn off the power switch and disconnect the
electric plug from the outlet. (If you are using batteries, remove all batteries from the instrument.) Then
have the device inspected by Yamaha service personnel.
- The power cord or plug becomes frayed or damaged.
- It emits unusual smells or smoke.
- Some object has been dropped into the instrument.
- There is a sudden loss of sound during use of the instrument.
• Do not connect the instrument to an electrical outlet using a multiple-connector. Doing so can result in
lower sound quality, or possibly cause overheating in the outlet.
• When removing the electric plug from the instrument or an outlet, always hold the plug itself and not
the cord. Pulling by the cord can damage it.
• Remove the electric plug from the outlet when the instrument is not to be used for extended periods of
time, or during electrical storms.
• Do not place the instrument in an unstable position where it might accidentally fall over.
• Before moving the instrument, remove all connected cables, to prevent damage to the cables or injury
to anyone who might trip over them.
• When setting up the product, make sure that the AC outlet you are using is easily accessible. If some
trouble or malfunction occurs, immediately turn off the power switch and disconnect the plug from the
outlet. Even when the power switch is turned off, electricity is still flowing to the product at the minimum
level. When you are not using the product for a long time, make sure to unplug the power cord from the
wall AC outlet.
• Use only the stand specified for the instrument. When attaching it, use the provided screws only. Failure
to do so could cause damage to the internal components or result in the instrument falling over.
• Before connecting the instrument to other electronic components, turn off the power for all components.
Before turning the power on or off for all components, set all volume levels to minimum.
• Be sure to set the volumes of all components at their minimum levels and gradually raise the volume
controls while playing the instrument to set the desired listening level.
• Do not insert a finger or hand in any gaps on the instrument.
• Never insert or drop paper, metallic, or other objects into the gaps on the panel or keyboard. This could
cause physical injury to you or others, damage to the instrument or other property, or operational
failure.
• Do not rest your weight on, or place heavy objects on the instrument, and do not use excessive force
on the buttons, switches or connectors.
• Do not use the instrument/device or headphones for a long period of time at a high or uncomfortable
volume level, since this can cause permanent hearing loss. If you experience any hearing loss or ringing
in the ears, consult a physician.
Battery
If you notice any abnormality
CAUTION
Always follow the basic precautions listed below to avoid the possibility of physical injury to you or others, or damage to the instrument or other property. These
precautions include, but are not limited to, the following:
Power supply/AC adaptor
Location
Connections
Handling caution
DMI-5 2/3

NP-32/NP-12 Owner’s Manual 7
Always turn the power off when the instrument is not in use.
Even when the [ ] (Standby/On) switch is in standby status (power lamp is off), electricity is still flowing
to the instrument at the minimum level.
When you are not using the instrument for a long time, make sure you unplug the power cord from the wall
AC outlet.
Make sure to discard used batteries according to local regulations.
NOTICE
To avoid the possibility of malfunction/damage to the product, damage to data, or damage to other
property, follow the notices below.
Handling
• Do not use the instrument in the vicinity of a TV, radio, stereo equipment, mobile phone, or other
electric devices. Otherwise, the instrument, TV, or radio may generate noise. When you use the
instrument along with an application on your iPad, iPhone or iPod touch, we recommend that you set
“Airplane Mode” to “ON” on that device in order to avoid noise caused by communication.
• Depending on the condition of surrounding radio waves, the instrument may possibly malfunction.
• Do not expose the instrument to excessive dust or vibrations, or extreme cold or heat (such as in direct
sunlight, near a heater, or in a car during the day) to prevent the possibility of panel disfiguration,
damage to the internal components or unstable operation. (Verified operating temperature range: 5° -
40°C, or 41° - 104°F.)
• Do not place vinyl, plastic or rubber objects on the instrument, since this might discolor the panel or
keyboard.
Maintenance
When cleaning the instrument, use a soft and dry cloth. Do not use paint thinners, solvents, alcohol,
cleaning fluids, or chemical-impregnated wiping cloths.
Saving data
• Some of the data of this instrument (page 19) are retained when the power is turned off. However, the
saved data may be lost due to some failure, an operation mistake, etc.
• When turning the power off, be sure to disconnect the AC adaptor only after all lamps of the instrument
turn off. If the AC adaptor is disconnected before the lamps go out, data could be lost.
Information
About copyrights
• Copying of the commercially available musical data including but not limited to MIDI data and/or audio
data is strictly prohibited except for your personal use.
• This product incorporates and bundles contents in which Yamaha owns copyrights or with respect to
which Yamaha has license to use others' copyrights. Due to copyright laws and other relevant laws, you
are NOT allowed to distribute media in which these contents are saved or recorded and remain virtually
the same or very similar to those in the product.
- The contents described above include a computer program, Accompaniment Style data, MIDI data,
WAVE data, voice recording data, a score, score data, etc.
- You are allowed to distribute medium in which your performance or music production using these
contents is recorded, and the permission of Yamaha Corporation is not required in such cases.
About functions/data bundled with the instrument
Some of the preset songs have been edited for length or arrangement, and may not be exactly the same as
the original.
About this manual
• The illustrations as shown in this manual are for instructional purposes only, and may appear somewhat
different from those on your instrument.
• iPhone, iPad and iPod touch are trademarks of Apple Inc., registered in the U.S. and other countries.
• The company names and product names in this manual are the trademarks or registered trademarks of
their respective companies.
Yamaha cannot be held responsible for damage caused by improper use or modifications to the
instrument, or data that is lost or destroyed.
DMI-5 3/3

8 NP-32/NP-12 Owner’s Manual
Thank you for choosing this Yamaha product.
In order to make the most of the performance potential and features of the instrument, please read the manual thoroughly, and keep it in a handy place
for later reference.
Table of Contents
Introduction ...................................................................9
About the Manuals ......................................................................... 9
Accessories ....................................................................................9
Panel Controls and Connectors .................................10
Top Panel ..................................................................................... 10
Rear Panel ................................................................................... 11
Setting Up ....................................................................12
Using an AC Adaptor ................................................................... 12
Using Batteries .............................................................................12
Enjoying the Sounds of the Instrument ....................13
Selecting Voices ...........................................................................13
Listening to the Voice Demo Songs .............................................13
Combining Voices (Dual) .............................................................14
Listening to the Piano Demo Songs ............................................. 15
Using the Metronome ..................................................16
Playing back the Metronome ........................................................ 16
Adjusting the Tempo ....................................................................16
Setting the Beat ...........................................................................16
Setting the Metronome Using the Keyboard ................................17
Recording Your Performance ....................................18
Deleting Recorded Song ..............................................................18
Backing up Data and Initializing the Settings ...........19
Backing up Data ...........................................................................19
Initializing the Settings ..................................................................19
Customizing the Settings ...........................................20
Octave Shift ...................................................................................20
Reverb Depth .................................................................................20
Transpose ......................................................................................20
Reverb Type ..................................................................................20
Tuning ............................................................................................21
Touch Sensitivity ............................................................................21
Operation Confirmation Sounds ....................................................21
Auto Power Off ..............................................................................21
Troubleshooting ..........................................................22
Specifications ..............................................................23

NP-32/NP-12 Owner’s Manual 9
Introduction
About the Manuals
Online Manuals (PDF)
In addition to this manual, the following online manuals are also available.
• iPhone/iPad Connection Manual
Explains how to connect the instrument to a smart device, such as
iPhone, iPad.
• Computer-related Operations
Contains instructions about computer-related functions.
• MIDI Reference
Contains information about MIDI such as the MIDI Data Format, MIDI
Implementation chart, etc.
To obtain these manuals, access the Yamaha Downloads website,
select your country, enter your model name in the Model Name box,
then click [Search].
Illustrations
• Illustrations may differ from actual item depicted.
• Keyboard illustrations show the NP-32 and the NP-12.
Symbols
Accessories
• Owner’s Manual (this book)
• AC adaptor
May not be included depending on your particular area. Please check
with your Yamaha dealer.
• Online Member Product Registration
You will need the PRODUCT ID on the sheet in order to fill out the User
Registration form.
•Music rest
Yamaha Downloads https://download.yamaha.com/
NOTICE Indicates precautions for use to avoid the possibility of
malfunction/damage to the instrument.
Indicates instructions and supplementary explanations for
optimum use.
[ ] Indicates buttons and jacks.
Insert into the slot
10 NP-32/NP-12 Owner’s Manual
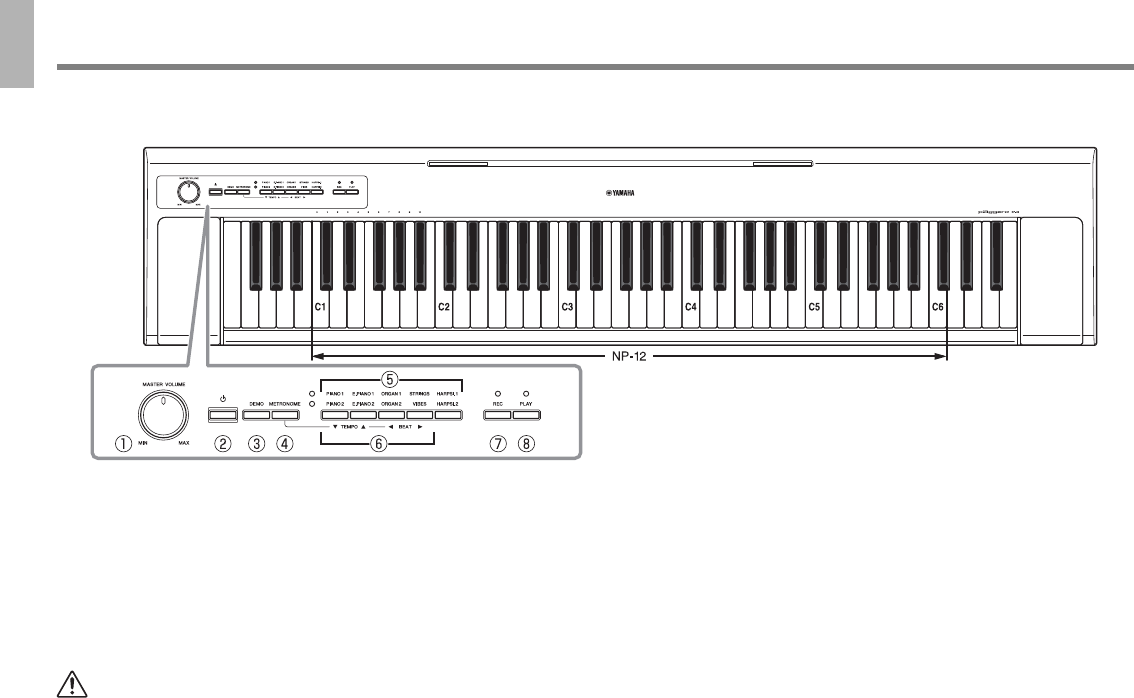
Panel Controls and Connectors
Top Panel
1 [MASTER VOLUME]
For controlling the volume.
Turning the dial to [MAX] increases the volume, while turning to [MIN]
decreases it.
2 [p] (Standby/On)
Turns the power on/off.
Press the button to turn the power on; the lamp next to [PIANO 1]
lights up. Holding down the button for about one second turns the
power off. Minimize the volume before turning the power on.
3 [DEMO] ... page 13
4 [METRONOME] ... page 16
5 Voice buttons ... page 13
6 [t]TEMPO[s], [<]BEAT[>] ... page 16
7 [REC] ... page 18
8 [PLAY] ... page 18
*The illustration shows the NP-32.
CAUTION
Even when [p] (Standby/On) is in the standby status, electricity
is still flowing to the instrument at a minimum level. When not
using the instrument for an extended period of time, be sure to
unplug the power cord from the wall AC outlet, and/or remove
batteries from the instrument.
NP-32/NP-12 Owner’s Manual 11
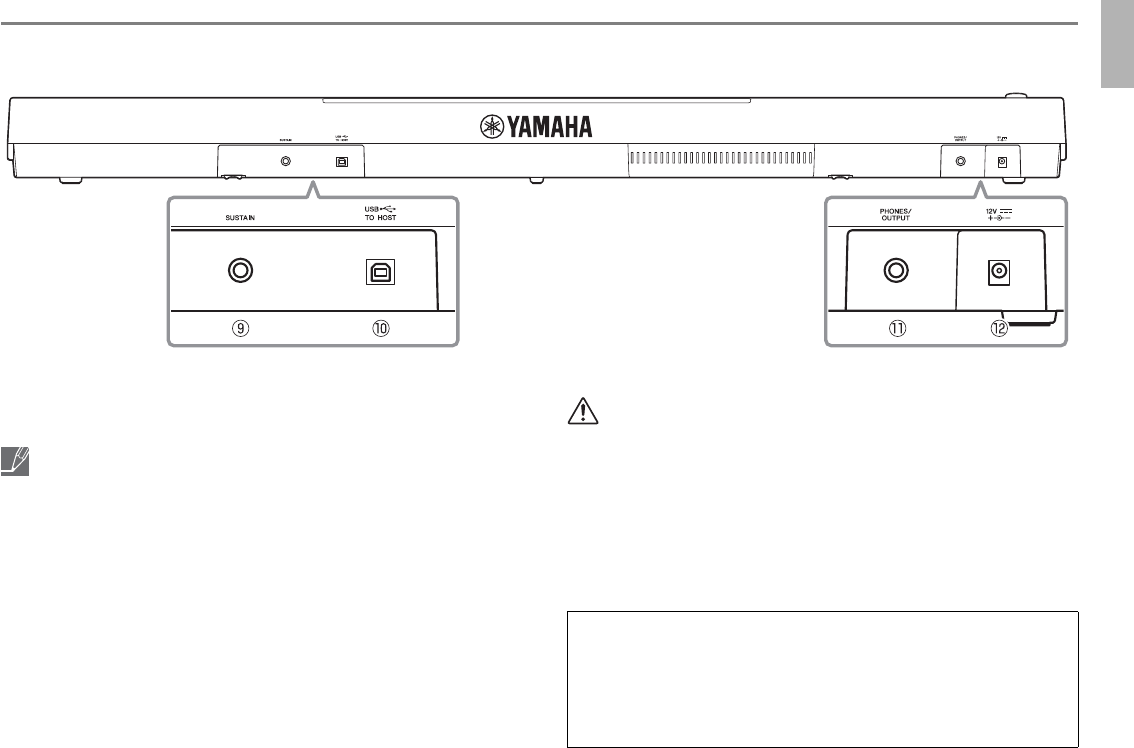
Panel Controls and Connectors
Rear Panel
9 [SUSTAIN]
For connecting a separately sold footswitch or foot pedal. Pressing
the connected footswitch/foot pedal sustains notes longer.
0 [USB TO HOST]
For connecting to a computer or a smart device such as iPhone or
iPad. Refer to the Online Manual “Computer-related Operations” and/
or “iPhone/iPad Connection Manual” for details.
A [PHONES/OUTPUT]
For connecting a set of standard stereo headphones. This jack also
functions as an external output. The speakers of the instrument are
automatically shut off when a plug is inserted into this jack.
B DC IN jack ... page 12
*The illustration shows the NP-32.
• Turn the power off when connecting or disconnecting the footswitch/foot
pedal.
• Do not turn the power on while pressing the footswitch/foot pedal.
Otherwise, the switch or pedal type (on/off) might be reversed.
NOTICE
Use an AB type USB cable of less than 3 meters. USB 3.0 cables cannot
be used.
CAUTION
To prevent damage to the speakers, turn the power of the
instrument and an external device off, and minimize their volume
before connecting. Be sure to turn the power of these devices on/
off in the following order to avoid electric shock or equipment
damage.
Turning the power on: (1) the instrument (2) external device
Turning the power off: (1) external device (2) the instrument
Smart device application - Digital Piano Controller
With the specially developed Digital Piano Controller app running on
your iPhone, iPad or iPod touch, you can remotely control your
instrument for even more convenience and flexibility. For more details
on Digital Piano Controller and other apps, refer to the following
Yamaha web site.
http://yamaha.com/kbdapps/
12 NP-32/NP-12 Owner’s Manual
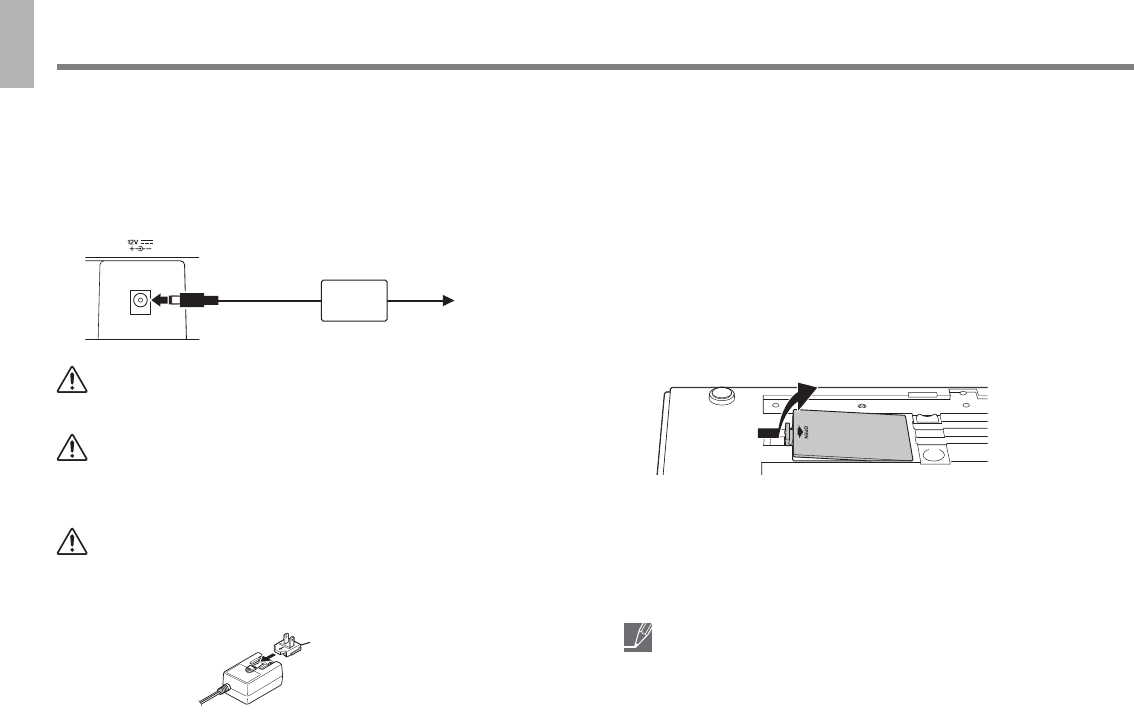
Setting Up
Although the instrument will run either from an optional AC adaptor or batteries, Yamaha recommends use of an AC adaptor whenever possible,
for optimum eco-friendly operation.
Using an AC Adaptor
Connect the AC adaptor to the DC IN jack and an AC outlet following the
order of 1 2 in the illustration below. When disconnecting, turn the
power off and disconnect the AC adaptor in order of 2 1.
For the AC Adaptor with a Removable Plug
Using Batteries
(Six commercially available 1.5V “AA” size batteries are required)
Usable batteries: alkaline (LR6), rechargeable nickel-metal hydride
batteries (rechargeable Ni-MH batteries), Manganese (R6)
• Alkaline or rechargeable Ni-MH batteries are recommended because
the instrument may consume a large amount of power.
• Make sure that the power of the instrument is off when installing the
batteries.
1 Put the instrument upside down on a soft cloth, and open
the battery compartment cover located on its bottom
panel.
2 Insert batteries following the polarity markings on the
side of the compartment.
3 Replace the compartment cover.
WARNING
Use the specified adaptor (page 23) only. Use of other adaptors
may result in irreparable damage to both the adaptor and
instrument. Yamaha cannot be held responsible for damage
caused by improper use even if the instrument is under warranty.
CAUTION
When setting up the instrument, make sure that the AC outlet you
are using is easily accessible. If some trouble or malfunction
occurs, immediately turn the power off and disconnect the plug
from the outlet.
WARNING
• Make sure to keep the plug attached to the AC adaptor. Using
the plug alone can cause electric shock or fire.
• If the plug is removed accidentally, slide the plug into place
without touching the metallic parts, and then push the plug in
completely until it clicks. To avoid electric shock, short circuit or
damage, also be careful that there is no dust between the AC
adaptor and plug.
AC
adaptor
1 DC IN jack
2 AC outlet
Plug
Slide the plug as indicated
* The shape of the plug differs depending on locale.
NOTICE
When battery power becomes too low, the instrument may not function
properly. When this happens, make sure to replace all batteries
with new ones or already-recharged ones.
• The instrument itself cannot charge the batteries. Use only the specified
charger device when charging.
• Power will be automatically drawn from the AC adaptor if an AC adaptor
is connected while batteries are installed in the instrument.
• Connecting or disconnecting the AC adaptor with batteries installed may
turn the power off.

NP-32/NP-12 Owner’s Manual 13
Enjoying the Sounds of the Instrument
Voice List
The original demo songs are Yamaha originals (©2015 Yamaha Corporation). The other demo songs are short rearranged excerpts from the original compositions.
Selecting Voices
The instrument has ten different sounds, which can be selected by Voice buttons (page 10).
You can switch between the upper- and lower-indicated Voices by pressing the Voice buttons located
under the Voices. Once selected, the lamp corresponding to the selected Voice’s side lights up.
Listening to the Voice Demo Songs
The instrument features special Voice Demo Songs that effectively showcase each of
the Voices.
While holding down [DEMO], press one of the Voice buttons to start the Voice Demo Song. The songs
provided for each Voice will play back in sequence. During playback, you can change the Voice Demo
Song by pressing a different Voice button. Press [DEMO] to stop playback.
Panel Name Voice Name Description Voice Demo Song
PIANO 1 Piano 1 Recorded samples from a full concert grand piano. Original
PIANO 2 Piano 2 Warm and soft piano sound. Original
E.PIANO 1 E.Piano 1 An electronic piano sound created by FM synthesis. Original
E.PIANO 2 E.Piano 2 The sound of an electric piano using hammer-struck metallic “tines.” Original
ORGAN 1 Organ 1 A typical pipe organ sound (8' + 4' + 2'). Original
ORGAN 2 Organ 2 The full coupler sound of a pipe organ. Original
STRINGS Strings Spacious and large-scale string ensemble. Original
VIBES Vibraphone The sound of a vibraphone played with relatively soft mallets. Original
HARPSI. 1 Harpsichord 1 The definitive instrument for baroque music. Gavotte (J.S.Bach)
HARPSI. 2 Harpsichord 2 Mixes the same Voice an octave higher for a more brilliant, dynamic tone. Invention No. 1 (J.S.Bach)
• Simply pressing [DEMO] starts the Demo Song sequence from [PIANO 1].
• While holding down [METRONOME], use [t] or [s] to decrease or increase the tempo, or press [t]/[s]
simultaneously to restore the default setting. You can also enter a specific tempo number by using the
keyboard. Refer to “Entering a specific tempo number” on page 17.

14 NP-32/NP-12 Owner’s Manual
Enjoying the Sounds of the Instrument
Setting the Octave for Voice 1/Voice 2 (Octave Shift)
While holding down [METRONOME], press one of the keys assigned to the Octave Shift (see figure below).
Setting range (Voice 1/Voice 2): –1 - +1 (default setting: 0)
Adjusting the Volume Balance between Voice 1/Voice 2
While holding down [METRONOME], press one of the keys assigned to the Volume Balance (see figure below).
Setting range: –6 - +6 (default setting (A#3); optimum volume balance for the currently layered Voices)
Combining Voices (Dual)
You can layer two Voices and play them simultaneously.
Choose two desired Voices, then press those Voice buttons simultaneously. Press one of
the Voice buttons to exit from Dual.
In Dual, a Voice assigned to a smaller group number will be designated as Voice 1, and a
Voice assigned to a larger group number will be designated as Voice 2 (see the illustration).
You cannot layer two Voices from the same group.
–6 +6
Volume of Voice 1 Minimum Maximum
Volume of Voice 2 Maximum Minimum
• The lamps next to [PIANO 1]/[PIANO 2] indicate the status of Voice 1.
• In Dual, the reverb type assigned to Voice 1 takes priority.
Octave Shift
Voice 2
To restore the default setting, press a key marked with .
Octave
Shift Voice 1
Volume balance between Voice 1/Voice 2
• Press the A3 key to increase the volume of Voice 2, and press
the B3 key to decrease it.
Up
1
Down
1
NP-32/NP-12 Owner’s Manual 15
Enjoying the Sounds of the Instrument
Listening to the Piano Demo Songs
The instrument provides ten different Piano Demo Songs.
Select your favorite number from the Piano Demo Song List below, and press
the corresponding key while holding down [DEMO]. The selected Piano
Demo Song will play back followed by the rest of the songs in sequence.
Press [DEMO] to stop playback.
NP-32 Piano Demo Song List NP-12 Piano Demo Song List
No. Title Composer No. Title Composer
1 Menuett G dur BWV.Anh.114 J.S.Bach 1 Invention No. 1 J.S.Bach
2 Turkish March W.A.Mozart 2 Prelude (Wohltemperierte Klavier I No.1) J.S.Bach
3 Für Elise L.v.Beethoven 3 Le Coucou L-C.Daquin
4 Valse op.64-1 “Petit chien” F.F.Chopin 4 Turkish March W.A.Mozart
5 Träumerei R.Schumann 5 Little Serenade J.Haydn
6 Dolly’s Dreaming and Awakening T.Oesten 6 Ecossaise L.v.Beethoven
7 Arabesque J.F.Burgmüller 7 Moments Musicaux op.94-3 F.P.Schubert
8 Humoresque A.Dvořák 8 Valse op.69-1 “L’adieu” F.F.Chopin
9 The Entertainer S.Joplin 9 Fröhlicher Landmann R.Schumann
10 La Fille aux Cheveux de Lin C.A.Debussy 10 La chevaleresque J.F.Burgmüller
(Numbers 1 to 10 are printed above the keys on the top panel.)
While holding down [METRONOME], use [t] or [s] to decrease or increase
the tempo, or press [t]/[s] simultaneously to restore the default setting. You
can also enter a specific tempo number by using the keyboad. Refer to
“Entering a specific tempo number” on page 17.

16 NP-32/NP-12 Owner’s Manual
Using the Metronome
Playing back the Metronome
Press [METRONOME] to play back the metronome, and press again to stop it.
Adjusting the Tempo
Press [t] or [s] while holding down [METRONOME] during playback. Press [t]/[s]
simultaneously to restore the default setting. You can also enter a specific tempo
number by using the keyboad. Refer to figure , on page 17.
Setting range: 32 - 280 (default setting: 120)
Setting the Beat
Press [<] or [>] while holding down [METRONOME] during playback. Press [<]/[>]
simultaneously to restore the default setting. You can also set the beat by using the
keyboad. Refer to figure on page 17.
Setting range: 0 (no beat: default setting), 2/3/4/5/6 beats

NP-32/NP-12 Owner’s Manual 17
Using the Metronome
Setting the Metronome Using the Keyboard
While holding down [METRONOME], pressing the corresponding keys shown in the illustration below allows you to enter a specific tempo number, adjust
the volume of the metronome (see figure below), and so on.
Entering a specific tempo number
The numbers 0 - 9 are assigned to the keys C1
- A1, respectively (the numbers are shown on
the top panel of the instrument).
For example, to set the tempo to “70”:
Press the G1 (7) and C1 (0) keys in sequence
while holding down [METRONOME].
Increasing or
decreasing the tempo value
in steps of one or ten.
Setting the beat
Adjusting the volume of the metronome
Setting range: 1 - 20 (default setting: 10)
Up
1
Down
1
To restore the default setting, press a key marked with .

18 NP-32/NP-12 Owner’s Manual
Recording Your Performance
You can record one song on the instrument. Since settings cannot be changed once recording starts, make the settings according to your
preferences beforehand.
Deleting Recorded Song
NOTICE
If a previously recorded song already exists, the [PLAY] lamp is lit. Recording another song while the [PLAY] lamp is on deletes the previously recorded song.
12 3 4
Press [REC]. Play the keyboard.
• The [REC] lamp lights and the [PLAY] lamp flashes
during recording.
• Pressing [PLAY] also starts recording.
Press [REC]. Press [PLAY].
Press [PLAY] again to
stop playback.
• The instrument can record up to 60 KB (approximately 7,000 notes). When the amount of recording exceeds the capacity, recording will stop automatically, but the
performance up to that point is stored.
• You can use the metronome while recording, but the metronome sound will not be recorded.
123
Press [REC]. Press [PLAY]. Press [REC].
Recording standby
Flashes
Start recording
Stop recording
Lights off Lights up
Currently playing back
Flashes
Flashes
Flashes
Delete recorded song
Lights off

NP-32/NP-12 Owner’s Manual 19
Backing up Data and Initializing the Settings
Backing up Data
The following settings are maintained even if you turn the power off.
• Recorded Song data (page 18)
• Auto Power Off
• Tuning
• Touch Sensitivity
• Operation Confirmation Sounds
• Metronome Volume/Beat (pages 16, 17)
Initializing the Settings
While holding down the highest key, turn the power on to initialize the backup data to
the factory settings.
(page 21)
Flashes four times
If the instrument malfunctions in some way, try turning the power off, then initialize the
settings.

20 NP-32/NP-12 Owner’s Manual
Customizing the Settings
To set items shown in the tables below, hold down the corresponding buttons or button, and press the corresponding keys. When you change a
setting, a confirmation sound (page 21) will let you know that the change has been completed.
Item Description Keys Settings
Octave Shift
You can shift the pitch up or down in octave steps.
Setting range: –1 - +1
Refer to “Octave Shift” on page 14 for details on octave shift in Dual mode.
D3
–1
D#3
0 (default setting)
E3
+1
Reverb Depth
You can adjust the reverb depth.
Setting range: 0 - 10
C4
Down 1
C#4
Optimum depth setting for the current Voice (default setting)
D4
Up 1
Transpose
The transpose function makes it possible to shift the pitch of the entire keyboard
up or down in semitone intervals.
For example, if you set the transpose to “+5,” playing a C key will produce the
pitch of F (C major F major).
Setting range: –6 - +6
F#4 - B4
Transposes the pitch down
C5
0 (default setting)
C#5 - F#5
Transposes the pitch up
Reverb Type
You can select a reverb type.
The appropriate reverb type is automatically set when a Voice is selected.
G5
Room: Simulates the acoustic reverberation you would hear in a room.
G#5
Hall 1: Simulates the natural reverberation of a small-size concert hall.
A5
Hall 2: Simulates the natural reverberation of a large concert hall.
A#5
Stage: Simulates the reverb of a stage environment.
B5
Off: No effect is applied.
Octave Shift
Reverb Depth
Reverb Type
Transpose
Down 1 Up 1
To restore the default setting, press a key marked with .

NP-32/NP-12 Owner’s Manual 21
Customizing the Settings
Item Description Keys Settings
Tuning
You can fine tune the pitch of the entire instrument.
Setting range: 414.8Hz - 466.8Hz
E4
Down 0.2Hz
F4
Up 0.2Hz
F#4
440.0Hz (default setting)
G4
442.0Hz
Touch
Sensitivity
You can specify the degree of touch sensitivity (how the sound responds to
your playing strength).
Touch sensitivity cannot be used for the Organ 1 and 2, or Harpsichord 1
and 2 voices.
A4
Fixed: The volume level does not change regardless of whether you play the
keyboard softly or strongly.
A#4
Soft: The volume level does not change much when you play the keyboard softly
or strongly.
B4
Medium: This is the standard piano touch response (default setting).
C5
Hard: You have to hit the keys strongly to produce a loud sound.
Operation
Confirmation
Sounds
When you turn a function on or off, or change a setting, the instrument
produces a sound to confirm the change.
• Ascending sound for on
• Descending sound for off
• Clicks for other settings
G5
Press the G5 key to enable or disable the Operation Confirmation Sounds
(default: enabled).
Auto Power
Off
This function automatically turns the power off if no buttons or keys are
operated for approximately 30 minutes.
When the power is off, turn the power on while holding down the lowest
key disables Auto Power Off.
G#5
Enable (default setting)
A5
Disable
* Refer to the Online Manual “MIDI Reference” for information about “MIDI Transmit/Receive Channel,” “Local Control,” “Program Change” and “Control
Change.”
Tuning
Touch Sensitivity
Auto Power Off
Enable/Disable
Local Control*:
On/Off
Control Change*:
On/Off
Program Change*:
On/Off
Enable/Disable
Operation Confirmation
Sounds
MIDI Transmit Channel* MIDI Receive Channel*
Off
To restore the default setting, press a key marked with .

22 NP-32/NP-12 Owner’s Manual
Troubleshooting
Problem Cause Solution
When the instrument is turned on or off, a
popping sound is temporarily produced.
This is normal and indicates that the instrument is
receiving electrical power.
—
The instrument does not turn on. The plugs are not properly connected. Securely connect the AC adaptor to the DC IN jack on the instrument and
to the AC outlet (page 12).
The batteries are low or dead. Use either new batteries or recharged Ni-MH batteries, or use the
included AC adaptor (page 12).
Power suddenly and unexpectedly turns off. This is normal and the Auto Power Off function may
have been activated (page 21).
—
When the instrument is turned on, the power
turns off suddenly and unexpectedly.
If an AC adaptor other than the one specified is used,
the power may be turned off suddenly and
unexpectedly.
—
Noise is heard from the instrument’s
speakers or headphones.
The noise may be due to interference caused by the
use of a mobile phone in close proximity to the
instrument.
Turn off the mobile phone, or use it further away from the instrument.
The batteries are low or dead. Use either new batteries or recharged Ni-MH batteries, or use the
included AC adaptor (page 12).
The overall volume is low, or no sound is
heard.
The volume is set too low. Turn up the volume (page 10).
A pair of headphones or conversion adaptor is
connected to [PHONES/OUTPUT].
Disconnect the pair of headphones or conversion adaptor (page 11).
Local Control is off. Turn Local Control on (see the Online Manual “MIDI Reference”).
The batteries are low or dead. Use either new batteries or recharged Ni-MH batteries, or use the
included AC adaptor (page 12).
The sound is distorted. You are using manganese batteries. Turn down the volume, or use either new batteries or recharged Ni-MH
batteries, or use the included AC adaptor (page 12).
The pitch and/or tone of the piano Voices in
certain ranges do not sound right.
This is normal and is a result of sampling algorithms. —
The sustain pedal has no effect. The pedal cable/plug may not be properly connected. Make sure to securely insert the pedal plug into [SUSTAIN] (page 11).
The footswitch/foot pedal seems to produce
the opposite effect.
The polarity is reversed because the footswitch/foot
pedal was pressed when the power was turned on.
Turn the power off and turn it on again to reset the function (page 11).
Noise is heard from the instrument’s
speakers or headphones when using the
instrument with the application on iPhone/
iPad/iPod touch.
— When you use the instrument along with the application on your iPhone/
iPad/iPod touch, we recommend that you set “Airplane Mode” to “ON” on
your device.

NP-32/NP-12 Owner’s Manual 23
Specifications
* The contents of this manual apply to the latest specifications as of the printing date. Since Yamaha makes continuous improvements to the product, this manual may not apply to the specifications of your particular product. To
obtain the latest manual, access the Yamaha website then download the manual file. Since specifications, equipment or separately sold accessories may not be the same in every locale, please check with your Yamaha dealer.
Item NP-32 (Digital Keyboard) NP-12 (Digital Keyboard)
Size/Weight
Dimensions W × D × H 1,244mm × 259mm × 105mm (49" × 10-3/16" × 4-1/8") 1,036mm × 259mm × 105mm (40-13/16" × 10-3/16" × 4-1/8")
Weight 5.7kg (12 lbs., 9 oz.) 4.5kg (9 lbs., 15 oz.)
Keyboard
Number of Keys 76 (E0 - G6) 61 (C1 - C6)
Type Box Type (Graded Soft Touch) Box Type
Touch Response Hard/Medium/Soft/Fixed Hard/Medium/Soft/Fixed
Voices
Tone Generation Tone Generating Technology AWM Stereo Sampling AWM Stereo Sampling
Polyphony Number of Polyphony (Max.) 64 64
Preset Number of Voices 10 10
Effects
Types Reverb 4 types 4 types
Function Dual Yes Yes
Recording/Playback
(MIDI data only; audio not
supported)
Preset Number of Preset Songs 10 Voice Demo Songs + 10 Piano Preset Songs 10 Voice Demo Songs + 10 Piano Preset Songs
Recording
Number of Songs 1 1
Data Capacity Approx. 7,000 notes Approx. 7,000 notes
Functions
Overall Controls
Metronome Yes Yes
Tempo 32 - 280 32 - 280
Transpose –6 - 0 - +6 –6 - 0 - +6
Tuning 414.8Hz - 440.0Hz - 466.8Hz 414.8Hz - 440.0Hz - 466.8Hz
Connectivity
Connectivity
SUSTAIN [SUSTAIN] × 1 (Half-Damper compatible) [SUSTAIN] × 1 (Half-Damper compatible)
USB TO HOST [USB TO HOST] × 1 [USB TO HOST] × 1
Headphones [PHONES/OUTPUT] × 1 [PHONES/OUTPUT] × 1
DC IN 12V 12V
Amplifiers and Speakers
Amplifiers 6W + 6W 2.5W + 2.5W
Speakers (12cm × 6cm) × 2 (12cm × 6cm) × 2
Power Supply
Power Supply
Adaptor PA-150 or an equivalent recommended by Yamaha
Users within the U.S. or Europe: PA-130 or an equivalent
recommended by Yamaha
Others: PA-3C, PA-130 or an equivalent
Batteries
Six “AA” size alkaline (LR6), manganese (R6) or Ni-MH rechargeable
batteries
Six “AA” size alkaline (LR6), manganese (R6) or Ni-MH rechargeable
batteries
Power Consumption 18W (when using PA-150) 8W (when using PA-130)
Auto Power Off Yes Yes
Included Accessories
• Owner’s Manual
• AC Adaptor (PA-150 or an equivalent recommended by Yamaha)
* May not be included depending on your particular area. Please
check with your Yamaha dealer.
• Online Member Product Registration
•Music Rest
• Owner’s Manual
• AC Adaptor (PA-130 or an equivalent recommended by Yamaha)
* May not be included depending on your particular area. Please
check with your Yamaha dealer.
• Online Member Product Registration
•Music Rest
Separately Sold Accessories
(May not be available depending on your locale.)
• AC Adaptor: PA-150 or an equivalent recommended by Yamaha
• Keyboard Stand: L-2C
• Headphones: HPH-150/HPH-100/HPH-50
• Foot Pedal: FC3A
• Foot Switch: FC4A/FC5
• AC Adaptor:
Users within the U.S. or Europe: PA-130 or an equivalent
recommended by Yamaha
Others: PA-3C, PA-130 or an equivalent
• Keyboard Stand: L-2C
• Headphones: HPH-150/HPH-100/HPH-50
• Foot Pedal: FC3A
• Foot Switch: FC4A/FC5
24
MEMO

25
Important Notice: Guarantee Information for customers in EEA* and Switzerland
English
Wichtiger Hinweis: Garantie-Information für Kunden in der EWR* und der Schweiz
Deutsch
Remarque importante: informations de garantie pour les clients de l’EEE et la Suisse
Français
Belangrijke mededeling: Garantie-informatie voor klanten in de EER* en Zwitserland
Nederlands
Aviso importante: información sobre la garantía para los clientes del EEE* y Suiza
Español
Avviso importante: informazioni sulla garanzia per i clienti residenti nell’EEA* e in Svizzera
Italiano
Aviso importante: informações sobre as garantias para clientes da AEE* e da Suíça
Português
ȈȘȝĮȞIJȚțȒıȘȝİȓȦıȘȆȜȘȡȠijȠȡȓİȢİȖȖȪȘıȘȢȖȚĮIJȠȣȢʌİȜȐIJİȢıIJȠȞǼȅȋțĮȚǼȜȕİIJȓĮ
ǼȜȜȘȞȚțȐ
Viktigt: Garantiinformation för kunder i EES-området* och Schweiz
Svenska
Viktig merknad: Garantiinformasjon for kunder i EØS* og Sveits
Norsk
Vigtig oplysning: Garantioplysninger til kunder i EØO* og Schweiz
Dansk
Tärkeä ilmoitus: Takuutiedot Euroopan talousalueen (ETA)* ja Sveitsin asiakkaille
Suomi
WDĪQHWDUXQNLJZDUDQF\MQHRERZLą]XMąFHZ(2*L6]ZDMFDULL
Polski
'ĤOHåLWpR]QiPHQt=iUXþQtLQIRUPDFHSUR]iND]QtN\Y(+6DYHâYêFDUVNX
ýHVN\
Magyar
2OXOLQHPlUNXV*DUDQWLLWHDYH(XURRSD0DMDQGXVSLLUNRQQD(03MDâYHLWVLNOLHQWLGHOH
Eesti keel
6YDUƯJVSD]LƼRMXPVJDUDQWLMDVLQIRUPƗFLMDNOLHQWLHP((=XQâYHLFƝ
Latviešu
'ơPHVLRLQIRUPDFLMDGơOJDUDQWLMRVSLUNơMDPV(((LUâYHLFDULMRMH
/LHWXYLǐNDOED
'{OHåLWpXSR]RUQHQLH,QIRUPiFLHR]iUXNHSUH]iND]QtNRYY(+3DâYDMþLDUVNX
6ORYHQþLQD
3RPHPEQRREYHVWLOR,QIRUPDFLMHRJDUDQFLML]DNXSFHY(*3LQâYLFL
6ORYHQãþLQD
ȼɚɠɧɨɫɴɨɛɳɟɧɢɟɂɧɮɨɪɦɚɰɢɹɡɚɝɚɪɚɧɰɢɹɬɚɡɚɤɥɢɟɧɬɢɜȿɂɉɢɒɜɟɣɰɚɪɢɹ
Ȼɴɥɝɚɪɫɤɢɟɡɢɤ
Ɂɚɩɨɞɪɨɛɧɚɢɧɮɨɪɦɚɰɢɹɡɚɝɚɪɚɧɰɢɹɬɚɡɚɬɨɡɢɩɪɨɞɭɤɬɧɚ<DPDKDɢɝɚɪɚɧɰɢɨɧɧɨɬɨɨɛɫɥɭɠɜɚɧɟɜɩɚɧɟɜɪɨɩɟɣɫɤɚɬɚɡɨɧɚɧɚ
ȿɂɉ ɢ ɒɜɟɣɰɚɪɢɹ ɢɥɢ ɩɨɫɟɬɟɬɟ ɩɨɫɨɱɟɧɢɹ ɩɨɞɨɥɭ ɭɟɛɫɚɣɬ ɧɚ ɧɚɲɢɹ ɭɟɛ ɫɚɣɬ ɢɦɚ ɮɚɣɥ ɡɚ ɩɟɱɚɬ ɢɥɢ ɫɟ ɫɜɴɪɠɟɬɟ ɫ
ɩɪɟɞɫɬɚɜɢɬɟɥɧɢɹɨɮɢɫɧɚ<DPDKDɜɴɜɜɚɲɚɬɚɫɬɪɚɧɚȿɂɉȿɜɪɨɩɟɣɫɤɨɢɤɨɧɨɦɢɱɟɫɤɨɩɪɨɫɬɪɚɧɫɬɜɨ
/LPEDURPkQă
https://europe.yamaha.com/warranty/
URL_5
Important Notice: Guarantee Information
for customers in European Economic Area
(EEA) and Switzerland
)RUGHWDLOHGJXDUDQWHHLQIRUPDWLRQDERXWWKLV<DPDKDSURGXFWDQG3DQ(($DQG6ZLW]HUODQGZDUUDQW\VHUYLFHSOHDVHHLWKHU
YLVLWWKHZHEVLWHDGGUHVVEHORZ3ULQWDEOHILOHLVDYDLODEOHDWRXUZHEVLWHRUFRQWDFWWKH<DPDKDUHSUHVHQWDWLYHRIILFHIRU\RXU
FRXQWU\(($(XURSHDQ(FRQRPLF$UHD
)UQlKHUH*DUDQWLH,QIRUPDWLRQEHUGLHVHV3URGXNWYRQ<DPDKDVRZLHEHUGHQ3DQ(:5XQG6FKZHL]HU*DUDQWLHVHUYLFHEHVXFKHQ
6LHELWWHHQWZHGHUGLH IROJHQGDQJHJHEHQH,QWHUQHWDGUHVVHHLQHGUXFNIlKLJH 9HUVLRQEHILQGHWVLFK DXFKDXIXQVHUHU:HEVHLWHRGHU
ZHQGHQ6LHVLFKDQGHQIU,KU/DQG]XVWlQGLJHQ<DPDKD9HUWULHE(:5(XURSlLVFKHU:LUWVFKDIWVUDXP
3RXUGHVLQIRUPDWLRQVSOXVGpWDLOOpHVVXUODJDUDQWLHGHFHSURGXLW<DPDKDHWVXUOHVHUYLFHGHJDUDQWLHDSSOLFDEOHGDQVO¶HQVHPEOH
GHO¶(((DLQVLTX¶HQ6XLVVHFRQVXOWH]QRWUHVLWH:HEjO¶DGUHVVHFLGHVVRXVOHILFKLHULPSULPDEOHHVWGLVSRQLEOHVXUQRWUHVLWH
:HERXFRQWDFWH]GLUHFWHPHQW<DPDKDGDQVYRWUHSD\VGHUpVLGHQFH((((VSDFH(FRQRPLTXH(XURSpHQ
9RRUJHGHWDLOOHHUGHJDUDQWLHLQIRUPDWLHRYHUGLW<DPDKDSURGXFWHQGHJDUDQWLHVHUYLFHLQKHHOGH((5HQ=ZLWVHUODQGJDDWX
QDDUGHRQGHUVWDDQGHZHEVLWHXYLQGHHQDIGUXNEDDUEHVWDQGRSRQ]HZHEVLWHRIQHHPWXFRQWDFWRSPHWGHYHUWHJHQZRRUGLJLQJ
YDQ<DPDKDLQXZODQG((5(XURSHVH(FRQRPLVFKH5XLPWH
3DUDXQDLQIRUPDFLyQGHWDOODGDVREUHHVWHSURGXFWR<DPDKD\VREUHHOVRSRUWHGHJDUDQWtDHQOD]RQD(((\6XL]DYLVLWHOD
GLUHFFLyQZHETXHVHLQFOX\HPiVDEDMRODYHUVLRQGHODUFKLYRSDUDLPSULPLUHVWDGLVSRQLEOHHQQXHVWURVLWLRZHERSyQJDVHHQ
FRQWDFWRFRQHOUHSUHVHQWDQWHGH<DPDKDHQVXSDtV((((VSDFLR(FRQyPLFR(XURSHR
3HULQIRUPD]LRQL GHWWDJOLDWH VXOODJDUDQ]LD UHODWLYDD TXHVWR SURGRWWR <DPDKDH O¶DVVLVWHQ]D LQ JDUDQ]LDQHL SDHVL (($ HLQ
6YL]]HUDSRWHWHFRQVXOWDUHLOVLWR:HEDOO¶LQGLUL]]RULSRUWDWRGLVHJXLWRqGLVSRQLELOHLOILOHLQIRUPDWRVWDPSDELOHRSSXUHFRQWDWWDUH
O¶XIILFLRGLUDSSUHVHQWDQ]DORFDOHGHOOD<DPDKD(($$UHD(FRQRPLFD(XURSHD
3DUDREWHUXPDLQIRUPDomRSRUPHQRUL]DGDVREUHHVWHSURGXWRGD<DPDKDHVREUHRVHUYLoRGHJDUDQWLDQD$((HQD6XtoD
YLVLWHRVLWHDVHJXLURDUTXLYRSDUDLPSUHVVmRHVWiGLVSRQtYHOQRQRVVRVLWHRXHQWUHHPFRQWDWRFRPRHVFULWyULRGHUHSUHVHQ
WDomRGD<DPDKDQRVHXSDtV$((ÈUHD(FRQ{PLFD(XURSpLD
īȚĮȜİʌIJȠȝİȡİȓȢʌȜȘȡȠijȠȡȓİȢİȖȖȪȘıȘȢıȤİIJȚțȐȝİIJȠʌĮȡȩȞʌȡȠȧȩȞIJȘȢ<DPDKDțĮȚIJȘȞțȐȜȣȥȘİȖȖȪȘıȘȢıİȩȜİȢIJȚȢȤȫȡİȢIJȠȣ
Ǽȅȋ țĮȚ IJȘȞ ǼȜȕİIJȓĮ İʌȚıțİijIJİȓIJİ IJȘȞ ʌĮȡĮțȐIJȦ ȚıIJȠıİȜȓįĮ ǼțIJȣʌȫıȚȝȘ ȝȠȡijȒ İȓȞĮȚ įȚĮșȑıȚȝȘ ıIJȘȞ ȚıIJȠıİȜȓįĮ ȝĮȢ Ȓ
ĮʌİȣșȣȞșİȓIJİıIJȘȞĮȞIJȚʌȡȠıȦʌİȓĮIJȘȢ<DPDKDıIJȘȤȫȡĮıĮȢǼȅȋǼȣȡȦʌĮȧțȩȢȅȚțȠȞȠȝȚțȩȢȋȫȡȠȢ
)|UGHWDOMHUDGLQIRUPDWLRQRP GHQQD <DPDKDSURGXNW VDPW JDUDQWLVHUYLFH L KHOD((6RPUnGHW RFK 6FKZHL]NDQ GX DQWLQJHQ
EHV|NDQHGDQVWnHQGHZHEEDGGUHVVHQXWVNULIWVYlQOLJILOILQQVSnZHEESODWVHQHOOHUNRQWDNWD<DPDKDVRIILFLHOODUHSUHVHQWDQWL
GLWWODQG((6(XURSHLVND(NRQRPLVND6DPDUEHWVRPUnGHW
'HWDOMHUWJDUDQWLLQIRUPDVMRQRPGHWWH<DPDKDSURGXNWHWRJJDUDQWLVHUYLFHIRUKHOH(6RPUnGHWRJ6YHLWVNDQInVHQWHQYHGn
EHV¡NHQHWWDGUHVVHQQHGHQIRUXWVNULIWVYHUVMRQILQQHVSnYnUHQHWWVLGHUHOOHUNRQWDNWHNRQWDNWH<DPDKDNRQWRUHWLODQGHWGHUGX
ERU(6'HWHXURSHLVNH¡NRQRPLVNHVDPDUEHLGVRPUnGHW
'HNDQILQGHGHWDOMHUHGHJDUDQWLRSO\VQLQJHURPGHWWH<DPDKDSURGXNWRJGHQIOOHVJDUDQWLVHUYLFHRUGQLQJIRU(2RJ6FKZHL]
YHGDWEHV¡JHGHWZHEVWHGGHUHUDQJLYHWQHGHQIRUGHUILQGHVHQILOVRPNDQXGVNULYHVSnYRUHVZHEVWHGHOOHUYHGDWNRQWDNWH
<DPDKDVQDWLRQDOHUHSUVHQWDWLRQVNRQWRULGHWODQGKYRU'HERU(2'HW(XURSLVNHNRQRPLVNH2PUnGH
7lPlQ<DPDKDWXRWWHHQVHNl(7$DOXHHQMD6YHLWVLQWDNXXWDNRVNHYDW\NVLW\LVNRKWDLVHWWLHGRWVDDWWHDOODROHYDVWDQHWWLRVRLWWHHV
WD7XORVWHWWDYDWLHGRVWRVDDWDYLVVDVLYXVWROODPPH9RLWWHP\|VRWWDD\KWH\WWlSDLNDOOLVHHQ<DPDKDHGXVWDMDDQ
(7$(XURRSDQWDORXVDOXH
$E\GRZLHG]LHüVLĊZLĊFHMQDWHPDWZDUXQNyZJZDUDQF\MQ\FKWHJRSURGXNWXILUP\<DPDKDLVHUZLVXJZDUDQF\MQHJRZFDá\P(2*L
6]ZDMFDULLQDOHĪ\RGZLHG]LüZVND]DQąSRQLĪHMVWURQĊLQWHUQHWRZą3OLNJRWRZ\GRZ\GUXNX]QDMGXMHVLĊQDQDV]HMVWURQLHLQWHUQHWRZHM
OXEVNRQWDNWRZDüVLĊ]SU]HGVWDZLFLHOVWZHPILUP\<DPDKDZVZRLPNUDMX(2*²(XURSHMVNL2EV]DU*RVSRGDUF]\
3RGUREQp]iUXþQt LQIRUPDFH R WRPWR SURGXNWX <DPDKDD]iUXþQtPVHUYLVXYFHOpP(+6 D YH âYêFDUVNX QDOH]QHWH QD QtåH
XYHGHQpZHERYpDGUHVHVRXERUNWLVNXMHGRVWXSQêQDQDãLFKZHERYêFKVWUiQNiFKQHERVHPĤåHWHREUiWLWQD]DVWRXSHQtILUP\
<DPDKDYHVYp]HPL(+6(YURSVNêKRVSRGiĜVNêSURVWRU
$ MHOHQ <DPDKD WHUPpNUH YRQDWNR]y UpV]OHWHV JDUDQFLDLQIRUPiFLyN YDODPLQW D] (*7UH pV 6YiMFUD NLWHUMHGĘ JDUDQFLiOLV
V]ROJiOWDWiVWHNLQWHWpEHQNHUHVVHIHOZHEKHO\QNHWD]DOiEELFtPHQDZHEKHO\HQQ\RPWDWKDWyIiMOWLVWDOiOYDJ\SHGLJOpSMHQ
NDSFVRODWEDD]RUV]iJiEDQPĦN|GĘ<DPDKDNpSYLVHOHWLLURGiYDO(*7(XUySDL*D]GDViJL7pUVpJ
7lSVHPDWHDEHVDDPLVHNVVHOOH<DPDKDWRRWHJDUDQWLLQLQJNRJX(XURRSD0DMDQGXVSLLUNRQQDMDâYHLWVLJDUDQWLLWHHQLQGXVHNRKWD
NODVWDJH SDOXQ YHHELVDLWL DOOMlUJQHYDO DDGUHVVLO PHLH VDLGLO RQ VDDGDYDO SULQGLWDY IDLO Y}L S||UGXJH 7HLH UHJLRRQL <DPDKD
HVLQGXVHSRROH(03(XURRSD0DMDQGXVSLLUNRQG
/DLVDƼHPWX GHWDOL]ƝWXJDUDQWLMDVLQIRUPƗFLMX SDUãR<DPDKDSURGXNWX NƗDUƯJDUDQWLMDVDSNDOSRãDQX ((=XQâYHLFƝOnjG]X
DSPHNOƝMLHW ]HPƗN QRUƗGƯWR WƯPHNƺD YLHWQHV DGUHVL WƯPHNƺD YLHWQƝ LU SLHHMDPV GUXNƗMDPV IDLOV YDL VD]LQLHWLHV DU MnjVX YDOVWL
DSNDOSRMRãR<DPDKDSƗUVWƗYQLHFƯEX((=(LURSDV(NRQRPLNDV]RQD
-HLUHLNLDLãVDPLRVLQIRUPDFLMRVDSLHãƳÄ<DPDKD³SURGXNWąLUMRWHFKQLQĊSULHåLnjUąYLVRMH(((LUâYHLFDULMRMHDSVLODQN\NLWHPnjVǐ
VYHWDLQơMHWROLDXQXURG\WXDGUHVXVYHWDLQơMH\UDVSDXVGLQWLQDVIDLODVDUEDNUHLSNLWơVƳÄ<DPDKD³DWVWRY\EĊVDYRãDOLDL
(((±(XURSRVHNRQRPLQơHUGYơ
3RGUREQpLQIRUPiFLHR]iUXNHWêNDM~FHVDWRKWRSURGXNWXRGVSRORþQRVWL<DPDKDDJDUDQþQRPVHUYLVHY(+3DâYDMþLDUVNX
QiMGHWHQDZHERYHMVWUiQNHXYHGHQHMQLåãLHQDQDãHMZHERYHMVWUiQNHMHNGLVSR]tFLLV~ERUQDWODþDOHERVDREUiĢWHQD]iVWXSFX
VSRORþQRVWL<DPDKDYRVYRMHMNUDMLQH(+3(XUySVN\KRVSRGiUVN\SULHVWRU
3HQWUXLQIRUPDĠLLGHWDOLDWHSULYLQGDFHVWSURGXV<DPDKDúLVHUYLFLXOGHJDUDQĠLH3DQ6((úL(OYHĠLDYL]LWDĠLVLWHXOODDGUHVDGH
PDLMRVILúLHUXOLPSULPDELOHVWHGLVSRQLELOSHVLWHXOQRVWUXVDXFRQWDFWDĠLELURXOUHSUH]HQWDQĠHL<DPDKDGLQĠDUDGXPQHDYRDVWUă
6((6SDĠLXO(FRQRPLF(XURSHDQ
=DSRGUREQHMãHLQIRUPDFLMHRWHP<DPDKLQHPL]GHONXWHUJDUDQFLMVNHPVHUYLVXYFHORWQHP(*3LQâYLFLRELãþLWH
VSOHWQRPHVWRNLMHQDYHGHQRVSRGDMQDWLVOMLYDGDWRWHNDMHQDYROMRQDQDãHPVSOHWQHPPHVWXDOLVHREUQLWHQD<DPDKLQHJD
SUHGVWDYQLNDYVYRMLGUåDYL(*3(YURSVNLJRVSRGDUVNLSURVWRU
)RQWRVILJ\HOPH]WHWpV*DUDQFLDLQIRUPiFLyND](*7WHUOHWpQpV6YiMFEDQpOĘYiViUOyNV]iPiUD
1RWLILFDUHLPSRUWDQWă,QIRUPDĠLLGHVSUHJDUDQĠLHSHQWUXFOLHQĠLLGLQ6((úL(OYHĠLD
Hrvatski
=DGHWDOMQHLQIRUPDFLMHRMDPVWYX ]DRYDM<DPDKLQ SURL]YRGWHMDPVWYHQRPVHUYLVX ]DFLMHOL(*3 LâYLFDUVNXPROLPR9DV GD
SRVMHWLWHZHEVWUDQLFXQDYHGHQXXQDVWDYNXLOLNRQWDNWLUDWHRYODãWHQRJ<DPDKLQRJGREDYOMDþDXVYRMRM]HPOML
(*3(XURSVNLJRVSRGDUVNLSURVWRU
9DåQDREDYLMHVW,QIRUPDFLMHRMDPVWYX]DGUåDYH(*3DLâYLFDUVNH

26
For details of products, please contact your nearest Yamaha representative or the authorized distributor listed below.
CANADA
Yamaha\ Canada Music Ltd.
135 Milner Avenue, Toronto, Ontario M1S
3R1, Canada
Tel: +1-416-298-1311
U.S.A.
Yamaha Corporation of America
6600 Orangethorpe Avenue, Buena Park, CA
90620, U.S.A.
Tel: +1-714-522-9011
MEXICO
Yamaha de México, S.A. de C.V.
Av. Insurgentes Sur 1647 Piso 9, Col. San José
Insurgentes, Delegación Benito Juárez,
CDMX,
C.P. 03900, México
Tel: +52-55-5804-0600
BRAZIL
Yamaha Musical do Brasil Ltda.
Praça Professor José Lannes, 40-Cjs 21 e 22,
Brooklin Paulista Novo CEP 04571-100 – São
Paulo – SP, Brazil
Tel: +55-11-3704-1377
ARGENTINA
Yamaha Music Latin America, S.A.,
Sucursal Argentina
Olga Cossettini 1553, Piso 4 Norte,
Madero Este-C1107CEK,
Buenos Aires, Argentina
Tel: +54-11-4119-7000
PANAMA AND OTHER LATIN
AMERICAN REGIONS/
CARIBBEAN REGIONS
Yamaha Music Latin America, S.A.
Edificio Torre Davivienda, Piso: 20
Avenida Balboa, Marbella, Corregimiento de
Bella Vista, Ciudad de Panamá, Rep. de
Panamá
Tel: +507-269-5311
THE UNITED KINGDOM/IRELAND
Yamaha Music Europe GmbH (UK)
Sherbourne Drive, Tilbrook, Milton Keynes,
MK7 8BL, U.K.
Tel: +44-1908-366700
GERMANY
Yamaha Music Europe GmbH
Siemensstrasse 22-34, 25462 Rellingen,
Germany
Tel: +49-4101-303-0
SWITZERLAND/LIECHTENSTEIN
Yamaha Music Europe GmbH, Branch
Switzerland in Thalwil
Seestrasse 18a, 8800 Thalwil, Switzerland
Tel: +41-44-3878080
AUSTRIA/CROATIA/
CZECH
REPUBLIC
/HUNGARY/ROMANIA/
SLOVAKIA/SLOVENIA
Yamaha Music Europe GmbH, Branch
Austria
Schleiergasse 20, 1100 Wien, Austria
Tel: +43-1-60203900
POLAND
Yamaha Music Europe
Sp.z o.o. Oddział w Polsce
ul. Wielicka 52, 02-657 Warszawa, Poland
Tel: +48-22-880-08-88
BULGARIA
Dinacord Bulgaria LTD.
Bul.Iskarsko Schose 7 Targowski Zentar
Ewropa
1528 Sofia, Bulgaria
Tel: +359-2-978-20-25
MALTA
Olimpus Music Ltd.
Valletta Road, Mosta MST9010, Malta
Tel: +356-2133-2093
NETHERLANDS/BELGIUM/
LUXEMBOURG
Yamaha Music Europe, Branch Benelux
Clarissenhof 5b, 4133 AB Vianen, The
Netherlands
Tel: +31-347-358040
FRANCE
Yamaha Music Europe
7 rue Ambroise Croizat, Zone d'activités de
Pariest,
77183 Croissy-Beaubourg, France
Tel: +33-1-6461-4000
ITALY
Yamaha Music Europe GmbH, Branch
Italy
Via Tinelli N.67/69 20855 Gerno di Lesmo
(MB), Italy
Tel: +39-039-9065-1
SPAIN/PORTUGAL
Yamaha Music Europe GmbH Ibérica,
Sucursal en España
Ctra. de la Coruña km. 17,200, 28231
Las Rozas de Madrid, Spain
Tel: +34-91-639-88-88
GREECE
Philippos Nakas S.A. The Music House
19th klm. Leof. Lavriou 190 02 Peania –
Attiki, Greece
Tel: +30-210-6686260
SWEDEN
Yamaha Music Europe GmbH Germany
Filial
Scandinavia
JA Wettergrensgata 1, 400 43 Göteborg,
Sweden
Tel: +46-31-89-34-00
DENMARK
Yamaha Music Denmark,
Fillial of Yamaha Music Europe GmbH,
Tyskland
Generatorvej 8C, ST. TH., 2860 Søborg,
Denmark
Tel: +45-44-92-49-00
FINLAND
F-Musiikki Oy
Antaksentie 4
FI-01510 Vantaa, Finland
Tel: +358 (0)96185111
NORWAY
Yamaha Music Europe GmbH Germany -
Norwegian Branch
Grini Næringspark 1, 1332 Østerås, Norway
Tel: +47-6716-7800
ICELAND
Hljodfaerahusid Ehf.
Sidumula 20
IS-108 Reykjavik, Iceland
Tel: +354-525-5050
CYPRUS
Nakas Music Cyprus Ltd.
Nikis Ave 2k
1086 Nicosia
Tel: + 357-22-511080
Major Music Center
21 Ali Riza Ave. Ortakoy
P.O.Box 475 Lefkoşa, Cyprus
Tel: (392) 227 9213
RUSSIA
Yamaha Music (Russia) LLC.
Room 37, entrance 7, bld. 7, Kievskaya street,
Moscow, 121059, Russia
Tel: +7-495-626-5005
NORTH AMERICA
CENTRAL &
SOUTH AMERICA
EUROPE

27
OTHER EUROPEAN REGIONS
Yamaha Music Europe GmbH
Siemensstrasse 22-34, 25462 Rellingen,
Germany
Tel: +49-4101-303-0
Yamaha Music Gulf FZE
JAFZA-16, Office 512, P.O.Box 17328,
Jebel Ali FZE, Dubai, UAE
Tel: +971-4-801-1500
TURKEY
Yamaha Music Europe GmbH
Merkezi Almanya Türkiye İstanbul Şubesi
Mor Sumbul Sokak Varyap Meridian Business
1.Blok No:1 113-114-115
Bati Atasehir Istanbul, Turkey
Tel: +90-216-275-7960
ISRAEL
RBX International Co., Ltd.
P.O Box 10245, Petach-Tikva, 49002
Tel: (972) 3-925-6900
OTHER REGIONS
Yamaha Music Gulf FZE
JAFZA-16, Office 512, P.O.Box 17328,
Jebel Ali FZE, Dubai, UAE
Tel: +971-4-801-1500
THE PEOPLE’S REPUBLIC OF
CHINA
Yamaha Music & Electronics (China) Co.,
Ltd.
2F, Yunhedasha, 1818 Xinzha-lu, Jingan-qu,
Shanghai, China
Tel: +86-400-051-7700
HONG KONG
Tom Lee Music Co., Ltd.
11/F., Silvercord Tower 1, 30 Canton Road,
Tsimshatsui, Kowloon, Hong Kong
Tel: +852-2737-7688
INDIA
Yamaha Music India Private Limited
P-401, JMD Megapolis, Sector-48, Sohna
Road,
Gurugram-122018, Haryana, India
Tel: +91-124-485-3300
INDONESIA
PT Yamaha Musik Indonesia Distributor
Yamaha Music Center Bldg. Jalan Jend. Gatot
Subroto Kav. 4, Jakarta 12930, Indonesia
Tel: +62-21-520-2577
KOREA
Yamaha Music Korea Ltd.
11F, Prudential Tower, 298, Gangnam-daero,
Gangnam-gu, Seoul, 06253, Korea
Tel: +82-2-3467-3300
MALAYSIA
Yamaha Music (Malaysia) Sdn. Bhd.
No.8, Jalan Perbandaran, Kelana Jaya, 47301
Petaling Jaya, Selangor, Malaysia
Tel: +60-3-78030900
SINGAPORE
Yamaha Music (Asia) Private Limited
Block 202 Hougang Street 21, #02-00,
Singapore 530202, Singapore
Tel: +65-6740-9200
TAIWAN
Yamaha Music & Electronics Taiwan Co.,
Ltd.
2F., No.1, Yuandong Rd., Banqiao Dist.,
New Taipei City 22063, Taiwan (R.O.C.)
Tel: +886-2-7741-8888
THAILAND
Siam Music Yamaha Co., Ltd.
3, 4, 15, 16th Fl., Siam Motors Building,
891/1 Rama 1 Road, Wangmai,
Pathumwan, Bangkok 10330, Thailand
Tel: +66-2215-2622
VIETNAM
Yamaha Music Vietnam Company Limited
15th Floor, Nam A Bank Tower, 201-203
Cach Mang Thang Tam St., Ward 4, Dist.3,
Ho Chi Minh City, Vietnam
Tel: +84-28-3818-1122
OTHER ASIAN REGIONS
https://asia-latinamerica-mea.yamaha.com/
index.html
AUSTRALIA
Yamaha Music Australia Pty. Ltd.
Level 1, 80 Market Street, South Melbourne,
VIC 3205 Australia
Tel: +61-3-9693-5111
NEW ZEALAND
Music Works LTD
P.O.BOX 6246 Wellesley, Auckland 4680,
New Zealand
Tel: +64-9-634-0099
REGIONS AND TRUST
TERRITORIES IN PACIFIC OCEAN
https://asia-latinamerica-mea.yamaha.com/
index.html
AFRICA
MIDDLE EAST
ASIA
OCEANIA
Head Office/Manufacturer: Yamaha Corporation 10-1, Nakazawa-cho, Naka-ku, Hamamatsu, 430-8650, Japan
Importer (European Union): Yamaha Music Europe GmbH Siemensstrasse 22-34, 25462 Rellingen, Germany
Importer (United Kingdom): Yamaha Music Europe GmbH (UK) Sherbourne Drive, Tilbrook, Milton Keynes, MK7 8BL, United Kingdom
DMI30

NP-32/NP-12
Owner’s Manual
Polski
Slovenščina
Русский
Български
Dansk
Română
Svenska
Latviski
Česky
Lietuvių k.
Slovenčina
eesti keel
Magyar
HrvatskiTürkçe
EnglishFrançaisEspañolDeutschPortuguêsItalianoNederlands
Manual Development Department
© 2015 Yamaha Corporation
Published 12/2021 ALTY-C0
ZR87720
Yamaha Global Site
https://www.yamaha.com/
Yamaha Downloads
https://download.yamaha.com/
NP-32 NP-12
Owner’s Manual
Mode d'emploi
Manual de instrucciones
Bedienungsanleitung
Manual do Proprietário
Manuale di istruzioni
Gebruikershandleiding
Podręcznik użytkownika
Руководство пользователя
Brugervejledning
Bruksanvisning
Uživatelská příručka
Používateľská príručka
Használati útmutató
Navodila za uporabo
Ръководство на потребителя
Manualul proprietarului
Lietotāja rokasgrāmata
Vartotojo vadovas
Kasutusjuhend
Korisnički priručnik
Kullanıcı el kitabı
EN
FR
ES
DE
PT
IT
NL
PL
RU
DA
SV
CS
SK
HU
SL
BG
RO
LV
LT
ET
HR
TR
